1998 DODGE RAM 1500 tv cable
[x] Cancel search: tv cablePage 2311 of 2627

COVER
REMOVAL
(1) Open the tailgate.
(2) Remove the eight screws and remove tailgate
liner, if equipped.
(3) Remove the bolts and remove the cover. (Fig. 3)
INSTALLATION
(1) Install the cover and install the bolts and
tighten by hand.
(2) Install the liner and install the screws, if
equipped.
HINGE
REMOVAL
(1) Remove the tailgate. (Refer to 23 - BODY/
TAILGATE/TAILGATE - REMOVAL)
(2) Remove the two screws and remove the hinge/
pivot. (Fig. 4)
INSTALLATION
(1) Install the hinge/pivot and install the screws.
(2) Tighten the screws to 34 N´m (25 ft. lbs.).
(3) Install the tailgate. (Refer to 23 - BODY/TAIL-
GATE/TAILGATE - INSTALLATION)
LATCH
REMOVAL
(1) Remove the cover. (Refer to 23 - BODY/TAIL-
GATE/COVER - REMOVAL)
(2) Using a grease pencil or equivalent, mark the
actuator rod for installation.
(3) Disconnect the actuator rod at the control
assembly. (Fig. 3)
(4) Remove the latch bolt and the check cable bolt.
(Fig. 5)
(5) Remove the latch and actuator rod assembly.
INSTALLATION
(1) Install the latch and actuator rod assembly.
(2) Install the latch and the check cable bolts and
tighten to 23 N´m (17 ft. lbs.).
(3) Connect the actuator rod to the control assem-
bly line up the marks made during removal.
(4) Install the cover. (Refer to 23 - BODY/TAIL-
GATE/COVER - INSTALLATION)
LATCH STRIKER
REMOVAL
(1) Open tailgate.
(2) Using a grease pencil or equivalent, mark out-
line of striker on cargo box jamb to aid installation.
(3) Using a Torx drive wrench, remove striker and
washer from cargo box.
Fig. 3 TAILGATE ASSEMBLY
1 - LATCH ASSEMBLY
2 - CONTROL ASSEMBLY
3 - ACTUATOR ROD (2)
4 - COVER
5 - BOLTS (10)
Fig. 4 TAILGATE HINGE
1 - HINGE/PIVOT
2 - TAILGATE PILLAR
3 - CLIP/BUSHING
4 - BOLTS (2)
23 - 16 TAILGATEDR
Page 2312 of 2627

INSTALLATION
(1) Position striker and washer on jamb using
alignment outline as reference and install with Torx
drive wrench.
(2) Tighten the striker to 34 N´m (25 ft. lbs.).
RELEASE HANDLE/LATCH
REMOTE
REMOVAL
(1) Remove the tailgate cover. (Refer to 23 - BODY/
TAILGATE/COVER - REMOVAL)
(2) Using a grease pencil or equivalent, mark the
latch actuator rods for ease of installation.
(3) Disconnect the latch actuator rods. (Fig. 3)
(4) Remove the control assembly nuts and remove
the control assembly and the exterior handle. (Fig. 5)
INSTALLATION
(1) Install the handle and the control assembly.
(2) Install the nuts and tighten to 7 N´m (60 in.
lbs.).
(3) Connect the actuator rods using the marks
made during removal.
(4) Install the cover. (Refer to 23 - BODY/TAIL-
GATE/COVER - INSTALLATION)
TAILGATE
REMOVAL
(1) Open the tailgate.
(2) Disconnect the tailgate check cables (Fig. 6).
(Refer to 23 - BODY/TAILGATE/CHECK CABLE -
REMOVAL)
(3) Close tailgate until the notch in the right hand
collar aligns with the pivot pin.
(4) Slip tailgate hinge collar from pivot pins.
(5) Slide tailgate to the right and separate left
hand collar from the pivot pin.
(6) Separate tailgate from vehicle.
INSTALLATION
(1) Position tailgate collar on left hand pivot pin
and slide tailgate to the left.
(2) Raise tailgate until the notch in the right hand
collar aligns with the pivot pin.
(3) Connect the tailgate check cables. (Refer to 23 -
BODY/TAILGATE/CHECK CABLE - INSTALLA-
TION)
Fig. 5 LATCH HANDLE - LATCH
1 - EXTERIOR HANDLE
2 - CONTROL ASSEMBLY
3 - NUTS (2)
4 - TAILGATE
5-LATCH
6 - CHECK CABLE
7 - CHECK/LATCH BOLT
8 - LATCH BOLT
Fig. 6 TAILGATE ASSEMBLY
1 - LATCH STRIKER
2 - CHECK CABLE BOLT
3 - CHECK CABLE
4 - TAILGATE
5 - HINGE BUSHING
DRTAILGATE 23 - 17
LATCH STRIKER (Continued)
Page 2334 of 2627

FRONT FENDER
REMOVAL
(1) Remove the antenna, if equipped. (Refer to 8 -
ELECTRICAL/AUDIO/ANTENNA BODY & CABLE -
REMOVAL)
(2) Remove the battery tray, if required. (Refer to 8
- ELECTRICAL/BATTERY SYSTEM/TRAY -
REMOVAL)
(3) Remove the cowl grille. (Refer to 23 - BODY/
EXTERIOR/COWL GRILLE - REMOVAL)
(4) Remove the headlamp unit. (Refer to 8 - ELEC-
TRICAL/LAMPS/LIGHTING - EXTERIOR/HEAD-
LAMP UNIT - REMOVAL)
(5) Remove the wheelhouse splash shield. (Refer to
23 - BODY/EXTERIOR/FRONT WHEELHOUSE
SPLASH SHIELD - REMOVAL)
(6) Remove the inside and lower bolts. (Fig. 6)
(7) Remove the two bolts below the headlamp.
(8) Remove the hinge support bolt at the cowl.
(9) Remove the three bolts along the fender rail.
INSTALLATION
(1) Install the three bolts along the upper fender
rail and tighten to 9 N´m (80 in. lbs.).
(2) Install the upper hinge support bolt at the cowl
and tighten to 17 N´m (13 ft. lbs.).
(3) Install the two bolts below the headlamp and
tighten to 9 N´m (80 in. lbs.).(4) Install the inside and lower bolts and tighten
to 17 N´m (13 ft. lbs.).
(5) Check the fender positioning and adjust as
required by adding shims. (Refer to 23 - BODY/
BODY STRUCTURE/GAP AND FLUSH - SPECIFI-
CATIONS)
(6) Install the wheelhouse splash shield. (Refer to
23 - BODY/EXTERIOR/FRONT WHEELHOUSE
SPLASH SHIELD - INSTALLATION)
(7) Install the headlamp unit. (Refer to 8 - ELEC-
TRICAL/LAMPS/LIGHTING - EXTERIOR/HEAD-
LAMP UNIT - INSTALLATION)
(8) Install the cowl grille. (Refer to 23 - BODY/EX-
TERIOR/COWL GRILLE - INSTALLATION)
(9) Install the battery tray, if required. (Refer to 8
- ELECTRICAL/BATTERY SYSTEM/TRAY -
INSTALLATION)
(10) Install the antenna, if required. (Refer to 8 -
ELECTRICAL/AUDIO/ANTENNA BODY & CABLE -
INSTALLATION)
FUEL FILL DOOR
REMOVAL
(1) Open fill door and remove the bolts. (Fig. 7)
(2) Remove the door.
INSTALLATION
(1) Install the fuel fill door.
(2) Install the bolts and tighten to 9 N´m (80 in.
lbs.).
Fig. 6 FRONT FENDER
1 - HOOD HINGE SUPPORT BOLT (1)
2 - HOOD HINGE
3 - INNER BOLT (1)
4 - FRONT BOLTS (2)
5 - LOWER BOLT INSERT
6 - FENDER
7 - UPPER BOLTS (3)
Fig. 7 FUEL FILL DOOR
1 - FUEL FILL DOOR
2 - BOLTS (2)
DREXTERIOR 23 - 39
Page 2341 of 2627

HOOD
TABLE OF CONTENTS
page page
HINGE
REMOVAL.............................46
INSTALLATION.........................46
HOOD
REMOVAL.............................46
INSTALLATION.........................47
LATCH
REMOVAL.............................47
INSTALLATION.........................47LATCH RELEASE CABLE/HANDLE ASSEMBLY
REMOVAL.............................47
INSTALLATION.........................47
LATCH STRIKER / SECONDARY CATCH
REMOVAL.............................47
INSTALLATION.........................48
SUPPORT CYLINDER
REMOVAL.............................48
INSTALLATION.........................48
HINGE
REMOVAL
NOTE: It is not necessary to remove the hood to
replace one or both hinges. The hinges can be
replaced one at a time.
(1) Remove the cowl grille. (Refer to 23 - BODY/
EXTERIOR/COWL GRILLE - REMOVAL)
(2) Using a grease pencil or equivalent, mark the
position of the hinge on the hood.
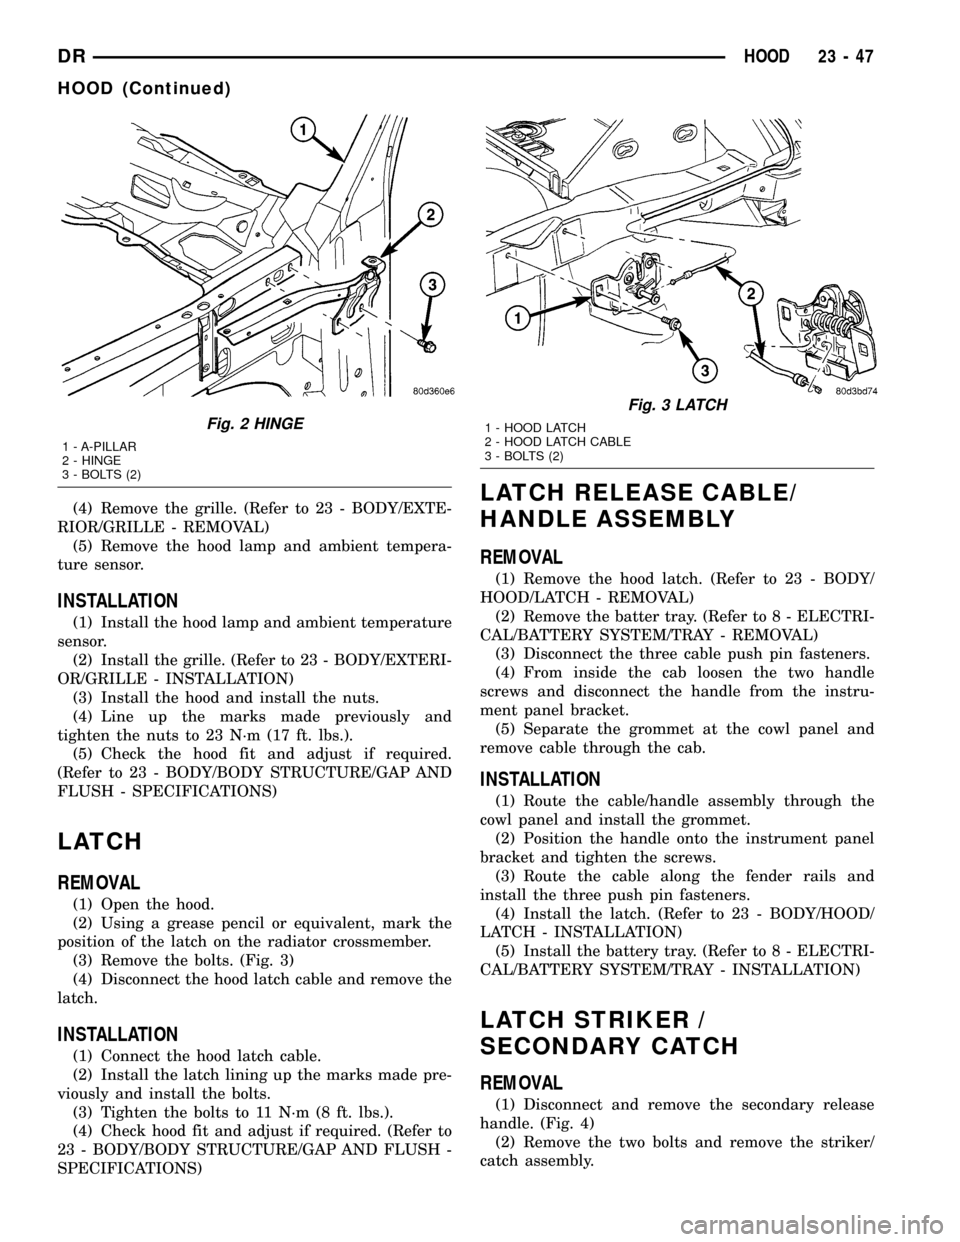
(3) Remove the fender support bolt. (Fig. 1)
(4) Remove the support cylinder. (Refer to 23 -
BODY/HOOD/SUPPORT CYLINDER - REMOVAL)
(5) Remove the hood nuts.
(6) Remove the wheelhouse splash shield. (Refer to
23 - BODY/EXTERIOR/FRONT WHEELHOUSE
SPLASH SHIELD - REMOVAL)
(7) From inside the fender, remove the two hinge
bolts. (Fig. 2)
(8) Slide the hinge forward and remove from the
fender rail.
INSTALLATION
(1) Install the hinge and slide back into position
on the fender rail.
(2) From inside the fender, install the two hinge
bolts and tighten to 20 N´m (15 ft. lbs.).
(3) Install the hood nuts and line up the marks
made previously.
(4) Tighten the nuts to 23 N´m (17 ft. lbs.).
(5) Install the support cylinder. (Refer to 23 -
BODY/HOOD/SUPPORT CYLINDER - INSTALLA-
TION)
(6) Install the fender support bolt and tighten to
11 N´m (8 ft. lbs.).(7) Check hood fit and adjust if required. (Refer to
23 - BODY/BODY STRUCTURE/GAP AND FLUSH -
SPECIFICATIONS)
(8) Install the cowl grille. (Refer to 23 - BODY/EX-
TERIOR/COWL GRILLE - INSTALLATION)
(9) Install the wheelhouse splash shield. (Refer to
23 - BODY/EXTERIOR/FRONT WHEELHOUSE
SPLASH SHIELD - INSTALLATION)
HOOD
REMOVAL
(1) Open the hood.
(2) Using a grease pencil or equivalent, mark the
position of the hinges on the hood.
(3) Remove the hood hinge nuts and remove the
hood.
Fig. 1 HINGE/FENDER BOLT
1 - FENDER
2 - FENDER SUPPORT BOLT
3 - HINGE
23 - 46 HOODDR
Page 2342 of 2627

(4) Remove the grille. (Refer to 23 - BODY/EXTE-
RIOR/GRILLE - REMOVAL)
(5) Remove the hood lamp and ambient tempera-
ture sensor.
INSTALLATION
(1) Install the hood lamp and ambient temperature
sensor.
(2) Install the grille. (Refer to 23 - BODY/EXTERI-
OR/GRILLE - INSTALLATION)
(3) Install the hood and install the nuts.
(4) Line up the marks made previously and
tighten the nuts to 23 N´m (17 ft. lbs.).
(5) Check the hood fit and adjust if required.
(Refer to 23 - BODY/BODY STRUCTURE/GAP AND
FLUSH - SPECIFICATIONS)
LATCH
REMOVAL
(1) Open the hood.
(2) Using a grease pencil or equivalent, mark the
position of the latch on the radiator crossmember.
(3) Remove the bolts. (Fig. 3)
(4) Disconnect the hood latch cable and remove the
latch.
INSTALLATION
(1) Connect the hood latch cable.
(2) Install the latch lining up the marks made pre-
viously and install the bolts.
(3) Tighten the bolts to 11 N´m (8 ft. lbs.).
(4) Check hood fit and adjust if required. (Refer to
23 - BODY/BODY STRUCTURE/GAP AND FLUSH -
SPECIFICATIONS)
LATCH RELEASE CABLE/
HANDLE ASSEMBLY
REMOVAL
(1) Remove the hood latch. (Refer to 23 - BODY/
HOOD/LATCH - REMOVAL)
(2) Remove the batter tray. (Refer to 8 - ELECTRI-
CAL/BATTERY SYSTEM/TRAY - REMOVAL)
(3) Disconnect the three cable push pin fasteners.
(4) From inside the cab loosen the two handle
screws and disconnect the handle from the instru-
ment panel bracket.
(5) Separate the grommet at the cowl panel and
remove cable through the cab.
INSTALLATION
(1) Route the cable/handle assembly through the
cowl panel and install the grommet.
(2) Position the handle onto the instrument panel
bracket and tighten the screws.
(3) Route the cable along the fender rails and
install the three push pin fasteners.
(4) Install the latch. (Refer to 23 - BODY/HOOD/
LATCH - INSTALLATION)
(5) Install the battery tray. (Refer to 8 - ELECTRI-
CAL/BATTERY SYSTEM/TRAY - INSTALLATION)
LATCH STRIKER /
SECONDARY CATCH
REMOVAL
(1) Disconnect and remove the secondary release
handle. (Fig. 4)
(2) Remove the two bolts and remove the striker/
catch assembly.
Fig. 2 HINGE
1 - A-PILLAR
2 - HINGE
3 - BOLTS (2)
Fig. 3 LATCH
1 - HOOD LATCH
2 - HOOD LATCH CABLE
3 - BOLTS (2)
DRHOOD 23 - 47
HOOD (Continued)
Page 2344 of 2627

INSTRUMENT PANEL
TABLE OF CONTENTS
page page
CLUSTER BEZEL
REMOVAL.............................49
INSTALLATION.........................49
ASH RECEIVER
REMOVAL.............................50
INSTALLATION.........................51
CUP HOLDER
REMOVAL.............................51
INSTALLATION.........................51
GLOVE BOX
REMOVAL.............................52
INSTALLATION.........................52
GLOVE BOX LATCH
REMOVAL.............................52
INSTALLATION.........................52
INSTRUMENT PANEL ASSEMBLY
REMOVAL.............................52
INSTALLATION.........................55
INSTRUMENT PANEL HEADLAMP SWITCH
BEZEL
REMOVAL.............................56
INSTALLATION.........................56INSTRUMENT PANEL CENTER BEZEL
REMOVAL.............................57
INSTALLATION.........................57
INSTRUMENT PANEL DRIVER SIDE BEZEL
REMOVAL.............................58
INSTALLATION.........................58
INSTRUMENT PANEL TOP COVER
REMOVAL.............................58
INSTALLATION.........................59
INSTRUMENT PANEL LOWER SURROUND
REMOVAL.............................59
INSTALLATION.........................59
STEERING COLUMN OPENING COVER
REMOVAL.............................60
INSTALLATION.........................60
STEERING COLUMN OPENING SUPPORT
BRACKET
REMOVAL.............................60
INSTALLATION.........................60
STORAGE BIN
REMOVAL.............................61
INSTALLATION.........................61
CLUSTER BEZEL
REMOVAL
WARNING: ON VEHICLES EQUIPPED WITH AIR-
BAGS, DISABLE THE AIRBAG SYSTEM BEFORE
ATTEMPTING ANY STEERING WHEEL, STEERING
COLUMN, SEAT BELT TENSIONER, OR INSTRU-
MENT PANEL COMPONENT DIAGNOSIS OR SER-
VICE. DISCONNECT AND ISOLATE THE BATTERY
NEGATIVE (GROUND) CABLE, THEN WAIT TWO
MINUTES FOR THE AIRBAG SYSTEM CAPACITOR
TO DISCHARGE BEFORE PERFORMING FURTHER
DIAGNOSIS OR SERVICE. THIS IS THE ONLY SURE
WAY TO DISABLE THE AIRBAG SYSTEM. FAILURE
TO TAKE THE PROPER PRECAUTIONS COULD
RESULT IN ACCIDENTAL AIRBAG DEPLOYMENT
AND POSSIBLE PERSONAL INJURY.
(1) Remove the headlamp switch bezel. (Refer to
23 - BODY/INSTRUMENT PANEL/INSTRUMENT
PANEL SWITCH BEZEL - REMOVAL)
(2) Remove the center bezel. (Refer to 23 - BODY/
INSTRUMENT PANEL/INSTRUMENT PANEL
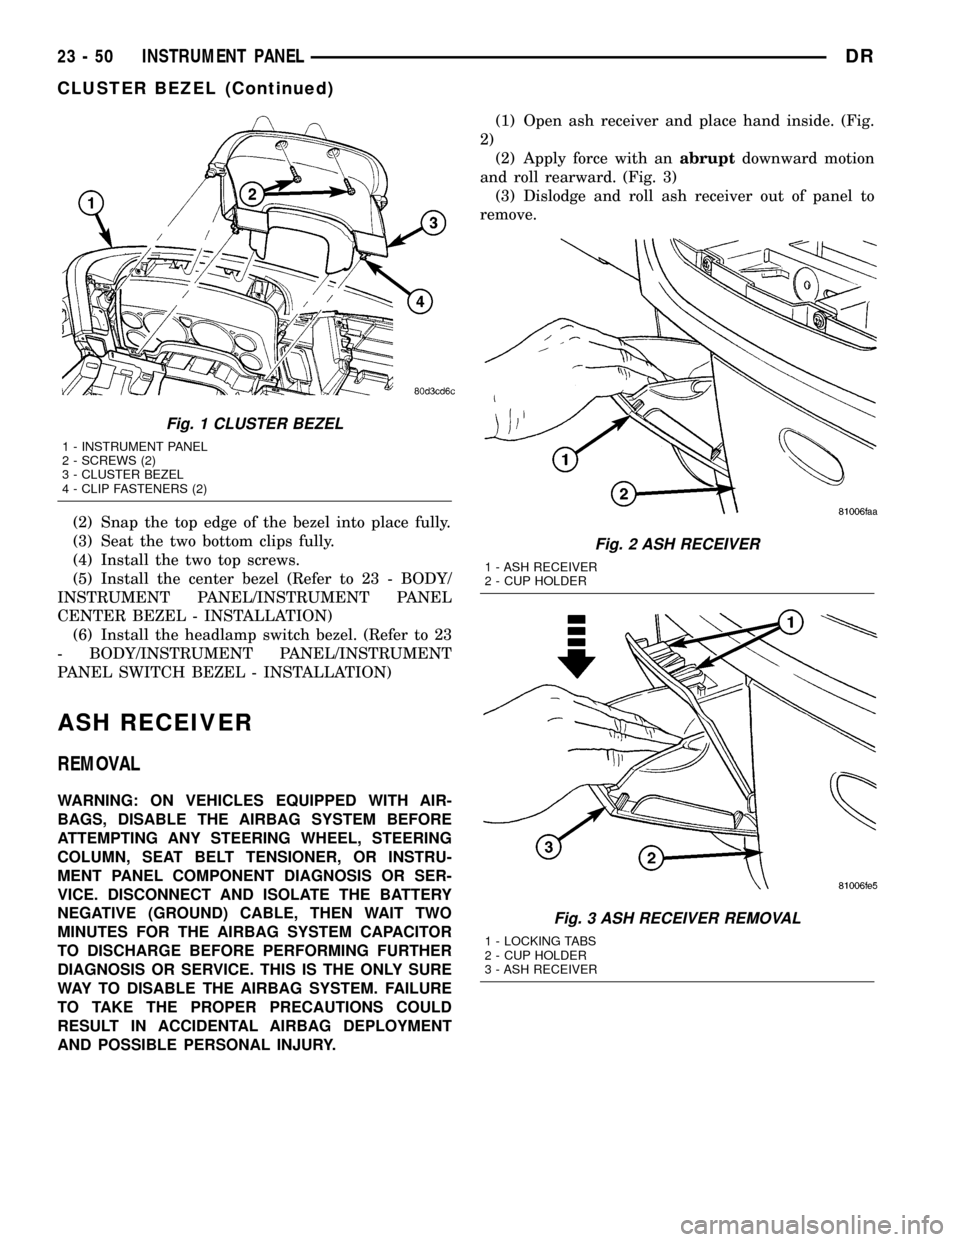
CENTER BEZEL - REMOVAL)(3) Remove the two top screws. (Fig. 1)
(4) Using a trim stick C-4755 or equivalent, sepa-
rate the two lower clips.
(5) Disengage the two top attachment bosses and
remove the bezel.
INSTALLATION
WARNING: ON VEHICLES EQUIPPED WITH AIR-
BAGS, DISABLE THE AIRBAG SYSTEM BEFORE
ATTEMPTING ANY STEERING WHEEL, STEERING
COLUMN, SEAT BELT TENSIONER, OR INSTRU-
MENT PANEL COMPONENT DIAGNOSIS OR SER-
VICE. DISCONNECT AND ISOLATE THE BATTERY
NEGATIVE (GROUND) CABLE, THEN WAIT TWO
MINUTES FOR THE AIRBAG SYSTEM CAPACITOR
TO DISCHARGE BEFORE PERFORMING FURTHER
DIAGNOSIS OR SERVICE. THIS IS THE ONLY SURE
WAY TO DISABLE THE AIRBAG SYSTEM. FAILURE
TO TAKE THE PROPER PRECAUTIONS COULD
RESULT IN ACCIDENTAL AIRBAG DEPLOYMENT
AND POSSIBLE PERSONAL INJURY.
(1) Position the cluster bezel over the cluster and
seat the outer bosses over the posts on the left and
right sides.
DRINSTRUMENT PANEL 23 - 49
Page 2345 of 2627

(2) Snap the top edge of the bezel into place fully.
(3) Seat the two bottom clips fully.
(4) Install the two top screws.
(5) Install the center bezel (Refer to 23 - BODY/
INSTRUMENT PANEL/INSTRUMENT PANEL
CENTER BEZEL - INSTALLATION)
(6) Install the headlamp switch bezel. (Refer to 23
- BODY/INSTRUMENT PANEL/INSTRUMENT
PANEL SWITCH BEZEL - INSTALLATION)
ASH RECEIVER
REMOVAL
WARNING: ON VEHICLES EQUIPPED WITH AIR-
BAGS, DISABLE THE AIRBAG SYSTEM BEFORE
ATTEMPTING ANY STEERING WHEEL, STEERING
COLUMN, SEAT BELT TENSIONER, OR INSTRU-
MENT PANEL COMPONENT DIAGNOSIS OR SER-
VICE. DISCONNECT AND ISOLATE THE BATTERY
NEGATIVE (GROUND) CABLE, THEN WAIT TWO
MINUTES FOR THE AIRBAG SYSTEM CAPACITOR
TO DISCHARGE BEFORE PERFORMING FURTHER
DIAGNOSIS OR SERVICE. THIS IS THE ONLY SURE
WAY TO DISABLE THE AIRBAG SYSTEM. FAILURE
TO TAKE THE PROPER PRECAUTIONS COULD
RESULT IN ACCIDENTAL AIRBAG DEPLOYMENT
AND POSSIBLE PERSONAL INJURY.(1) Open ash receiver and place hand inside. (Fig.
2)
(2) Apply force with anabruptdownward motion
and roll rearward. (Fig. 3)
(3) Dislodge and roll ash receiver out of panel to
remove.
Fig. 1 CLUSTER BEZEL
1 - INSTRUMENT PANEL
2 - SCREWS (2)
3 - CLUSTER BEZEL
4 - CLIP FASTENERS (2)
Fig. 2 ASH RECEIVER
1 - ASH RECEIVER
2 - CUP HOLDER
Fig. 3 ASH RECEIVER REMOVAL
1 - LOCKING TABS
2 - CUP HOLDER
3 - ASH RECEIVER
23 - 50 INSTRUMENT PANELDR
CLUSTER BEZEL (Continued)
Page 2346 of 2627

INSTALLATION
WARNING: ON VEHICLES EQUIPPED WITH AIR-
BAGS, DISABLE THE AIRBAG SYSTEM BEFORE
ATTEMPTING ANY STEERING WHEEL, STEERING
COLUMN, SEAT BELT TENSIONER, OR INSTRU-
MENT PANEL COMPONENT DIAGNOSIS OR SER-
VICE. DISCONNECT AND ISOLATE THE BATTERY
NEGATIVE (GROUND) CABLE, THEN WAIT TWO
MINUTES FOR THE AIRBAG SYSTEM CAPACITOR
TO DISCHARGE BEFORE PERFORMING FURTHER
DIAGNOSIS OR SERVICE. THIS IS THE ONLY SURE
WAY TO DISABLE THE AIRBAG SYSTEM. FAILURE
TO TAKE THE PROPER PRECAUTIONS COULD
RESULT IN ACCIDENTAL AIRBAG DEPLOYMENT
AND POSSIBLE PERSONAL INJURY.
(1) Seat the bottom of the receiver into position.
(2) Pivot the receiver forward and seat the retain-
ing clips fully.
CUP HOLDER
REMOVAL
WARNING: ON VEHICLES EQUIPPED WITH AIR-
BAGS, DISABLE THE AIRBAG SYSTEM BEFORE
ATTEMPTING ANY STEERING WHEEL, STEERING
COLUMN, SEAT BELT TENSIONER, OR INSTRU-
MENT PANEL COMPONENT DIAGNOSIS OR SER-
VICE. DISCONNECT AND ISOLATE THE BATTERY
NEGATIVE (GROUND) CABLE, THEN WAIT TWO
MINUTES FOR THE AIRBAG SYSTEM CAPACITOR
TO DISCHARGE BEFORE PERFORMING FURTHER
DIAGNOSIS OR SERVICE. THIS IS THE ONLY SURE
WAY TO DISABLE THE AIRBAG SYSTEM. FAILURE
TO TAKE THE PROPER PRECAUTIONS COULD
RESULT IN ACCIDENTAL AIRBAG DEPLOYMENT
AND POSSIBLE PERSONAL INJURY.
(1) Remove the center bezel.(Refer to 23 - BODY/
INSTRUMENT PANEL/INSTRUMENT PANEL
CENTER BEZEL - REMOVAL)
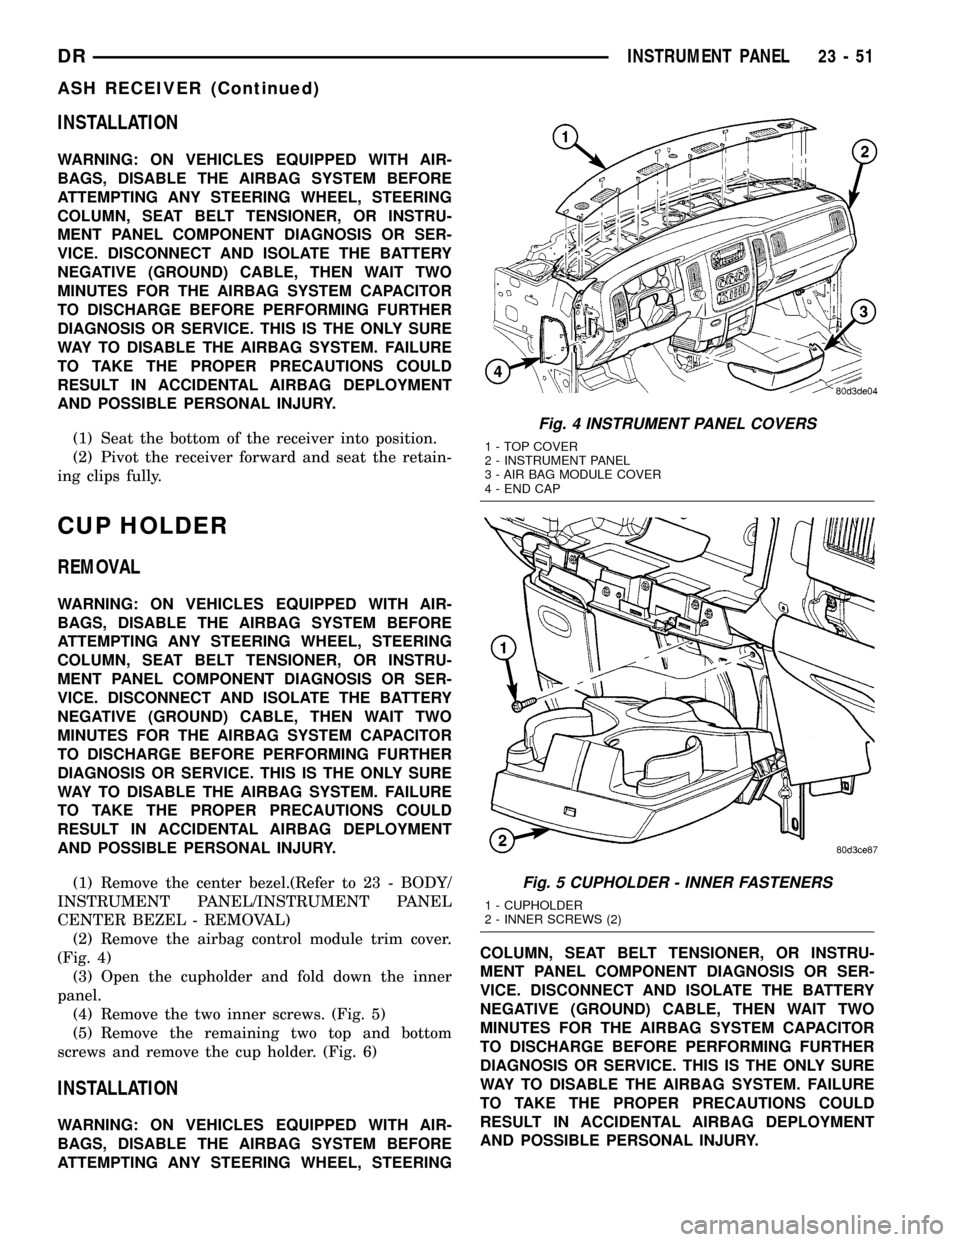
(2) Remove the airbag control module trim cover.
(Fig. 4)
(3) Open the cupholder and fold down the inner
panel.
(4) Remove the two inner screws. (Fig. 5)
(5) Remove the remaining two top and bottom
screws and remove the cup holder. (Fig. 6)
INSTALLATION
WARNING: ON VEHICLES EQUIPPED WITH AIR-
BAGS, DISABLE THE AIRBAG SYSTEM BEFORE
ATTEMPTING ANY STEERING WHEEL, STEERINGCOLUMN, SEAT BELT TENSIONER, OR INSTRU-
MENT PANEL COMPONENT DIAGNOSIS OR SER-
VICE. DISCONNECT AND ISOLATE THE BATTERY
NEGATIVE (GROUND) CABLE, THEN WAIT TWO
MINUTES FOR THE AIRBAG SYSTEM CAPACITOR
TO DISCHARGE BEFORE PERFORMING FURTHER
DIAGNOSIS OR SERVICE. THIS IS THE ONLY SURE
WAY TO DISABLE THE AIRBAG SYSTEM. FAILURE
TO TAKE THE PROPER PRECAUTIONS COULD
RESULT IN ACCIDENTAL AIRBAG DEPLOYMENT
AND POSSIBLE PERSONAL INJURY.
Fig. 4 INSTRUMENT PANEL COVERS
1 - TOP COVER
2 - INSTRUMENT PANEL
3 - AIR BAG MODULE COVER
4 - END CAP
Fig. 5 CUPHOLDER - INNER FASTENERS
1 - CUPHOLDER
2 - INNER SCREWS (2)
DRINSTRUMENT PANEL 23 - 51
ASH RECEIVER (Continued)