1998 DODGE RAM 1500 Temperature sensor 5.9
[x] Cancel search: Temperature sensor 5.9Page 1472 of 2627
Filter Removal
(1) The housing cover is equipped with spring clips
(Fig. 6) and is hinged with plastic tabs. Unlatch clips
from top of air cleaner housing and tilt housing cover
up for cover removal.
(2) Remove air cleaner element from air cleaner
housing.
INSTALLATION
(1) Before installing new air cleaner element (fil-
ter), clean inside of air cleaner housing.
(2) Position air cleaner cover to tabs on front of air
cleaner housing. Latch spring clips to seal cover to
housing.
CYLINDER HEAD
DESCRIPTION
The cylinder head is constructed of cast iron and is
a one piece cross flow design with four valves per cyl-
inder. The arrangement of two intake and two
exhaust valves per cylinder allows for a centrally
located injector. The cylinder head also includes an
integral intake manifold, an integral thermostat
housing, and a longitudal fuel return rifle, which
exits at the rear of the head. The 24 valve design
also includes integrally cast valve guides and hard-
ened intake and exhaust valve seat inserts.
REMOVAL
(1) Disconnect battery negative cables.
(2) Raise vehicle on hoist.
(3) Drain engine coolant.
(4) Disconnect exhaust pipe from turbocharger
elbow.
(5) Disconnect turbocharger oil drain tube at rub-
ber hose connection. Cap off open ports to prevent
intrusion of dirt or foreign material.
(6) Lower vehicle.
(7) Disconnect air inlet temperature/pressure sen-
sor.
(8) Remove air cleaner housing and snorkel from
the vehicle. Cap off turbocharger air inlet to prevent
intrusion of dirt or foreign material.
(9) Disconnect cab heater core supply and return
hoses from the cylinder head and heater pipe.
(10) Disconnect turbocharger oil supply line at the
turbocharger end. Cap off open ports to prevent
intrusion of dirt or foreign material.
(11) Remove exhaust manifold-to-cylinder head
bolts, spacers, heat shield, retention straps, and cab
heater plumbing. Remove exhaust manifold and tur-
bocharger from the vehicle as an assembly.
(12) Remove cooling fan assembly.
(13) Remove accessory drive belt (Refer to 7 -
COOLING/ACCESSORY DRIVE/DRIVE BELTS -
REMOVAL).
(14) Remove cooling fan support from cylinder
block.
(15) Remove upper generator bolt, loosen lower
generator bolt, and rotate generator away from cylin-
der head.
(16) Disconnect radiator upper hose from the ther-
mostat housing.
(17) Disconnect the Intake Air Temperature/Mani-
fold Air Pressure, and Coolant Temperature sensor
connectors.
(18) Remove the engine harness to cylinder head
attaching bolts and P-clips at front of head.
(19) Remove the throttle linkage cover (Fig. 8).
(20) For automatic equipped vehicles only, remove
the six (6) accelerator pedal position sensor assem-
bly-to-cylinder head bracket bolts (Fig. 9) and secure
the entire assembly out of the way. Disconnect the
APPS connector (Fig. 10).It is not necessary to
disconnect the cables from the throttle control
assembly.
(21) Remove the intake air grid heater wires from
the grid heater.
(22) Remove engine oil level indicator tube attach-
ing bolt at fuel filter housing bracket and inlet air
connection..
(23) Remove the charge air cooler-to-air inlet hous-
ing pipe.
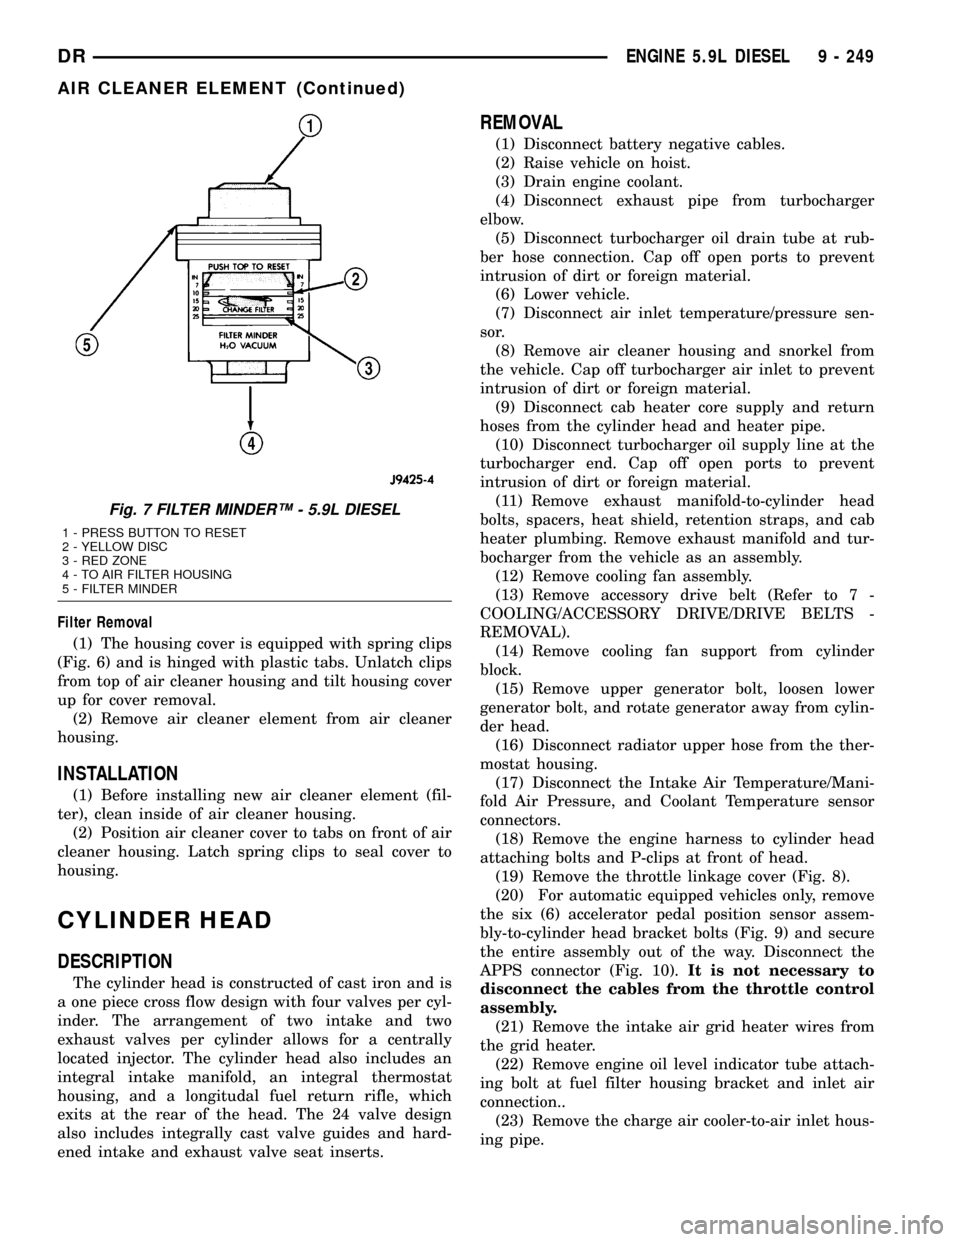
Fig. 7 FILTER MINDERŸ - 5.9L DIESEL
1 - PRESS BUTTON TO RESET
2 - YELLOW DISC
3 - RED ZONE
4 - TO AIR FILTER HOUSING
5 - FILTER MINDER
DRENGINE 5.9L DIESEL 9 - 249
AIR CLEANER ELEMENT (Continued)
Page 1477 of 2627
(9) Install rocker housing and bolts. Tighten to 24
Nm (18 lb. ft.).
(10) Install fuel injector(Refer to 14 - FUEL SYS-
TEM/FUEL INJECTION/FUEL INJECTOR -
INSTALLATION).
(11) Install injector harness nuts. Tighten to 1.25
Nm (11 lb. in.).
(12) Install cylinder head cover (Refer to 9 -
ENGINE/CYLINDER HEAD/CYLINDER HEAD
COVER(S) - INSTALLATION).
(13) Install wire harness P-clip to cylinder head
behind filter housing 24 N´m (18 ft. lbs.).
(14) Connect the IAT/MAP sensor connector.
(15) Install the fuel filter canister assembly and
torque mounting bolts to 24 N´m (18 ft. lbs.).
(16) Connect fuel lift pump, WIF sensor, and fuel
heater.
(17) Remove the engine lift bracket at rear of cyl-
inder head.
CAUTION: Failure to follow procedure will result in
fuel leaks and/or fuel system failure.
(18)Install the fuel rail and high pressure
fuel lines as follows:
(a) Hand tighten fuel rail bolts.
(b) Hand tighten fuel drain line to pressure lim-
iting valve. Hand tighten banjo bolt at fuel filter
housing.
(c) Hand tighten fuel rail-to-cylinder head high
pressure fuel lines.(d) Install fuel line brace bolts-to-intake mani-
fold finger tight.
(e) Hand tighten fuel pump to fuel rail line.
(f) Torque fuel line nuts at cylinder head to 30
Nm ( 22 ft. lbs.).
(g) Torque fuel line nuts at fuel rail to 30 Nm
(22 ft. lbs.)
(h) Using a back up wrench, torque fuel pump to
fuel rail line to 37 Nm (27 ft. lbs.). At injection
pump.
(i) Torque fuel pump to fuel rail line to 37 Nm
(27 ft. lbs.) at fuel rail.
(j) Torque fuel drain banjo bolt at pressure lim-
iting valve and front of fuel filter housing to 24 Nm
(18 ft. lbs.).
(k) Torque fuel line brace bolts to 24 N´m (18 ft.
lbs.).
(l) Torque rail bolts to 24 Nm (18 ft. lbs.).
(m) Connect fuel pressure sensor.
(19) Install the engine lift bracket at the rear of
cylinder head. Torque to 77 N´m (57 ft. lbs.).
(20) Reposition number 6 fuel line shield and
torque to 43 N´m (32 ft. lbs.).
(21) Install the fuel filter to injection pump low
pressure line. Inspect and replace sealing washers if
necessary. Torque banjo bolts to 24 N´m (18 ft. lbs.).
(22) Connect fuel return line at back of cylinder
head hand tight.
(23) Connect fuel return line at filter housing hand
tight.
(24) Torque banjo connections at cylinder head and
fuel filter housing to 24 Nm (18 ft. lbs.)
(25) Install bracket to rear of filter housing.
Torque to 24 Nm (18 ft. lbs.).
(26) Using new gaskets, install the intake grid
heater and air inlet housing. Torque bolts to 24 N´m
(18 ft. lbs.).
(27) Install wire harness P-clip and push on clip to
air inlet housing.
(28) Connect engine oil level indicator tube at fuel
filter housing and at air inlet housing.
(29) Connect the APPS connector.
(30) Install the APPS assembly to the cylinder
head bracket and torque bolts to 24 N´m (18 ft. lbs.).
(31) Install the throttle linkage cover.
(32) Install the charge air cooler-to-air inlet hous-
ing duct assembly. Torque all clamps to 11 N´m (100
in. lbs.).
(33) Connect intake grid heater wires.
(34) Secure engine harness to front of cylinder
head with bolt at four locations.
(35) Connect engine coolant temperature sensor
connector.
(36) Connect radiator upper hose to thermostat
housing.
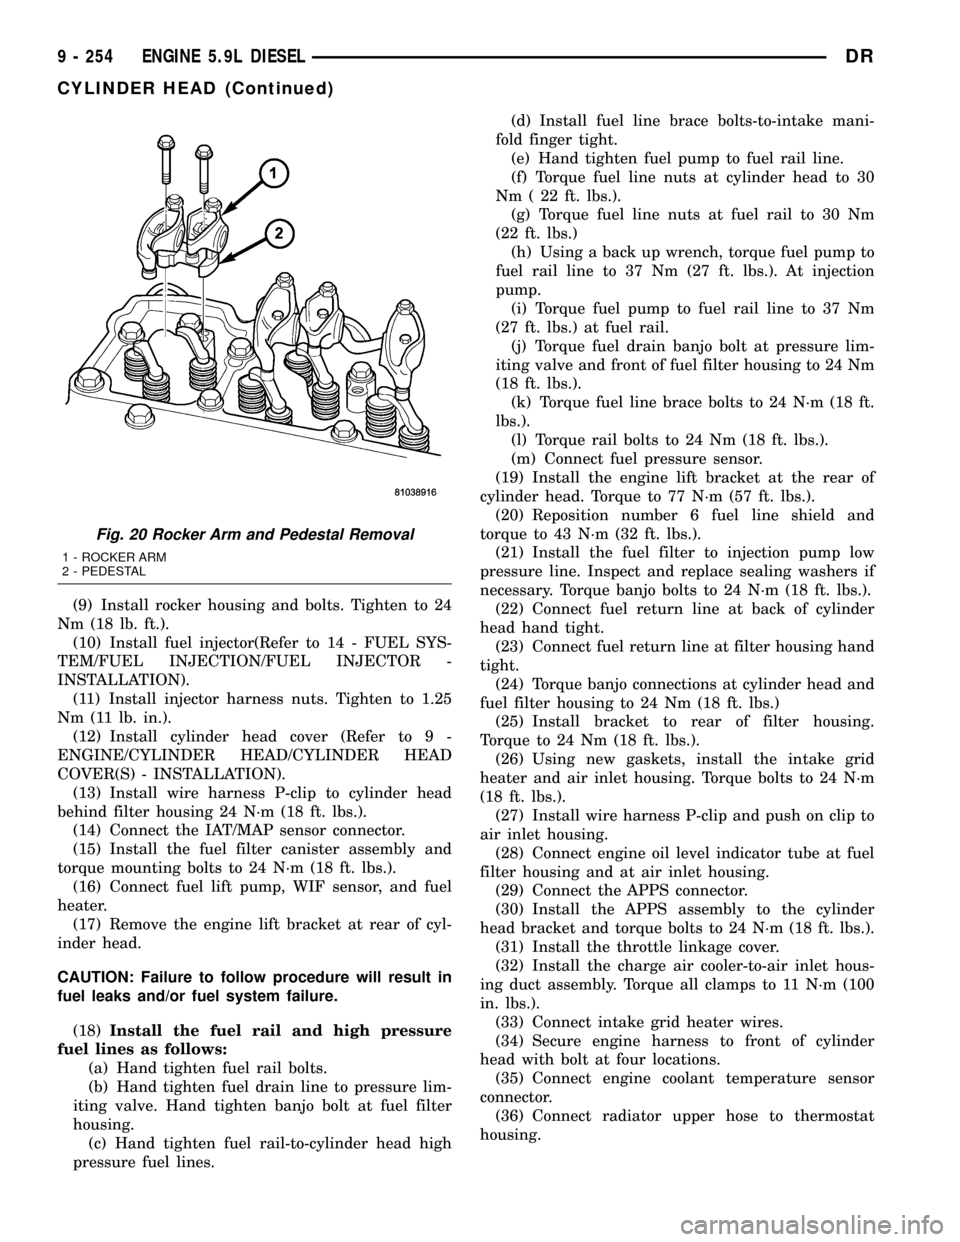
Fig. 20 Rocker Arm and Pedestal Removal
1 - ROCKER ARM
2 - PEDESTAL
9 - 254 ENGINE 5.9L DIESELDR
CYLINDER HEAD (Continued)
Page 1478 of 2627
(37) Rotate generator into position. Install upper
bolt and torque upper and lower bolts.
(38)
Install wire harness push-on clip below bracket.
(39) Install wire harness P-clip to top of bracket.
(40) Install fan support and torque to 32 N´m (24
ft. lbs.).
(41) Install cooling fan/drive refer to (Refer to 7 -
COOLING/ENGINE/RADIATOR FAN - INSTALLA-
TION).
(42) Install accessory drive belt (Refer to 7 -
COOLING/ACCESSORY DRIVE/DRIVE BELTS -
INSTALLATION).
(43) Install exhaust manifold/turbocharger assem-
bly, using new gaskets. Start all bolts/spacers by
hand. Torque bolts to 43 N´m (32 ft. lbs.).
(44) Install exhaust manifold heat shield to
exhaust manifold studs. Install retaining nuts.Torque
to 15 N´m (11 ft. lbs.).
(45) Install exhaust bolt retention straps across
cylinders5&6.
(46) Connect turbocharger oil drain tube. Torque
clamp to 8 N´m (71 in. lbs.).
(47) Perform the turbocharger pre-lube procedure.
Refer to Group 11, Exhaust System and Turbo-
charger for the correct procedure.
(48) Connect the turbocharger oil supply line.
Torque to 24 N´m (18 ft. lbs.).
(49) Install air cleaner housing and duct.
(50) Connect air inlet temperature/pressure sensor.
(51) Raise vehicle on hoist.
(52) Install exhaust pipe to turbocharger elbow.
Torque bolts to 11 N´m (100 in. lbs.).
(53) Lower vehicle.
(54) Fill engine coolant (Refer to 7 - COOLING -
STANDARD PROCEDURE).
(55) Start engine and check for leaks.
CYLINDER HEAD COVER(S)
REMOVAL
REMOVALÐCYLINDER HEAD COVER
(1) Disconnect both battery negative cables.
(2) Remove oil fill cap.
(3) Remove the breather cover.
(4) Disconnect the breather hose and breather
drain tube from the breather housing.
(5) Remove cylinder head cover bolts.
(6) Remove the cylinder head cover.
REMOVALÐROCKER HOUSING
(1) Remove cylinder head cover as outlined in this
section.
(2) Disconnect rocker housing injector harness con-
nectors.(3) Remove injector harness nuts from injectors.
(4) Remove rocker housing bolts.
(5) Remove rocker housing and gasket.
CLEANING
Using a suitable solvent, Clean and dry gasket
mating surfaces on cylinder head and rocker housing.
Wipe gasket dry and inspect for re-use.
INSPECTION
The cylinder head cover gasket and rocker hous-
ing gasket, are reusable.However, should cracks,
nicks, or tears be present in the rubber/silicone construc-
tion, the defective components should be replaced. Also
replace gasket if it is no longer flexible. Inspect o-rings
on cylinder head cover bolts.Do not reuse gasket if it
has been removed from the groove in the rocker
housing or cylinder head cover.
INSTALLATION
INSTALLATIONÐCYLINDER HEAD COVER
(1) Inspect cylinder head cover gasket for cuts and
proper installation in groove. Replace if damaged.
(2)
Position cylinder cover on top of rocker housing.
(3) Install bolts.
(4) Starting with the center bolt, torque to 24 N´m
(18 ft. lbs.).
(5) Install breather hose to breather.
(6) Install breather drain hose to breather.
(7) Install breather cover and wire harness clip.
Torque to 24 N´m (18 ft. lbs.).
INSTALLATION - ROCKER HOUSING
(1) Inspect rocker housing gasket for cuts, nicks,
or tears. Replace if damaged or if gasket has come
out of groove.
(2) Inspect rocker housing gasket for proper instal-
lation in groove. Gasket bead must be centered in
groove. A gasket bead that is tilted to the side will
cause an oil leak.
CAUTION: When installing rocker housing onto cyl-
inder head, do not slide housing from side to side,
The gasket could fall out or be damaged.
(3) Install the rocker housing. Carefully guide the
rocker housing evenly down onto the cylinder head.
(4) Install rocker housing bolts and tighten finger
tight.
(5) Torque bolts, working from center out, to 24
Nm (18ft. lbs.).
(6) Install injector harness nuts to injector sole-
noid. Torque to 1.25 Nm (11 in. lbs.).
(7) Connect rocker housing injector harness con-
nections.
DRENGINE 5.9L DIESEL 9 - 255
CYLINDER HEAD (Continued)
Page 1520 of 2627
(13) Install the cooling fan (Refer to 7 - COOLING/
ENGINE/RADIATOR FAN - INSTALLATION).
(14) Connect battery negative cables.
(15) Start engine and check for oil leaks.
INTAKE MANIFOLD
REMOVAL
(1) Disconnect the battery negative cables.
(2) Remove the charge air cooler outlet tube from
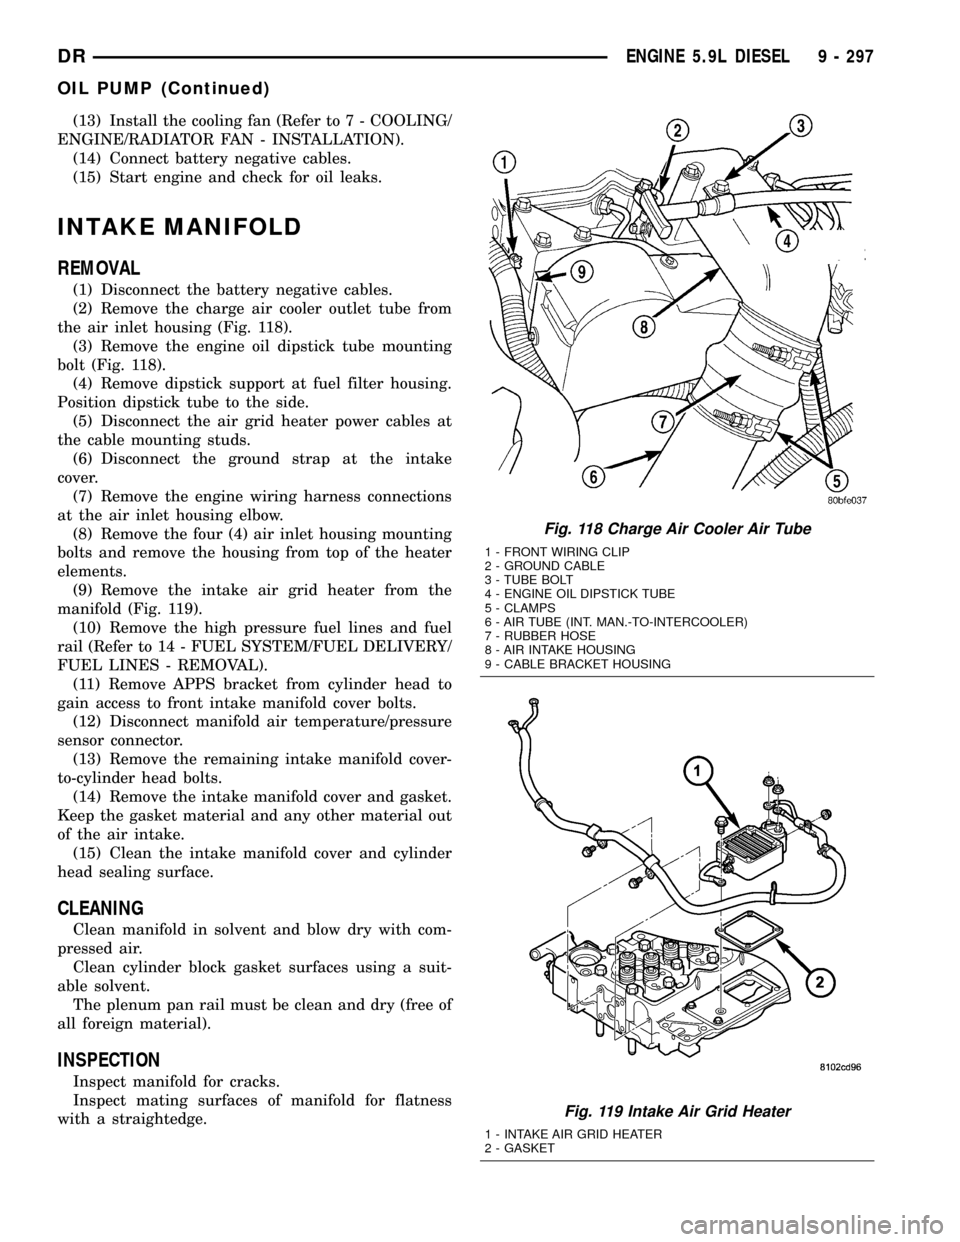
the air inlet housing (Fig. 118).
(3) Remove the engine oil dipstick tube mounting
bolt (Fig. 118).
(4) Remove dipstick support at fuel filter housing.
Position dipstick tube to the side.
(5) Disconnect the air grid heater power cables at
the cable mounting studs.
(6) Disconnect the ground strap at the intake
cover.
(7) Remove the engine wiring harness connections
at the air inlet housing elbow.
(8) Remove the four (4) air inlet housing mounting
bolts and remove the housing from top of the heater
elements.
(9) Remove the intake air grid heater from the
manifold (Fig. 119).
(10) Remove the high pressure fuel lines and fuel
rail (Refer to 14 - FUEL SYSTEM/FUEL DELIVERY/
FUEL LINES - REMOVAL).
(11) Remove APPS bracket from cylinder head to
gain access to front intake manifold cover bolts.
(12) Disconnect manifold air temperature/pressure
sensor connector.
(13) Remove the remaining intake manifold cover-
to-cylinder head bolts.
(14) Remove the intake manifold cover and gasket.
Keep the gasket material and any other material out
of the air intake.
(15) Clean the intake manifold cover and cylinder
head sealing surface.
CLEANING
Clean manifold in solvent and blow dry with com-
pressed air.
Clean cylinder block gasket surfaces using a suit-
able solvent.
The plenum pan rail must be clean and dry (free of
all foreign material).
INSPECTION
Inspect manifold for cracks.
Inspect mating surfaces of manifold for flatness
with a straightedge.
Fig. 118 Charge Air Cooler Air Tube
1 - FRONT WIRING CLIP
2 - GROUND CABLE
3 - TUBE BOLT
4 - ENGINE OIL DIPSTICK TUBE
5 - CLAMPS
6 - AIR TUBE (INT. MAN.-TO-INTERCOOLER)
7 - RUBBER HOSE
8 - AIR INTAKE HOUSING
9 - CABLE BRACKET HOUSING
Fig. 119 Intake Air Grid Heater
1 - INTAKE AIR GRID HEATER
2 - GASKET
DRENGINE 5.9L DIESEL 9 - 297
OIL PUMP (Continued)
Page 1521 of 2627
INSTALLATION
(1) Using a new gasket, install the intake manifold
cover.
(2) Install the cover-to-cylinder head bolts that do
not hold down the fuel rail. Tighten the bolts to 24
N´m (18 ft. lbs.) torque.
(3) Install the high pressure rail and fuel lines
(Refer to 14 - FUEL SYSTEM/FUEL DELIVERY/
FUEL LINES - INSTALLATION).
(4) Using two (2) new gaskets, install the intake
air grid heater and air inlet housing. Position the
ground cable and install and tighten the bolts to 24
N´m (18 ft. lbs.) torque.
(5) Connect the manifold air temperature/pressure
sensor connector.
(6) Install and tighten the air intake heater power
supply nuts to 14 N´m (120 in. lbs.) torque.
(7) Install the APPS bracket. Torque fasteners to
43 N´m (32ft lbs.) torque.
(8) Install oil dipstick tube support at fuel filter
housing.
(9) Install the engine oil dipstick tube and mount-
ing bolt.
(10) Position the charge air cooler outlet tube onto
the air inlet housing. Tighten the clamps to 11 N´m
(100 in. lbs.) torque.
(11) Attach the engine wire harness to the air inlet
housing at two locations.
(12) Prime the fuel system. Refer to the fuel prim-
ing procedure in Group 14, Fuel System.
(13) Connect the battery negative cables.
EXHAUST MANIFOLD
REMOVAL
(1) Disconnect the battery negative cables.
(2) Raise vehicle on hoist.
(3) Disconnect the exhaust pipe from the turbo-
charger elbow.
(4) Disconnect oil drain tube from turbocharger.
(5) Lower vehicle.
(6) Disconnect the turbocharger air inlet hose.
(7) Remove air cleaner assembly.
(8) Disconnect the turbocharger oil supply line.
(9) Disconnect the charge air cooler inlet pipe from
the turbocharger.
(10) Remove the turbocharger and gasket from the
exhaust manifold.
(11) Remove the cab heater return pipe nuts from
the exhaust manifold stud. Position the tube out of
the way.
(12) Remove heat shield.
(13) Remove exhaust manifold bolt lockplates.
(14) Remove the exhaust manifold-to-cylinder head
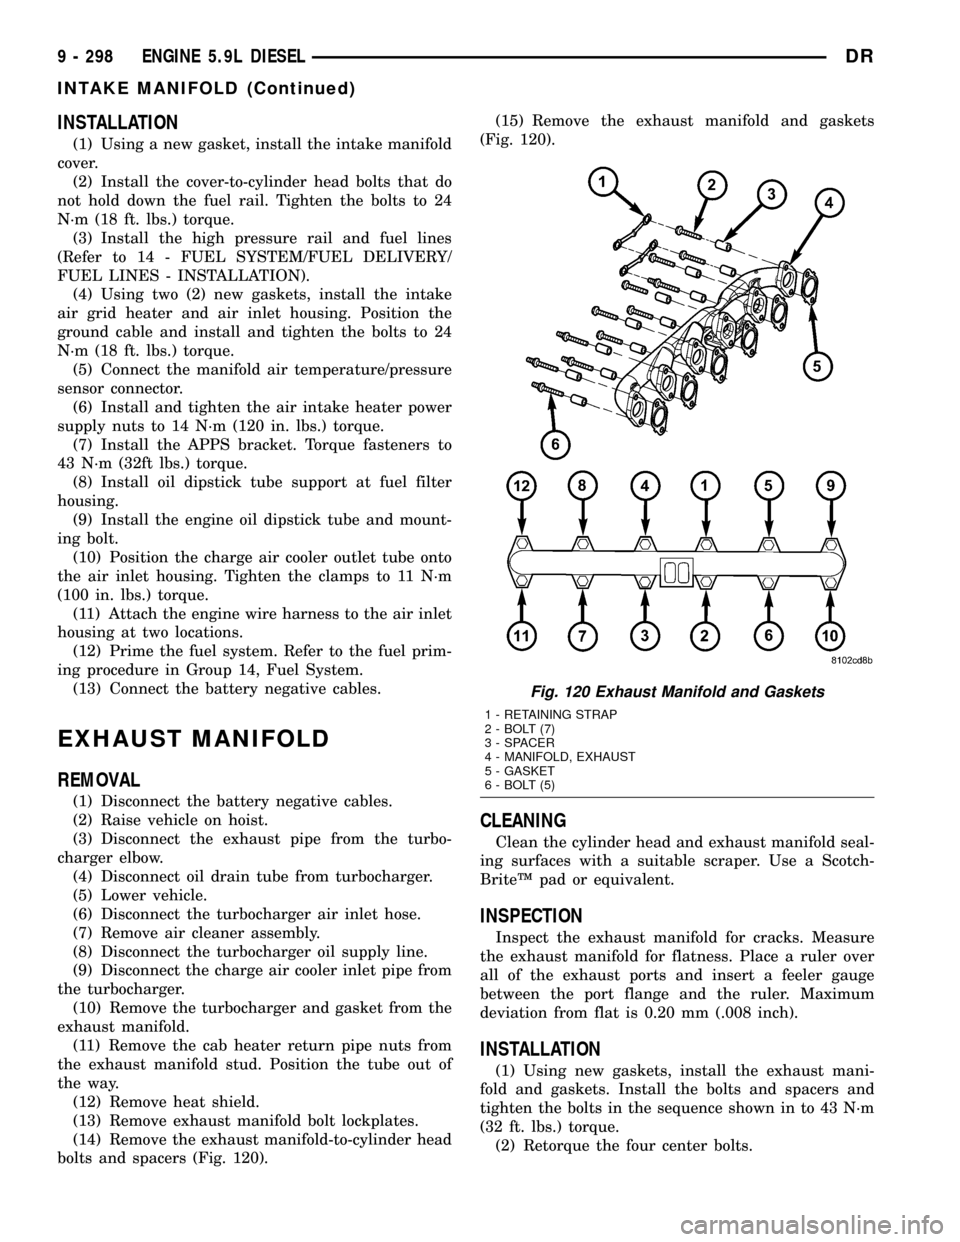
bolts and spacers (Fig. 120).(15) Remove the exhaust manifold and gaskets
(Fig. 120).
CLEANING
Clean the cylinder head and exhaust manifold seal-
ing surfaces with a suitable scraper. Use a Scotch-
BriteŸ pad or equivalent.
INSPECTION
Inspect the exhaust manifold for cracks. Measure
the exhaust manifold for flatness. Place a ruler over
all of the exhaust ports and insert a feeler gauge
between the port flange and the ruler. Maximum
deviation from flat is 0.20 mm (.008 inch).
INSTALLATION
(1) Using new gaskets, install the exhaust mani-
fold and gaskets. Install the bolts and spacers and
tighten the bolts in the sequence shown in to 43 N´m
(32 ft. lbs.) torque.
(2) Retorque the four center bolts.
Fig. 120 Exhaust Manifold and Gaskets
1 - RETAINING STRAP
2 - BOLT (7)
3 - SPACER
4 - MANIFOLD, EXHAUST
5 - GASKET
6 - BOLT (5)
9 - 298 ENGINE 5.9L DIESELDR
INTAKE MANIFOLD (Continued)
Page 1648 of 2627

(8) Connect battery cables to both batteries.
(9) Start engine and check for leaks.
INLET AIR TEMPERATURE
SENSOR/PRESSURE SENSOR
DESCRIPTION
The combination, dual function Inlet Air Tempera-
ture/Pressure Sensor is located on the air cleaner (fil-
ter) cover.
OPERATION
The Inlet Air Temperature/Pressure Sensor is a
combination dual-function sensor. The sensor element
extends into the intake air stream at the top of the
air filter housing. Ambient air temperature as well as
barometric pressure is monitored by this sensor. The
Engine Control Module (ECM) monitors signals from
this sensor.
REMOVAL
The Inlet Air Temperature/Pressure Sensor is
located on the air cleaner cover (Fig. 23).
(1) Disconnect electrical connector at sensor (Fig.
24).
(2) Remove two Torx-type mounting screws.
(3) Remove sensor from air cleaner cover.
(4) Check condition of sensor o-ring (Fig. 25).
INSTALLATION
(1) Check condition of sensor o-ring.
(2) Position sensor into top of air cleaner cover
with a slight twisting action.
(3) Install 2 mounting screws.
(4) Install electrical connector.
Fig. 22 FUEL INJECTOR RAIL
1 - FUEL RAIL MOUNTING BOLTS (3)
2 - INSULATED CLAMPS
3 - FUEL INJECTOR RAIL
Fig. 23 IAT/PRESSURE SENSOR LOCATION - 5.9L
DIESEL
1 - CLIPS
2 - FILTER COVER
3 - FILTER MINDERŸ
4 - INLET AIR TEMPERATURE/ PRESSURE SENSOR
5 - FILTER HOUSING
DRFUEL INJECTION - DIESEL 14 - 79
FUEL INJECTOR RAIL (Continued)
Page 2494 of 2627
²Faulty A/C-heater control.
²Faulty related wiring harness or connectors.
²Improper engine coolant temperature.
SPECIFICATIONS - A/C SYSTEM
The R-134a refrigerant system charge capacity for
this vehicle can be found on the underhood Specifica-
tion Label.
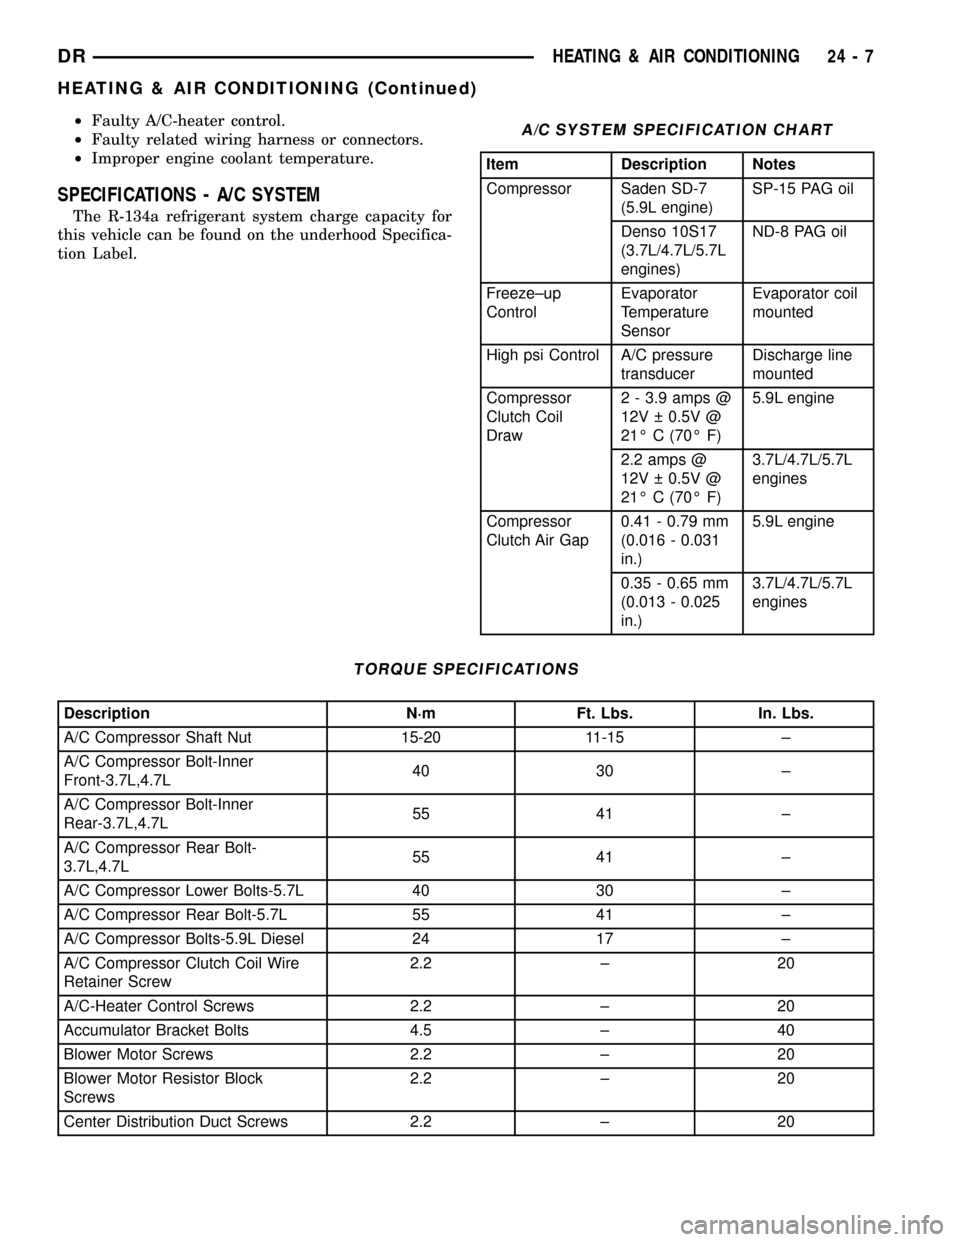
A/C SYSTEM SPECIFICATION CHART
Item Description Notes
Compressor Saden SD-7
(5.9L engine)SP-15 PAG oil
Denso 10S17
(3.7L/4.7L/5.7L
engines)ND-8 PAG oil
Freeze±up
ControlEvaporator
Temperature
SensorEvaporator coil
mounted
High psi Control A/C pressure
transducerDischarge line
mounted
Compressor
Clutch Coil
Draw2 - 3.9 amps @
12V 0.5V @
21É C (70É F)5.9L engine
2.2 amps @
12V 0.5V @
21É C (70É F)3.7L/4.7L/5.7L
engines
Compressor
Clutch Air Gap0.41 - 0.79 mm
(0.016 - 0.031
in.)5.9L engine
0.35 - 0.65 mm
(0.013 - 0.025
in.)3.7L/4.7L/5.7L
engines
TORQUE SPECIFICATIONS
Description N´m Ft. Lbs. In. Lbs.
A/C Compressor Shaft Nut 15-20 11-15 ±
A/C Compressor Bolt-Inner
Front-3.7L,4.7L40 30 ±
A/C Compressor Bolt-Inner
Rear-3.7L,4.7L55 41 ±
A/C Compressor Rear Bolt-
3.7L,4.7L55 41 ±
A/C Compressor Lower Bolts-5.7L 40 30 ±
A/C Compressor Rear Bolt-5.7L 55 41 ±
A/C Compressor Bolts-5.9L Diesel 24 17 ±
A/C Compressor Clutch Coil Wire
Retainer Screw2.2 ± 20
A/C-Heater Control Screws 2.2 ± 20
Accumulator Bracket Bolts 4.5 ± 40
Blower Motor Screws 2.2 ± 20
Blower Motor Resistor Block
Screws2.2 ± 20
Center Distribution Duct Screws 2.2 ± 20
DRHEATING & AIR CONDITIONING 24 - 7
HEATING & AIR CONDITIONING (Continued)
Page 2590 of 2627
BALL JOINT - DIAGNOSIS AND TESTING,
LOWER.........................2-19,2-34
BALL JOINT - DIAGNOSIS AND TESTING,
UPPER..........................2-27,2-36
BALL JOINT - INSTALLATION, LOWER . 2-20,2-35
BALL JOINT - INSTALLATION, UPPER.....2-36
BALL JOINT - REMOVAL, LOWER.....2-19,2-35
BALL JOINT - REMOVAL, UPPER.........2-36
BAND OPERATION - DIAGNOSIS AND
TESTING, AIR TESTING
TRANSMISSION CLUTCH.............21-144
BANDS - ADJUSTMENT...............21-195
BANDS - DESCRIPTION...............21-194
BANDS - OPERATION................21-194
BAR - DESCRIPTION, STABILIZER........2-24
BAR - DESCRIPTION, TORSION..........2-26
BAR - INSTALLATION, STABILIZER....2-25,2-40
BAR - INSTALLATION, TORSION..........2-27
BAR - INSTALLATION, TRACK...........19-38
BAR - OPERATION, STABILIZER..........2-25
BAR - OPERATION, TORSION............2-26
BAR - REMOVAL, STABILIZER.......2-25,2-39
BAR - REMOVAL, TORSION.............2-26
BAR - REMOVAL, TRACK..............19-38
BAR CROSS MEMBER BUSHING -
INSTALLATION, TORSION...............2-15
BAR CROSSMEMBER BUSHING -
REMOVAL, TORSION...................2-13
BASE BRAKE, SPECIFICATIONS...........5-10
BASE BRAKE SYSTEM - DIAGNOSIS AND
TESTING.............................5-2
BASE BRAKES, SPECIAL TOOLS...........5-5
BASECOAT/CLEARCOAT FINISH -
DESCRIPTION.......................23-73
BATTERIES - STANDARD PROCEDURE,
RKE TRANSMITTER...................8N-8
BATTERY - DESCRIPTION...............8F-7
BATTERY - DIAGNOSIS AND TESTING.....8F-7
BATTERY CABLES - DESCRIPTION.......8F-14
BATTERY CABLES - DIAGNOSIS AND
TESTING...........................8F-15
BATTERY CABLES - INSTALLATION.......8F-17
BATTERY CABLES - OPERATION.........8F-15
BATTERY CABLES - REMOVAL..........8F-16
BATTERY CHARGING - STANDARD
PROCEDURE.........................8F-8
BATTERY HOLDDOWN - DESCRIPTION....8F-14
BATTERY HOLDDOWN - INSTALLATION . . . 8F-14
BATTERY HOLDDOWN - OPERATION.....8F-14
BATTERY HOLDDOWN - REMOVAL.......8F-14
BATTERY SYSTEM - CLEANING...........8F-5
BATTERY SYSTEM - DESCRIPTION........8F-1
BATTERY SYSTEM - DIAGNOSIS AND
TESTING............................8F-2
BATTERY SYSTEM - INSPECTION.........8F-5
BATTERY SYSTEM - OPERATION.........8F-2
BATTERY SYSTEM - SPECIFICATIONS......8F-6
BATTERY SYSTEM SPECIAL TOOLS,
SPECIAL TOOLS......................8F-7
BATTERY TEMPERATURE SENSOR -
DESCRIPTION.......................8F-21
BATTERY TEMPERATURE SENSOR -
INSTALLATION.......................8F-21
BATTERY TEMPERATURE SENSOR -
OPERATION.........................8F-21
BATTERY TEMPERATURE SENSOR -
REMOVAL..........................8F-21
BATTERY TESTER - STANDARD
PROCEDURE, USING MICRO 420........8F-12
BATTERY TRAY - DESCRIPTION.........8F-17
BATTERY TRAY - INSTALLATION.........8F-18
BATTERY TRAY - OPERATION...........8F-17
BATTERY TRAY - REMOVAL............8F-17
BEAM INDICATOR - DESCRIPTION, HIGH . . 8J-28
BEAM INDICATOR - OPERATION, HIGH....8J-28
BEARING - ADJUSTMENTS, CENTER.......3-9
BEARING - FITTING - STANDARD
PROCEDURE, CRANKSHAFT MAIN . . 9-134,9-207
BEARING - INSTALLATION, CENTER........3-9
BEARING - INSTALLATION, CLUTCH
RELEASE............................6-10
BEARING - INSTALLATION, HUB
..........2-32
BEARING - INSTALLATION, OUTPUT
SHAFT FRONT
......................21-216
BEARING - INSTALLATION, OUTPUT
SHAFT REAR
.......................21-217
BEARING - INSTALLATION, PILOT
........6-12
BEARING - REMOVAL, CENTER
...........3-9BEARING - REMOVAL, CLUTCH RELEASE . . . 6-9
BEARING - REMOVAL, HUB.............2-31
BEARING - REMOVAL, OUTPUT SHAFT
FRONT............................21-216
BEARING - REMOVAL, OUTPUT SHAFT
REAR.............................21-216
BEARING - REMOVAL, PILOT............6-11
BEARING AND CRANKSHAFT JOURNAL
CLEARANCE - STANDARD
PROCEDURE, CONNECTING ROD........9-272
BEARING CLEARANCE - STANDARD
PROCEDURE, MAIN...................9-274
BEARING FITTING - STANDARD
PROCEDURE, CONNECTING ROD........9-129
BEARING FITTING, STANDARD
PROCEDURE - CONNECTING ROD........9-49
BEARING FITTING, STANDARD
PROCEDURE - MAIN...................9-44
BEARINGS - INSPECTION, CRANKSHAFT
MAIN.........................9-135,9-208
BEARINGS - INSTALLATION, AXLE . . 3-125,3-153,
3-44,3-95
BEARINGS - INSTALLATION, CAMSHAFT . . 9-271
BEARINGS - INSTALLATION,
DIFFERENTIAL CASE . . . 3-106,3-134,3-161,3-48,
3-75
BEARINGS - REMOVAL, AXLE . 3-125,3-152,3-43,
3-95
BEARINGS - REMOVAL, CAMSHAFT......9-268
BEARINGS - REMOVAL, DIFFERENTIAL
CASE............3-105,3-134,3-161,3-48,3-75
BELT - 3.7L / 4.7L - INSTALLATION,
DRIVE................................7-26
BELT - 3.7L / 4.7L - REMOVAL, DRIVE.....7-26
BELT - 5.9L DIESEL - INSTALLATION,
DRIVE..............................7-29
BELT - 5.9L DIESEL - REMOVAL, DRIVE....7-29
BELT / CHAIN COVER(S) -
INSTALLATION, TIMING...........9-171,9-81
BELT / CHAIN COVER(S) - REMOVAL,
TIMING........................9-170,9-81
BELT - DIAGNOSIS AND TESTING,
ACCESSORY DRIVE................7-24,7-27
BELT - INSTALLATION, FRONT CENTER
SEAT ..............................8O-31
BELT - REMOVAL, FRONT CENTER SEAT . . 8O-30
BELT & RETRACTOR - INSTALLATION,
FRONT CENTER SEAT.................8O-29
BELT & RETRACTOR - INSTALLATION,
REAR CENTER SEAT..................8O-45
BELT & RETRACTOR - INSTALLATION,
REAR OUTBOARD SEAT...............8O-47
BELT & RETRACTOR - REMOVAL, FRONT
CENTER SEAT.......................8O-29
BELT & RETRACTOR - REMOVAL, REAR
CENTER SEAT.......................8O-44
BELT & RETRACTOR - REMOVAL, REAR
OUTBOARD SEAT....................8O-46
BELT BUCKLE - INSTALLATION, FRONT
OUTBOARD SEAT....................8O-38
BELT BUCKLE - REMOVAL, FRONT
OUTBOARD SEAT....................8O-37
BELT MOLDING - INSTALLATION, FRONT
DOOR INNER........................23-93
BELT MOLDING - INSTALLATION, FRONT
DOOR OUTER.......................23-93
BELT MOLDING - INSTALLATION, REAR
DOOR INNER........................23-94
BELT MOLDING - INSTALLATION, REAR
DOOR OUTER.......................23-94
BELT MOLDING - REMOVAL, FRONT
DOOR INNER........................23-93
BELT MOLDING - REMOVAL, FRONT
DOOR OUTER.......................23-92
BELT MOLDING - REMOVAL, REAR
DOOR INNER........................23-94
BELT MOLDING - REMOVAL, REAR
DOOR OUTER.......................23-93
BELT SWITCH - DESCRIPTION, SEAT.....8O-51
BELT SWITCH - DIAGNOSIS AND
TESTING, SEAT
......................8O-51
BELT SWITCH - OPERATION, SEAT
.......8O-51
BELT TENSION REDUCER -
DESCRIPTION, SEAT
..................8O-53
BELT TENSION REDUCER - DIAGNOSIS
AND TESTING, SEAT
..................8O-54
BELT TENSION REDUCER - OPERATION,
SEAT
..............................8O-54BELT TENSIONER - 3.7L / 4.7L -
DESCRIPTION........................7-21
BELT TENSIONER - 3.7L / 4.7L -
INSTALLATION........................7-22
BELT TENSIONER - 3.7L / 4.7L -
OPERATION..........................7-21
BELT TENSIONER - 3.7L / 4.7L -
REMOVAL...........................7-21
BELT TENSIONER - 5.9L DIESEL -
DESCRIPTION........................7-23
BELT TENSIONER - 5.9L DIESEL -
INSTALLATION........................7-24
BELT TENSIONER - 5.9L DIESEL -
OPERATION..........................7-23
BELT TENSIONER - 5.9L DIESEL -
REMOVAL...........................7-23
BELT TENSIONER - DESCRIPTION, SEAT . . 8O-52
BELT TENSIONER - OPERATION, SEAT....8O-53
BELT TENSIONER-5.7L - DESCRIPTION....7-22
BELT TENSIONER-5.7L - INSTALLATION....7-23
BELT TENSIONER-5.7L - OPERATION......7-22
BELT TENSIONER-5.7L - REMOVAL.......7-22
BELT TURNING LOOP ADJUSTER -
INSTALLATION, SEAT.................8O-55
BELT TURNING LOOP ADJUSTER -
REMOVAL, SEAT.....................8O-55
BELT/CHAIN AND SPROCKETS -
INSPECTION, TIMING.............9-174,9-84
BELT/CHAIN AND SPROCKETS -
INSTALLATION, TIMING...........9-176,9-85
BELT/CHAIN AND SPROCKETS -
REMOVAL, TIMING.................9-172,9-83
BEZEL - INSTALLATION, CLUSTER.......23-49
BEZEL - INSTALLATION, INSTRUMENT
PANEL CENTER......................23-57
BEZEL - INSTALLATION, INSTRUMENT
PANEL DRIVER SIDE..................23-58
BEZEL - INSTALLATION, INSTRUMENT
PANEL HEADLAMP SWITCH............23-56
BEZEL - REMOVAL, CLUSTER...........23-49
BEZEL - REMOVAL, INSTRUMENT PANEL
CENTER............................23-57
BEZEL - REMOVAL, INSTRUMENT PANEL
DRIVER SIDE........................23-58
BEZEL - REMOVAL, INSTRUMENT PANEL
HEADLAMP SWITCH..................23-56
BIN - INSTALLATION, STORAGE.........23-61
BIN - INSTALLATION, UNDER SEAT
STORAGE...........................23-80
BIN - REMOVAL, STORAGE.............23-61
BIN - REMOVAL, UNDER SEAT STORAGE . . 23-80
BIN COVERING - INSTALLATION, UNDER
SEAT STORAGE......................23-80
BIN COVERING - REMOVAL, UNDER
SEAT STORAGE......................23-80
BIN LATCH - INSTALLATION, UNDER
SEAT STORAGE......................23-80
BIN LATCH - REMOVAL, UNDER SEAT
STORAGE...........................23-80
BIN LID - INSTALLATION, UNDER SEAT
STORAGE...........................23-80
BIN LID - REMOVAL, UNDER SEAT
STORAGE...........................23-80
BLADE - DESCRIPTION, WIPER.........8R-18
BLADE - INSTALLATION, WIPER.........8R-20
BLADE - OPERATION, WIPER...........8R-19
BLADE - REMOVAL, WIPER............8R-19
BLEEDING - STANDARD PROCEDURE......5-31
BLEEDING - STANDARD PROCEDURE,
ABS BRAKE..........................5-46
BLEEDING - STANDARD PROCEDURE,
MANUAL.............................5-5
BLEEDING - STANDARD PROCEDURE,
MASTER CYLINDER...................5-26
BLEEDING - STANDARD PROCEDURE,
PRESSURE...........................5-5
BLEND DOOR - INSTALLATION..........24-27
BLEND DOOR - REMOVAL.............24-27
BLEND DOOR ACTUATOR -
DESCRIPTION.......................24-17
BLEND DOOR ACTUATOR -
INSTALLATION.......................24-18
BLEND DOOR ACTUATOR - OPERATION
. . . 24-17
BLEND DOOR ACTUATOR - REMOVAL
....24-17
BLOCK - CLEANING, ENGINE
. . 9-128,9-205,9-39
BLOCK - DESCRIPTION, BLOWER
MOTOR RESISTOR
...................24-18
BLOCK - DESCRIPTION, ENGINE
.....9-128,9-38
DRINDEX 3
Description Group-Page Description Group-Page Description Group-Page