1998 CADILLAC CATERA engine oil
[x] Cancel search: engine oilPage 262 of 346

Downloaded from www.Manualslib.com manuals search engine Be sure to fill it enough to put the level somewhere in
the proper operating range. Push the dipstick
all the way
back in when you’re through.
What Kind of Engine Oil to Use
Oils recommended for your vehicle can be identified by
looking for the “Starburst” symbol. This symbol
indicates that the oil has been certified by the American
Petroleum Institute
(API). Do not use any oil which
does not carry this Starburst symbol.
If you change your own oil,
be sure you use oil that has
the Starburst symbol on the
front of the
oil container. If
you have your oil changed
for you, be sure the
oil put
into your engine is
American Petroleum
Institute certified for
gasoline engines.
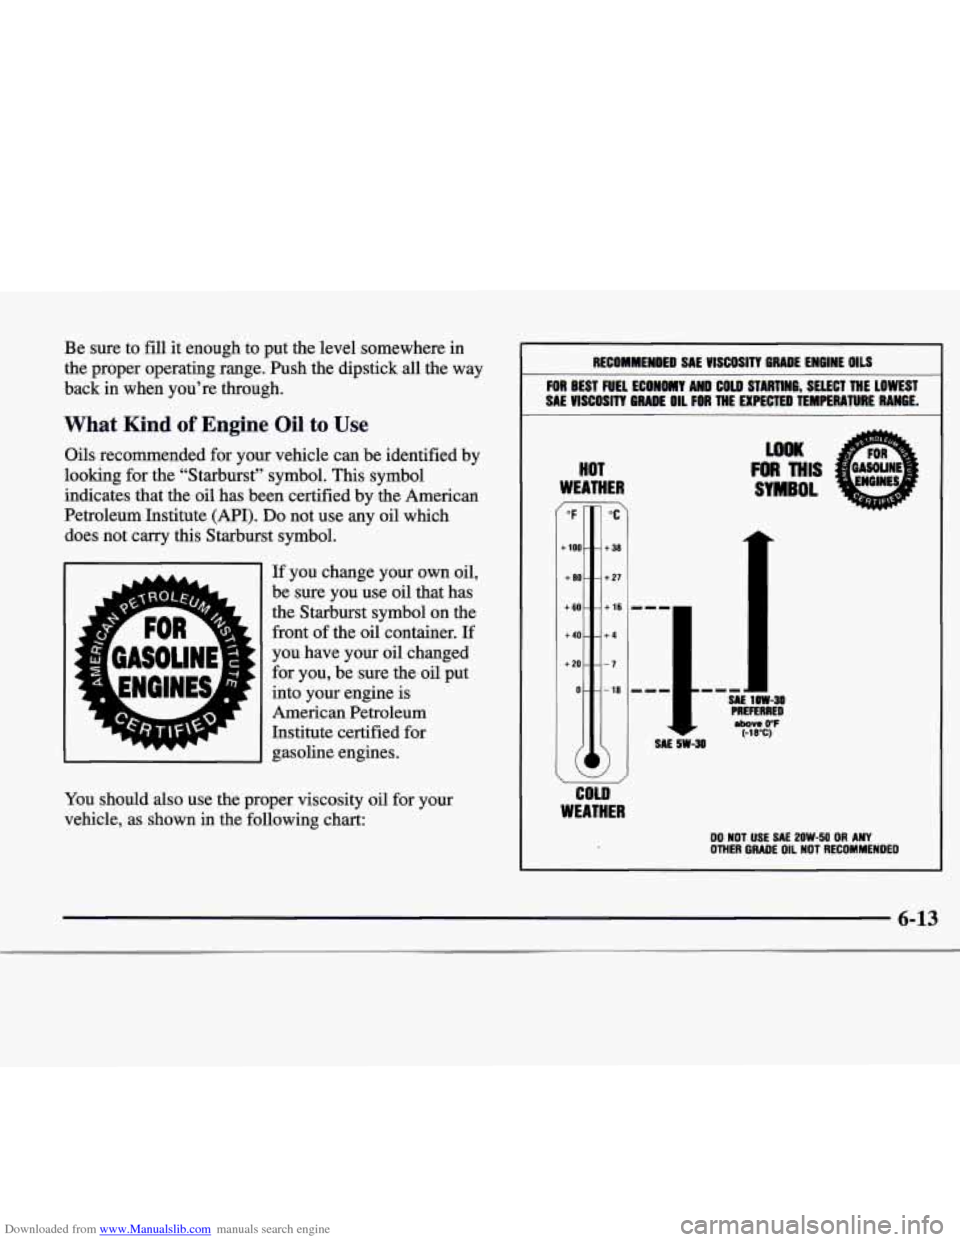
You should also use the proper viscosity oil for your
vehicle, as shown in the following chart:
RECOMHEHDED SAE VISCOSITY GRADE ENGINE OILS
FOR BEST FUEL ECONOMY AND COW STARTING, SELECT THE LOWEST
SAE
VISCOSITY GRADE OIL FOR THE EXPECTED TEMPERATURE RANGE.
HOT
WEATHER
“F
t 100
+ 80
t60.
t40.
t20.
0.
(
i
“C
t 38
t 27
t 16
t4
-7
- 18
SAE sw-30
,I SAE I lOW-30
PREFERRED above 0°F (-18°C)
WOK
FI)R THIS
SYMBOL
u
COLD
WEATHER
DO NOT USE SAE 2OW-50 OR ANY OTHER GRADE OIL NOT RECOMMENDED
6-13
Page 263 of 346

Downloaded from www.Manualslib.com manuals search engine As shown in the chart, SAE 1OW-30 is best for your
vehicle. However, you
can use SAE 5W-30 if it’s going
to be colder than
60 OF (1 6 O C) before your next oil
change. When it’s very cold, you should use
SAE
5W-30. These numbers on an oil container show its
viscosity, or thickness.
Do not use other viscosity oils,
such as
SAE 20W-50.
NOTICE:
Use only engine oil with the American Petroleum
Institute Certified For Gasoline Engines
“Starburst” symbol. Failure to use the
recommended oil can result in engine damage not
covered by your warranty.
GM Goodwrench@ oil meets all the requirements for
your vehicle.
If you are in an area where the temperature falls below
-20°F (-29”C), consider using either an
SAE 5W-30
synthetic oil or an
SAE OW-30 oil. Both will provide
easier cold starting and better protection for your engine
at extremely low temperatures.
Engine Oil Additives
Don’t add anything to your oil. Your dealer is ready to
advise
if you think something should be added.
When to Change Engine Oil
If any one of these is true for you, use the short tripkity
maintenance schedule:
0
0
0
0
0
Most trips are less than 5 to 10 miles (8 to 16 km).
This is particularly important when outside
temperatures
are below freezing.
Most trips include extensive idling (such as frequent driving in stop-and-go traffic).
Most trips are through dusty areas.
You frequently tow a trailer
or use a carrier on top of
your Catera.
The vehicle is used for delivery service, police, taxi
or other commercial application.
Driving under these conditions causes engine oil
to
break down sooner. If any one of these is true for your
vehicle, then you need to change your oil and filter
every
5,000 miles (8 000 km) or 3 months -- whichever
occurs first.
Page 264 of 346

Downloaded from www.Manualslib.com manuals search engine If none of them is true, use the long triphighway
maintenance schedule. Change the oil and filter at the
first
5,000 miles (8 000 km) or 3 months -- whichever
occurs first. Then, change the oil and filter every
10,000 miles (16 000 km) or 12 months -- whichever
occurs first. Driving a vehicle with a fully warmed
engine under highway conditions causes engine oil to
break down slower.
What to Do with Used Oil
Did you know that used engine oil contains certain
elements that may be unhealthy for your skin and could
even cause cancer? Don't let used oil stay on your skin
for very long. Clean your skin and
nails with soap and
water, or a good hand cleaner. Wash or properly throw
away clothing or rags containing used engine oil. (See
the manufacturer's warnings about the use and disposal
of oil products.)
Air Cleaner
The air cleaner is located behind the headlamps on
the passenger's side
of the engine. Be sure the engine
has cooled before following these steps to replace the
air filter.
Used
oil can be a real threat to the environment. If you
change your own oil, be sure to drain all free-flowing oil
from the filter before disposal. Don't ever dispose of oil
by putting it
in the trash, pouring it on the ground, into
sewers,
or into streams or bodies of water. Instead,
recycle
it by taking it to a place that collects used oil. If
you have a problem properly disposing
of your used oil,
ask your dealer, a service station or a local recycling
center for help.
6-15
Page 267 of 346

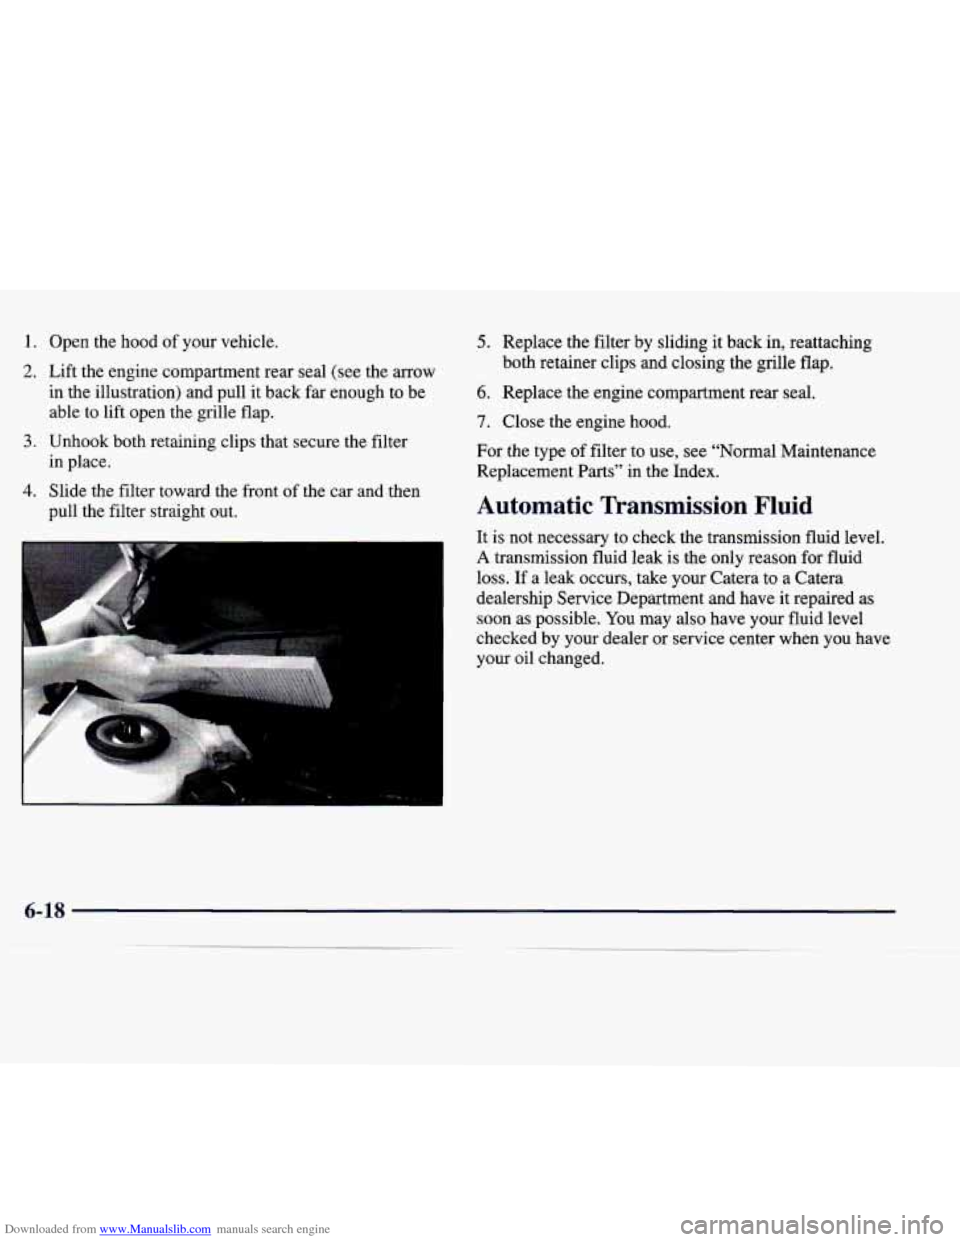
Downloaded from www.Manualslib.com manuals search engine 1. Open the hood of your vehicle.
2. Lift the engine compartment rear seal (see the arrow
in the illustration) and pull it back far enough to be
able to lift open the grille flap.
in place.
pull the filter straight out.
3. Unhook both retaining clips that secure the filter
4. Slide the filter toward the front of the car and then
5. Replace the filter by sliding it back in, reattaching
6. Replace the engine compartment rear seal.
7. Close the engine hood.
both retainer clips and closing the grille flap.
For the type of filter to use, see “Normal Maintenance
Replacement Parts” in the Index.
Automatic Transmissio~ Fluid
It is not necessary to check the transmission fluid level.
A transmission fluid leak is the only reason for fluid
loss. If a leak occurs, take your Catera to
a Catera
dealership Service Department and have it repaired as
soon as possible. You may
also have your fluid level
checked by your dealer
or service center when you have
your oil changed.
Page 269 of 346

Downloaded from www.Manualslib.com manuals search engine What to Use
Refer to the Maintenance Schedule to determine what
kind of lubricant to use. See “Recommended Fluids and
Lubricants” in the Maintenance Schedule booklet.
Engine Coolant
The cooling s stem in your vehicle is filled with
DEX-COOL engine coolant.
This coolant is designed
to remain in your vehicle for
5 years or 150,000 miles
(240 000 krnb whichever occurs first, if you add only
DEX-COOL extended life coolant.
J
The following explains your cooling system and how to
add coolant when it is low. If you have
a problem with
engine overheating, see “Engine Overheating” in
the Index.
A 50/50 mixture of water and DEX-COOL’
coolant will:
a Give freezing protection down to -34°F (-37°C).
Give boiling protection up to 265 OF (129°C).
Protect against rust and corrosion.
Help keep the proper engine temperature.
Let the warning lights and gages work as
they should.
NOTICE:
When adding coolant, it is important that you use
only
DEX-COOL@ (silicate-free) coolant.
If coolant other than DEX-COOL is added to the
system, premature engine, heater core or
radiator corrosion may result. In addition, the
engine coolant
will require change sooner -- at
30,000 miles (50 000 km) or 24 months,
whichever occurs
first. Damage caused by the use
of coolant other than DEX-COOL@
is not
covered
by your new vehicle warranty.
6-20
-
Page 270 of 346

Downloaded from www.Manualslib.com manuals search engine What to Use
Use a mixture of one-half clean water (preferably
distilled) and one-half
DEX-COOL@ coolant which
won’t damage aluminum parts.
If you use this mixture,
you don’t need to add anything else.
Adding only plain water to your cooling system
can be dangerous. Plain water, or some other
liquid like alcohol, can boil before the proper
coolant mixture will. Your vehicle’s coolant
warning system
is set for the proper coolant
mixture. With plain water or the wrong mixture,
your engine could get too hot but you wouldn’t
get the overheat warning. Your engine could
catch fire and you or others could be burned.
Use
a 50/50 mixture of clean water and
DEX-COOL@ coolant.
NOTICE:
If you use an improper coolant mixture, your
engine could overheat and be badly damaged.
The repair cost wouldn’t be covered by your
warranty. Too much water
in the mixture can
freeze and crack the engine, radiator, heater core
and other parts.
If you have to add coolant more than four times a year,
have your dealer check your cooling system.
NOTICE:
If you use the proper coolant, you don’t have to
add extra inhibitors or additives which claim to
improve the system. These can be harmful.
6-21
Page 276 of 346

Downloaded from www.Manualslib.com manuals search engine What to Add
When you do need brake fluid, use only DOT-3 brake
fluid
-- such as Delco Supreme 11 @ (GM Part
No. 12377967). Use new brake fluid from a sealed
container only.
Always clean
the brake fluid reservoir cap and the area
around the cap before removing it. This will help keep
dirt from entering the reservoir.
With the wrong kind of fluid in your brake
system, your brakes may not work well, or they
may not even work at all. This could cause a
crash. Always use the proper brake fluid.
1
NOTICE:
Using the wrong fluid can badly damage
brake system parts. For example, just a few
drops
of mineral-based oil, such as engine
oil, in your brake system can damage brake
system parts
so badly that they’ll have to be
replaced. Don’t let someone put in the
wrong kind
of fluid.
If you spill brake fluid on your vehicle’s
painted surfaces, the paint finish can be
damaged. Be careful not to spill brake fluid
on your vehicle.
If you do, wash it off
immediately. See “Appearance Care” in
the Index.
Page 295 of 346

Downloaded from www.Manualslib.com manuals search engine Cleaning the Inside of Your Vehicle
Use a vacuum cleaner often to get rid of dust and loose
dirt. Wipe vinyl or leather with a clean, damp cloth.
Your dealer has two cleaners, Multi-Purpose Interior
Cleaner and Capture Non-Solvent Dry Spot and Soil
Remover. They will clean normal spots and stains very
well. You can get GM-approved cleaning products from
your dealer. (See “Appearance Care and Materials” in
the Index.)
Here are some cleaning tips:
Always read the instructions on the cleaner label.
Clean up stains as soon as you can -- before they set.
0 Carefully scrape off any excess stain.
0 Use a clean cloth or sponge, and change to a clean
area often. A soft brush may be used if stains
are stubborn.
If a ring forms after spot cleaning, clean the entire
area immediately or it will set.
Using Multi-Purpose Interior Cle;- ~- - ->
on Fabric
1. Vacuum and brush the area to remove any loose dirt.
2. Always clean a whole trim panel or section. Mask
surrounding trim along stitch or welt lines.
the container label to form thick suds.
3. Mix powdered cleaner following the directions on
4. Use suds only and apply with a clean sponge. Don’t
5. As soon as you’ve cleaned the section, use a sponge saturate the material and don’t rub
it roughly.
to remove the suds.
6. Wipe cleaned area with a clean, damp towel or cloth.
7. Wipe with a clean cloth and let dry.
6-46
-~