Page 11 of 211

Contents
Overview
Controls and features
Cockpit16
Instrument cluster18
Indicator and warning lamps20
Multifunction steering wheel
(MFL)23
Hazard warning flashers24
Warning triangle24
First-aid kit24
Refueling25
Fuel specifications25
Tire inflation pressure26
Locks and security systems:
Keys30
Electronic vehicle
immobilizer31
Central locking system32
Door locks – outside32
Radio remote control33
Door locks – inside36
Luggage compartment lid37
Luggage compartment39
Alarm system40
Electric power windows42
Security glass43
Sliding/Tilt sunroof44
Adjustments:
Seats46
Steering wheel49
Mirrors50
Seat, mirror and steering wheel
memory51
Car Memory, Key Memory53
Passenger safety systems:
Safety belts54
Airbags55
Child restraints57
Child restraint installation58
Child-safety locks58
Driving:
Steering/Ignition lock59
Starting engine59
Switching off engine60Parking brake61
Automatic transmission62
Automatic transmission with
Steptronic65
Turn signal/Headlamp flasher68
Washer/Wiper system/Rain
sensor68
Rear window defroster70
Cruise control70
Everything under control:
Odometer, outside temperature
display72
Tachometer72
Energy control73
Fuel gauge73
Temperature gauge74
Service Interval Display74
Check Control 75
Multi-Information Display
(MID)78
Digital clock79
Onboard computer84
Technology for safety and
convenience:
Park Distance Control PDC90
Automatic Stability Control plus
Traction (ASC+T)/Dynamic Sta-
bility Control (DSC)92
Electronic Damper Control
(EDC)93
Tire Pressure Control (RDC)94
Page 18 of 211
17n
RepairsIndexOverview Controls Car care Technology Data
1 Parking lamps/Low beams96
2
>
Turn signal68
>
Parking lamp97
>
High beams97
>
Headlamp flasher68
>
Onboard computer89
3 Horn: The entire surface
4 Fog lamps97
5 Wiper/Washer lever68
6 Central locking system32
7 Hazard warning system24
8 Rear window defroster70
9 Electric steering wheel
adjustment49
10 Parking brake release handle61
11 Parking brake pedal61
Cockpit
Page 20 of 211

19n
RepairsIndexOverview Controls Car care Technology Data
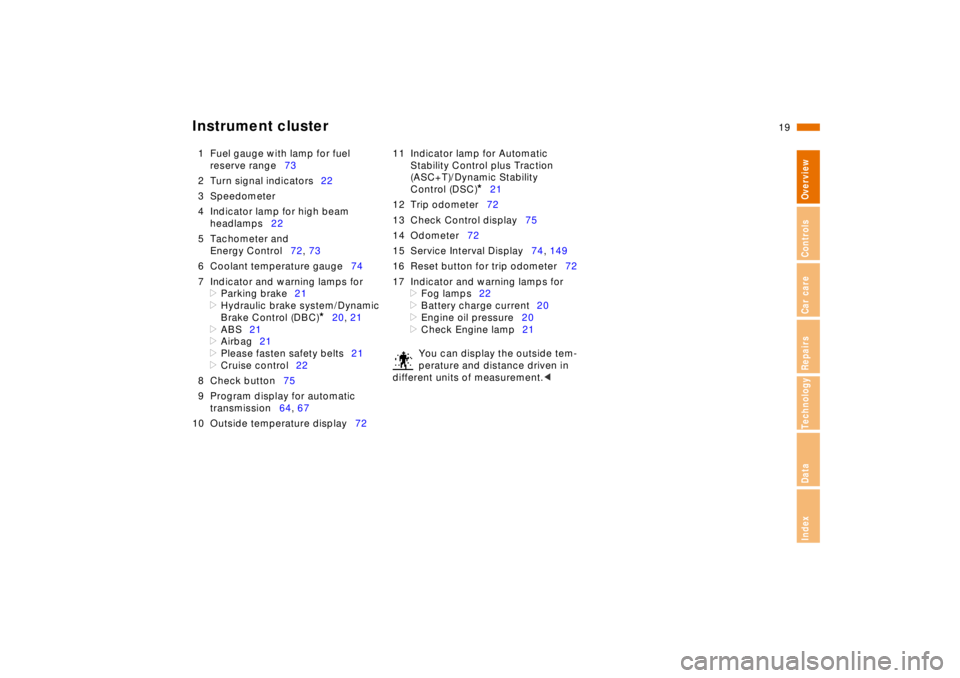
Instrument cluster
1 Fuel gauge with lamp for fuel
reserve range73
2 Turn signal indicators22
3 Speedometer
4 Indicator lamp for high beam
headlamps22
5 Tachometer and
Energy Control72, 73
6 Coolant temperature gauge74
7 Indicator and warning lamps for
>
Parking brake21
>
Hydraulic brake system/Dynamic
Brake Control (DBC)
*
20, 21
>
ABS21
>
Airbag21
>
Please fasten safety belts21
>
Cruise control22
8 Check button75
9 Program display for automatic
transmission64, 67
10 Outside temperature display7211 Indicator lamp for Automatic
Stability Control plus Traction
(ASC+T)/Dynamic Stability
Control (DSC)
*
21
12 Trip odometer72
13 Check Control display75
14 Odometer72
15 Service Interval Display74, 149
16 Reset button for trip odometer72
17 Indicator and warning lamps for
>
Fog lamps22
>
Battery charge current20
>
Engine oil pressure20
>
Check Engine lamp21
You can display the outside tem-
perature and distance driven in
different units of measurement.
<
Page 23 of 211
22n
Indicator and warning lamps
Green: For your information
Turn signal
Flashes when the turn signals
are in operation. Rapid flashing
indicates a system malfunction.
For additional information: Refer to
page 68.
Cruise control
Lights up when the cruise con-
trol is activated. Available for
operation via the multi-function steering
wheel.
For additional information: Refer to
page 70.
Fog lamps
Lights up whenever you switch
on the fog lamps.
For additional information: Refer to
page 97.
Blue: For your information
High beam
Lights up when the high beams
are on or the headlamp flasher
is actuated.
For additional information: Refer to
pages 68, 97.
Page 69 of 211

68n
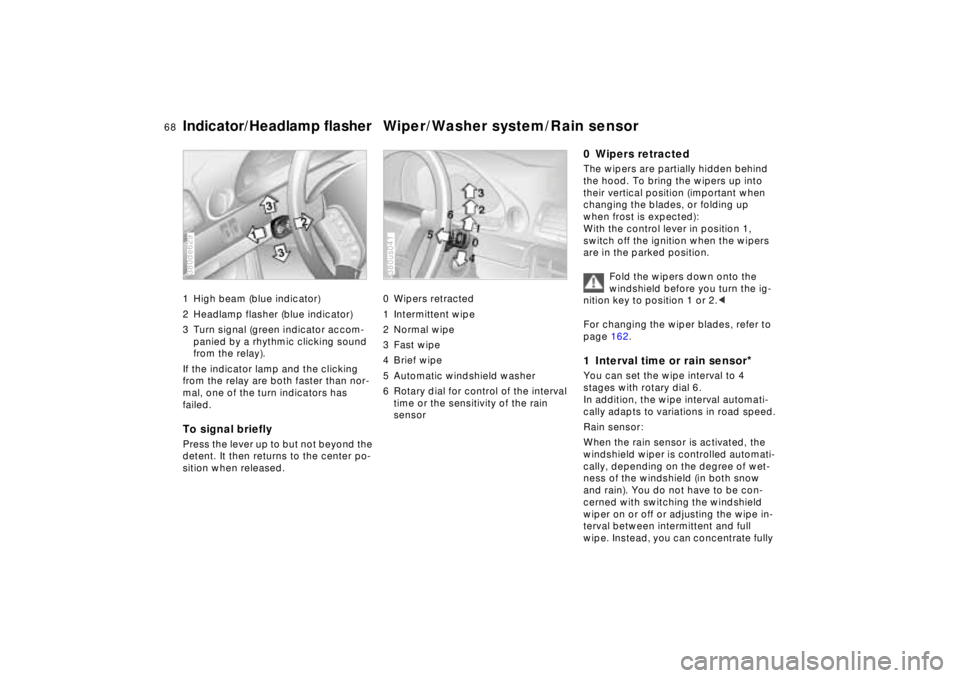
Indicator/Headlamp flasher Wiper/Washer system/Rain sensor1 High beam (blue indicator)
2 Headlamp flasher (blue indicator)
3 Turn signal (green indicator accom-
panied by a rhythmic clicking sound
from the relay).
If the indicator lamp and the clicking
from the relay are both faster than nor-
mal, one of the turn indicators has
failed.To signal brieflyPress the lever up to but not beyond the
detent. It then returns to the center po-
sition when released.380de629
0 Wipers retracted
1 Intermittent wipe
2 Normal wipe
3 Fast wipe
4 Brief wipe
5 Automatic windshield washer
6 Rotary dial for control of the interval
time or the sensitivity of the rain
sensor380us041
0 Wipers retractedThe wipers are partially hidden behind
the hood. To bring the wipers up into
their vertical position (important when
changing the blades, or folding up
when frost is expected):
With the control lever in position 1,
switch off the ignition when the wipers
are in the parked position.
Fold the wipers down onto the
windshield before you turn the ig-
nition key to position 1 or 2.<
For changing the wiper blades, refer to
page 162.1 Interval time or rain sensor
*
You can set the wipe interval to 4
stages with rotary dial 6.
In addition, the wipe interval automati-
cally adapts to variations in road speed.
Rain sensor:
When the rain sensor is activated, the
windshield wiper is controlled automati-
cally, depending on the degree of wet-
ness of the windshield (in both snow
and rain). You do not have to be con-
cerned with switching the windshield
wiper on or off or adjusting the wipe in-
terval between intermittent and full
wipe. Instead, you can concentrate fully
Page 73 of 211

72n
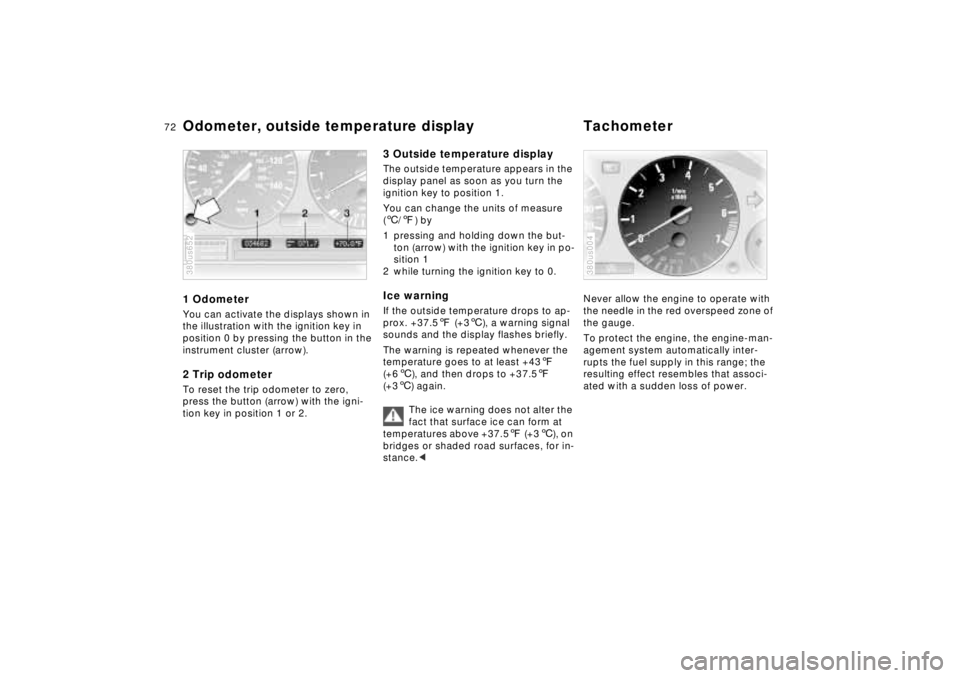
Odometer, outside temperature display Tachometer1 OdometerYou can activate the displays shown in
the illustration with the ignition key in
position 0 by pressing the button in the
instrument cluster (arrow).2 Trip odometerTo reset the trip odometer to zero,
press the button (arrow) with the igni-
tion key in position 1 or 2.380us652
3 Outside temperature displayThe outside temperature appears in the
display panel as soon as you turn the
ignition key to position 1.
You can change the units of measure
(6/7) by
1 pressing and holding down the but-
ton (arrow) with the ignition key in po-
sition 1
2 while turning the ignition key to 0.Ice warningIf the outside temperature drops to ap-
prox. +37.57 (+36), a warning signal
sounds and the display flashes briefly.
The warning is repeated whenever the
temperature goes to at least +437
(+66), and then drops to +37.57
(+36) again.
The ice warning does not alter the
fact that surface ice can form at
temperatures above +37.57 (+36), on
bridges or shaded road surfaces, for in-
stance.<
Never allow the engine to operate with
the needle in the red overspeed zone of
the gauge.
To protect the engine, the engine-man-
agement system automatically inter-
rupts the fuel supply in this range; the
resulting effect resembles that associ-
ated with a sudden loss of power.380us004
Page 90 of 211
89n
RepairsIndexOverview Controls Car care Technology Data
Onboard computerRemote controlYou can display all information for the
onboard computer and digital clock
with the switch in the turn signal lever.
You can also display selected informa-
tion in the Check Control in the instru-
ment cluster following specific entries.
To enter:
1 Press the control in the turn signal
lever until "Prog 1" appears in the
display
2 Press the buttons on the MID in the
sequence in which you want the in-
formation to be displayed.
The program number is counted in
the display every time information is
stored
3 Press the SET key.380de630
If you wish to display all data:
1 Press the control in the turn signal
lever until "Prog 1" appears in the
display
2 Press the SET key.
Data request:
Briefly press the switch in the turn sig-
nal lever for each data request.
Page 98 of 211
97n
RepairsIndexOverview Controls Car care Technology Data
High beams/Parking lampsFog lamps Interior lamps1 High beam
(blue indicator lamp)
2 Headlamp flasher
(blue indicator lamp)
3 Parking lamp
(not released at this time)Parking lamp, left or right
*
With the ignition key in position 0, en-
gage the lever in the appropriate turn-
signal position.380de629
Front fog lamps
A green indicator light appears in
the instrument cluster to indicate
that the front fog lamps are on.
If the high beam is switched on, the fog
lamps go out.
380us037
The interior lamps operate automati-
cally.Switching interior lamps on
and offPress the button (arrow).
If you want the interior lamps to remain
off continuously, maintain pressure on
the button for approximately 3 seconds.
Press the button briefly to revert to nor-
mal operation.
The orientation lamps on the right and
left of the button for interior lamps
come on when the side lamps are
switched on.380us640