Page 17 of 40
19-14
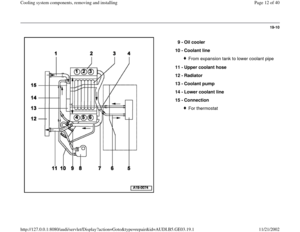
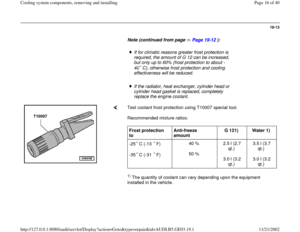
- Replace coolant drain plug O-ring and install
coolant drain plug into engine.
Tightening torque: 20 Nm (15 ft lb).
- Install lower right coolant hose and secure with
retaining clip.
- Secure coolant drain valve to radiator.
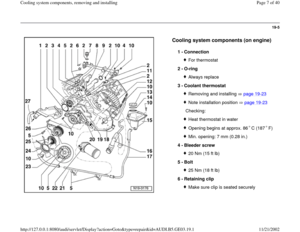
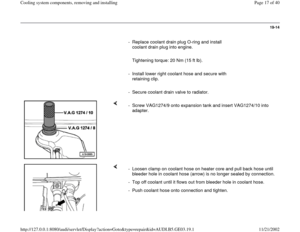
- Screw VAG1274/9 onto expansion tank and insert VAG1274/10 into
adapter.
- Loosen clamp on coolant hose on heater core and pull back hose until
bleeder hole in coolant hose (arrow) is no longer sealed by connection.
- Top off coolant until it flows out from bleeder hole in coolant hose.
- Push coolant hose onto connection and tighten.
Pa
ge 17 of 40 Coolin
g system com
ponents, removin
g and installin
g
11/21/2002 htt
p://127.0.0.1:8080/audi/servlet/Dis
play?action=Goto&t
yp
e=re
pair&id=AUDI.B5.GE03.19.1
Page 18 of 40
19-15
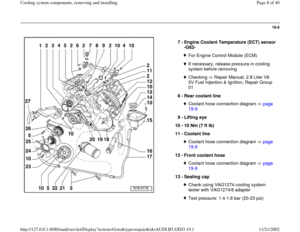
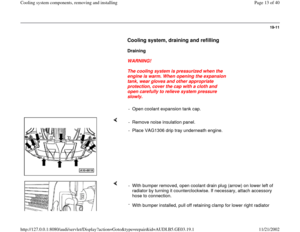
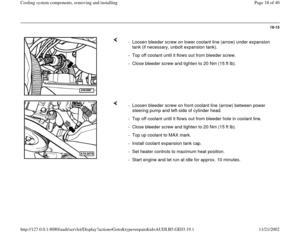
- Loosen bleeder screw on lower coolant line (arrow) under expansion
tank (if necessary, unbolt expansion tank).
- Top off coolant until it flows out from bleeder screw.
- Close bleeder screw and tighten to 20 Nm (15 ft lb).
- Loosen bleeder screw on front coolant line (arrow) between power
steering pump and left-side of cylinder head.
- Top off coolant until it flows out from bleeder hole in coolant line.
- Close bleeder screw and tighten to 20 Nm (15 ft lb).
- Top up coolant to MAX mark.
- Install coolant expansion tank cap.
- Set heater controls to maximum heat position.
- Start engine and let run at idle for approx. 10 minutes.
Pa
ge 18 of 40 Coolin
g system com
ponents, removin
g and installin
g
11/21/2002 htt
p://127.0.0.1:8080/audi/servlet/Dis
play?action=Goto&t
yp
e=re
pair&id=AUDI.B5.GE03.19.1
Page 19 of 40
19-16
- Raise engine speed to approx. 2000 rpm for
approx. 5 minutes.
- Allow engine to idle until lower coolant hose on
radiator is hot.
- Check coolant level and top-off if necessary.
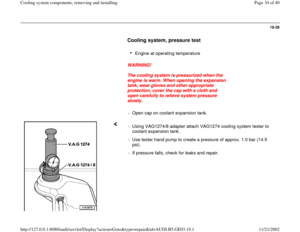
When engine is at normal operating
temperature, coolant level must be on MAX
mark. When engine is cold, coolant level must
be between MIN and MAX marks.
WARNING!
The cooling system is pressurized when the
engine is warm. When opening the expansion
tank, wear gloves and other appropriate
protection, cover the cap with a cloth and
open carefully to relieve system pressure
slowly.
Pa
ge 19 of 40 Coolin
g system com
ponents, removin
g and installin
g
11/21/2002 htt
p://127.0.0.1:8080/audi/servlet/Dis
play?action=Goto&t
yp
e=re
pair&id=AUDI.B5.GE03.19.1
Page 20 of 40
19-17
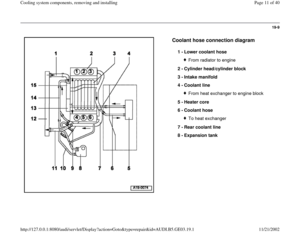
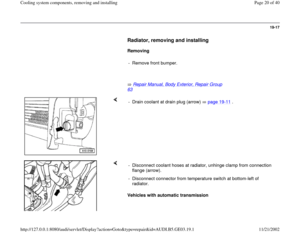
Radiator, removing and installing
Removing
- Remove front bumper.
Repair Manual, Body Exterior, Repair Group
63
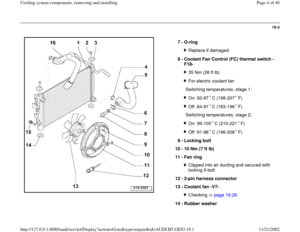
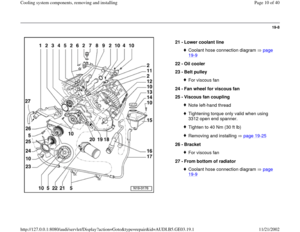
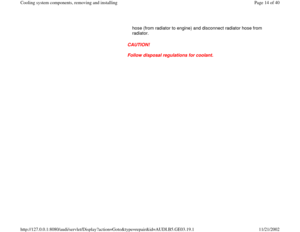
- Drain coolant at drain plug (arrow) page 19
-11
.
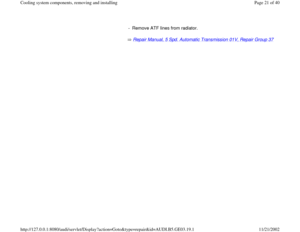
Vehicles with automatic transmission - Disconnect coolant hoses at radiator, unhinge clamp from connection
flange (arrow).
- Disconnect connector from temperature switch at bottom-left of
radiator.
Pa
ge 20 of 40 Coolin
g system com
ponents, removin
g and installin
g
11/21/2002 htt
p://127.0.0.1:8080/audi/servlet/Dis
play?action=Goto&t
yp
e=re
pair&id=AUDI.B5.GE03.19.1
Page 21 of 40
Repair Manual, 5 Spd. Automatic Transmission 01V, Repair Group 37
- Remove ATF lines from radiator.
Pa
ge 21 of 40 Coolin
g system com
ponents, removin
g and installin
g
11/21/2002 htt
p://127.0.0.1:8080/audi/servlet/Dis
play?action=Goto&t
yp
e=re
pair&id=AUDI.B5.GE03.19.1
Page 22 of 40
19-18
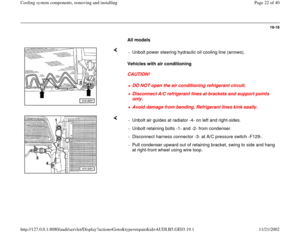
All models
Vehicles with air conditioning
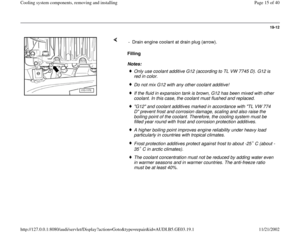
CAUTION! - Unbolt power steering hydraulic oil cooling line (arrows).
DO NOT open the air conditioning refrigerant circuit.Disconnect A/C refrigerant lines at brackets and support points
only. Avoid damage from bending. Refrigerant lines kink easily.
- Unbolt air guides at radiator -4- on left and right-sides.
- Unbolt retaining bolts -1- and -2- from condenser.
- Disconnect harness connector -3- at A/C pressure switch -F129-.
- Pull condenser upward out of retaining bracket, swing to side and hang
at right-front wheel using wire loop.
Pa
ge 22 of 40 Coolin
g system com
ponents, removin
g and installin
g
11/21/2002 htt
p://127.0.0.1:8080/audi/servlet/Dis
play?action=Goto&t
yp
e=re
pair&id=AUDI.B5.GE03.19.1
Page 23 of 40
19-19
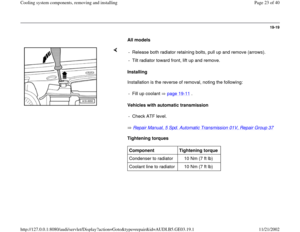
All models
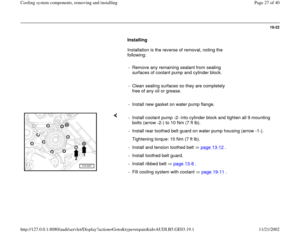
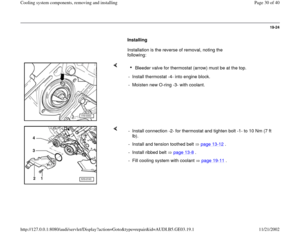
Installing
Installation is the reverse of removal, noting the following:
Vehicles with automatic transmission
Repair Manual, 5 Spd. Automatic Transmission 01V, Repair Group 37
Tightening torques - Release both radiator retaining bolts, pull up and remove (arrows).
- Tilt radiator toward front, lift up and remove.
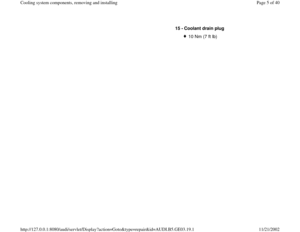
- Fill up coolant page 19
-11
.
- Check ATF level.Component
Tightening torque
Condenser to radiator 10 Nm (7 ft lb)
Coolant line to radiator 10 Nm (7 ft lb)
Pa
ge 23 of 40 Coolin
g system com
ponents, removin
g and installin
g
11/21/2002 htt
p://127.0.0.1:8080/audi/servlet/Dis
play?action=Goto&t
yp
e=re
pair&id=AUDI.B5.GE03.19.1
Page 24 of 40
19-20
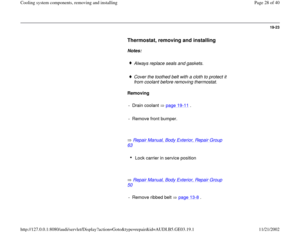
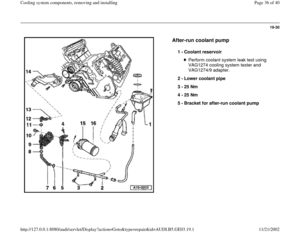
Coolant pump, removing and installing
Notes:
Always replace seals and gaskets.
Cover the toothed belt with a cloth to protect it
from coolant before removing the coolant pump.
Removing
- Remove front bumper.
Repair Manual, Body Exterior, Repair Group
63
- Move lock carrier into service position.
Repair Manual, Body Exterior, Repair Group
50
- Remove ribbed belt page 13
-8 .
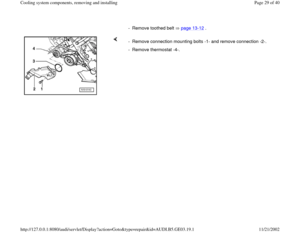
- Remove toothed belt page 13
-12
.
Pa
ge 24 of 40 Coolin
g system com
ponents, removin
g and installin
g
11/21/2002 htt
p://127.0.0.1:8080/audi/servlet/Dis
play?action=Goto&t
yp
e=re
pair&id=AUDI.B5.GE03.19.1


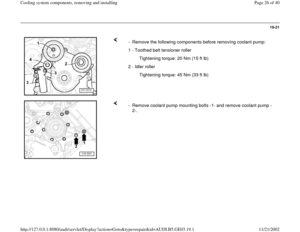
.
- Install lower right coolant hose and secure with")
 under expansion
tank (if necessary, unbolt expansion tank).
- Top off coolant until it flows out from bleeder screw.
- Close blee")


.
DO NOT open the air conditioning refrigerant circuit.Disconnect A/")

