Page 714 of 1680

\
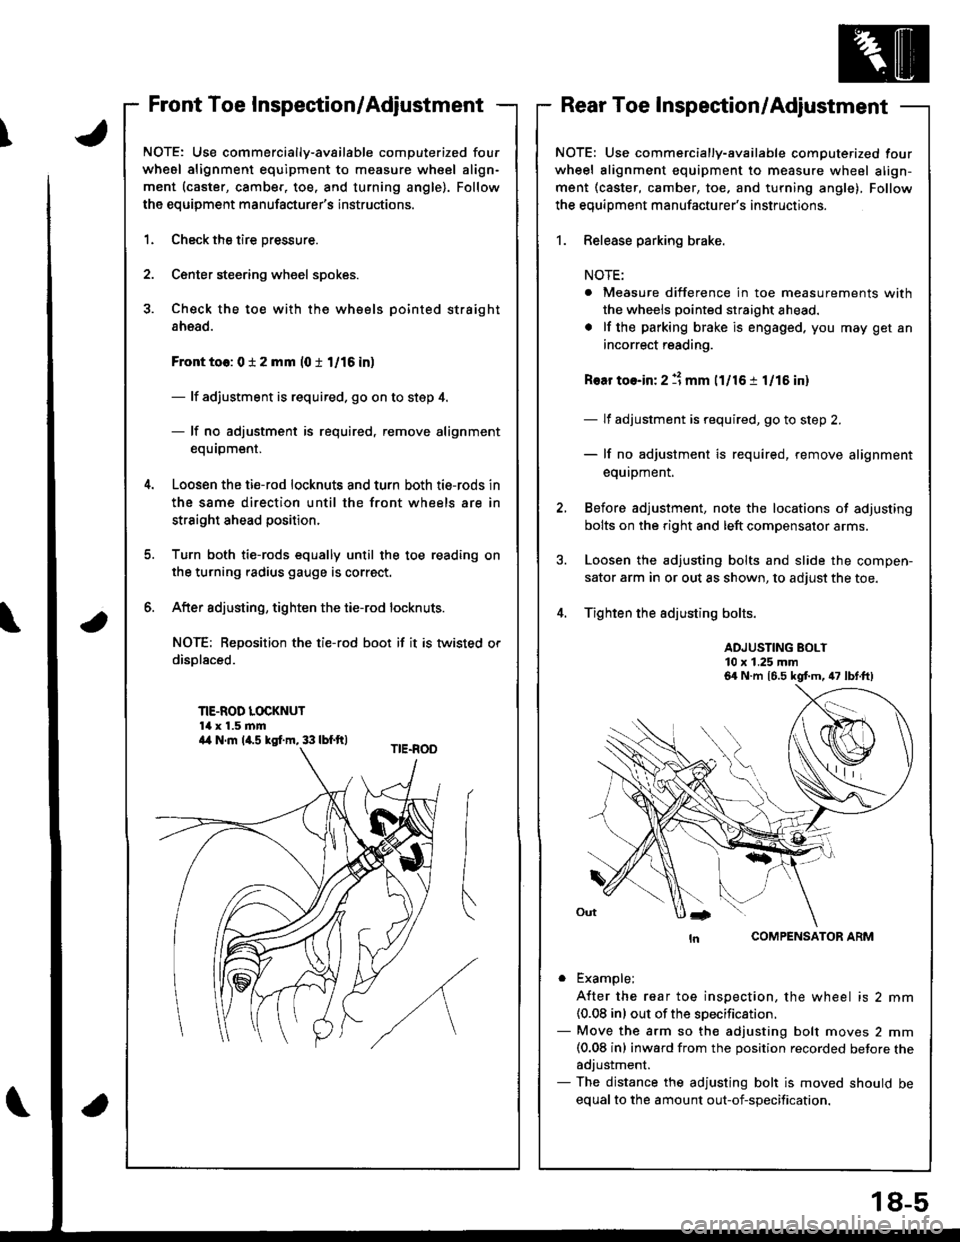
Front Toe Inspection/AdjustmentRear Toe Inspection/Adjustment
NOTE: Use commercially-available computerized four
whesl alignment equipment to measure wheel align-
ment (caster, camber, toe. and turning angle). Follow
the equipment manufacturer's instructions.
1.
2.
Check the tire pressure.
C€nter steering wheel spokes.
Check the toe with the wh€els pointed straight
ahead.
Front to6: 0 i 2 mm (0 t 1/16 in)
- lf adjustment is required. go on to step 4.
- lf no adjustment is required, remove alignment
equrpm€nr,
Loosen the ti€-rod locknuts and turn both tie-rods in
the same direction until the front wheels are in
straight ahead position.
Turn both tie-rods equally until the toe reading on
the turning radius gauge is correct.
After sdjusting, tighten the tie-rod locknuts.
NOT€: Reposition the tie-rod boot if it is twisted or
displaced.
TIE-ROD LOCKNUT14 x 1.5 mm
6.
a
NOTE: Use commercially-available computerized four
wheel alignment equipment to measure wheel align-
ment (caster, camber, toe, and turning angle), Follow
the equiDment manufacturer's instructions.
1. Release parking brake.
NOTE:
. Measure difference in toe measurements with
the wheels pointed straight ahead.
. lf the parking brake is engaged. you may get an
incorrect reading.
Rear toe-in: 2 11 mm l1l16 i 1/15 in)
- lf adjustment is required, go to step 2.
- lf no adjustment is required, remove alignment
equipment.
Before adjustment, note the locations of adjusting
bolts on the right and left compensator arms.
Loosen the adjusting bolts and slide the compen-
sator arm in or out as shown, to adjust the toe.
Tighten the adjusting bolts.
ADJUSTING BOLT10 x 1.25 mm
COMPENSATOR ARM
. Example;
A{ter the rear toe inspection, the wheel is 2 mm(0.08 inl out of the soecification.- Move the arm so the adjusting bolt moves 2 mm(0.08 inl inward from the position recorded betore theadjustment.- The distance the adjusting bolt is moved should be
equal to the amount out-of-specification.
6a N.m 16.5 kgt m, 47 lbt.ft)
a4 N.m la.s kgI.m, 33 lbf.ft)
18-5
Page 717 of 1680

Front Suspension
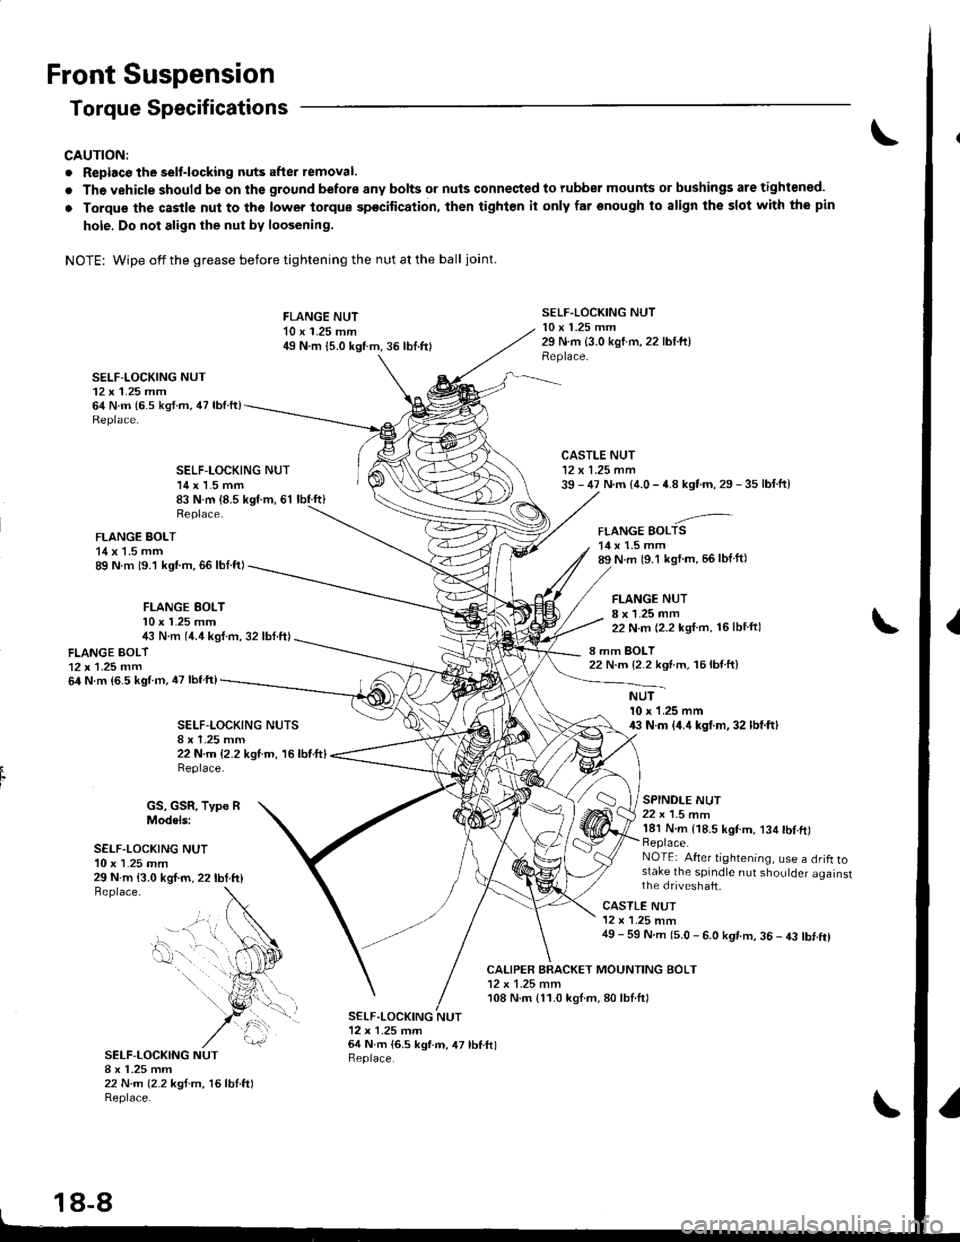
Torque Specifications
CAUTION:
. Replacc the selt-locking nuts after removal.
. The vehicle should be on the ground before any bolts or nuls connected to rubber mounts or bushings are tightoned.
o Torque thc castle nut to the lower torque spocitication, then tighten it only far onough to align the slot with the pin
hole. Do not align the nut bv loosening.
NOTE: Wipe offthegrease before tightening the nutatthe ball joint.
SELF-LOCKING NUT12 x 1.25 mm64 N.m (6.s ksf.m, 47 lbfft)
FLANGE NUT10 x 1.25 mm49 N.m {5.0 kgtm.36 lbt.frl
SELF.LOCKING NUT10 x 1.25 mm29 N.m {3.0 kgtm,22 lbl.ft)Replace.
CALIPER BRACKET MOUNTING BOLT12 x 1.25 mm108 N.m {11.0 kgl.m,80lbl.ftl
SELF-LOCKING NUT14 x 1.5 mm83 N.m {8.5 kgf.m, 61 lbf.ft}
CASTLE NUT12 x 1.25 mm39 - 47 N.m {4.0 - 4.8 kgtm, 29 - 35 lbf.ft}
-'-FLANGE BOLTS14 x 1.5 mm89 N.m (9.1 kgl m, 56lblft)
FLANGE NUT8 x 1.25 mm22 N.m (2.2 kgf.m, 16lbtftl
8 mm BOLT22 N.m {2.2 ksnm, 16lb{ ft}
Replace.
FLANGE BOLT14 x 1.5 mm89 N m 19.1 kgt.m,66 lbl.ftl
FLANGE EOLTl0 x l�25 mm4i, N.m (4.4 kgl.m, 32 lbf.ft)
FLANGE BOLT12x 1.25 mm64 N.m (6.5 kgtm, iU lbfftl
SELF-I-OCKING NUTS
22 N.m {2.2 kgtm, 16lbtftlReplace.
NUT10 x 1.25 mm43 N.m {4.4 kgt.m,32 lbf.ftl
SPINDLE NUT22 x 1.5 nm181 N.m {18.5 kgtm. 134 tbl.ft)Replace.NOTEi After tightening, use a drifl tostake the spindle nut shoulder againstthe dfiveshaft,29 N.m {3.0 kgf.m, 22lbtttlBeplace.
GS, GSR, Type RModels:
SELF.LOCKING NUT10 x 1.25 mm
SELF-LOCKING NUTI x 1.25 mm22 N.m (2.2 ksf.m, 16lbl.ftlReplace-
CASTLE NUT12 x '1.25 mm49 - 59 N.m (5.0 - 6.0 kgt m, 36 - 43 tbt.ftl
SELF.LOCKING NUT12x 1-25 tnrn64 N.m 16.5 kgl.m, 47 lbf.ftlReplace.
- --.." t,..
0-. .
18-8
Page 720 of 1680

1.
Knuckle Removal
Loosen the wheel nuts slightly.
Raise the front of vehicle. and support it with safetystands in the proper locations {see section l ).
B€move the wheel nuts and front wheel.
SPINDLE NUT22 x 1.5 mmReplace.
Raise the locking tab on the
remove the nut.
spindle nut. then
Remove the brake hose mounting bolts.
Remove the caliper bracket mounting bolts, andhang the caliper to one side.
CAUTION: To pravant accidental damage to thgcaliper or braks hoso, use a shqrt piece of wirs tohsng the c8liper flom the undercarriage.
CALIPER BRACKET MOUNTING BOLTS12 x 1.25 mm
7, Remove the 6 mm brake disc retaining screws.
BRAKE DISCCheck for wear and rust.Inspection, section j9.
8. Screw the two I x L25 mm bolts into the disc topush it awav from the hub.
NOTE: Turn each bolt two turns at a time to pre-
vent cocking the disc excessively.
Remove the brake disc from the knuckle.
Check the front hub for damage or cracks.
Remove the wheel sensor wire bracket, thenremove the wheel sensor lrom the knuckle (for vehi-cles with ABS).
NOTE: Do not disconnect the wheel sensor connec-ror.
4.
6.
10.
11.
WHEEL SENSOFWIRE BRACKET
FRONT WHEEL
8 x 1.25 mm BOLTS
WHEEL SENSOR(cont'd)
Page 729 of 1680
Front Suspension
Removal/lnspection
CAUTION:
. Replacs ihe self-locking nuts after r6moval'
SELF-LOCKING NUT12 x 'l.25 mmReplace.
UPPER ARMCheck the bushing for deterioration and damage.
Suspension Arms
818 Cl and B18C5
Engin6 Mod.ls:
SELF.LOCKING NUT10 x 1.25 mmReplace.
BALL JOINT BOOT. Check for deterioration and damage.' See page 18 19 for boot replacement.
STABILIZER BARCheck for bending and damage.
SELF-LOCKING NUTx 1-25 mmReolace,
14 x 1.5 mm
SELF.LOCKING NUT14 x 1.5 mmReplace.
FLANGE BOLTS14 x l.5 mm
FLANGE BOLT10 x 1.25 mmCheck for deteriorationano oamage,LOWER ARMCheck for damage.LOWER ARMRUBBER BUSHING. Check for deteriorationano oamage.. See page 18-22 tor
OAMPER FORKCheck for damage
bushing replacement.
and damage.
STABILIZER ENDRUBBER BUSHINGCheck f or deterioration
-LOCKING NUT12 x 1.25 mmReplace.
OAMPER FORKRUBBER BUSHING. Check for deterioration and damage.. See page 18 22 for bushing replacement.
STABILIZER LINK
1A-20
Page 730 of 1680

lnstallation
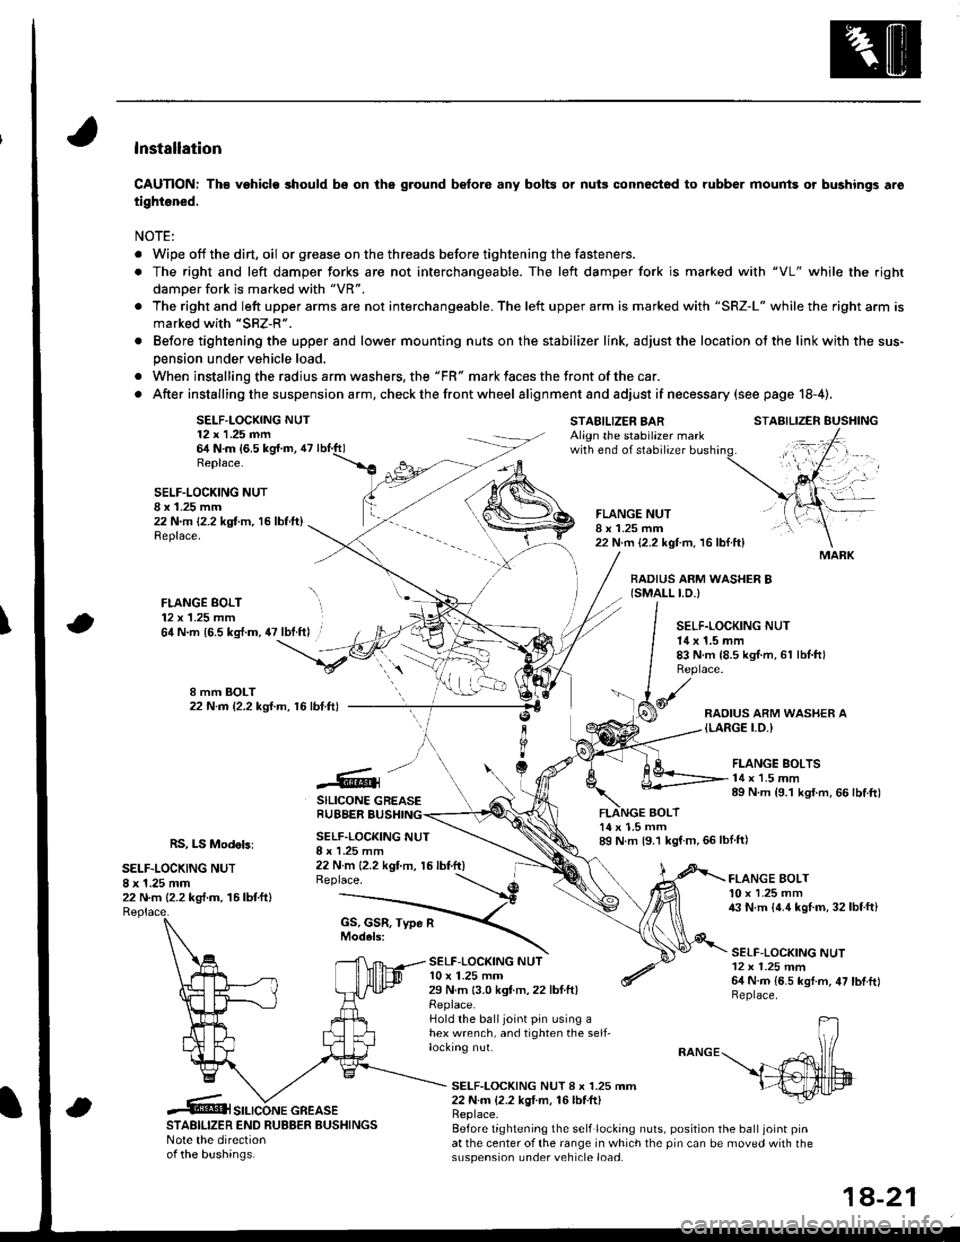
CAUTION: Th€ vehiclo should bs on the ground b€fore any bolts or nuis connectod to rubber mounis or bushings aro
tightened.
NOTE:
. Wipe off thedirt,oil or gr€ase on the threads before tightening the fasteners.
. The right and left damper forks are not interchangeable. The left damper fork is ma.ked with "VL" while the righr
damoer fork is marked with "VR".
. The right and left upper arms are not interchangeable. The left upper arm is marked with "SRZ-L" while the right arm is
marked with "SRZ-R".
. Before tightening the upper and lower mounting nuts on the stabilizer link, adjust the location ot the link with the sus-
pension under vehicle load.
. When installing the radius arm washers, the "FR" mark faces the front ofthe car.
. After installing the suspension a rm, check the front wheel alignmentand adjust if necesssry (see page 18-4).
SELF-LOCKING NUT12 x 1.25 nn64 N.m {6,5 kg{.m, 47Replace.
STABILIZER BARAlign the stabilazer markwith end of stabilizer
BOLT
STABILIZER EUSHING
SELF.LOCKING NUTI x 1.25 mm22 N.m 12.2 kgt m, 16 lbf.ft)Replace.
FLANGE BOLT12 x 1.25 mm
FLANGE NUTI x 1.25 mm22 N.m {2.2 kgt m. 16 lbf.ft}
BADIUS ARM WASHER B{SMALL I.D.)
\64 N.m {6.5 kg{.m, 47 lbt.ft) .SELF.LOCKING NUT14 x 1.5 mm83 N.m {8.5 kgI.m, 61 lbl.ftlReplace.
RAOIUS ARM WASHER A{LARGE I.O.I
.@]
SILICONE GREASERUBBER BUSHING
FLANGE BOLTS14 x 1.5 mm89 N.m {9.1 kgf.m, 66 lbtft)
RS, LS Modebi
SELF.LOCKING NUT8 x 1.25 mm22 N.m (2.2 kg,f.m. 16lbtftl
SELF.LOCKING NUTI x I .25 mm22 N m {2.2 kgt'm, 15 lbf.ft)Replace.
14 x 1.5 mm89 N m {9.1 kgf m,66lblft)
SELF-LOC(ING NUTl0 x 1.25 mm29 N.m 13.0 kgf.m,22 lbtftlReplace.Hold the balljoint pin using ahex wrench, and tighten the self-locking nut.
FLANGE BOLT10 x 1.25 mm43 N.m {4.4 kgl.m, 32lbf.ft}
SELF-LOCKING NUT12 x 1.25 mm64 N.m {6.5 kgf.m, 47 lbtftlReplace.
SELF-LOCKING NUT 8 x 1.25 mm22 N.m {2.2 kgI m, 16lbf.ft)
STABILIZER END RUBBER BUSHINGSNote the directionof the bushinas.
Replace.Before tightening the self locking nuts, position the ball joint pinat the center of the range in which the pin can be moved with thesuspension under vehicle load.
MARK
SILICONE GREASE
1A-21
Page 731 of 1680

Front Damper
FLANGE BOLT10 x'1.25 mm
1.
4.
Removal
Remove thefrontwheels (see page 18-'11).
Remove the brake hose mounting bolts from the
damper.
Remove the flange bolt.
Remove the flange bolt and self-locking nut, then
remove the damper fork.
MOUNTING BOLT{8 x 16 mm)
Disassembly/lnspection
Disassembly
1. Compress the damper spring with the spring com-
pressor according to the manufacturer's instruc-
tions. then remove the self-locking nut.
CAUTION: Do nol compros3 tho 3pring morc than
nocessary to romovo th€ nut.
DAMPER FORK
FLANGE BOLT
SELF.LOCKING10 x 1.25 mmReplace.
COMPRESSORIlComm.rci.lly .Yrll.blclARAN|CKO T/N MST-580A, T/N 72IX',or aouivalant
Remove the damper by removing the two flange
n uts.
2, Remove the spring compressor, then disassemble
the damper as shown on the neld page.
Inspection
1. Reassemble all parts, exceptthe spring,
2, Push on the damper as shown.
3. Check for smooth operation through a full stroke,
both compression and extension.
NOTE: The damper should move smoothly. lf it
does not (no compression or no extension), the gas
is leaking, and the damper should be replaced.
Check for oil leaks, abnormal noises or binding dur-
ing these tests.
BMKE HOSE MOUNTING BOLT(8 x 20 mml
/GS, GSR, Type R Mod6ls: \l8x25mm I
18-22
Page 732 of 1680
Disassembly/lnspection
Inspection
All oxcspt Type R Models:
Replace.
DAMPER MOUNTING WASHERChsck for weakn6ss.
EUMP STOPCheck tor weakness anddamage.
Type R Model:
SELF.LOCKING NUT10 x 1.25 mm29 N.rr| (3.0 kgf.m, 22 lbf.ft)SELF.LOCKING NUT \10 x 1.25 mm \29 N.rh {3.0 lgfm, 22 lbtftl \Replace. \
DAMPERRUBBERCheck fordeteriorationano oamage.
DAMPER MOUNNNGBASE
DAMPER MOUNNNGRUBBER
DAMPER MOUNTING COLLAR
DAMPER MOUNTINGRUBAERCheck fordeteriorationano oamage.
DAMPER MOUNTNGRUBBERCheckfordeteriorationano oamage,
SPRING MOUNNNG RUABERCheck for deterio.ationano oamage.
SPRING MOUNTING RUBBERCheck for detoriorationand damage.
Check for weakened, compressionand damage.
DUST COVER PLATE
DAMPEB SPRINGCheck tor weakendcompressionor damago,
Check tor weakness anddamage.
BUMPER STOP
:fftt;'"::'"''-"'"" _--4
oampea rnoun-nruc / agEcoLLAR ,_-lVDAMPERMOUNTING- Gb@
DAMP€R UNIT
DAMPER UNIT
18-23
Page 733 of 1680
Front Damper
Reassembly
Install the damper unit on a spring compressor'
NOTE: Follow the manufacturer's instructions.
Assemble the damper in reverse order of disassem-
bly except the damper mounting washer and selt
locking nut.
NOTE: Align the bottom of damper spring and
spring lower seat as shown.
Position the damper mounting base on the damper
unit as shown.
61'30'13'
I
STRUT SPRING COMPRESSOR:
{Commercially available)BBANICKO T/N MST-580A, T/N 7200,or equivalentSPRING LOWER SEAT
ALIGNINGTAB
GfL
lr
rl
I
1a-24
Compress the damper spring with the sprlng com-
pressor.
Install the damper mounting washer, and loosely
install a new self-locking nut.
Hold the damper shaft with a hex wrench and tight-
en the self-locking nut.
SELF-LOCKING NUT10 x 1.25 mm29 N.m {3.0 kgt.m, 22 lbI.ft)Replace.