Page 900 of 1680

Moonroof
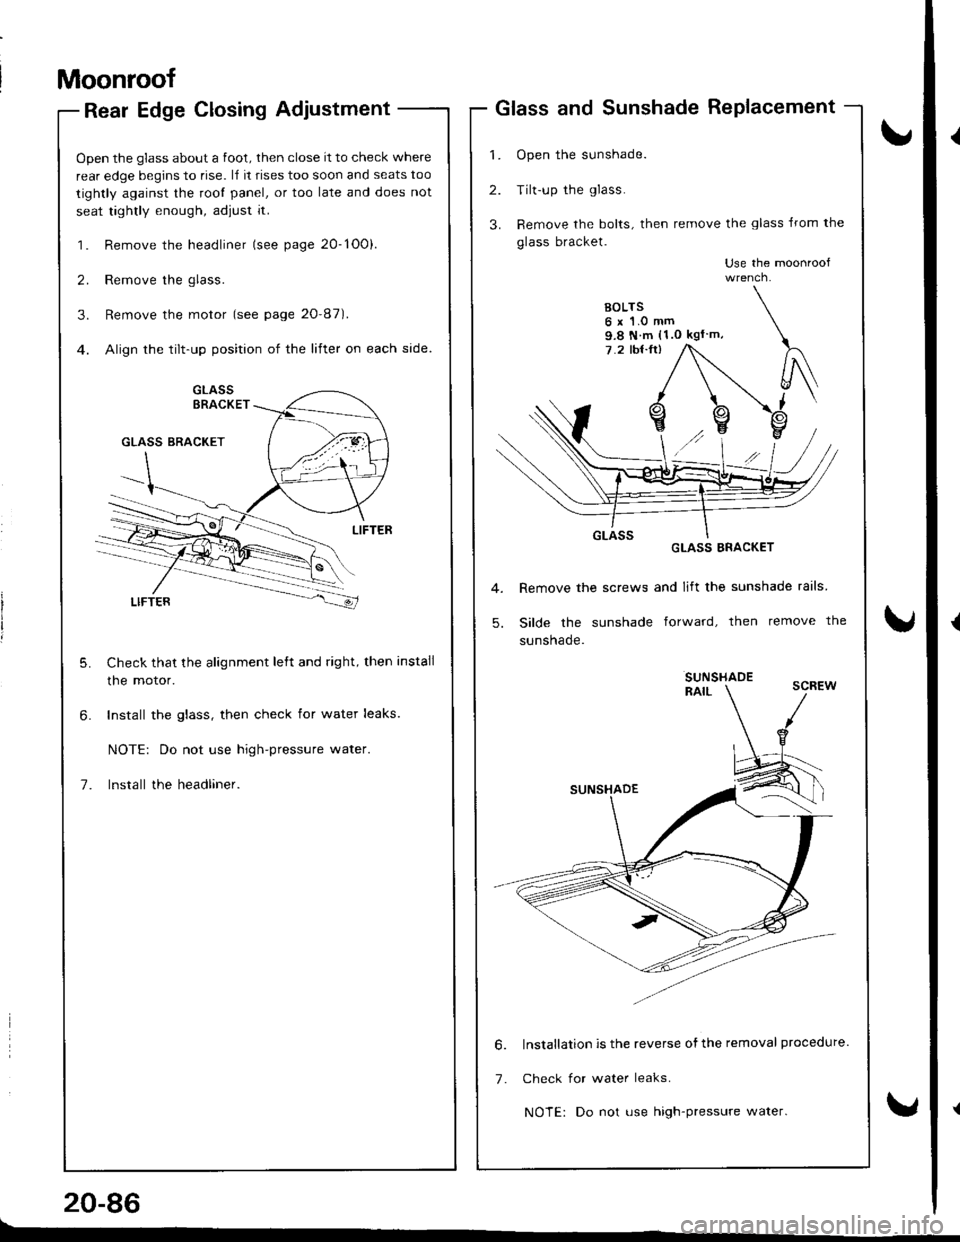
Rear Edge Closing Adjustment
Open the glass about a foot, then close it to check where
rear edge begins to rise. l,f it rises too soon and seats too
tightly against the root panel, or too late and does not
seat tightly enough, adjust it.
1. Remove the headliner (see page 20-1O0).
2. Remove the glass.
3. Remove the motor (see page 20'87).
4. Align the tilt-up position of the lifter on each side.
Check that the alignment left and right, then install
the motor.
Install the glass, then check for water leaks.
NOTE: Do not use high-pressure water.
lnstall the headliner.
20-86
Glass and Sunshade RePlacement
1. Open the sunshade.
2. Tilt-up the glass.
3. Remove the bolts, then remove the glass lrom the
glass bracket.
Use the moonroof
GLASS ERACKET
Remove the screws and lift the sunshade rails
Silde the sunshade forward, then remove the
sunsnaqe.
SUNSHADERAIL
lnstallation is the reverse ofthe removal procedure.
Check for water leaks.
NOTE: Do not use high-pressure water.
9.8 N m (1.0 kgl m,
6.
7.
Page 901 of 1680

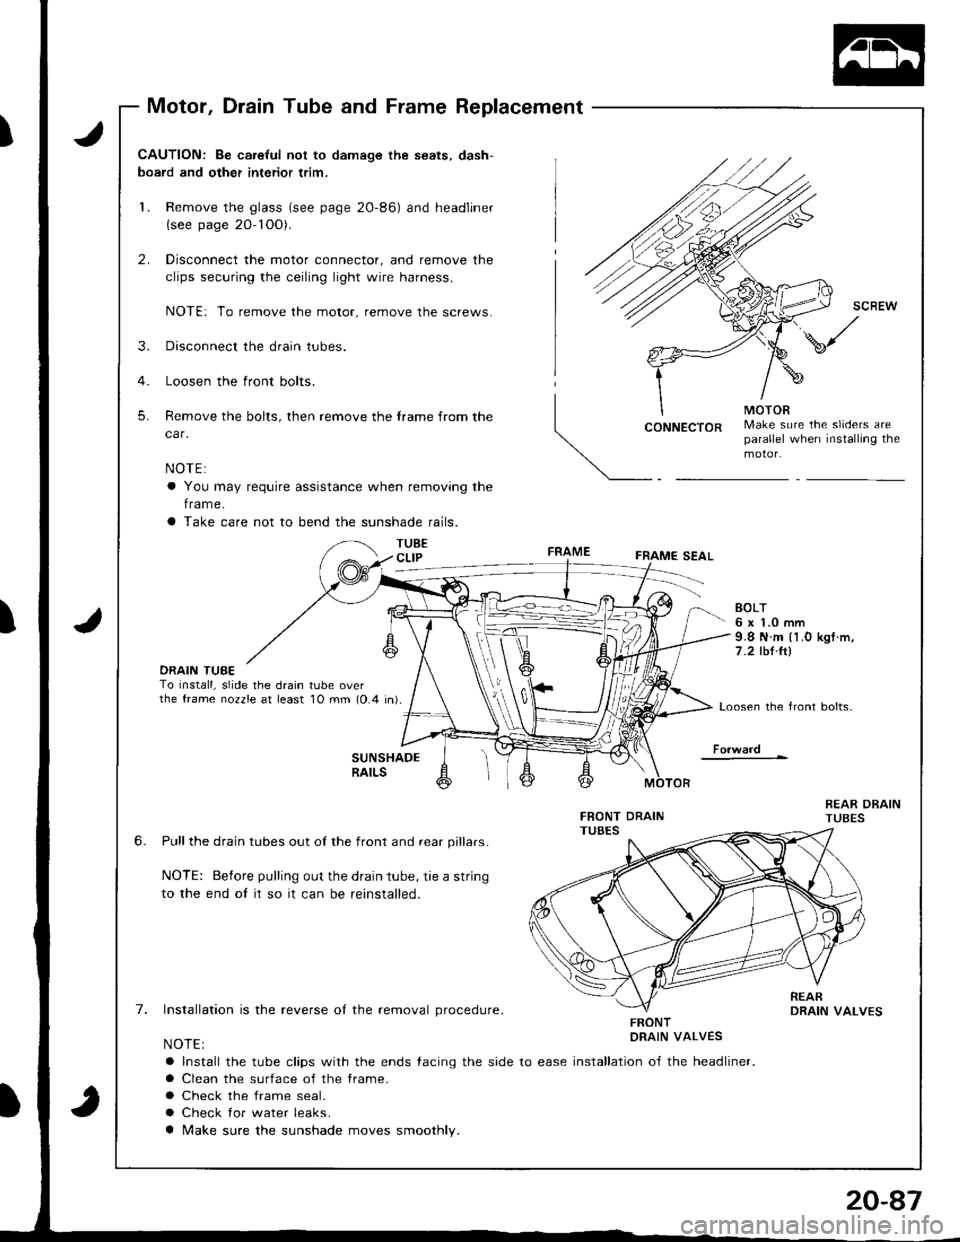
Motor, Drain Tube and Frame Replacement
J
J
CAUTION: Be ca.eful not to damage the seats, dash-
board and other interior trim,
1. Remove the glass (see page 2O-86) and headliner(see page 20- 1OO).
2. Disconnect the motor connector, and remove the
clips securing the ceiling light wire harness.
NOTE: To remove the motor, remove the screws.
3. Disconnect the drain tubes.
4. Loosen the front bolts.
5. Remove the bolts, then remove the frame from the
car.
NOTE:
a You may require assistance when removing the
f rame.
a Take care not to bend the sunshade rails.
TUBECLIP
CONNECTORMake sure the sliders areparallel when installing themotor.
FRAMEFRAME SEAL
DRAIN TUBETo Install, slide the drain tube overthe frame nozzle at least 10 mm (0.4 in).
EOLT6 x 1.0 mm9.8 N.m l1.O kgf .m,
7 .2 tbt.ltl
Loosen the front bolts,
Fo.ward
6.
7.
SUNSHADERAILS
Pull the drain tubes out of the front and rear pillars.
NOTE: Before pulling out the drain tube, rie a string
to the end oI it so it can be reinstalled.
Installation is the reverse ol the removal procedure.
NOTE:
a Install the tube clips with the ends {acing the side to ease
a Clean the surface of the frame.
a Check the frame seal.
a Check lor water leaks.
a Make sure the sunshade moves smoothly.
FRONTDRAIN VALVES
installation of the headliner.
Page 917 of 1680
Seats
FrontSeatRemcival
NOTE: Take care not to scratch the seat covers and
oooy.
1 . Slide the front seat backward, then remove the bolts.
>: Bolt locations, 2
3. Remove the bolts.
v:Bolt locations
A V: Bolt, 1I >:Bolr, 1
10 x 1.25 mm l38 N.m (4.0 kgJ m, J,":: J
8 x 1.25 mm22 N.m {2.2 kgt m,
:u",: -/
8 x 1.25 mm I22 N'm 12.2 kst m. )16 rbf.rt)_ /
NOTE: When installing, usey'
--RONT SEAT
2. Slide the front seat forward, then remove the seat
track end covers.
CAUTION: When p.ying with I llat tip screwdliver,
wrap it with protective tape to prevent damage.
liq0id thread lock.
Lift the lront seat, then disconnect the seat
switch connector {driver's).
belt
SEAT TRACKENO COVER
SEAT BELT SWITCHCONNECTOR
5. Carelully remove the front seat through the door
opening.
6. Installation is the reverse of the removal procedure.
Page 918 of 1680
Seats
Front Seat Replacement
CENTER COVER
NOTEr Take care not to scratch the seat covers and
oooy.
l. Remove the front seat through the door opening (see
page 20-'103).
2. Remove the screws and recline knob, then remove
the recline cover.
SCREW
l-{O
BECLINE KNOB
3. Remove the screws, then remove the center cover.
SEAT BELTBUCKLE(see page 20-119)
scREws
4. Remove the hook and fastener, then fold the seat-back cover back.
RECLINE COVER SCREW
20-104
5. Fold the seat-back Qover and pad, then remove the
bo lts.
>: Boli locations, 2
SEAT.EACKCOVER
PAD
6. Remove the pivot nut.
PLAINWASHER
PIVOT NUT8 x 1.25 mm22 N.n (2.2 kgt m,'t 6 tbt.ttl
Remove the seat-back.
NOTE: Take care not to bend the hinge bracket.
10 x 1.25 mm47 N.m 14.8 kgf.m,3!'oli1 /
7.
+ sEAr-BAcK
-A\
@ )\
f\
Page 920 of 1680
Seats
Front Seat Disassembly and Reassembly
CAUTION: When prying with a tlat tip screwdriver, wrap it with protective tape to pravont damage.
NOTE: Take care not to scratch the body or tear the seat covers.
Driver's seat (manual height adiustment):
HEADREST
SEAT CUSHION
PIVOT NUT8 x 1.25 mm22 N.m 12.2 kg{.m,16 |bnft)
BUSHING
HOOK
LUMBERSUPPORTKNOB
cuP
CENTER
RECLINEAI!USTER
8 x 1 .25 mm2.2 N.m {2.2 kgf.m,10 x 1.25 mm47Nm{4.Ekgl.m,35 tbt.ftl
CLIP
16 tbf.ftlRECUNECOVER
SEATTRACK
WASHER
8 x 1.25 mm22N-m l2.2kgl.m,16 tbtftl
SEAT TRACK
Reassembly in the reverse order of disassembly.
REARHEIGHTKNOA
8 x 1.25 mm20 N.m 12.0 kgt.m,14 tbtft)
CLIP
8 x 1.25 mm22 N.n 12.2 kgl.m,16 tbf.tt)
NOTE:
. Make sure the bushing and pivot washer are installed properly.
a To prevent wrinkles when installing the seat-back cover. make sure the material is stretched evenly over the pad.
a Grease all moving portion.
SEAT-BACK
RECLINELEVER
Page 922 of 1680
Seats
Front Seat Cover Replacement
CAUTION: Wea. gloves to remove and install the seat
covers.
NOTE: Take care not to tear the seams or damage the
seat covers.
Seat-back cover removal:'l- Slide the {ront seat forward and Jold the seat back
forward.
2. Remove the hooks and fasteners, then fold the seat
back cover back.
FASTENER
SEAT-8ACKCOVER
Remove the headrest and headrest
Screw
o
FASTENER
gu rd e.
location, 1
)
HEADREST
HEADRESTGUIDE
KNOB
SEAT.BACK
20-108
o
4. Remove the lumbar support knob.
LUMBARSUPPORTKNOB
J
tf*,,
5. Remove the seat-back cover by releasing the inside
clrps -
Clip removal:
SEAT-BACKCOVER
6. Pull back the edge of the seat-back cover all the way
around. then release the clios.
SEAT,BACKCOVER
Page 924 of 1680
Seats
Rear Seat Replacement
Hatchback
NOTEr Take care not to scratch the seat covers and
body.
1. Fold the seat backs lorward.
2. Remove the clips, then lold the trunk mat.
V : Clip locations, 14
I=+ i---M- l
_Y/
STRIKER
I\.
TRUNK MAT
20-110
3. Remove the clip pin on each side.
Slide the seat-backs outward, then remove the seat-
backs Jrom the pivot bracket.
SEAT.BACK
SEAT-BACK PTVOTBRACKET
\
CLIP PIN
Page 926 of 1680
Seats
Rear Seat Replacement {cont'd)
Sedan
NOTE: Take care not to scratch the seat covers and
oooy.
1. Fold the seat-back forward.
2. Remove the clips.
V : Clip locations. 8
SEAT-BACK
TRUNI( MAT
SEAT-BACK
20-112
3. Detach the hook. then remove the trunk mat.
TRUNK
/--x'
w
YHOOK
4. Remove the bolts, then remove the seat-back.
V : Bolt locations, 4
REAR SEAT LATCH/LOCK CYUiIDEB(see pog€ 2G113)REAR SEATHVOT BNACKET(s6e page 20-113)
SEAT-BACK
I
(\Jr', 6 x 1.0 mm I-ET- 9.8 N m (1.0 kgl'm, I
E 7.2 tbt.ht Iq7 ,2'/.
SEAT.BACK