Page 150 of 221

149
Xtra-cab modelsÐTo raise the vehicle,
insert the jack handle extension into the jack (it is a loose fit) and turn it clockwisewith the handle, making sure the handle remains firmly fitted into the jack handle
extension. As the j
ack touches the vehicle
and begins to lift, double-check that it is
properly positioned.
Never get under the vehicle when
the vehicle is supported by the jack alone. CAUTION
!
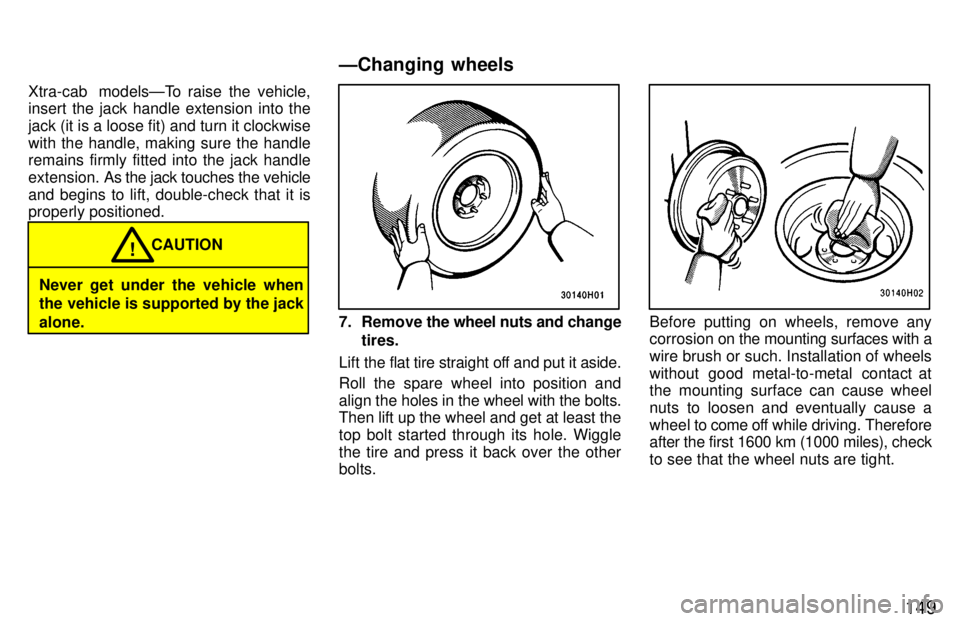
7. Remove the wheel nuts and change
tires.
Lift the flat tire straight off and put it aside.
Roll the spare wheel into position and
align the holes in the wheel with the bolts.
Then lift up the wheel and get at least thetop bolt started through its hole. Wigglethe tire and press it back over the other bolts.Before putting on wheels, remove any
corrosion on the mounting surfaces with a
wire brush or such. Installation of wheels
without good metal-to-metal contact at
the mounting surface can cause wheel
nuts to loosen and eventually cause a
wheel to come off while driving. Therefore
after the first 1600 km (1000 miles), check
to see that the wheel nuts are tight.
ÐChanging wheels
Page 151 of 221

150
8. Reinstall all the wheel nuts fingertight.
Reinstall the wheel nuts (tapered end in-
ward) and tighten them as much as youcan by hand. Press back on the tire back and see if you can tighten them more.Two-wheel drive models
Four-wheel drive models 9. Lower the vehicle completely and
tighten the wheel nuts.
Turn the jack handle counterclockwise to lower the vehicle.
Xtra-cab modelsÐTurn the jack handle
extension counterclockwise with handle
to lower the vehicle, making sure the han-dle remains firmly fitted onto the jack han-
dle extension. Use only the wheel nut wrench to tighten the nuts. Do not use other tools or any
additional leverage other than your
hands, such as a hammer, pipe or your
foot. M ake sure the wrench is securely en-
gaged over the nut.
Tighten each nut a little a time in the order
shown. Repeat the process until all the
nuts are tight.
When lowering the vehicle, make sure all portions of your body and
all other persons around will not be
injured as the vehicle is lowered tothe ground. CAUTION
!
ÐLowering your vehicle
ÐReinstalling wheel nuts
Page 186 of 221

185
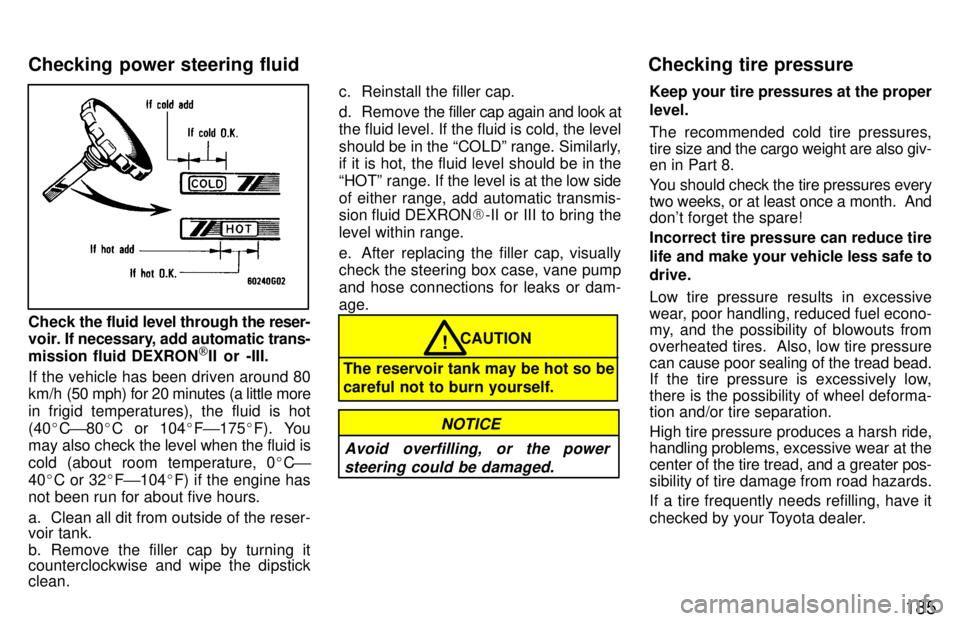
Check the fluid level through the reser-
voir. If necessary, add automatic trans-
mission fluid DEXRON [
II or -III.
If the vehicle has been driven around 80
km/h (50 mph) for 20 minutes (a little more
in frigid temperatures), the fluid is hot (40 �C ' 80 �C or 104 �F ' 175 �F). You
may also check the level when the fluid is
cold (about room temperature, 0 �C '
40 �C or 32 �F ' 104 �F) if the engine has
not been run for about five hours.
a. Clean all dit from outside of the reser- voir tank.
b. Remove the filler cap by turning it
counterclockwise and wipe the dipstick clean. c. Reinstall the filler cap.
d. Remove the filler cap again and look at the fluid level. If the fluid is cold, the level
should be in the COLDº range. Similarly, if it is hot, the fluid level should be in the
HOTº range. If the level is at
the low side
of either range, add automatic transmis-
sion fluid DEXRON �-II or III to bring the
level within range.
e. After replacing the filler cap, visually check the steering box case, vane pump
and hose connections for leaks or dam-age.
CAUTION
The reservoir tank may be hot so be careful not to burn yourself.!
Avoid overfilling, or the power steering could be damaged.
NOTICE
Keep your tire pressures at the proper level.
The recommended cold tire pressures, tire size and the cargo weight are also giv-
en in Part 8.
You should check the tire pressures every two weeks, or at least once a month. And
don't forget the spare!
Incorrect tire pressure can reduce tire
life and make your vehicle less safe to drive.
Low tire pressure results in excessive
wear, poor handling, reduced fuel econo-
my, and the possibility of blowouts from
overheated tires. Also, low tire pressure
can cause poor sealing of the tread bead.
If the tire pressure is excessively low,
there is the possibility of wheel deforma- tion and/or tire separation.
High tire pressure produces a harsh ride,
handling problems, excessive wear at the center of the tire tread, and a greater pos-
sibility of tire damage from road hazards.
If a tire frequently needs refilling, have it
checked by your Toyota dealer.
Checking power steering fluid
Checking tire pressure
Page 213 of 221

212
Engine compartment (Canada)
6. HORN 15 A: Emergency flashers,
horns
7. DOME 15 A: Car audio system, power
antenna, interior light, clock, ignition
switch light, personal ligths, door cour-
tesy lights
8. TAIL 10 A: Tail lights, license plate
lights
9. PANEL 10 A: Emergency flashers,
heater cotnrol system, air conditioning
cooling system, gauges and meters,
clock, car audio system overdrive indi-
cator light, glovebox light, cigarette
lighter, instrument panel lightsInstrument panel
10. A/C 10 A: Air conditionin cooling sys-
tem
11. HEAD (RH) 10 A: Right-hand head-
light
12. HEAD (LH) 10 A: Left-hand headlight
13. HEAD (HI RH) 10 A: Right-hand
headlight (high beam), hi-beam indi-
cator light
14. HEAD (HI LH) 10 A: Left-hand head-
light (high beam)
15. HEAD (LO RH) 10 A: Right-hand
headlight (low beam)
16. HEAD (LO LH) 10 A: Left-hand head-
light (low beam) 17. DRL 7.5 A:
Daytime running light sys-
tem
18. 4WD 15 A: A.D.D. control system,
four-wheel drive control system, rear
differential lock system
19. GAUGE 10 A: Gauges and meters,
back-up lights, cruise control system,
power antenna, power door lock con- trol system, electronically controlled
automatic transmission system, start-
ing system, charging system, heater control system
20. TURN 10 A: Turn signal lights
21. ECU-IG 15 A: Cruise control system,
anti-lock brake system, shift lock sys-tem
22. WIPER 20 A: Windshield wipers and
washer
23. IGN 7.5 A: Discharge warning light,
SRS airbag system
24. RADIO 7.5 A: Car audio system, pow-
er antenna
25. CIG 15 A: Cigarette lighter, clock,
power rear view mirrors, back-up lights, shift lock system
26. ECU-B 15 A: SRS airbag warning
light, daytime running light system, cruise control syste, anti-lock brake system