1997 TOYOTA TACOMA lock
[x] Cancel search: lockPage 160 of 221

159
Many Toyota dealers can make a new
key if you can give them the key num-
ber. See the suggestion given in Keysº in Chapter 1-2.
If your keys are locked in the vehicle and
you cannot get a duplicate, many Toyota
dealers
can still open the door for you, us-
ing their special tools. If you must break a
window to get in, we suggest breaking the
smallest side window because it is the least expensive to replace. Be extremely cautious to avoid cuts from the glass.
If you lose your keys
Page 170 of 221

169
Tire surface and wheel nuts Check the tires carefully
for cuts, damage
or excessive wear. See Chapter 7-2 for
additional information. When checking the tires, make sure no nuts are missing,
and check the nuts for looseness. T ighten
them if necessary.
Tire rotation
Rotate the tires every 12000 km (7500
miles). See Chapter 7-2 for additional in- formation.
Fluid leaks Check underneath for leaking fuel, oil, wa-
ter or other fluid after the vehicle has been
parked for a while. If you smell fuel fumes
or notice any leak, have the cause found
and corrected immediately. Doors and engine hood Check that all doors including tailgate op- erate smoothly and all latches lock se-
curely. M ake sure the engine hood secon-
dary latch secures the hood from opening
when the primary latch is released. INSIDE THE VEHICLE Items listed below should be checked
regularly, e.g. while performing peri-
odic services, cleaning the vehicle,etc. Lights Make sure the headlights, stop lights, tail lights, turn signal lights, and other lights are all working. Check headlight aim. Service reminder indicators and
warn-
ing buzzers Check that all service reminder indicators
and warning buzzers function properly. Steering wheel
Be alert for changes in steering condition, such as hard steering or strange noise. Seats Check that all front seat controls such as
seat adjusters, seatback recliner, etc. op- erate smoothly and that all latches lock
securely in any position. Check that the
head restraints move up and down
smoothly and that the locks hold securely
in any latched position. For folding-down
seatback (bench seat), check that the
latches lock securely. Seat belts
Check that the seat belt system such as
buckles, retractors and anchors operate
properly
and smoothly. Make sure the belt
webbing is not cut, frayed, worn or dam-aged. Accelerator pedal Check the pedal for smooth operation and
uneven pedal effort or catching. Clutch pedal Check the pedal for smooth operation. Brake pedal Check the pedal for smooth operation and
that the pedal has the proper clearance. Check the brake booster function. Brakes
At a safe place, check that the brakes do not pull to one side when applied. Parking brake Check that the lever has the proper travel and that, on a safe incline, your vehicle is
held securely with only the parking brake applied.
Page 171 of 221

170Automatic transmission Parkº
mech-
anism
Check the lock release button of the se-
lector lever for proper and smooth opera-
tion. On a safe incline, check that your ve-
hicle is held securely with the selector lever in ºPº position and all brakes re- leased.
IN THE ENGINE COMPARTMENT Items listed below should be checked
from time to time , e.g. each time when
refueling.
Washer fluid
Make sure there is sufficient fluid in the
tank. See Chapter 7-3 for additional infor-
mation.
Engine coolant level Make sure the coolant level is between
the FULLº and LOWº lines on the see-
through reservoir when the engine is cold.
See Chapter 7-2 for additional informa-tion.
Battery electrolyte level Make sure the electrolyte level of all bat-
tery cells is between upper and lower level
lines on the case. Add only distilled water
when replenishing. See Chapter 7-3 for
additional information. Brake fluid level
Make sure the brake fluid level is correct. See Chapter 7-2 for additional informa- tion.
Engine oil level
Check the l
evel on the dipstick with the en-
gine turned off and the vehicle parked on
a level spot. See Chapter 7-2 for addition-
al information. Power steering fluid level Check the level on the dipstick. The level
should be in the HOTº or COLDº range
depending on the fluid temperature. SeeChapter 7-2 for additional information. Exhaust system
If you notice any change in the sound of
the exhaust or smell exhaust fumes, have the cause located and corrected immedi-
ately. (See engine exhaust cautions in
Part 2.) Be on the alert for changes in perfor-
mance, sounds, and visual tip-offs
that in-
dicate service is needed. Some important
clues are as follows: � Engine missing, stumbling, or pinging
� Appreciable loss of power
� Strange engine noises
� A leak under the vehicle (however, wa-
ter dripping from the air conditioning
after use is normal.)
� Change in exhaust sound (This may
indicate a dangerous carbon monox-
ide leak. Drive with the windows open
and have the exhaust system checked
immediately.)
� Flat-looking tire; excessive tire squeal
when cornering; uneven tire wear
� Vehicle pulls to one side when drivingstraight on a level road
� Strange noises related to suspensionmovement
� Loss of brake effectiveness; spongy
feeling brake or clutch pedal; pedal al-
most touches floor; vehicle pulls to one
side when braking
� Engine coolant temperature continual-
ly higher than normal
Does your vehicle need repairing?
Page 175 of 221

1741. Windshield washer fluid tank (type A)
2. Engine oil filler cap
3. Brake fluid reservoir
4. Fuse block
5. Battery
6. Engine coolant reservoir
7. Power steering fluid reservoir
8. Engine oil level dipstick
9. Windshield washer fluid tand (type B)
Engine compartment overview�
2RZ-FE and 3RZ-FE engines
Page 176 of 221

175
1. Windshield washer fluid tank (type A)
2. Engine oil filler cap
3. Brake fluid reservoir
4. Fuse block
5. Battery
6. Engine coolant reservoir
7. Engine oil level dipstick
8. Power steering fluid reservoir
9. Windshield washer fluid tand (type B)
�
5VZ-FE engine
Page 186 of 221

185
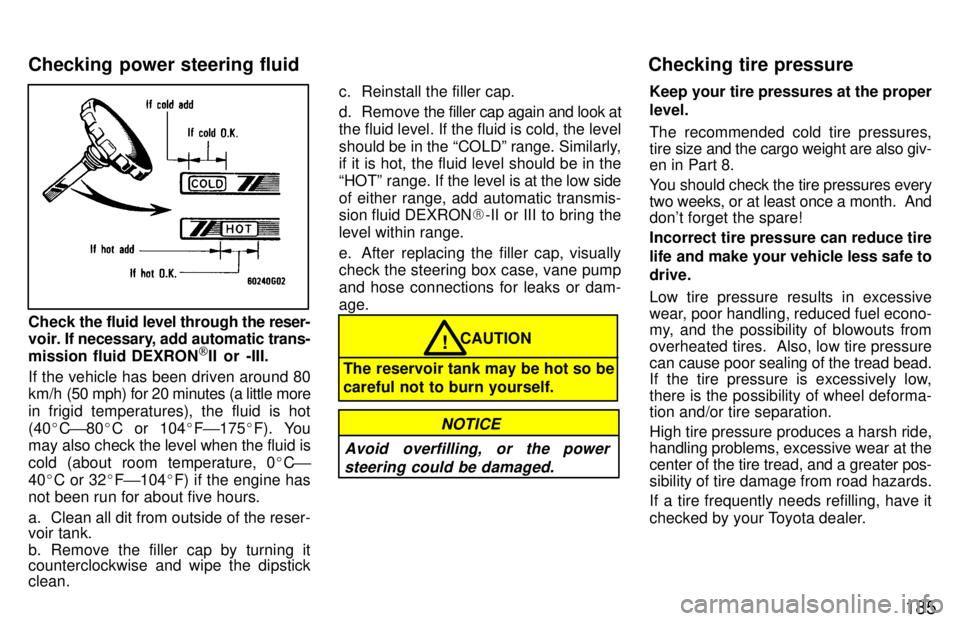
Check the fluid level through the reser-
voir. If necessary, add automatic trans-
mission fluid DEXRON [
II or -III.
If the vehicle has been driven around 80
km/h (50 mph) for 20 minutes (a little more
in frigid temperatures), the fluid is hot (40 �C ' 80 �C or 104 �F ' 175 �F). You
may also check the level when the fluid is
cold (about room temperature, 0 �C '
40 �C or 32 �F ' 104 �F) if the engine has
not been run for about five hours.
a. Clean all dit from outside of the reser- voir tank.
b. Remove the filler cap by turning it
counterclockwise and wipe the dipstick clean. c. Reinstall the filler cap.
d. Remove the filler cap again and look at the fluid level. If the fluid is cold, the level
should be in the COLDº range. Similarly, if it is hot, the fluid level should be in the
HOTº range. If the level is at
the low side
of either range, add automatic transmis-
sion fluid DEXRON �-II or III to bring the
level within range.
e. After replacing the filler cap, visually check the steering box case, vane pump
and hose connections for leaks or dam-age.
CAUTION
The reservoir tank may be hot so be careful not to burn yourself.!
Avoid overfilling, or the power steering could be damaged.
NOTICE
Keep your tire pressures at the proper level.
The recommended cold tire pressures, tire size and the cargo weight are also giv-
en in Part 8.
You should check the tire pressures every two weeks, or at least once a month. And
don't forget the spare!
Incorrect tire pressure can reduce tire
life and make your vehicle less safe to drive.
Low tire pressure results in excessive
wear, poor handling, reduced fuel econo-
my, and the possibility of blowouts from
overheated tires. Also, low tire pressure
can cause poor sealing of the tread bead.
If the tire pressure is excessively low,
there is the possibility of wheel deforma- tion and/or tire separation.
High tire pressure produces a harsh ride,
handling problems, excessive wear at the center of the tire tread, and a greater pos-
sibility of tire damage from road hazards.
If a tire frequently needs refilling, have it
checked by your Toyota dealer.
Checking power steering fluid
Checking tire pressure
Page 189 of 221

188WHEN TO USE SNOW TIRES OR CHAINS
Snow tires or chains are recom-
mended when driving on snow or ice.
On wet or dry roads, conventional tires
provide better traction than snow tires. SNOW TIRE SELECTION
If you need snow tires, select tires of
the same size, construction and load capacity as the original tires on your
Toyota.
Do not use tires other than those men-
tioned above. Do not install studded tires
without first checking local regulations for
possible restrictions.
SNOW TIRE INSTALLATION
Snow tires should be installed on all wheels. Installing snow tires on the front wheels
only can lead to an excessive difference
in road grip capability between the front
and rear tires which would cause loss of
vehicle control.
When storing removed tires, you should
store them in a cool dry place.
Mark the direction of rotation and be sure to install them in the same direction when replacing.
CAUTION
� Do not drive with the snow tires in- correctly inflated.
� Never drive over 120 km/h (75 mph)
with any type of snow tires.!
TIRE CHAIN SELECTION
Use the tire chains of correct size and type.
Regulations regarding the use of tire
chains vary according to location or
type of road, so always check then be-
fore installing chains.
CHAIN INSTALLATIONInstall the chains on the front tires as
tightly as possible. Do not use tire
chains on the rear tires. Retighten
chains after driving 0.5 '1.0 km
(1/4 '1/2 mile).
When installing chains on your tires, care- fully follow the instructions of the chain
manufacturer.
If wheel covers are used, they will be
scratched by the chain band, so remove the covers before putting on the chains.
� Do not exceed 50 km/h (30 mph) or
the chain manufacturer's recom-
mended speed limit, whichever is
lower.
� Drive carefully avoiding bumps,
holes, and sharp turns, which may cause the vehicle to bounce.
� Avoid sharp turns or locked-wheel
braking, as use of chains may ad- versely affect vehicle handling.
CAUTION!
Installing
snow tires and
chains
Page 199 of 221

198
3. Loosen the retainer screws
NOTICE
Never attempt to loosen the headlight aim adjusting screws.
4. Take out the beam unit together with the retainer, unplugging the
connector.
To disconnect the wire connector, com-
press the lock releases. If the connector is tight, wiggle it.5. Install a new beam unit with the single protrusion on the glass face
upward, plugging the connector.
Put the retainer on the unit and
tighten the screws. Install the radia-
tor grille and parking light units.
When aiming adjustment is necessary,
contact your Toyota dealer.