1997 TOYOTA PASEO wheel
[x] Cancel search: wheelPage 119 of 182
11 7
Getting more kilometers/mileage from a liter/gallon of fuel is easyÐjust take it
easy. It will help make your vehicle last
longer, too. Here are some specific tips on how to save money on both fuel and repairs: �
Keep your tires inflated at the cor- rect pressure. Underinflation causes
tire wear and wastes fuel. See Chapter
7-2 for instructions.
� Do not carry unneeded weight in
your vehicle. Excess weight puts a
heavier load on the engine, causinggreater fuel consumption.
� Avoid lenghty warm-up idling.
Once the engine is running smoothly,
begin driving-but gently. Remember,
however, that on cold winter days this
may take a little longer.
� Accelerate slowly and smoothly.
Avoid jackrabbit starts. Get into high
gear as quickly as possible.
� Avoid long engine idling. If you have
a long wait and you are not in traffic, it
is better to turn off the engine and start
again later.
� Avoid engine lug or overrevving.
Use a gear position suitable for the
road on which you are travelling. �
Avoid continuous speeding up and
slowing down. Stop-and-go driving
wastes fuel.
� Avoid unnecessary stopping and
braking. Maintain a steady pace. Try
to time the traffic signals so you only
need to stop as little as possible or take
advantage of through streets to avoid
traffic lights. Keep a proper distance
from other vehicles to avoid sudden braking. This will also recduce wear on
your brakes.
� Avoid heavy traffic or traffic jams
whenever possible.
� Do not rest your foot on the clutch
or brake pedal. This causes needless
wear, overheating and poor fuel econ-
omy.
� Maintain a moderate speed onhighways. The faster you drive, the
greater the fuel consumption. By re-
ducing your speed, you will cut down
on fuel consumption.
� Keep the front wheels in properalignment. Avoid hitting the curb and
slow down on rough roads. Improper
alignment not only causes faster tire
wear but also puts an extra load on the
engine, which, in turn, wastes fuel. �
Keep the bottom of your vehicle
free from mud, etc. This not only
lessens weight but also helps preventcorrosion.
� Keep your vehicle tuned-up and in
top shape. A dirty air cleaner, improp-
er valve clearance, dirty plugs, dirty oil
and grease, brakes not adjusted, etc.
all lower engine performance and con-
tribute to poor fuel economy. For lon-
ger life of all parts and lower operating
costs, keep all maintenance work on
schedule, and if you often drive under severe conditions, see that your ve-
hicle receives more frequent mainte-
nance (For schedule maintenance in-
formation, please refer to the separate
Owner 's Manual Supplement/Main-
tenance Scheduleº).
CAUTION
Never turn off the engine to coast
down hills. Your power steering and
brake booster will not function with-
out the engine running. Also, the emission control system operates
properly only when the engine isrunning.!
How to save fuel and make
your vehicle last longer, too
Page 126 of 182
124
1. Reduce
your speed gradually, keeping
a straight line. Move cautiously off the
road to a safe place well away from the
traf fic. Avoid stopping on the center di-
vider of a highway. Park on a level spotwith firm ground.
2. Stop the engine and turn on your emergency flashers.
3. Firmly set the parking brake and put the transmission in Pº (automatic) or reverse (manual).
4. Have everyone get out of the vehicle on the side away from traffic.
5. Read the following instructions thor- oughly.
When jacking, be sure to observe
the following to reduce the poss- ibility of personal injury: �Follow jacking instructions.
� Do not start or run the engine
while your vehicle is supported by
the jack. CAUTION
!
�
Stop the vehicle on a level place
and chock the wheel diagonally
opposite to the one being
changed. Otherwise, the vehicle
will move and possibly cause un-
expected accident.
� Make sure to set the jack properly
in the jack point. Raising the ve-
hicle with jack improperly posi-
tioned will damage the vehicle or
may allow the vehicle to fall off the jack and cause injury to the per-son.
� Never get under the vehicle when
the vehicle is supported by the jack alone.
� Use the jack only for lifting your
vehicle during wheel changing.
� Do not raise the vehicle with some-
one in the vehicle.
� When raising the vehicle, do not
put an object on or under the jack.
NOTICE
Do not continue driving with a deflated tire. Driving even a short
distance can damage a tire beyondrepair.
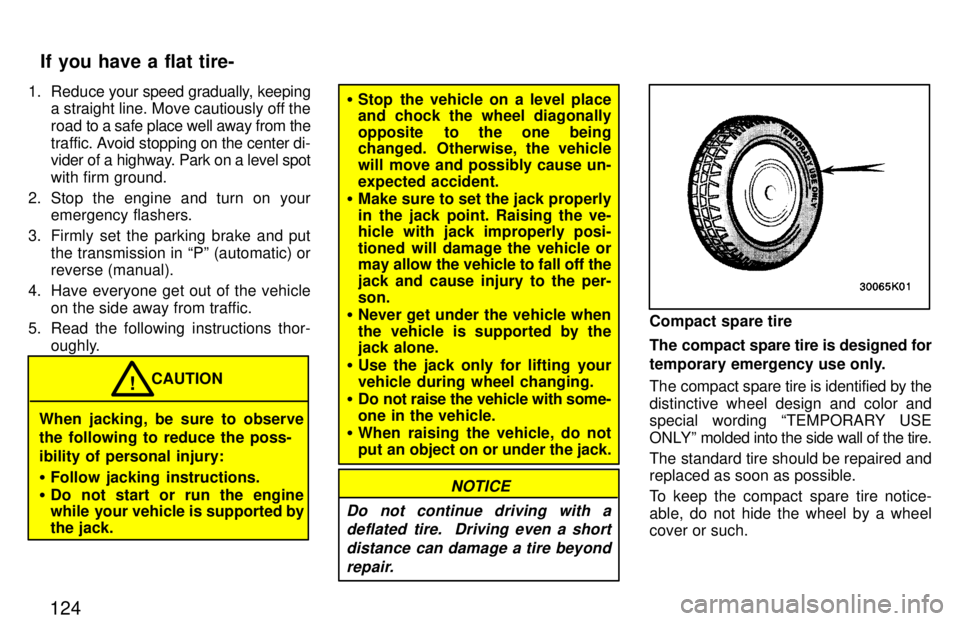
Compact spare tire
The compact spare tire is designed for
temporary emergency use only.
The compact spare tire is identified by the
distinctive wheel design and color and
special wording TEMPORARY USE
ONLYº molded into the side wall of the tire.
The standard tire should be repaired and replaced as soon as possible.
To keep the compact spare tire notice-
able, do not hide the wheel by a wheel cover or such.
If you have a flat tire-
Page 127 of 182
125
The compact spare tire saves space in your trunk, and its lighter weight helps to improve fuel economy and permits easier
installation in case of a flat tire.
The compact spare
tire can be used many
times, if necessary. It has tread life of up
to 4800km (3000 miles) depending on
road conditions and your driving habits.
When tread wear indicators appear on the
tire, replace the tire.
See also the tire section in chapter 7-2 for
details on the tread wear indicators andother service information.
� The compact spare tire was de-
signed especially for your Toyota.
Do not use it on any other vehicle.
� Do not exceed 80 km/h (50 mph)
when driving with the compactspare tire.
� Avoid sudden acceleration, sud-
den deceleration, and sharp turns
with the compact spare tire. CAUTION
!
NOTICE
Your ground clearance is reduced when the compact spare tire is
installed so avoid driving overobstacles and drive slowly on rough, unpaved roads and speedbumps. Also, do not attempt to go through an automatic car wash asthe vehicle may get caught,
resulting in damage.
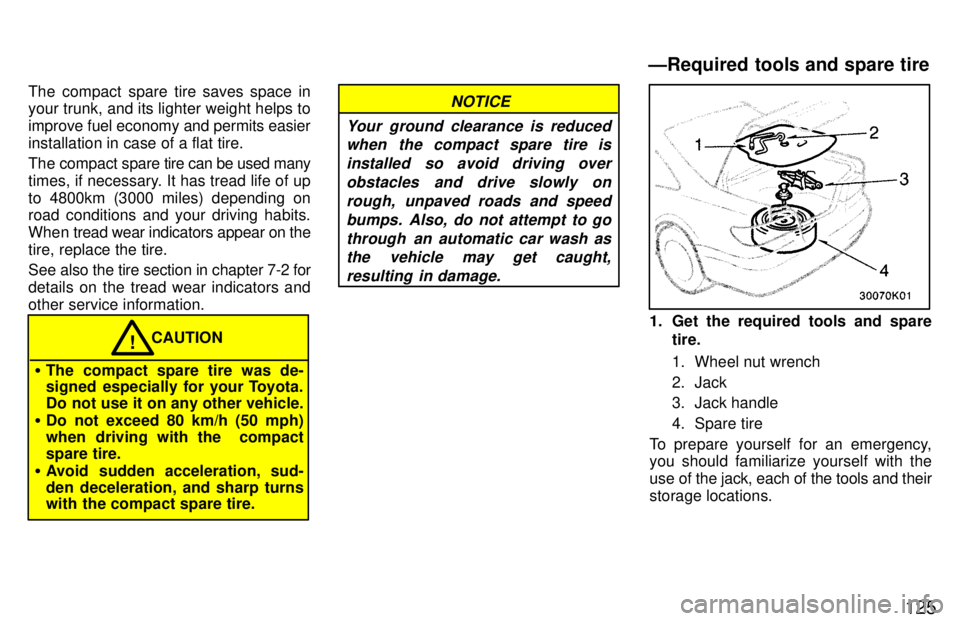
1. Get the required tools and spare tire.
1. Wheel nut wrench
2. Jack
3. Jack handle
4. Spare tire
To prepare yourself for an emergency, you should familiarize yourself with the
use of the jack, each of the tools and theirstorage locations.
ÐRequired tools and spare tire
Page 128 of 182

126
Turn the jack joint by hand.
To remove: Turn the joint in direction 1 un- til the jack is free.
To store: Turn the joint in direction 2 until the jack is firmly secured to prevent it fly-
ing forward during a collision or sudden braking.To remove the spare tire:
1. Remove the spare tire cover.
2. Loosen the bolt and remove it. Then take the spare tire out of the vehicle.
When storing the spare tire, put it in place with the outer side of the wheel facing up. Then secure the tire by repeating the
above removal st eps in reverse order to
prevent it from flying forward during a col-
lision or sudden braking.2. Block the wheel diagonally oppo-
site the flat tire to keep the vehicle from rolling when it is jacked up.
When blocking the wheel, place a wheel
block from the front for the front wheels or
from the rear for the rear wheels.
ÐBlocking the wheel
Page 129 of 182
127
Type A
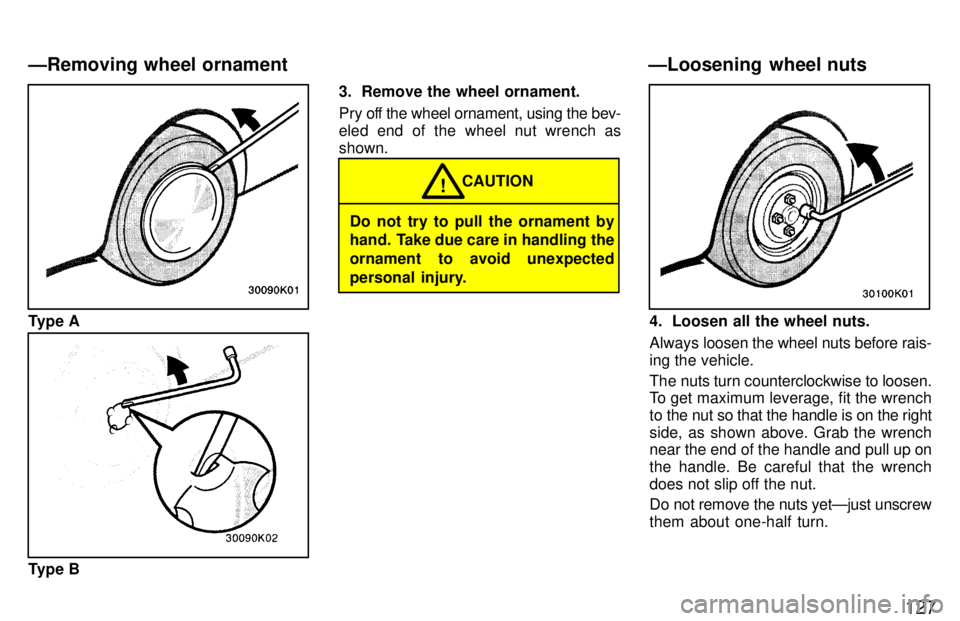
Type B3. Remove the wheel ornament.
Pry off the wheel ornament, using the bev-
eled end of the wheel nut wrench asshown.
Do not try to pull the ornament by
hand. Take due care in handling the
ornament to avoid unexpected
personal injury.
CAUTION
!
4. Loosen all the wheel nuts. Always l
oosen the wheel nuts before rais-
ing the vehicle.
The nuts turn counterclockwise to loosen.
To get maximum leverage, fit the wrench
to the nut so that the handle is on the right
side, as shown above. Grab the wrench
near the end of the handle and pull up on
the handle. Be careful that the wrench
does not slip off the nut.
Do not remove the nuts yetÐjust unscrew
them about one-half turn.
ÐLoosening wheel nuts
ÐRemoving wheel ornament
Page 131 of 182

129
7. Remove the wheel nuts and changetires.
Lift the flat tire straight off and put it aside.
Roll the spare wheel into position and
align the holes in the wheel with the bolts.
Then lift up the wheel and get at least the top bolt started through its hole. Wiggle the tire and press it back over the other bolts.Before putting on wheels, remove any
corrosion on the mounting surfaces with a
wire brush or such. Installation of wheels
without good metal-to-metal contact at
the mounting surface can cause wheel
nuts to loosen and eventually cause a
wheel to come off while driving. Therefore
after the first 1600 km (1000 miles), check
to see that the wheel nuts are tight.8. Reinstall all the wheel nuts finger
tight.
Reinstall the wheel nuts (tapered end in-
ward) and tighten them as much as you
can by hand. Press back on the tire and see if you can tighten them more.
ÐChanging wheels
ÐReinstalling wheel nuts
Page 132 of 182
130
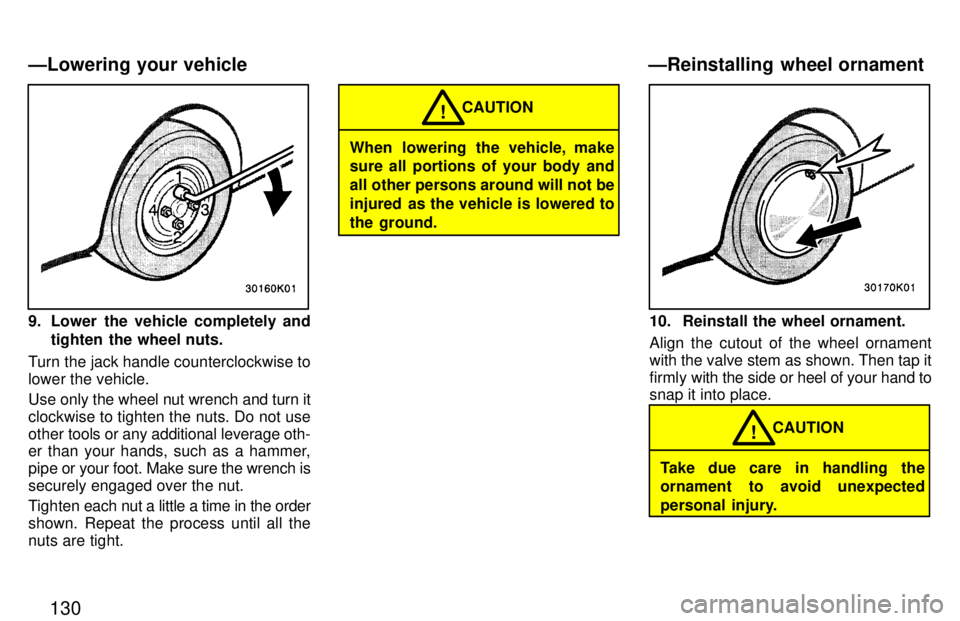
9. Lower the vehicle completely andtighten the wheel nuts.
Turn the jack handle counterclockwise to lower the vehicle.
Use only the wheel nut wrench and turn it
clockwise to tighten the nuts. Do not useother tools or any additional leverage oth-
er than your hands, such as a hammer,
pipe or your foot. Make sure the wrench is
securely engaged over the nut.
Tighten each nut a little a time in the order
shown. Repeat the process until all the
nuts are tight.
When lowering the vehicle, make sure all portions of your body and
all other persons around will not be
injured as the vehicle is lowered tothe ground. CAUTION
!
10. Reinstall the wheel ornament.
Align the cutout of the wheel ornament with the valve stem as shown. Then tap it
firmly
with the side or heel of your hand to
snap it into place.
Take due care in handling the
ornament to avoid unexpected
personal injury. CAUTION
!
ÐReinstalling wheel ornament
ÐLowering your vehicle
Page 133 of 182
131
11. Check the air pressure of the re-
placed tire.
Adjust the air pressure to the specification
designated in Part 8. If the pressure is
lower, drive slowly to the nearest service station and fill to the correct pressure.
Do not forget to reinstall the tire inflation valve cap as dirt and moisture could get into the valve core and possibly cause air
leakage. If the cap is missing, have a new
one put on as soon as possible.
12. Restow all the tools, jack and flat
tire securely.
As soon as possible after changing
wheels, tighten the wheel nuts to the torque specified in Part 8 with a torque wrench, have a technician repair the flat tire and replace the spare tire with it.
Before driving, make sure all the
tools, jack and flat tire are securely in place in their storage location to
reduce the possibility of personal
injury during a collision or suddenbraking. CAUTION
!
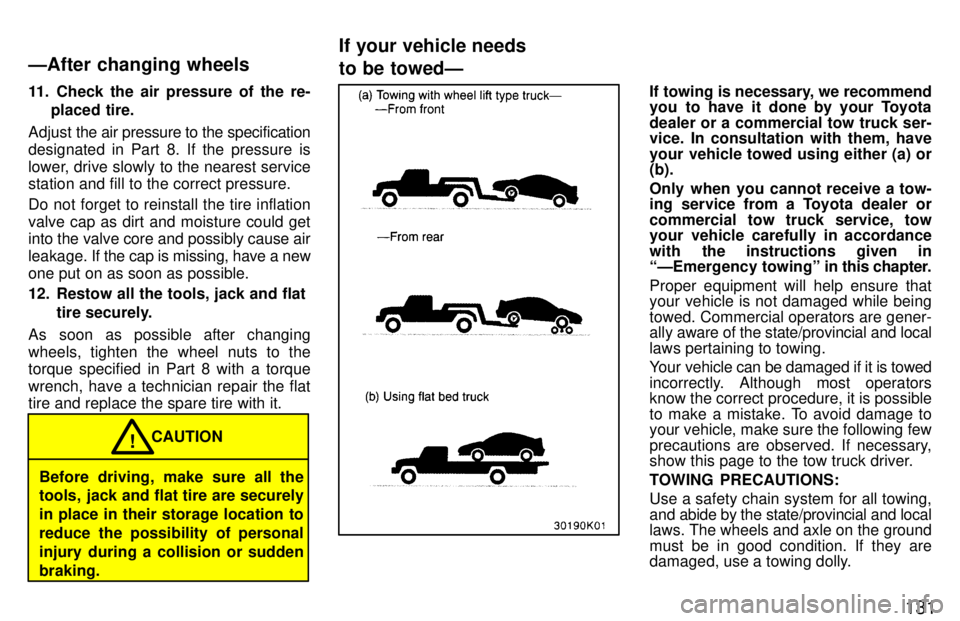
If towing is necessary, we recommend
you to have it done by your Toyota
dealer or a commercial tow truck ser-
vice. In consultation with them, have
your vehicle towed using either (a) or (b).
Only when you cannot receive a tow-
ing service from a Toyota dealer or
commercial tow truck service, tow
your vehicle carefully in accordance
with the instructions given in
ÐEmergency towingº in
this chapter.
Proper equipment will help ensure thatyour vehicle is not damaged while being
towed. Commercial operators are gener-
ally aware of the state/provincial and local
laws pertaining to towing.
Your vehicle can be damaged if it is towed
incorrectly. Although most operators know the correct procedure, it is possible
to make a mistake. To avoid damage to your vehicle, make sure the following few
precautions are observed. If necessary,
show this page to the tow truck driver.
TOWING PRECAUTIONS: Use a safety chain system for all towing,
and abide by the state/provincial and local
laws. The wheels and axle on the ground
must be in good condition. If they are
damaged, use a towing dolly.
ÐAfter changing wheels
If your vehicle needs to be towedÐ