Page 261 of 419
If there is a wheel cover,
loosen the plastic nut caps
with the wheel wrench.
They won’t come off. Then, using the flat end
of the
wheel wrench, pry along the
edge of the cover until it
comes off. Be careful; the
edges may be sharp. Don’t
try to remove the cover with
your bare hands.
Removing the Flat Tire and Installing the
Spare Tire
If your vehicle has wheel nut caps, remove them using
the wheel wrench.
1. Using the wheel wrench, loosen all the wheel nuts.
Don’t remove them yet.
2. Turn the jack handle clockwise to raise the jack lift
head
a few inches.
5-27
ProCarManuals.com
Page 262 of 419
FRONT
VEHICLE
REAR EDGE OF FRONT
WHEEL OPENING
For jacking at the vehicle's front location, put jack
lift head about 6 inches (15 cm> from the rear edge
of the front wheel opening or in between the two bolts
as
shown.
L?ONT VEHICLE /-
FRONT EDGE OF
REAR WHEEL
OPEN1
NG
For jacking at the vehicle's rear location, put jack lift
head about 5.5 inches (14 cm) from the front edge of
rear wheel opening or just behind off-set as shown.
Put the
compact spare tire near you.
I
Getting under a vehicle when it is j ked up is
dangerous.
If the vehicle slips off the jack, you
could be badly injured or killed, Never get under
a vehicle when it is supported only by a jack.
5-28
ProCarManuals.com
Page 263 of 419
& CAUTION:
- -
Raising your vehicle with the jack i
positioned can damage the vehicle and even make
the vehicle fall. To help avoid personal injury and
vehicle damage, be sure
to fit the jack lift head into
the proper location before raising the vehicle.
3. Raise the vehicle by turning the jack handle
clockwise. Raise the vehicle far enough off the
ground for the spare tire to fit under the vehicle.
Remove all wheel nuts and take off the flat tire.
4. Remove any rust or dirt
from the wheel bolts,
mounting surfaces
and
spare wheel.
Rust or dirt on the wheel, or on the parts to
which it is fastened, can make the wheel nuts
become loose after a time. The wheel could come
off and cause an accident. When you change a
wheel, remove any rust or dirt from the places
where the wheel attaches to the vehicle.
In an
CAUTION: (Continued)
5-29
ProCarManuals.com
Page 265 of 419

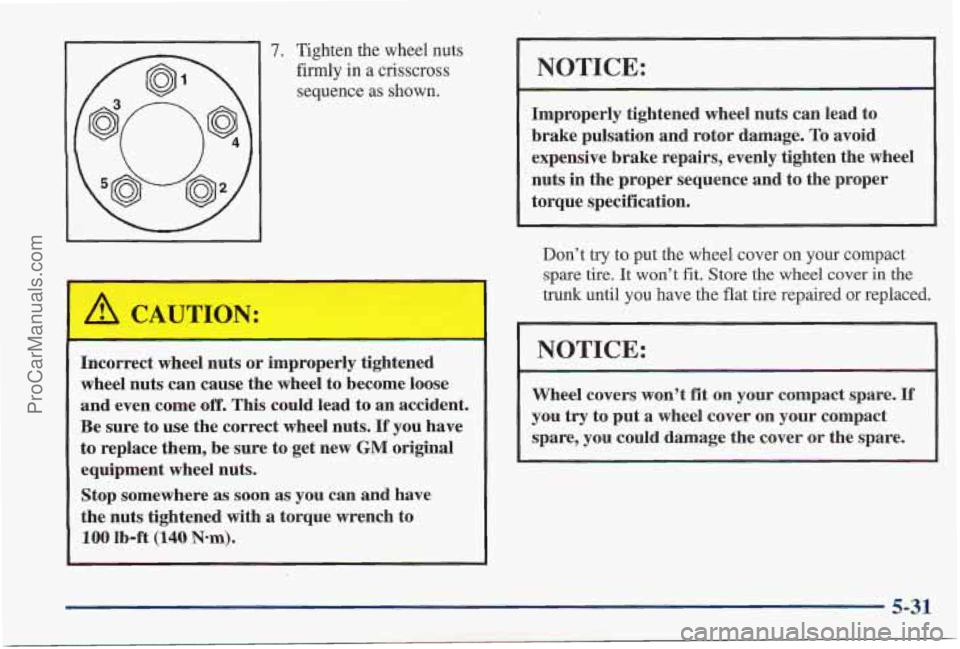
7. Tighten the wheel nuts
firmly in
a crisscross
sequence as shown.
Incorrect wheel nuts or improperly tightened
wheel nuts can cause the wheel to become loose
and even come off. This could lead
to an accident.
Be sure to use the correct wheel nuts.
If you have
to replace them, be sure to get new GM original
equipment wheel nuts.
Stop somewhere as soon as you can and have
the nuts tightened with
a torque wrench to
100 Ib-ft (140 Nom). ’
NOTICE:
Improperly tightened wheel nuts can lead to
brake pulsation and rotor damage.
To avoid
expensive brake repairs, evenly tighten the wheeI
nuts in the proper sequence and to the proper
torque specification.
Don’t try to put the wheel cover on your compact
spare tire.
It won’t fit. Store the wheel cover in the
trunk until you have th’e flat tire repaired or replaced.
NOTICE:
Wheel covers won’t fit on your compact spare. If
you try to put a wheel cover on your compact
spare, you could damage the cover or the spare.
5-31
ProCarManuals.com
Page 266 of 419
Storing the Flat Tire and Tools
Storing a jack, a tire or other equipment in the
passenger compartment
of the vehicle could
cause
injury. In a sudden stop or collision, loose
equipment could strike someone. Store
all these
in the proper place.
After you’ve put the compact spare tire on your vehicle,
you’ll need to store the flat tire in your trunk. Use the
following procedure
to secure the flat tire in the trunk. When storing a full-size tire you must use the extension
to help avoid wheel surface damage. Use extension and
protector/guide located in foam holder.
To store a
full-size tire, place tire valve stem facing down then
remove protectivelguide and attach retainer securely.
When reinstalling compact spare put protective/guide
back in foam holder. Store the cover
as far forward
as possible.
5-32
ProCarManuals.com
Page 268 of 419

Compact Spare Tire
Although the compact spare tire was fully inflated
when your vehicle
was new, it can lose air after a time.
Check
the inflation pressure regularly. It should be
60 psi (420 Ha).
After installing the compact spare on your vehicle, you
should stop as soon
as possible and make sure your spare
tire is correctly inflated.
The compact spare is made to
perform well
at speeds up to 65 rnph (105 kdh) for
distances up to
3,000 miles (5 000 krn), so YOU can finish
your trip and have your full-size tire repaired or replaced
where
you want. You must calibrate the Tire Pressure
Monitor after installing
or removing the compact spare.
See “Driver Information Center - Controls and Displays”
in
the Index. Of course, it’s best to replace your spare
with a full-size tire as soon as you can. Your spare
will last longer and be in good shape in case you need
it again.
NOTICE:
When the compact spare is installed, don’t take
your vehicle through an automatic vehicle wash
with guide rails. The compact spare can get
caught
on the rails. That can damage the tire and
wheel, and maybe other parts
of your vehicle.
Don’t use your compact spare on other vehicles.
And don’t mix your compact spare tire or wheel with
other wheels or tires. They won’t fit. Keep your spare
tire and its wheel together.
NOTICE:
Tire chains won’t fit your compact spare. Using
them can damage your vehicle
and can damage
the ‘chains too. Don’t use tire chains on your
compact spare.
5-34
ProCarManuals.com
Page 318 of 419

To calibrate the system:
1. Turn the ignition switch to ON.
2. The CALIBRATE TIRE PRESS button is under the
instrument panel, to the right of the steering column.
Press and hold the button for about three seconds.
The
CHECK TIRE PRFSS light will flash three
times and go out.
If the light doesn’t go out after you
press the
CALIBRATE TIRE PRESS button, see
your dealer for service.
3. The system completes the calibration process during
driving. During the first
10 to 20 miles (15 to 30 km)
of driving, the system will not alert you if a tire is
low or high. After
20 to 80 miles (30 to 125 km), the
system will only alert
you about pressure differences
of
12 psi (85 kPa) or more. After 80 miles (125 km)
of driving, the system will alert you if a tire is 8 psi
(55 Pa) different from the other three tires.
Tire Inspection and Rotation
Tires should be rotated every 6,000 to 8,000 miles
(10 000 to 13 000 km). Any time you notice unusual
wear, rotate your tires as soon as possible and check
wheel alignment. Also check for damaged tires or
wheels. See “When
It’s Time for New Tires” and
“Wheel Replacement” later in this section for
more information. The
purpose
of regular rotation is to achieve more
uniform wear for all tires on the vehicle. The first
rotation is the most important. See “Scheduled
Maintenance Services” in the Index for scheduled
rotation intervals.
When rotating your tires, always use
the correct rotation
pattern shown here.
Don’t include the compact spare tire in your tire rotation.
6-48
ProCarManuals.com
Page 320 of 419

g New Tires
To find out what kind and size of tires you need, look at
the Tire-Loading Information label.
The tires installed on your vehicle when it was new had
a Tire Performance Criteria Specification (TPC Spec)
number on each tire’s sidewall. When
you get new tires,
get ones with that sarne TPC Spec number. That way
your vehicle will continue to have tires that are designed
to give proper endurance, handling, speed rating,
traction, ride and other things during normal service
on
your vehicle. If your tires have an all-season tread
design, the TPC number will be followed by an “MS”
(for mud and snow).
If you ever replace your tires with those not having a
TPC Spec number, make sure they are the same size,
load range, speed rating and construction type (bias,
bias-belted or radial) as your original tires. Reset Tire
Inflation Monitor
(TIM).
I
Mixing tires could cause you to lose control while
driving.
If you mix tires of different sizes or types
(radial and bias-belted
tires), the vehicle may not
handle properly, and you could have
a crash.
Using tires of different sizes may also cause
damage to your vehicle.
Be sure to use the same
size and type tires
on all wheels.
It’s all right to drive with your compact spare,
though. It was developed for use on your vehicle.
6-50
ProCarManuals.com