1997 PONTIAC PONTIAC radio
[x] Cancel search: radioPage 82 of 419

3. Close the door.
4. Do the same thing to the other rear door lock.
The rear doors of your vehicle cannot be opened from
the insid'e when this feature is
in use. If you want to
open the rear door when the security lock
is on, unlock
the door from the inside and then open the door from
the outside.
Leaving Your Vehicle
If you are leaving the vehicle, take your keys, open your
door and set the locks from inside. Then get out and
close the door.
Keyless Entry (If Equipped)
If your Pontiac has this option, you can lock and unlock your
doors or unlock your
trunk from up to 30 feet (9 m) away
using
the key chain transmitter supplied with your vehicle.
Your Keyless
Entry System operates on a radio frequency
subject to Federal Communications Commission (FCC)
Rules and with Industry and Science Canada Rules.
This device complies with Part 15 of the FCC Rules.
Operation is subject to
the following two conditions:
(1) This device may not cause harmful interference, and
(2) This device must accept any interference received,
including interference that may cause undesired operation. This device complies
with
RSS-210 of Industry and
Science Canada. Operations is subject to the following
two conditions:
(I) this device may not cause
interference, and
(2) this device must accept any
interference received, including interference that may
cause undesired operation of the device.
This system has a range
of about 3 geet (1 m) up to
30 feet (9 m). At times you may notice a decrease in
range. This
is normal for any remote keyless entry
system. If the transmitter does not work or if you have
to stand closer to your vehicle for th'e transmitter to
work, try
this:
Check to determine if battery replacement is
necessary. See the instructions that follow.
Check the distance. You may be too far from your
vehicle. You may need to stand closer during rainy
or snowy weather.
Check the location. Other vehicles or objects may
be blocking the signal. Take
a few steps to the left
or right and try again.
or a qualified technician for service.
If you're still having trouble, see your Pontiac dealer
Changes or modifications to this system by other than
an authorized service facility
could void authorization to
use this equipment.
2-8
ProCarManuals.com
Page 89 of 419

New Vehicle “Break-In”
NOTICE:
Your modern Pontiac doesn’t need an elaborate
“break-in.” But
it will perform better in the long
run
if you follow these guidelines:
Don’t drive at any one speed -- fast or
slow -- for the first 500 miles (805 km).
Don’t make full-throttle starts.
200 miles (322 km) or so. During this time
your new brake linings aren’t yet broken
in. Hard stops with new linings can mean
premature wear and earlier replacement.
Follow this breaking-in guideline every
time
you get new brake linings.
Don’t tow a trailer during break-in. See
“Towing
a Trailer’’ in the Index for
more information.
0 Avoid making hard stops for the first
Ignition Positions
C
With the ignition key in the ignition switch, you can turn
the switch to five positions:
ACCESSORY (A): This position lets you use things
like the radio and windshield wipers when the engine is
off. To use ACCESSORY, push in the key and turn it
toward you. Your steering wheel will stay locked.
LOCK (B): Before you put the key into the ignition
switch, the switch is in
LOCK. It’s also the only position
in which you can remove your key.
This position locks
your ignition, steering wheel and transaxle. It’s a
theft-deterrent feature.
2-15
ProCarManuals.com
Page 119 of 419

Entering Programming Mode
To program features, your vehicle must be in this
programming mode. Follow these steps:
FUSE USA
CIRCUIT
BREAKERS STR WHL
piq ILUM
RAP
0 ’ ECM CRUISE
CIG LTR
INT LAMP
0 PWR WDO
SE CHART
MALLPGM I MALL I WIPER
‘TT:FL I SUNROOF I RADIO I I PWR LOCK HSEATILUM
HAZARD PWR MIR
STOP LAMP AUWCNSL
I/P - IGN SIR
ABS
HVAC CTRL
ABS IGN
R DEFOG
HVAC
HI
CD CHG
TURN BTSI
DIC/HVAC DRL
I Printed in USA. I
1. The Content Theft-Deterrent system (if equipped)
must be disarmed.
2. Remove the MALL PGM fuse from the instrument
panel fuse block.
3. Turn the ignition switch to ACCESSORY.
4. You will hear one to four chimes, depending upon
the features that you have.
You can now program your choices.
Leaving Programming Mode
To get out of the programming mode, just turn the key
from the ACCESSORY position to the OFF position and
put the MALL PGM fuse back into the instrument panel
fuse block.
Delayed IlluminatiodExit Lighting
Your vehicle comes with this feature set in Mode 4. This
means that:
The interior lamps will stay on for awhile after all
the doors are closed and
The interior lamps will come on and stay on for a while
whenever you remove the keys from the ignition.
2-45
ProCarManuals.com
Page 140 of 419

Charging System Light
/+I
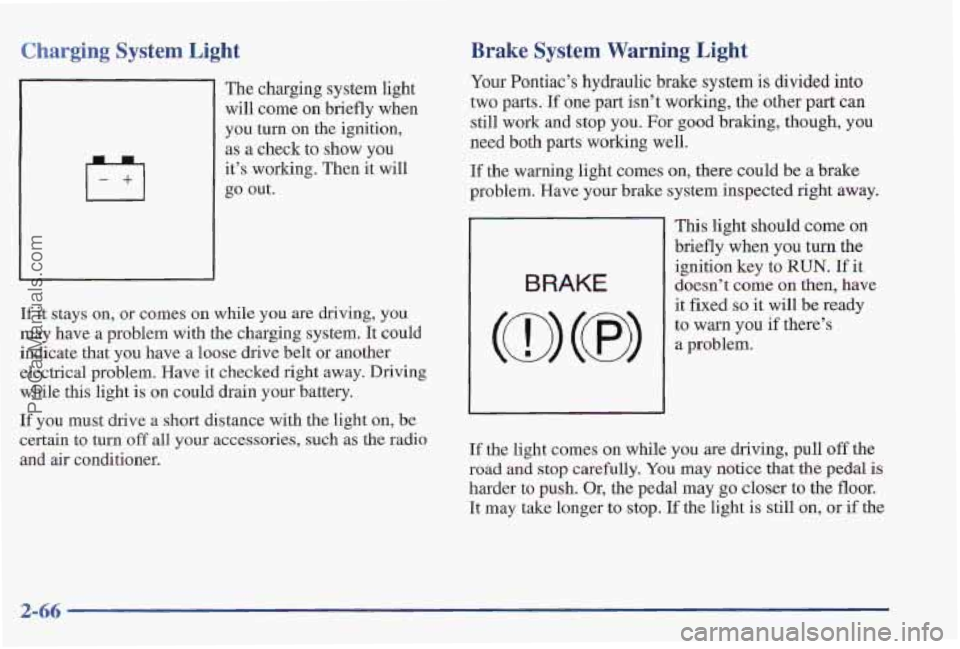
The charging system light
will come on briefly when
you turn on the ignition,
as
a check to show you
it’s working. Then it will
go out.
If it stays on, or comes on while you are driving, you
may have a problem with the charging system. It could
indicate that
you have a loose drive belt or another
electrical problem.
Have it checked right away. Driving
while this light
is on could drain your battery.
If you must drive a short distance with the light on, be
certain to turn
off all your accessories, such as the radio
and air conditioner.
Brake System Warning Light
Your Pontiac’s hydraulic brake system is divided into
two parts.
If one part isn’t worhng, the other part can
still work and stop you. For good braking, though, you
need both parts working well.
If the warning light comes on, there could be a brake
problem. Have your brake system inspected right away.
This light should come on
briefly when
you turn the
BRAKE I
ignition key to RUN. If it
doesn’t
come on then, have
(0 (7)
:;:;gu if there’s
it fixed so it will be ready
If the light comes on while you are driving, pull off the
road and stop carefully. You may notice thatthe pedal is
harder to gush. Or, the pedal may go closer to the floor.
It may take longer to stop. If the light is still on, or if the
ProCarManuals.com
Page 157 of 419

TRUNK A JAR: If your trunk is not fully closed or
open, a light will outline the trunk area on your
vehicle outline.
TRAC SWITCH: If yop vehicle has the Trac System
(this is not an available option with the 3800 Supercharged
engine),
you will have a disable switch on the far right
side
of your Trip Computer. Your Trac System is
automatically activated when you turn the ignition on. This
switch will activate/deactivate the Trac System. If you
need to disable
the system, such as when you are stuck
and are rocking your vehicle back and forth, push this
switch. See “Stuck: In Sand, Mud, Ice or Snow” in
the Index.
TRAC OFF: This light lets you know that your Trac
System has been disabled and will not limit wheel spin.
See “Trac System Warning Light” or “Low Traction
Light” in the Index.
LOW TRAC: This light will come on when your Trac
System is limiting wheel spin or when your anti-lock
brake system is active. See “Trac System” or “Low
Traction Light” in the Index.
Head-Up Display (If Equipped)
radio station or CD track,
displayed “through”
the windshield.
The
HUD also shows these lights when they are lit on
the instrument panel:
0 Turn Signal Indicators
0 High-Beam Indicator Symbol
0 Low Fuel Symbol
2-83
ProCarManuals.com
Page 158 of 419

The HUD will display the “Check Gage” when the
following are lit on the instrument panel:
Oil warning Symbol
0 Coolant Temperature Symbol
0 Charging System Symbol
When you sit straight in your seat, the HUD image will
appear straight ahead near the front bumper.
When
the ignition key is turned to RUN, the HUD
image will come on. Then the Head-Up Display will
operate normally.
NOTICE:
Although the HUD image appears to be near the
front
of the vehicle, do not use it as a parking aid.
The
HUD was not designed for that purpose.
If you try to use it that way, such as in a
parking lot, you may misjudge distance and
run into something.
When the HUD is on, the speedometer reading will be
displayed continually. The current radio station or
CD
track number will only be displayed for three seconds
after the radio or
CD track status changes. This will
happen whenever one
of the radio controls is pressed,
either on the radio itself or on the optional steering
wheel controls.
...... ............. ... ...... .... . ... 2-84 L ., .5 e--..% _I...-,. I. .. .: . ’ ., , ,. ,.-. - .... ., .. _. .. .. . ,. .
ProCarManuals.com
Page 161 of 419

Section 3 Comfort Controls and Audio Systems
In this section, you'll find out how to operate the comfort control and audio systems offered with your Pontiac. Be
sure to read about the particular systems supplied with your vehicle.
3-2
3-2
3-4
3-4
3-8
3-8
3-8
3-9
3- 10
Comfort Controls
Air Conditioning, Air Conditioning with
Electronic Controls Air Conditioning, Air Conditioning with
Automatic and Auxiliary Temperature Control
Heating, Air Conditioning with
Electronic Controls
Heating, Air Conditioning with Automatic
and Auxiliary Temperature Controls
Ventilation System and Tips
Tips for Defogging and Defrosting
Rear Window Defogger Setting the Clock 3- 10
3-15
3-24
3-26
3-29
3-30 3-30
3-30
3-3 1
3-32
3-32
3-32 Radios
CD Adapter Kit
Trunk Mounted CD Changer
Theft-Deterrent Feature
Steering Wheel Controls
Understanding Radio Reception Adding Sound Equipment to Your
Tips About Your Audio System
Care
of Your Cassette Tape Player
Care of Your Compact Discs
Fixed Mast Antenna
Backglass Antenna
.. :le
ProCarManuals.com
Page 170 of 419

Audio Systems
Your Delco@ audio system has been designed to operate
easily and give years of listening pleasure.
You will get
the most enjoyment out
of it if you acquaint yourself
with it first, Find out what your Delco system can do
and how
to operate all its controls, to be sure you’re
getting the most
out of the advanced engineering that
went into it.
Setting the Clock for AM-FM Stereo
Press SET. Within five seconds, press and hold the
SEEK clown arrow until the correct hour appears on the
display. Press and hold the
SEEK up arrow until the
correct minute appears on the display.
Setting the Clock for All Systems Except
AM-FM Stereo
Press and hold HR until the correct hour appears. Press
and hold
MIN until the correct minute appears. There
will be a two-second delay before the clock goes into
time-set mode, and the colon on the display will blink
while in this mode.
AM-FM Stereo
Playing the Radio
VOLUME:
Push this knob to turn the system on and
off. To increase volume, turn the knob clockwise. Turn
it counterclockwise to decrease volume.
RCLPROG: Press this button to recall the station
being played or to display the clock.
3-10
ProCarManuals.com