1997 OLDSMOBILE CUTLASS tow
[x] Cancel search: towPage 83 of 353

It can be dangerous to get out of your vehicle if
the shift lever is not fully in
PARK (P) with the
parking brake firmly set, Your vehicle can roll,
Don’t leave your vehicle when the engine
is
running unless you have to. If you’ve left the
engine running, the vehicle can move suddenly.
You
or others could be injured, To be sure your
vehicle won’t move, even when you’re on
fairly
level ground, always set your parkink brake and
move the shift lever to
PARK (P).
Windows
Manual Windows
On a vehicle with manual windows, use the window
crank to open and close each window.
Power Windows (If Equipped)
Follow the proper steps to be sure your vehicle won’t
move. See “Shifting Into
PARK (P)” in the Index.
If
you are parking on a hill and if you’re pulling a
trailer,
also see “Towing a Trailer” in the Index.
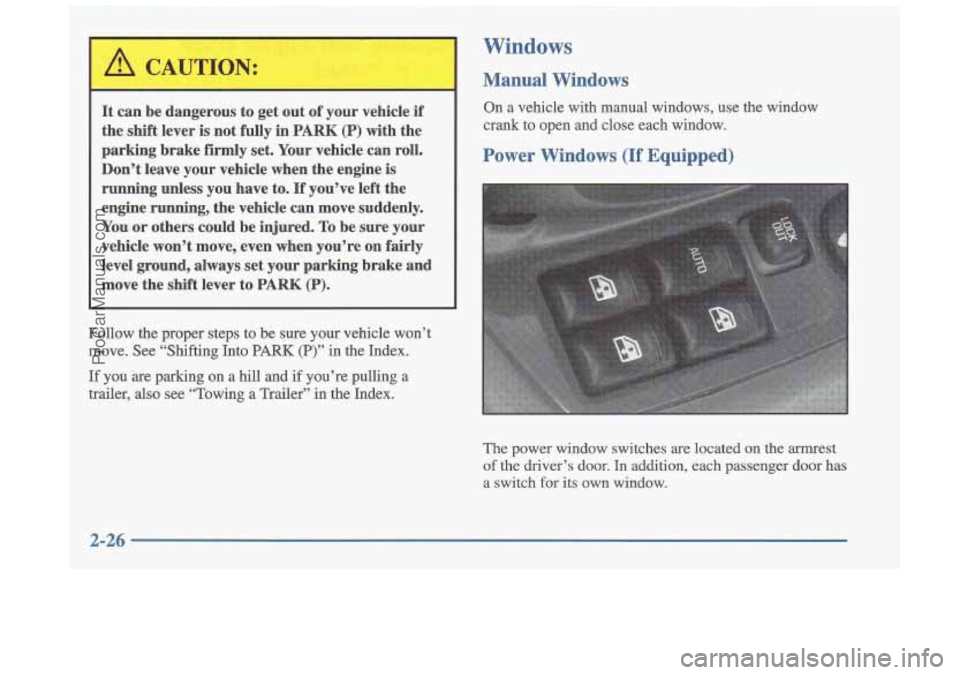
The power window switches
are located on the mest
of the driver’s door.
In addition, each passenger door has
a switch for its own window.
2-26
ProCarManuals.com
Page 84 of 353

Auto-Down Switch
The driver’s window switch has an auto-down feature.
This switch is labeled
AUTO. Push the switch back
partway, and the driver’s window will open a small
amount. If the switch is pushed
all the way back, the
window will go all the way down.
Tilt Wheel
To stop the window while it is lowering, move the
switch forward. To raise the window, move and hold
the switch forward.
Lock Out Switch
The driver’s power window controls also include a
lock out switch. Press LOCK
OUT to stop front and
rear passengers from using their window switches. The
driver can still control all the windows with the lock on.
Press the LOCK
OUT button again for normal window
operation.
Horn
You can sound the horn by pressing the horn symbol on
your steering wheel.
A tilt steering wheel allows you to adjust the steering
wheel before
you drive.
You can also raise it to the highest level to give your
legs more room when you exit and enter the vehicle.
To tilt the wheel, hold the steering wheel and pull the
lever toward you.
Move the steering wheel to a comfortable level, then
release the lever to lock the wheel in place.
2-27
ProCarManuals.com
Page 86 of 353

To signal a lane change, just raise or lower the lever
until the arrow starts to flash. Hold it there until you
complete your lane change. The lever will return by
itself when you release it.
A warning chime signal will come on if you have left
your turn signal on for more than
3/4 mile (1 km).
As you signal a turn or a lane change, if the arrow
flashes rapidly, a signal bulb may be burned out and other drivers won’t see your turn signal.
If a bulb is burned out, replace it to help avoid an
accident. If the arrow doesn’t go on at all when you
signal a turn, check for burned-out bulbs and then check
the fuse (see “Fuses and Circuit Breakers” in the Index).
Headlamp High/Low Beam
To change the headlamps
from low beam to high
beam, push forward on the
turn signaUmultifunction
lever.
To change the
headlamps from high beam
to low beam, pull the turn
signal lever backward.
When the high bearns are
I I on, a light on the instrument
panel also will be on.
Flash to Pass
This feature lets you use your high-beam headlamps to
signal a driver
in front of you that you want to pass.
To use it, pull the turn signaYmultifunction lever toward
you until the high-beam headlamps come on, then
release the lever to turn them
off.
ProCarManuals.com
Page 96 of 353

Mirrors
Inside Daymight Rearview Mirror
This mirror can be adjusted two ways. First, to adjust
the angle of the mirror, move the mirror to a position
that allows you see out the back window.
To adjust the
height of the mirror, adjust the
arm that connects the
mirror to the windshield.
To reduce glare from lights behind you, move the lever
toward you
to the night position.
Manual Remote Control Mirror
The outside rearview mirror should be adjusted so you
can just see the side
of your vehicle when you are sitting
in a comfortable driving position.
Adjust the driver’s side
outside mirror with the
control lever on the
driver’s door.
To adjust your passenger’s side mirror, sit in the driver’s
seat and have a passenger adjust the mirror for you.
2-39
ProCarManuals.com
Page 110 of 353

Brake System Warning Light
Your Oldsmobile’s hydraulic brake system is divided
into two parts.
If one part isn’t working, the other part
can still work and stop you. For good braking, though,
you need both parts working well.
If the warning light comes on, there could be a brake
problem. Have your brake system inspected right away.
BRAKE
This light should come on
briefly when you turn the
ignition key to
ON. If it
doesn’t come on then, have
it fixed
so it will be ready to
warn you if there’s
a
problem.
If the light and chime come on while you are driving,
pull
off the road and stop carefully. You may notice that
the pedal is harder to push. Or, the pedal may
go closer
to the
floor. It may take longer to stop. If the light is still
on, have the vehicle towed for service. (See “Towing
Your Vehicle’’
in the Index.)
Your brake system may not be working properly
if the brake system warning light is
on. Driving
with the brake system warning light on can lead
to an accident. If the light is still on after you’ve
pulled off the road and stopped carefully, have
the vehicle towed for service.
When the ignition is on, the brake system warning light
will also come
on when you set your parking brake. The
light will stay on if your parking brake doesn’t release
fully. If it stays on after your parking brake is fully
released, it means you have a brake problem.
ProCarManuals.com
Page 113 of 353

I
NOTICE:
If you keep driving your vehicle with this light
on, after a while, your emission controls may not
work as well, your fuel economy may not be as
good and your engine
may not run as smoothly.
This could lead to costly repairs that may not be
covered by your warranty.
This light should come on, as a check to show you it is
working, when the ignition is on and the engine is not
running.
If the light doesn’t come on, have it repaired.
This light will
also come on during a malfunction in one
of two ways:
Light Flashing -- A misfire condition has been
detected. A misfire increases vehicle emissions and
may damage the emission control system on your
vehicle. Retailer or qualified service center diagnosis and service is required.
Light On Steady -- An emission control system
malfunction has been detected on your vehicle.
Retailer or qualified service center diagnosis and service may be required.
If the Light Is Flashing
The following may prevent more serious damage to
your vehicle:
Reducing vehicle speed.
Avoiding hard accelerations.
Avoiding steep uphill grades.
If you are towing a trailer, reduce the .amount of
cargo being hauled as soon as it is possible.
If the light stops flashing and remains on steady, see “If
the Light Is
On Steady” following.
If the light continues to flash, when it is safe to do so,
stop the vehicle. Find a safe place to park your vehicle.
Turn the key
off, wait at least 10 seconds and restart the
engine. If the light remains on steady, see
“If the Light
Is On Steady” following.
If the light is still flashing,
follow the previous steps, and drive the vehicle to your
retailer or qualified service center for service.
2-56
ProCarManuals.com
Page 125 of 353

Heating
On cold days, use FLOOR with the temperature knob all
the way in the red area. The system will bring in outside
air, heat it and send it to the floor ducts.
Your vehicle has heat ducts that are directed toward the
rear seat. Keep the area under the front seats clear
of
obstructions so the heated air can reach the rear
seat passengers.
If your vehicle has an engine coolant heater, you can use
it to help your system provide warm
air faster when it’s
cold outside (0°F
(- 18 O C) or lower). An engine coolant
heater warms the coolant your engine and heating system use to provide heat. See “Engine Coolant
Heater” in the Index.
Defogging and Defrosting Windows
Your system has two settings for clearing the front and
side windows. For each setting, adjust the temperature
control as desired.
To defrost the windows quickly, rotate the temperature
control
knob all the way in the red area. Use
DEFROST and adjust the fan to the highest speed.
To warm passengers while keeping the windows clean,
use DEFOG.
Your vehicle is equipped with side window defogger
vents. The side window defogger vents are located on
the outside of the side instrument panel vents. For
additional side window defogging, rotate the mode
control to VENT, rotate the
fan control to the highest
speed, press A/C and aim the side vents on the
instrument panel to the windows. For increased airflow
to the side windows, close the center vents.
RECIRCULATION will not work in DEFROST and
DEFOG. This is done to prevent recirculation of humid
inside air and allow the system to work properly.
ProCarManuals.com
Page 146 of 353

Section 4 Your Driving and the Road
Here you’ll find information about driving on different kinds\
of roads and in varying weather conditions. We’ve also
included many other useful tips on driving.
4-2 4-3
4-6
4-6
4-7
4-9
4-9 4-11
4- 12
4-13 Defensive Driving
Driving Drunk
Having Control of Your Vehicle
Your Braking System Information
Anti-Lock Brake Information
Braking in Emergencies
Steering Tips
Off-Road Recovery Tips
Passing Other Vehicles
Losing Control of Your Vehicle 4-
14
4-16
4-2
1
4-22
4-22
4-24
4-26
4-28
4-30
4-32 Night Driving
Driving
in Rain and on Wet Roads
Tips Before Leaving on a Long Trip
Avoiding Highway Hypnosis
Driving on
Hills and Mountains
Winter Driving If You’re Caught
in a Blizzard
Recreational Vehicle Towing
Loading Your Vehicle
Helpful Hints for Towing a Trailer
4-1
ProCarManuals.com