1997 Oldsmobile Aurora display
[x] Cancel search: displayPage 61 of 404

-ewer Door Locks
) .......... * ............ With power door locks, you
can lock or unlock all doors
of your vehicle from the
driver or front passenger
door lock switch,
Door Ajar Reminder Programmable Automatic Door Locks
This is a
Personalization feature that programs your
door
locks to automatically lock or unlock.
Close your doors and turn on the ignition. Every time
you
move your shift lever out of PARK (P), all of the
doors will lock. And, every time
you stop and move
your shift lever into PARK
(P), your doors will unlock.
If someone needs to get out while you’re not in
PARK
(P), have that person use the manual or power
lock. When the door is closed again, it will not lock
automatically. Just use the manual or power lock to lock
the door again.
If you need to lock your doors before
shifting out
of PARK (P), use the manual or power lock
button
to lock the doors.
If a door is not fully closed when the transaxle is in gear, a
chime will sound and the Driver Information Center (DIC)
will display one
of these messages:
DRIVER DOOR AJAR
PASSENGER DOOR AJAR
LEFT REAR DOOR AJAR
RIGHT REAR DOOR AJAR
2-5
Page 77 of 404

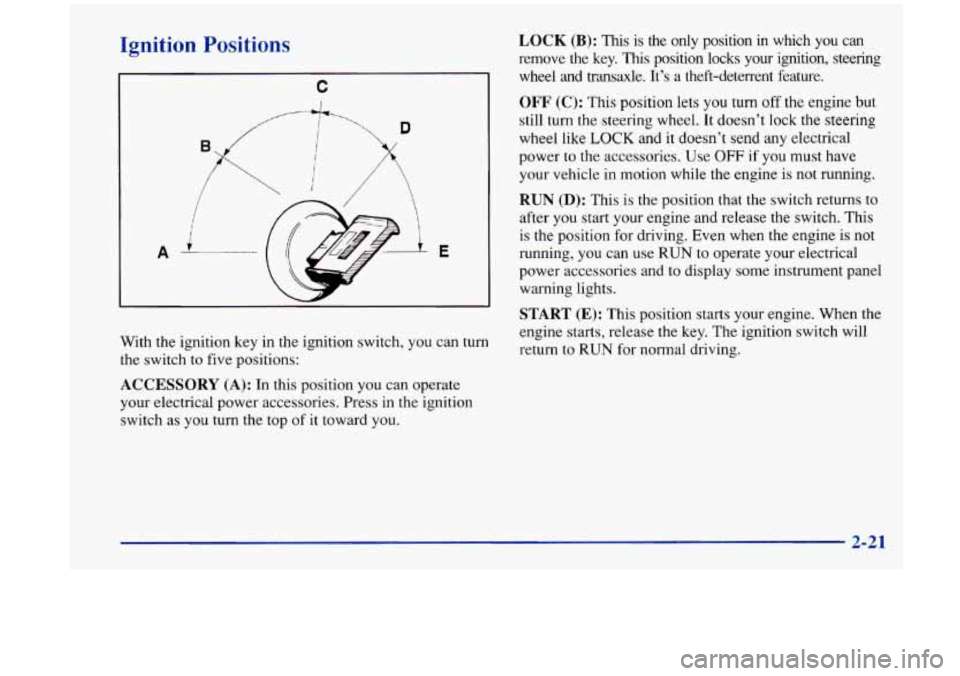
Ignition Positions
C
D
1 I
A E
With the ignition key in the ignition switch, you can turn
the switch to five positions:
LOCK (B): This is the only position in which you can
remove the key. This position locks your ignition, steering
wheel and transaxle. It’s a theft-deterrent feature.
OFF (C): This position lets you turn off the engine but
still turn the steering wheel. It doesn’t lock the steering
wheel like
LOCK and it doesn’t send any electrical
power to the accessories. Use
OFF if you must have
your vehicle in motion while the engine is not running.
RUN (D): This is the position that the switch returns to
after you start your engine and release the switch. This
is the position for driving. Even when the engine
is not
running, you can use
RUN to operate your electrical
power accessories and to display some instrument panel
warning lights.
START (E): This position starts your engine. When the
engine starts, release the key. The ignition switch will
return to
RUN for normal driving.
ACCESSORY (A): In this position you can operate
your electrical power accessories. Press in the ignition
switch as you turn the top of it toward you.
2-21
Page 102 of 404

Twilight Sentinel
TWILIGHTSENTINEL I
Twilight sentinel hlms your
headlamps, taillamps and
parking lamps on and
off by
sensing how dark it
is outside.
To operate it, leave the headlamp switch off and move
the twilight sentinel control toward
MAX. The control is
located to the left of the steering column.
If you move the control all the way to MAX, your lamps
will remain on for three minutes after
you turn off your
engine. If
you move the control toward MIN, the lamps
will go off quickly when
you turn off your engine. You
can set this delay time for only a few seconds or up to
three minutes.
Light Sensor
Your twilight sentinel and daytime running lamps work
with the light sensor on top
of the instrument panel.
Don't cover
it up. If you do it will read "dark" and the
headlamps will come on.
Interior Lamps
Instrument Panel Brightness
INTERIOR LIGHTS TWILIGHT SENTINEL
C A
You can brighten or dim your instrument cluster, radio
and climate control displays and control lights by
rotating the INTERIOR
LIGHTS control between LO
and HI when your lights are on. Rotate the control all
the way to HI and you will turn on the interior
courtesy lamps.
2-46
Page 103 of 404

Time Out Feature Theater Dimming
The interior
lamps will automatically shut off after 10
minutes if a door is left open. This feature is designed to
help eliminate battery wear down.
Courtesy Lamps
When any door is opened, several lamps go on. They
make it easy for you to enter and leave the car. To turn
on these lamps, rotate the
INTERIOR LIGHTS knob all
the way to
HI.
Delayed Illumination
When you open the door to enter your vehicle, the interior
lamps will come on. When you close the door with the
ignition
off, the interior lamps will stay on for 25 seconds
or until the ignition is turned on. Please note that locking
the doors will override the delayed illumination feature
and the lights will turn off right away. This feature allows for
a three to five-second fade out
of
the courtesy lamps instead of immediate turn off. They
will not fade if the interior lights switch
is used.
Parade Dimming
This feature prohibits the dimming of your instrument
displays during daylight while your headlamps are on.
This feature operates with the light sensor for
the
twilight sentinel and is fully automatic. When the light
sensor reads darkness outside, you will be able to dim
your instrument panel displays once again.
Exit Lighting
With this feature, the interior lamps will come on for
25 seconds after you remove the key from the ignition.
This will give you time to find the door pull handle or
lock switches when you exit the vehicle.
2-47
Page 107 of 404

Setting the Mirror Time Delay
OFF: This
setting turns off the day/night function and
compass. The mirror will stay in the day mode.
M: This turns on the day/night portion of the mirror to
automatically reduce glare.
C/M: This setting turns on the compass in addition to
the day/night function. The letter or letters displayed in
the top right corner
of the mirror indicate the direction
in which you are traveling. This mirror
has a time delay feature that prevents rapid
changing from the night mode
to the day mode as you
drive under lights and through traffic.
Reverse Gear Day Mode
The reverse mode is another important feature of
the electrochromic mirror. When you shift into
REVERSE (R), the mirror changes to the day mode.
This gives you a bright image in the mirror as you
back up.
Cleaning the Photocells
Use a cotton swab and glass cleaner to clean the
photocells when necessary.
2-
Page 108 of 404

Compass Calibration
Once the compass is calibrated, it does not need to be
recalibrated as long
as the mirror is left in your vehicle
and the vehicle remains in the same geographical zone.
To calibrate the compass:
1. Set the switch on the mirror control to
C/M.
2. Turn the vehicle’s ignition switch on. If the letter C
is not displayed in the mirror compass window, hold
the
CAL switch (on the bottom of the mirror) for
more than
10 seconds. To hold in the CAL switch,
insert a paper clip into the small hole on the bottom
of the mirror housing. The display will show a
number first, but keep holding until the letter
C
appears.
For quick calibration, drive the vehicle
in a
360-degree circle at less than 5 mph (Skdh) until
the display reads
a compass direction.
For normal calibration, drive the vehicle on
your everyday routine, and the compass will
eventually calibrate.
Compass Variance
Variance is the difference between magnetic north and
geographic north.
Tn some areas, the difference between
the two can be great enough to cause false compass
readings. If this happens, follow these instructions to set
the variance
for your particular location:
1. Find your location on the zone map. Note your
zone number.
2-52
Page 109 of 404

2. Hold in the CAL switch (on the bottom of the mirror
housing) for five seconds until the current zone entry
number appears
on the display. To hold in the CAL
switch, insert a paper clip into the small hole on the
bottom of the mirror housing.
Repeatedly press the
CAL switch until the number
for the new zone entry is displayed.
Once the desired zone number is displayed, stop
pressing the CAL switch and the display will show
compass direction within a few seconds.
Power Remote Control Mirror
The controls on the far left
of the instrument panel
control both outside
rearview mirrors. Move the
center switch
to the left to
select the driver’s side
rearview mirror, or to the
right to select the
passenger’s side rearview mirror. Then
press the arrows to adjust each mirror
so that you
can just see the side of your vehicle when you are sitting
in
a comfortable driving position.
To lock the controls, leave
the selector switch in the
middle position.
When you operate the rear window defogger, a defogger
also warms the driver’s and passenger’s outside
rearview mirrors to help clear them of ice and snow.
Parallel Park Assist Mirror
The passenger’s outside rearview mirror also includes a
tilt-down feature that operates when the shift lever is in
reverse. This feature assists
the driver with improved
rear obstacle detection.
Move the power remote control mirror switch to the
left
(L) or center position to enable this feature. Move
the switch to the right (R) to turn this feature off.
Page 124 of 404

Tachometer
The tachometer displays the
engine speed in revolutions
per minute (rpm).
If your engine speed equals or exceeds the safe limit for
operation, the message HOT
... REDUCE ENGINE RPM
is displayed on the information center.
I NOTICE: I
Do not operate the engine with the tachometer in
the red area,
or when the message
HOT. ..REDUCE ENGINE RPM is displayed.
Engine damage may occur.
Warning Lights, Gages and Indicators
This part describes the warning lights and gages that may be
on your vehicle. The pictures will help you locate them.
Warning lights and gages can signal that something
is
wrong before it becomes serious enough to cause an
expensive repair or replacement. Paying attention to
your warning lights and gages could also save you
or
others from injury.
Warning lights come on when there may be or is a
problem with one of your vehicle’s functions.
As you will
see
in the details on the next few pages, some warning
lights come on briefly when
you start the engine just to let
you know they’re working.
If you are familiar with this
section, you should not be alarmed when this happens.
Gages can indicate when there may be or
is a problem
with one of your vehicle’s functions. Often gages and
warning lights work together to let you know when
there’s
a problem with your vehicle.
When one
of the warning lights comes on and stays on
when you are driving, or when one
of the gages shows
there may be a problem, check the section that tells you
what to
do about it. Please follow this manual’s advice.
Waiting to
do repairs can be costly -- and even
dangerous.
So please get to know your warning lights
and gages. They’re
a big help.