1997 NISSAN QUEST air condition
[x] Cancel search: air conditionPage 146 of 247

N (Neutral):
Neither forward nor reverse gear is en-
gaged. The engine can be started in this
position. You may shift to N and restart a
stalled engine while the vehicle is moving.
D (Drive):
Use this position for all normal forward
driving.
2 (Second gear):
Use for hill climbing or engine braking on
downhill grades.
Do not downshift into 2 at speeds over 63
MPH (100 km/h). Do not exceed 63 MPH
(100 km/h) in 2.
1 (Low gear):
Use 1 when climbing steep hills slowly or
driving slowly through deep snow, sand or
mud, or for maximum engine braking on
steep downhill grades.
Do not exceed 38 MPH (60 km/h) in 1.
Do not shift into 1 at speeds over 38 MPH
(60 km/h).Accelerator downshift
Ð In D position Ð
For rapid passing or hill climbing, fully depress
the accelerator pedal to the floor. This shifts the
transmission down into third gear, second gear
or first gear, depending on the vehicle speed.
Fail-safe
When the Fail-safe operation occurs, the
next time the key is turned to the ON
position, the O/D OFF light blinks for ap-
proximately 8 seconds after coming on for 2
seconds. While the vehicle can be driven
under these circumstances, please note
that the gears in the automatic transmission
will be locked in 3rd gear.
NOTE: If the vehicle is driven under extreme
conditions, such as excessive wheel spinning
and subsequent hard braking, the Fail-safe
system may be activated. This will occur even
if all electrical circuits are functioning prop-
erly. In this case, turn the ignition key OFF
and wait for 3 seconds. Then turn the key
back to the ON position. The vehicle should
return to its normal operating condition. If it
does not return to its normal operating condi-
tion, have your NISSAN dealer check the
transmission and repair, if necessary.
OVERDRIVE SWITCH
Each time your vehicle is started, the trans-
mission is automatically ``reset'' to overdrive
ON.
ON: For normal driving the overdrive
switch is engaged. The transmission
is upshifted into overdrive as the
vehicle speed increases.
The overdrive does not engage until the
engine has warmed up.
OFF: For driving up and down long slopes
where engine ``braking'' would be
advantageous, push the overdrive
switch. The O/D OFF light illumi-
ASD0561
4-7
ZX
Page 151 of 247

During the first 1,000 miles (1,600 km),
follow these recommendations for the future
reliability and fuel economy of your new
vehicle. Failure to follow these recommen-
dations may result in vehicle damage or
shortened engine life.
cDo not drive over 55 MPH (90 km/h) and
do not run the engine over 4,000 RPM.
Avoid driving for long periods at constant
speed, either fast or slow.
cDo not accelerate at full throttle in any
gear.
cAvoid quick starts.
cAvoid hard braking as much as possible.
cDo not tow a trailer for the first 500 miles
(800 km).cAccelerate slowly and smoothly. Main-
tain cruising speeds with a constant ac-
celerator position.
cDrive at moderate speeds on the high-
way. Driving at high speed lowers fuel
economy.
cAvoid unnecessary stopping and brak-
ing. Maintain a safe distance behind
other vehicles.
cUse a proper gear range which suits road
conditions. On level roads, shift into high
gear as soon as possible.
cAvoid unnecessary engine idling.cKeep your engine tuned up.
cFollow the recommended periodic main-
tenance schedule.
cKeep the tires inflated at the correct
pressure. Low pressure increases tire
wear and wastes fuel.
cKeep the front wheels in correct align-
ment. Improper alignment causes not
only tire wear but also lower fuel
economy.
cAir conditioner operation lowers fuel
economy. Use the air conditioner only
when necessary.
cWhen cruising at highway speeds, it is
more economical to use the air condi-
tioner and leave the windows closed to
reduce drag.
SD1001M
BREAK-IN SCHEDULE INCREASING FUEL
ECONOMY
4-12
ZX
Page 154 of 247

The anti-lock brake system controls the
brakes at each wheel so the wheels do not
lock when braking abruptly or when braking
on slippery surfaces. The system detects the
rotation speed at each wheel and varies the
brake fluid pressure to prevent each wheel
from locking and sliding. By preventing wheel
lockup, the system helps the driver maintain
steering control and helps to minimize swerv-
ing and spinning on slippery surfaces.
Using the system
Depress the brake pedal and hold it down.
WARNING
Do not pump the brake pedal. Doing so
may result in increased stopping dis-
tances.
Normal operation
The anti-lock brake system does not operate
at speeds below 3 to 6 MPH (5 to 10 km/h) to
completely stop the vehicle. (The speeds vary
according to road conditions.) When the anti-
lock system senses one or more wheels are
close to locking up, the actuator (under the
hood) rapidly applies and releases hydraulic
pressure (like pumping the brakes veryquickly). While the actuator is working, you
may feel a pulsation in the brake pedal and
hear a noise or vibration from the actuator
under the hood. This is normal and indicates
the anti-lock system is working properly. How-
ever, the pulsation may indicate road condi-
tions are hazardous and extra care is required
while driving.
Self-test feature
The anti-lock brake system consists of elec-
tronic sensors, electric pumps, and hydraulic
solenoids controlled by a computer. The com-
puter has a built-in diagnostic feature that
tests the system each time you start the
engine and move the vehicle at a low speed in
forward or reverse. When the self-test occurs,
you may hear a ``clunk'' noise and/or feel a
pulsation in the brake pedal. This is normal
and is not an indication of any malfunction. If
the computer senses any malfunction, it
switches the anti-lock brake system OFF and
turns on the ABS brake warning light in the
dashboard. The brake system then operates
normally, but without anti-lock assistance.
If the light comes on during the self-test, or
while driving, take your vehicle to your NIS-
SAN dealer for repair at your earliest conve-
nience.
WARNING
The anti-lock brake system is a sophis-
ticated device, but it cannot prevent
accidents resulting from careless or
dangerous driving techniques. It can
help maintain vehicle control during
braking on slippery surfaces, but re-
member that the stopping distance on
slippery surfaces will be longer than on
normal surfaces, even with the anti-
lock system. Stopping distances may
also be longer on rough, gravel or
snow covered roads, or if you are using
tire chains. Always maintain a safe dis-
tance from the vehicle in front of you.
Ultimately, the responsibility for safety
of self and others rests in the hands of
the driver.
Tire type and condition of tires may
also affect braking effectiveness.
cWhen replacing tires, install the
specified size of tires on all 4 wheels.
ANTI-LOCK BRAKE SYSTEM
(ABS) (if so equipped)
4-15
ZX
Page 166 of 247

Always follow the instructions below.
Failure to do so could result in damage
to the charging system and cause per-
sonal injury.
1. If the booster battery is in another ve-
hicle, position the two vehicles to bring
their batteries close to each other.
Do not allow the two vehicles to touch.
2. Apply the parking brake. Move the gear-
shift lever to the P (Park) position. Switch
off all unnecessary electrical systems
(lights, heater, air conditioner, etc.).3. Remove vent caps on the battery (if so
equipped). Cover the battery with an old
cloth to reduce explosion hazard.
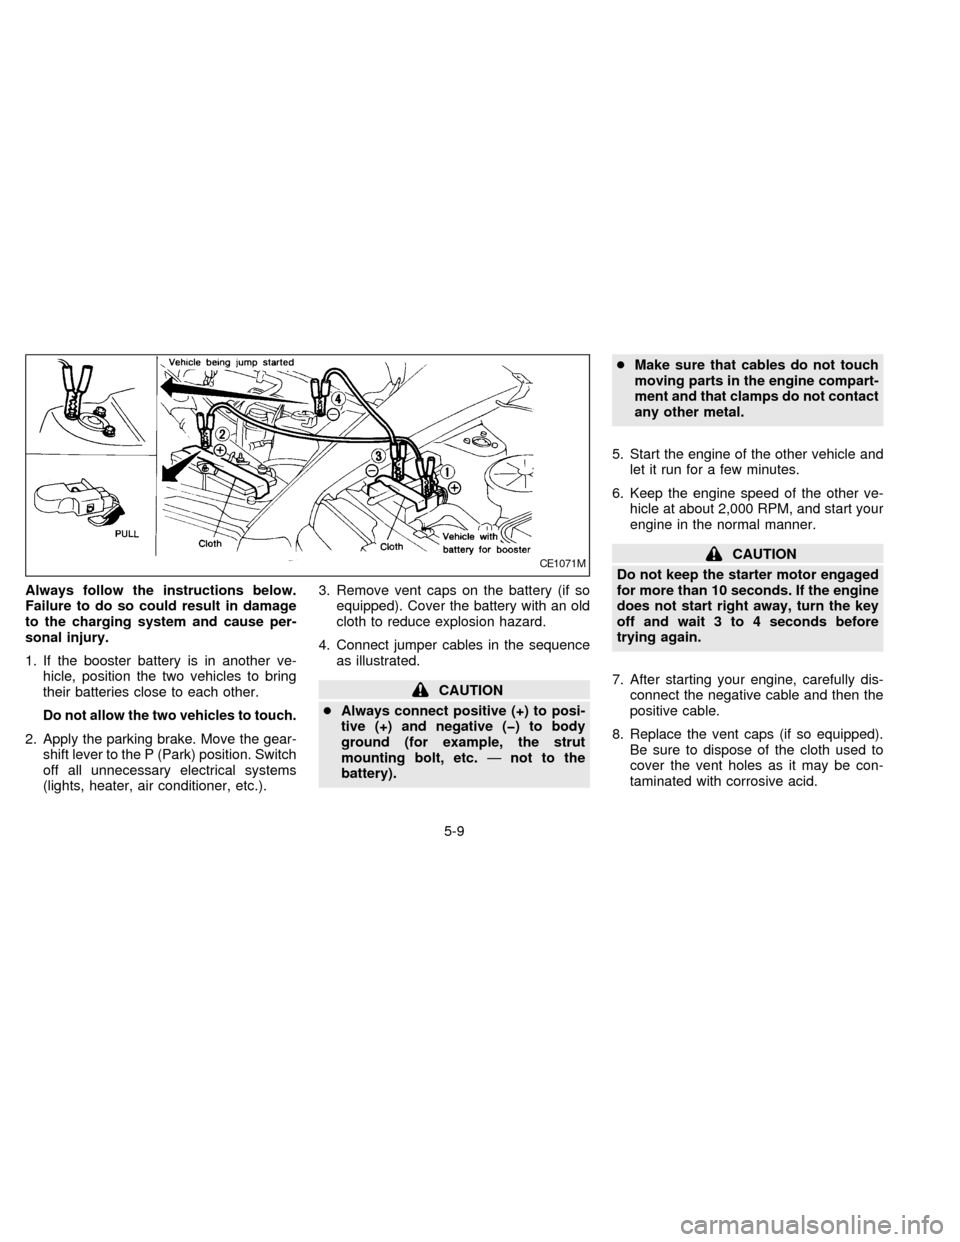
4. Connect jumper cables in the sequence
as illustrated.
CAUTION
cAlways connect positive (+) to posi-
tive (+) and negative (þ) to body
ground (for example, the strut
mounting bolt, etc.Ðnot to the
battery).cMake sure that cables do not touch
moving parts in the engine compart-
ment and that clamps do not contact
any other metal.
5. Start the engine of the other vehicle and
let it run for a few minutes.
6. Keep the engine speed of the other ve-
hicle at about 2,000 RPM, and start your
engine in the normal manner.
CAUTION
Do not keep the starter motor engaged
for more than 10 seconds. If the engine
does not start right away, turn the key
off and wait 3 to 4 seconds before
trying again.
7. After starting your engine, carefully dis-
connect the negative cable and then the
positive cable.
8. Replace the vent caps (if so equipped).
Be sure to dispose of the cloth used to
cover the vent holes as it may be con-
taminated with corrosive acid.CE1071M
5-9
ZX
Page 167 of 247

CAUTION
cAutomatic transmission models can-
not be push started. This may cause
transmission damage.
cThree way catalyst equipped models
should not be started by pushing
since the three way catalyst may be
damaged.
cNever try to start the vehicle by tow-
ing it, when the engine starts, the
forward surge could cause the ve-
hicle to collide with the tow vehicle.If your vehicle is overheating (indicated by
an extremely high temperature gauge read-
ing), or if you feel a lack of engine power,
detect abnormal noise, etc., take the follow-
ing steps:
WARNING
cDo not continue to drive if your ve-
hicle overheats. Doing so could
cause a vehicle fire.
cTo avoid the danger of being
scalded, never remove the radiator
cap while the engine is still hot.
When the radiator cap is removed,
pressurized hot water will spurt out,
possibly causing serious injury.
cDo not open the hood if steam is
coming out.
1. Move the vehicle safely off the road,
apply the parking brake and move the
gearshift lever to the P (Park) position.
Do not stop the engine.
2. Turn off the air conditioner switch. Open
all the windows, move the temperature
control dial to warm and fan control knob
to 4.3. If engine overheating is caused by climb-
ing a long hill on a hot day, run the engine
at a fast idle (approximately 1,500 RPM)
until the temperature gauge indication
returns to normal.
4. Get out of the vehicle. Look and listen for
steam or coolant escaping from the ra-
diator before opening the hood. Wait until
no steam or coolant can be seen before
proceeding.
5. Open the hood.
WARNING
If steam or water is coming from the
engine, stand clear to prevent getting
burned.
6. Visually check drive belts for damage or
looseness. Also check to make sure the
cooling fan is running. The radiator hoses
and radiator should not leak water. If
coolant is leaking, the water pump belt is
missing or loose, or the cooling fan does
not run, stop the engine.
PUSH STARTING IF YOUR VEHICLE
OVERHEATS
5-10
ZX
Page 178 of 247

7Do-it-yourself operations
Maintenance precautions .......................................7-2
Engine compartment check locations ....................7-3
Engine cooling system ...........................................7-4
Checking engine coolant level ...............................7-4
Changing engine coolant .......................................7-5
Engine oil ...............................................................7-5
Checking engine oil level .......................................7-5
Changing engine oil ...............................................7-6
Changing engine oil filter .......................................7-7
Automatic transmission fluid (ATF) ........................7-8
Temperature conditions for checking ATF .............7-8
Power steering fluid................................................7-9
Brake fluid ............................................................7-10
Window washer fluid ............................................7-10
Battery ..................................................................7-11
Jump starting ........................................................7-12Drive belts ............................................................7-12
Spark plug replacement .......................................7-12
Air cleaner housing filter ......................................7-13
Wiper blades ........................................................7-14
Parking brake check.............................................7-16
Brake pedal ..........................................................7-16
Brake booster .......................................................7-17
Fuses ....................................................................7-17
Fusible links..........................................................7-18
Light bulbs ............................................................7-19
Headlights ............................................................7-19
Bulb replacement .................................................7-21
Wheels and tires ..................................................7-25
Types of tires........................................................7-26
Tire chains ............................................................7-26
ZX
Page 195 of 247

the right-front corner of the engine compart-
ment.
The right headlight (passenger side) fuse is
located in the left-hand fuse box, near the
radiator cap.
1. Turn the headlight switch to the OFF
position.
2. Open the engine hood.
3. Remove the appropriate fuse box cover.
4. Remove the fuse with the fuse puller
attached to the passenger compartment
fuse box cover.
5. If the fuse is open, replace it with a new
fuse.
6. If a new fuse opens again, have the
electrical system checked and repaired
by your NISSAN dealer.If the electrical equipment does not operate
and fuses are in good condition, check the
fusible links. If any of these fusible links are
melted, replace only with genuine NISSAN
parts.
If the new fusible link melts again, have the
system checked and repaired by your
NISSAN dealer.
ADI0584
FUSIBLE LINKS
7-18
ZX
Page 209 of 247

Your new NISSAN has been designed to
have minimum maintenance requirements
with longer service intervals to save you
both time and money. However, some day-
to-day and regular maintenance is essential
to maintain your NISSAN's good mechani-
cal condition, as well as its emission and
engine performance.
It is the owner's responsibility to make sure
the specified maintenance, as well as gen-
eral maintenance, is performed.
As the vehicle owner, you are the only one
who can ensure that your vehicle receives
the proper maintenance care. You are a
vital link in the maintenance chain.
General maintenance
General maintenance includes those items
which should be checked during normal
day-to-day operation of the vehicle. They
are essential if your vehicle is to continue to
operate properly. It is your responsibility to
perform these procedures regularly as pre-
scribed.
These checks or inspections can be done
by yourself, a qualified technician or, if you
prefer, your NISSAN dealer.
Periodic maintenance
The maintenance items listed in this section
must be serviced at regular intervals.
However, under severe driving conditions,
additional or more frequent maintenance is
required.
Where to go for service
If maintenance service is required or your
vehicle appears to malfunction, have the
systems checked and tuned by an autho-
rized NISSAN dealer.
NISSAN technicians are well-trained spe-
cialists and are kept up to date with the
latest service information through technical
bulletins, service tips, and in-dealership
training programs. They are completely
qualified to work on NISSAN's vehiclesbe-
forethey work on your vehicle, rather than
after they have worked on it.
You can be confident that your NISSAN
dealer's service department performs the
best job to meet the maintenance require-
ments on your vehicle Ð in a reliable and
economic way.During the normal day-to-day operation of
the vehicle, general maintenance should be
performed regularly as prescribed in this
section. If you detect any unusual sounds,
vibrations or smells, be sure to check for the
cause or have your NISSAN dealer do it
promptly. In addition, you should notify your
NISSAN dealer if you think repairs are re-
quired.
When performing any checks or mainte-
nance work, closely observe the precau-
tions in the ``Do-it-yourself operations'' sec-
tion.
Additional information on the following
items with ``*'' can be found in the ``Do-it-
yourself operations'' section.
OUTSIDE THE VEHICLE
The maintenance items listed here should
be performed from time to time, unless
otherwise specified.
Tires*Ð Check the pressure with a gauge
periodically when at a service station, in-
cluding the spare, and adjust to the speci-
fied pressure if necessary. Check carefully
for damage, cuts or excessive wear.
Wheel nuts*Ð When checking the tires,
GENERAL MAINTENANCE
8-2
ZX