1997 NISSAN PATHFINDER transmission
[x] Cancel search: transmissionPage 126 of 233
the key back to the ªONº position. The
vehicle should return to its normal operat-
ing condition. If it does not return to its
normal operating condition have your
NISSAN dealer check the transmission and
repair if necessary.
IDo not downshift abruptly on slippery
roads. This may cause a loss of con-
trol.
IDo not over-rev the engine when
shifting to a lower gear. This may
cause a loss of control or engine
damage.
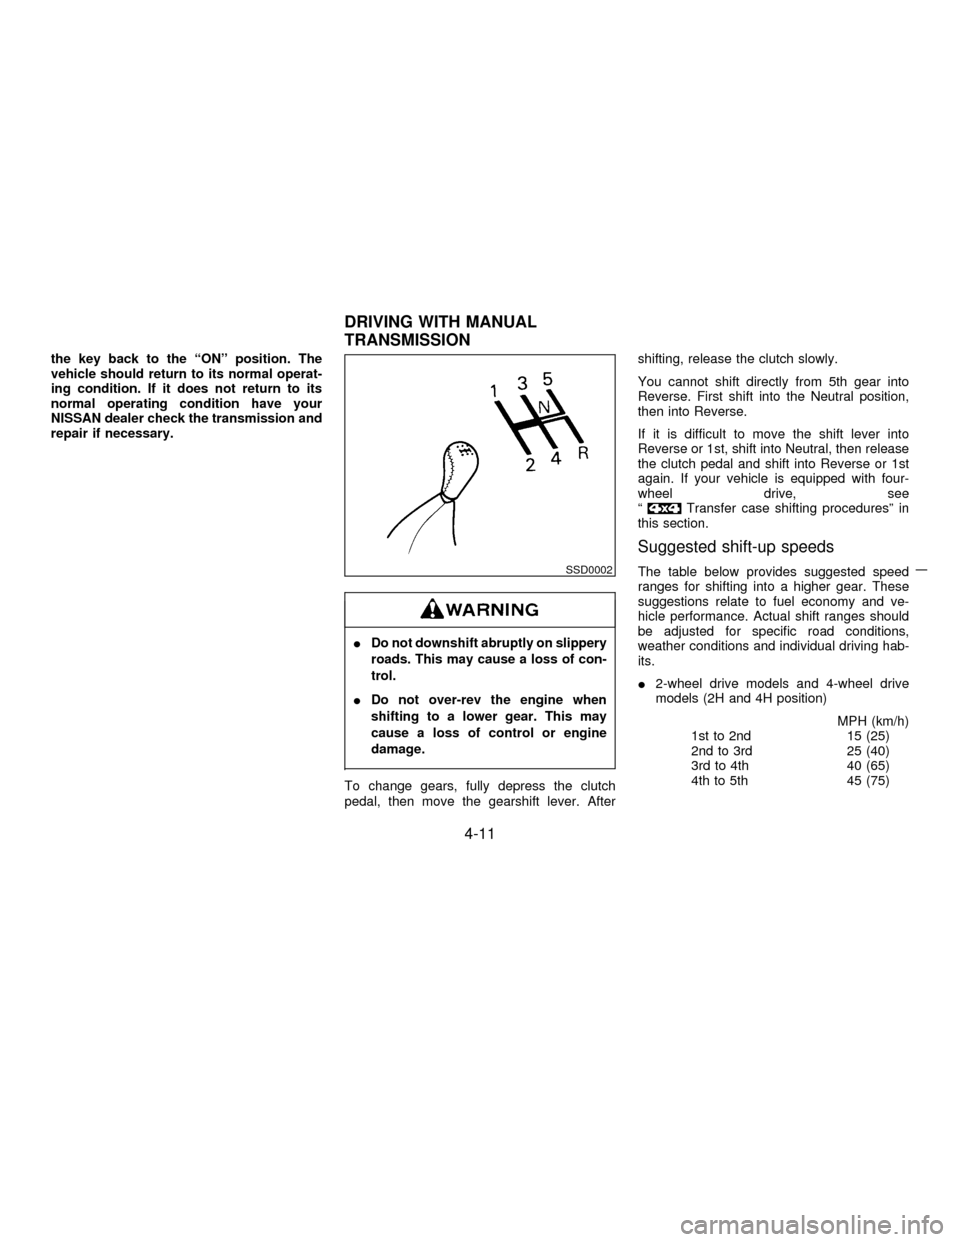
To change gears, fully depress the clutch
pedal, then move the gearshift lever. Aftershifting, release the clutch slowly.
You cannot shift directly from 5th gear into
Reverse. First shift into the Neutral position,
then into Reverse.
If it is difficult to move the shift lever into
Reverse or 1st, shift into Neutral, then release
the clutch pedal and shift into Reverse or 1st
again. If your vehicle is equipped with four-
wheel drive, see
ª
Transfer case shifting proceduresº in
this section.
Suggested shift-up speeds
The table below provides suggested speed
ranges for shifting into a higher gear. These
suggestions relate to fuel economy and ve-
hicle performance. Actual shift ranges should
be adjusted for specific road conditions,
weather conditions and individual driving hab-
its.
I2-wheel drive models and 4-wheel drive
models (2H and 4H position)
MPH (km/h)
1st to 2nd 15 (25)
2nd to 3rd 25 (40)
3rd to 4th 40 (65)
4th to 5th 45 (75)SSD0002
DRIVING WITH MANUAL
TRANSMISSION
4-11
Z01.2.1/R50-DX
Page 128 of 233
1. Apply the parking brake.
2.Automatic transmission:
Move the selector lever to ªPº (Park position
or ªNº (Neutral position). (ªPº preferred)
The selector lever cannot be moved out
of ªPº and into any of the other gear
positions if the ignition key is turned to
ªOFFº or if the key is removed from the
switch.
The starter is designed not to operate if
the selector lever is in one of the driving
positions.
Manual transmission:
Move the gearshift lever to ªNº (Neutral
position), and depress the clutch pedal to
the floor while starting the engine.
The starter is designed not to operate
unless the clutch pedal is depressed.
3. Crank the enginewith your foot off the
accelerator pedalby turning the ignition
key to ªSTARTº. Release the key when the
engine starts. If the engine starts, but fails
to run, repeat the above procedure.
Ð If the engine is very hard to start in
extremely cold or hot weather ÐUse the accelerator pedal to help start the
engine.
Do not crank the engine for more than 10
seconds at a time. If the engine does not
start, turn the key off and wait 10 sec-
onds before cranking again, otherwise
the starter could be damaged.
4.Warm-up
Always allow the engine to idle for at least
30 seconds after starting. Drive at moder-
ate speed for a short distance first, espe-
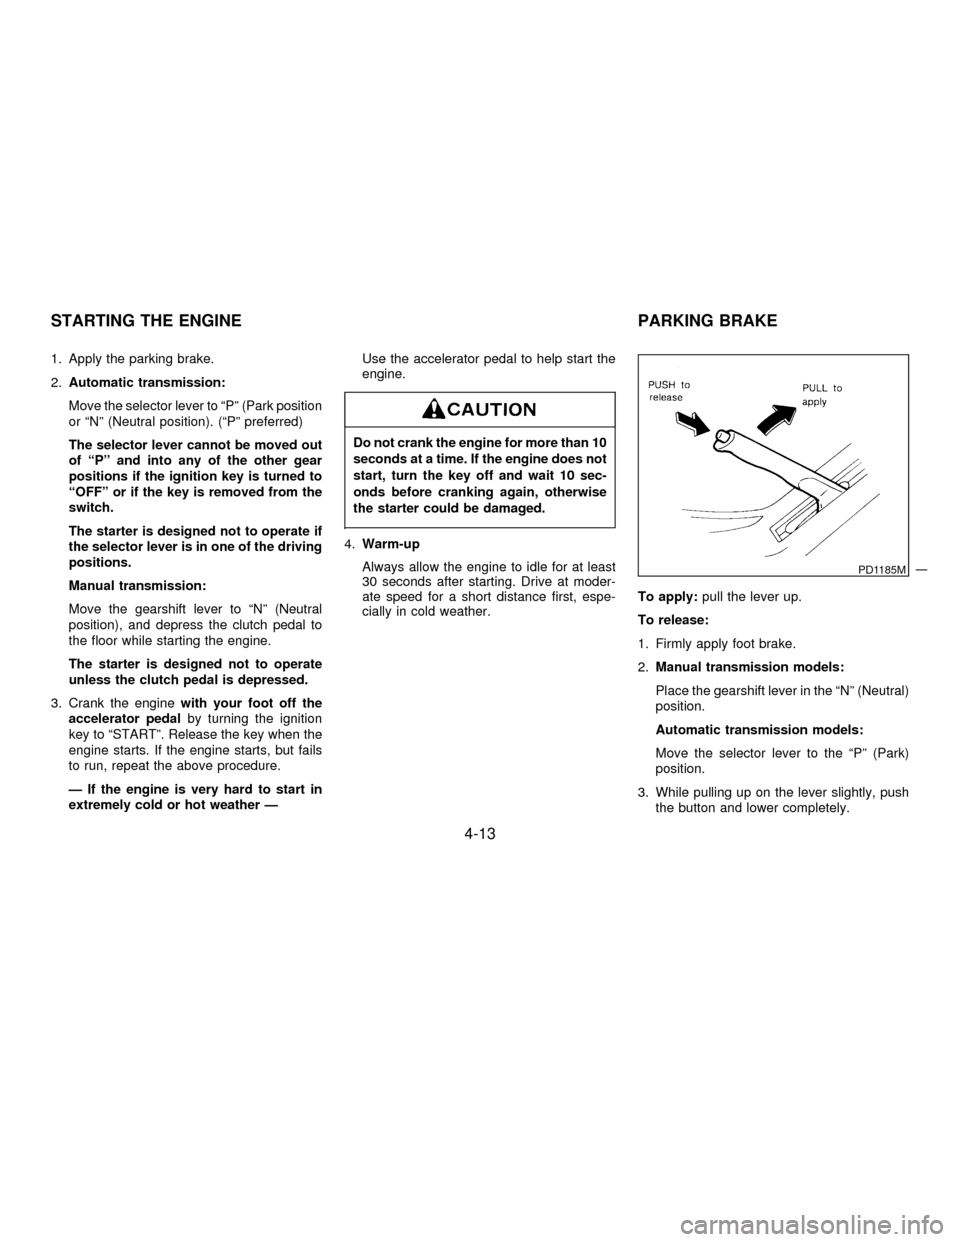
cially in cold weather.To apply:pull the lever up.
To release:
1. Firmly apply foot brake.
2.Manual transmission models:
Place the gearshift lever in the ªNº (Neutral)
position.
Automatic transmission models:
Move the selector lever to the ªPº (Park)
position.
3. While pulling up on the lever slightly, push
the button and lower completely.
PD1185M
STARTING THE ENGINE PARKING BRAKE
4-13
Z01.2.1/R50-DX
Page 130 of 233
c) Turn the main switch off. Both the ªONº
indicator and ªCRUISEº light will go out.
IIf you depress the brake pedal while push-
ing the ªACCELº set switch and reset at the
cruising speed, turn the main switch off
once and then turn it on again.
IThe cruise control will automatically be can-
celled if the vehicle slows down more than
8 MPH (13 km/h) below the set speed.
IDepress the clutch pedal (manual transmis-
sion), or move the selector lever to ªNº
(automatic transmission). ªCRUISEº light
will go out.
To reset at a faster cruising speed,follow
either of these three methods:
a) Depress the accelerator pedal. When the
vehicle attains the desired speed, push and
release the ªCOAST/SETº switch.
b) Push and hold the ªACCELº set switch.
When the vehicle attains the speed you
desire, release the switch.c) Push, then quickly release the ªACCELº set
switch. Each time you do this, the set speed
will increase by about 1 MPH (1.6 km/h).
To reset at a slower cruising speed,follow
either of these three methods:
a) Lightly tap the brake pedal. When the ve-
hicle attains the desired speed, push the
ªCOAST/SETº switch and release it.
b) Push and hold the ªCOAST/SETº switch.
Release the switch when the vehicle slows
down to the desired speed.
c) Push, then quickly release the
ªCOAST/SETº switch. Each time you do
this, the set speed will decrease by about 1
MPH (1.6 km/h).
To resume the preset speed,push and re-
lease the ªRESUMEº set switch. The vehicle
will resume the last set cruising speed when
the vehicle speed is over 30 MPH (48 km/h).
Precautions
IThe cruise indicator may sometimes blink
when the cruise control switch (Main
switch) is turned ªONº while pushing the
ªRESUME/ACCELº switch or
ªCOAST/SETº switch or ªCANCELº switch
(located on the steering wheel). To properly
set the cruise control system perform thesteps above in the order indicated. (This is
a fail-safe mode. Turn the main switch
ªOFFº and turn it ªONº again without push-
ing the set switch to return to normal opera-
tion.)
IIf the cruise control system malfunctions, it
will cancel automatically. The cruise indica-
tor in the meter assembly will then blink to
warn the driver.
IWhen the cruise indicator blinks, turn the
cruise control switch (Main switch) ªOFFº
and have the system checked by your
NISSAN dealer.
Do not use the cruise control when driv-
ing under the following conditions:
Iwhen it is not possible to keep the
vehicle at set speed.
Iin heavy traffic or in traffic that varies
in speed.
Ion winding or hilly roads.
Ion slippery roads (rain, snow, ice,
etc.)
Iin very windy areas.
4-15
Z01.2.1/R50-DX
Page 131 of 233
Doing so could cause a loss of vehicle
control and result in an accident.
On the manual transmission model, do
not shift into neutral position without
depressing the clutch pedal when the
cruise control is on. This could cause
engine damage. If you shift into neutral
without depressing the pedal, depress
the clutch pedal and turn the main
switch off immediately.
During the first 1,000 miles (1,600 km), follow
these recommendations for the future reliabil-
ity and economy of your new vehicle. Failure to
follow these recommendations may result in
vehicle damage or shortened engine life.
IDo not run the engine over 4,000 rpm.
Do not drive over the following speed limits:
2-wheel drive models:
4-wheel drive models
(2H position):
55 MPH (90 km/h)
4-wheel drive models
(4H position):
50 MPH (80 km/h)
4-wheel drive models
(4L position):
30 MPH (50 km/h)
IDo not accelerate hard in top gear.
IAvoid quick starts and full acceleration.
IAvoid hard stops as much as possible.
I
For the first 300 miles (500 km), it is rec-
ommended that you drive in the 2-wheel
drive (2H) position.IDo not tow a trailer for the first 500 miles
(800 km).
BREAK-IN SCHEDULE
4-16
Z01.2.1/R50-DX
Page 133 of 233
4LÐ (4WD, low range) Four wheels are
driven. Use when climbing or descending
steep hills, or during hard driving in sand, mud
or deep snow. The ª4Lº position provides
maximum power and traction. Avoid raising
vehicle speed excessively, as the maximum
speed is approximately 30 MPH (50 km/h).
NÐ No wheels are driven. Always keep the
transfer lever out of the ªNº position. Shift the
lever quickly and smoothly when moving
across the ªNº position with the vehicle
stopped.
IDo not drive on dry hard surface
roads in 4-wheel drive.
Driving on dry hard surfaces in ª4Hº
or ª4Lº may cause unnecessary
noise and tire wear. We recommend
driving in the ª2Hº position under
these conditions.
IWhen parking the vehicle, apply the
parking brake and shift the transfer
control lever in the ª2Hº, ª4Hº or ª4Lº
position.
IDo not leave the transfer control lever
in the ªNº position. Otherwise, the
vehicle could roll unexpectedly even
if the manual transmission is in any
gear or the automatic transmission in
the ªPº position. If the ATP light is
ªONº, this indicates that the auto-
matic transmission ªparkº position
will not function and the transfer le-
ver is in neutral.
IFailure to engage the transfer control
lever in ª2Hº, ª4Hº or ª4Lº could
result in the vehicle moving unex-
pectedly, resulting in serious per-
sonal injury or property damage.
4-18
Z01.2.1/R50-DX
Page 134 of 233
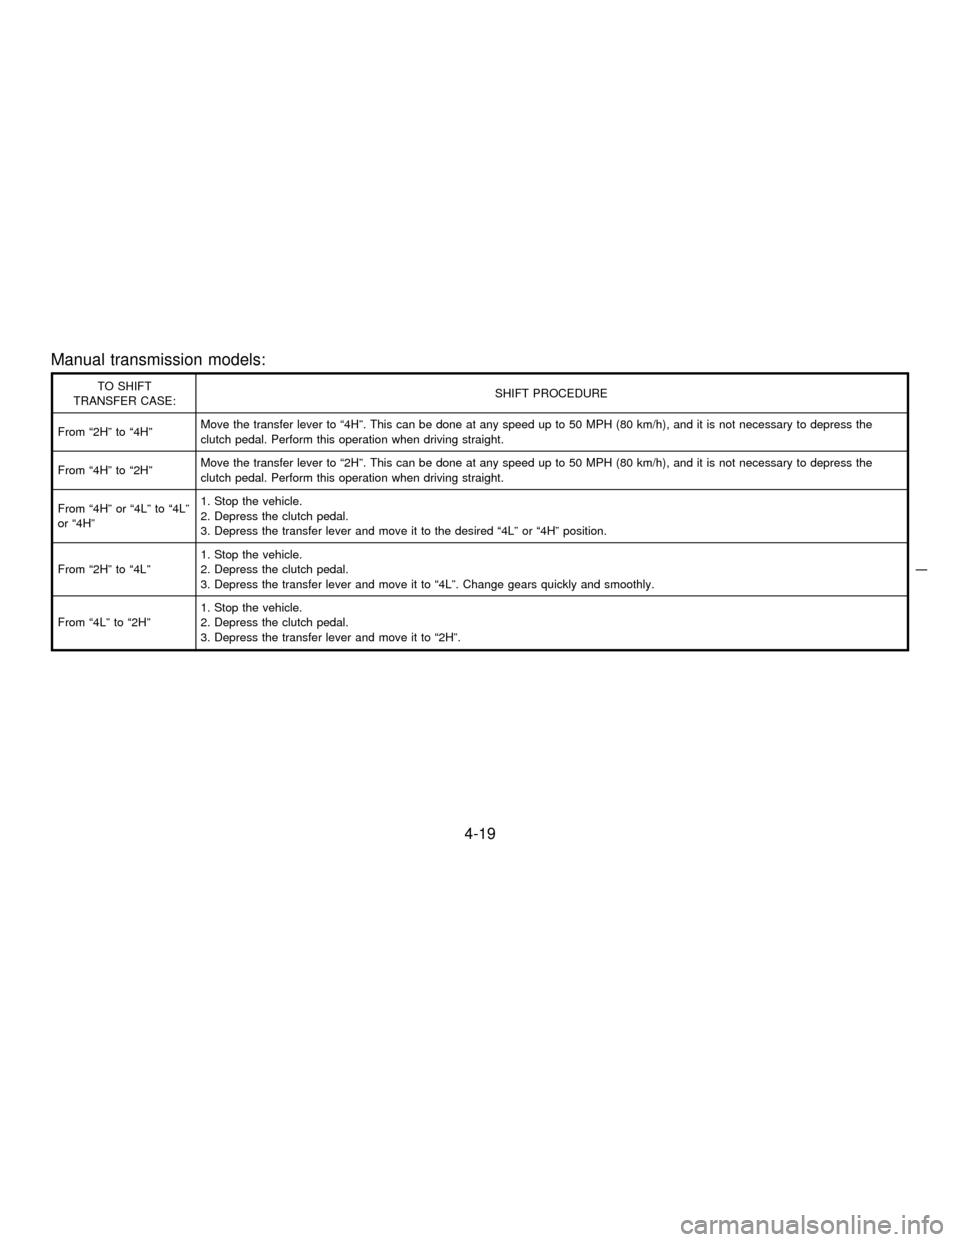
Manual transmission models:
TO SHIFT
TRANSFER CASE:SHIFT PROCEDURE
From ª2Hº to ª4HºMove the transfer lever to ª4Hº. This can be done at any speed up to 50 MPH (80 km/h), and it is not necessary to depress the
clutch pedal. Perform this operation when driving straight.
From ª4Hº to ª2HºMove the transfer lever to ª2Hº. This can be done at any speed up to 50 MPH (80 km/h), and it is not necessary to depress the
clutch pedal. Perform this operation when driving straight.
From ª4Hº or ª4Lº to ª4Lº
or ª4Hº1. Stop the vehicle.
2. Depress the clutch pedal.
3. Depress the transfer lever and move it to the desired ª4Lº or ª4Hº position.
From ª2Hº to ª4Lº1. Stop the vehicle.
2. Depress the clutch pedal.
3. Depress the transfer lever and move it to ª4Lº. Change gears quickly and smoothly.
From ª4Lº to ª2Hº1. Stop the vehicle.
2. Depress the clutch pedal.
3. Depress the transfer lever and move it to ª2Hº.
4-19
Z01.2.1/R50-DX
Page 135 of 233
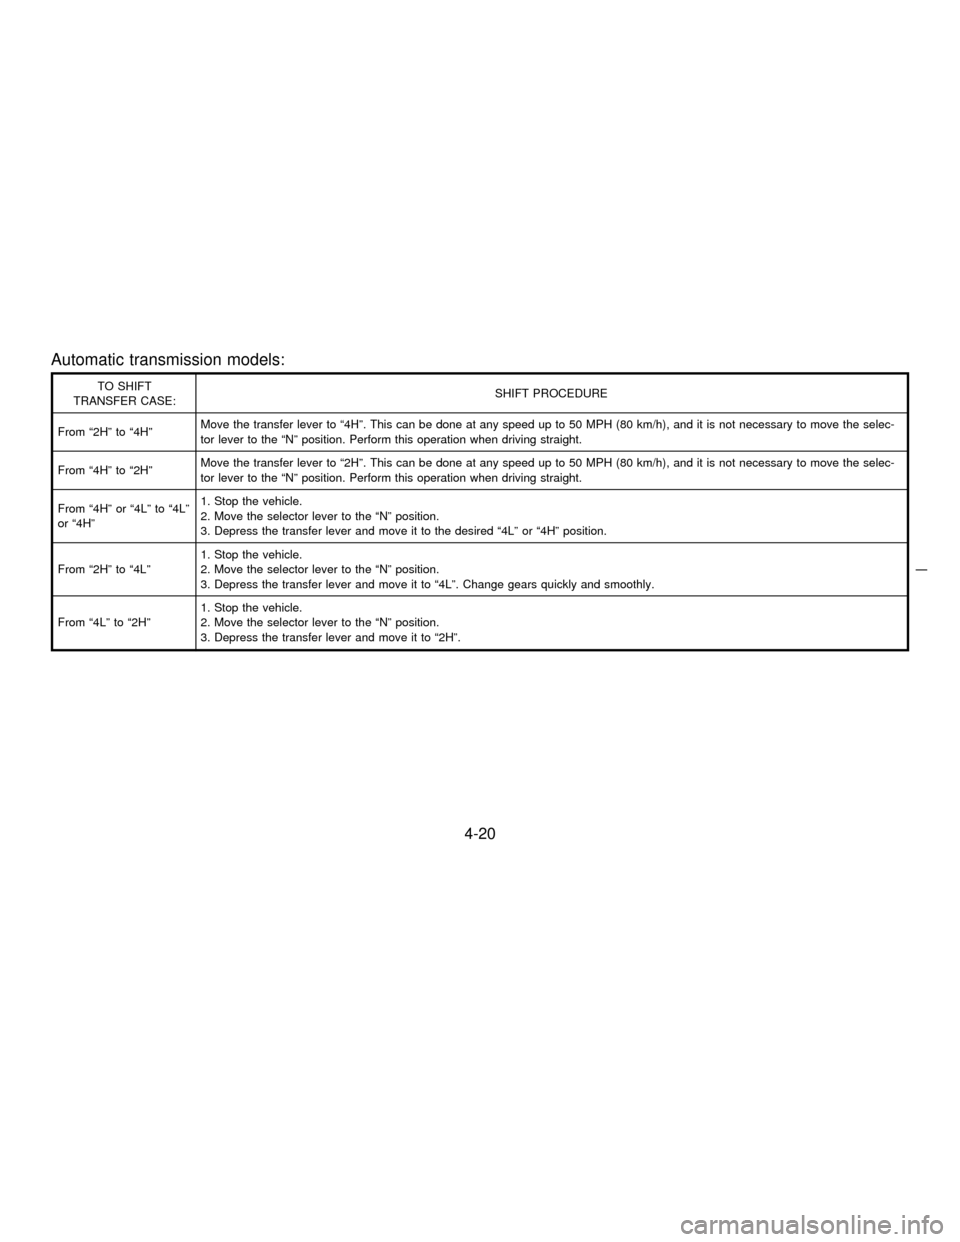
Automatic transmission models:
TO SHIFT
TRANSFER CASE:SHIFT PROCEDURE
From ª2Hº to ª4HºMove the transfer lever to ª4Hº. This can be done at any speed up to 50 MPH (80 km/h), and it is not necessary to move the selec-
tor lever to the ªNº position. Perform this operation when driving straight.
From ª4Hº to ª2HºMove the transfer lever to ª2Hº. This can be done at any speed up to 50 MPH (80 km/h), and it is not necessary to move the selec-
tor lever to the ªNº position. Perform this operation when driving straight.
From ª4Hº or ª4Lº to ª4Lº
or ª4Hº1. Stop the vehicle.
2. Move the selector lever to the ªNº position.
3. Depress the transfer lever and move it to the desired ª4Lº or ª4Hº position.
From ª2Hº to ª4Lº1. Stop the vehicle.
2. Move the selector lever to the ªNº position.
3. Depress the transfer lever and move it to ª4Lº. Change gears quickly and smoothly.
From ª4Lº to ª2Hº1. Stop the vehicle.
2. Move the selector lever to the ªNº position.
3. Depress the transfer lever and move it to ª2Hº.
4-20
Z01.2.1/R50-DX
Page 138 of 233
IDo not park the vehicle over flam-
mable materials, such as dry grass,
waste paper, or rags. They may ignite
and cause a fire.
I
The transfer control lever
must be in the ª2Hº, ª4Hº or ª4Lº
position and the parking brake must
be set to prevent the vehicle from
rolling.
INever place the transfer control lever
in the ªNº position, otherwise, the
vehicle could roll unexpectedly even
if the manual transmission is in gear
or the automatic transmission is in
the ªPº position. This could result in
serious personal injury or property
damage.
1. Firmly apply the parking brake.
2.Manual transmission models:
Place the shift lever in the ªREVERSEºposition. When parking on an uphill grade,
place the gearshift lever in the ª1stº posi-
tion.
Automatic transmission models:
Move the selector lever to the ªPº (PARK)
position.
Safe parking procedures require that
both the parking brake be set and the
transmission placed into the ªPº posi-
tion (automatic) or in appropriate gear
(manual). Failure to do so could cause
the vehicle to move unexpectedly or roll
away and result in an accident. Make
sure the shift lever has been pushed as
far forward as it can go and cannot be
moved.
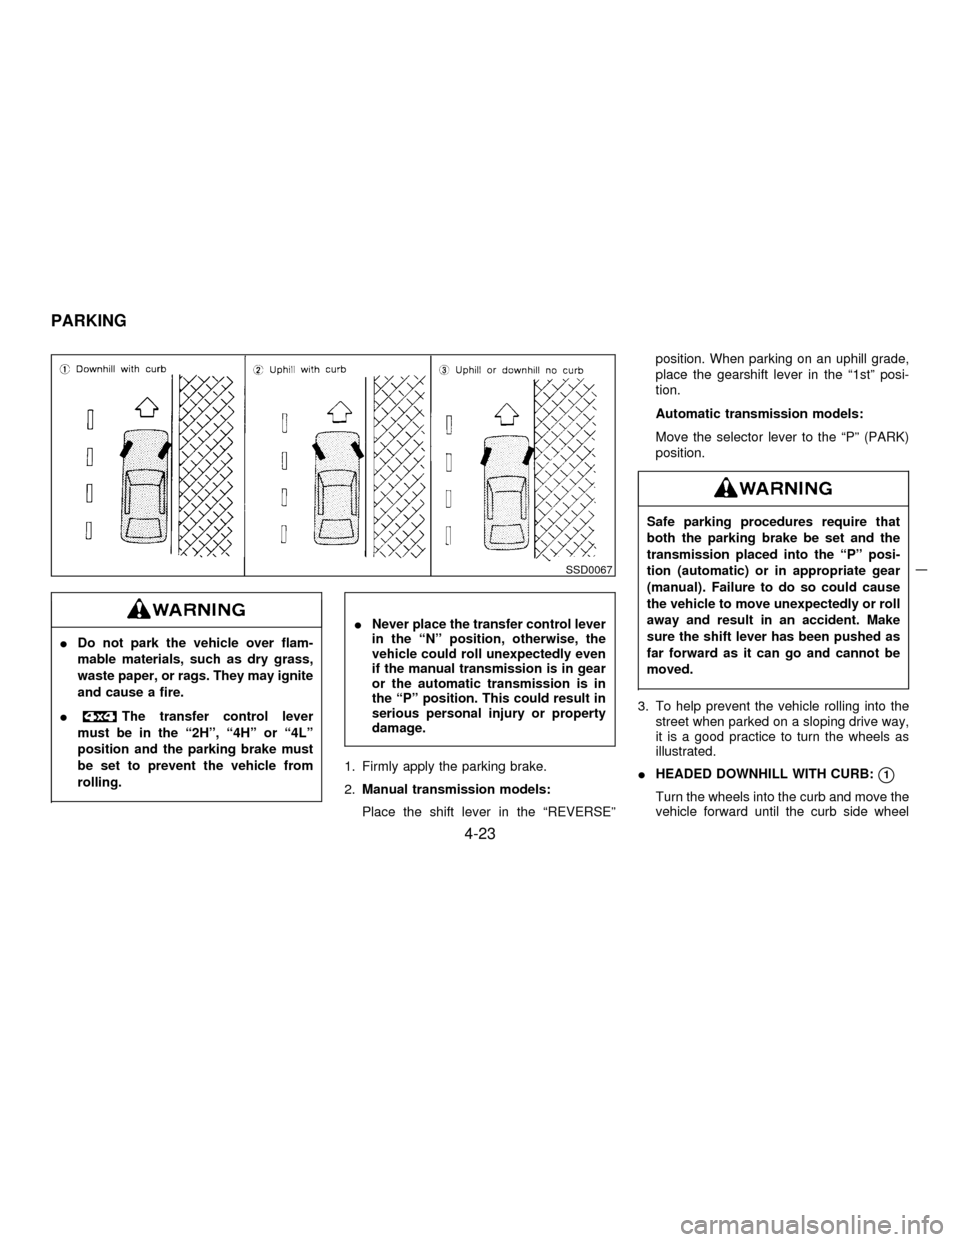
3. To help prevent the vehicle rolling into the
street when parked on a sloping drive way,
it is a good practice to turn the wheels as
illustrated.
IHEADED DOWNHILL WITH CURB:
q1
Turn the wheels into the curb and move the
vehicle forward until the curb side wheel
SSD0067
PARKING
4-23
Z01.2.1/R50-DX