1997 NISSAN FRONTIER lock
[x] Cancel search: lockPage 8 of 204

1Instruments and controls
Meters and gauges ................................................1-2
Speedometer and odometer ..................................1-3
Tachometer (if so equipped) ..................................1-3
Engine coolant temperature gauge........................1-4
Fuel gauge .............................................................1-4
Instrument cluster clock (if so equipped) ...............1-5
Warning/indicator lights and chimes ......................1-6
Headlight and turn signal switch ..........................1-10
Daytime running light system (Canada only) .......1-10
Windshield wiper and washer switch ...................1-11
Instrument brightness control ...............................1-12Hazard warning flasher switch .............................1-12
Cigarette lighter (accessory) and ash tray ...........1-13
Cup holder (if so equipped) .................................1-13
Interior light and cargo light .................................1-14
Spotlights (if so equipped) ...................................1-14
Manual windows ...................................................1-15
Power windows (if so equipped) ..........................1-15
Automatic power window switch ..........................1-16
Rear sliding window (if so equipped) ...................1-16
Opera window (if so equipped) ............................1-17
Sunroof (if so equipped).......................................1-17
ZX
Page 12 of 204

The digital clock displays time regardless of
ignition switch position. When the ignition
key is in the ACC or ON position, the clock
illuminates.
Adjusting the time
Turn the adjust knob counterclockwise to
advance the hour display.
Turn the adjust knob clockwise to advance
the minute display.
Resetting the time
To reset the time to the time signal, push the
adjust knob.
For example, if the adjust knob is depressed
while the time is between 8:00 and 8:29, the
display resets to 8:00. If depressed while it
is between 8:30 and 8:59, the display resets
to 9:00.
Once the power supply is disconnected, the
clock starts to operate from the time 1:00. It
may be necessary to adjust the time.
SIC0047A
INSTRUMENT CLUSTER CLOCK
(if so equipped)
1-5
ZX
Page 13 of 204

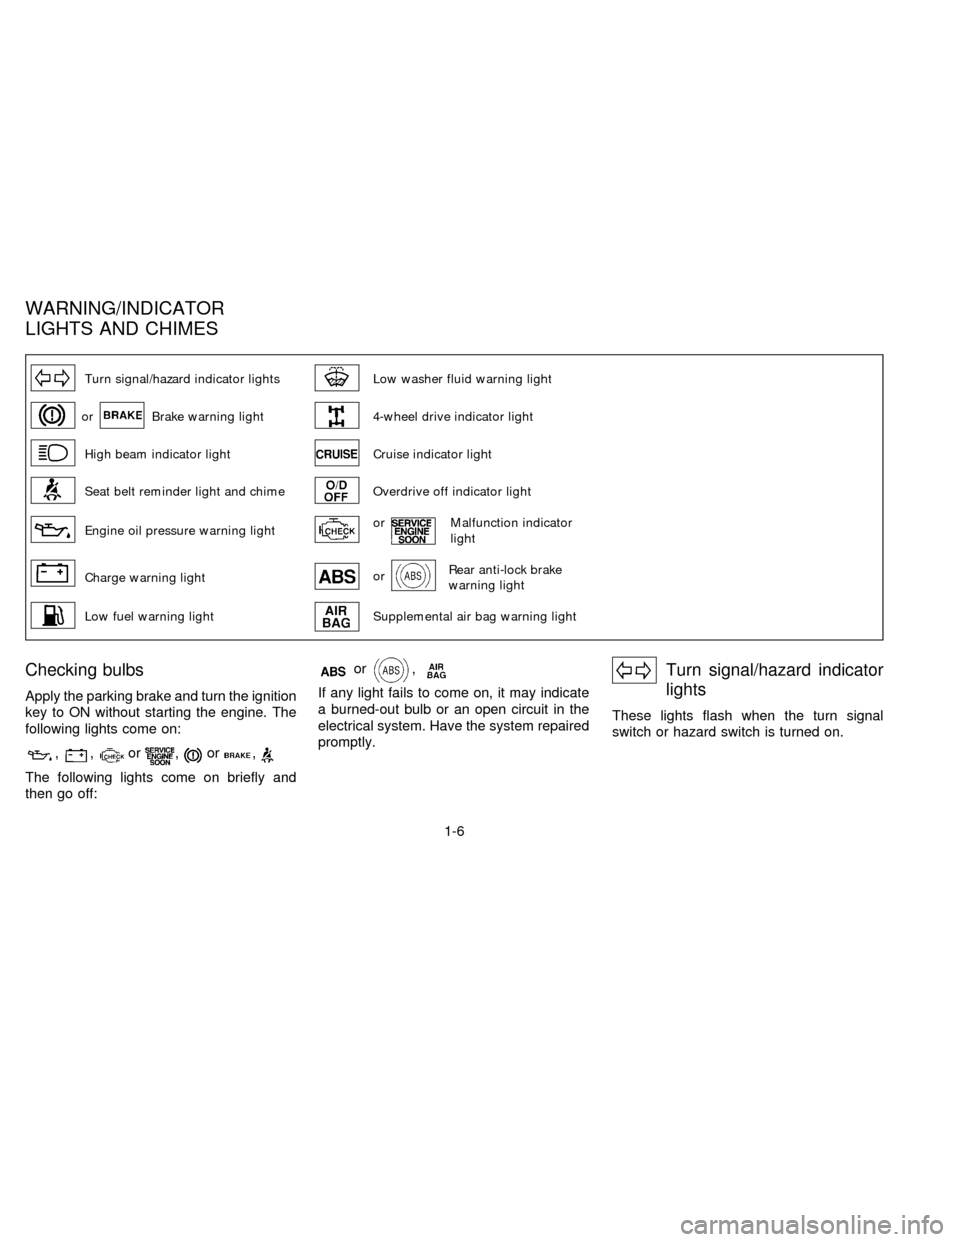
Turn signal/hazard indicator lightsLow washer fluid warning light
orBrake warning light4-wheel drive indicator light
High beam indicator lightCruise indicator light
Seat belt reminder light and chimeOverdrive off indicator light
Engine oil pressure warning lightorMalfunction indicator
light
Charge warning lightorRear anti-lock brake
warning light
Low fuel warning lightSupplemental air bag warning light
Checking bulbs
Apply the parking brake and turn the ignition
key to ON without starting the engine. The
following lights come on:
,,or,or,
The following lights come on briefly and
then go off:
or,
If any light fails to come on, it may indicate
a burned-out bulb or an open circuit in the
electrical system. Have the system repaired
promptly.
Turn signal/hazard indicator
lights
These lights flash when the turn signal
switch or hazard switch is turned on.
WARNING/INDICATOR
LIGHTS AND CHIMES
1-6
ZX
Page 16 of 204

orRear anti-lock brake
warning light
If the light comes on while the engine is
running, it may indicate a potential problem
with the rear anti-lock brake system. Have the
system checked by your NISSAN dealer.
If an abnormality occurs in the system, the
rear anti-lock function ceases but the ordi-
nary brakes continue to operate normally.
If the light comes on while you are driving,
contact your NISSAN dealer for repair.
The rear anti-lock brake system may only
be effective when driving in the 2-wheel
drive mode.
When driving in the 4-wheel drive mode, if the
front wheels lock, the rear wheels also lock. If
this happens, the rear anti-lock brake system
may stop functioning, but the ordinary brakes
operate normally. The warning light then
comes on. The above condition is not a mal-
function, and the rear anti-lock brake system
recovers once the engine is turned off and
restarted. The warning light then goes off. For
further description of the rear anti-lock brake
system, refer to ``Rear anti-lock brake system''
in the ``Starting and driving'' section.
Overdrive off indicator light
(if so equipped)
This light comes on when the overdrive
switch is pushed to the OFF position.
Key reminder chime
The chime sounds when the driver's door is
opened and the key is left in the ignition
switch. Take the ignition key when you
leave the vehicle.
Light reminder chime
A chime sounds if the driver's door is opened
with the headlight switch on unless the ignition
key is in the ON position. Turn the headlight
switch off when you leave the vehicle.
Brake pad wear warning
The disc brake pads have audible wear
warnings. When a brake pad requires re-
placement, it makes a high pitched scraping
sound when the vehicle is in motion whether
or not the brake pedal is depressed. Have
the brakes checked as soon as possible if
the warning sound is heard.
orMalfunction indi-
cator light (MIL)
If the malfunction indicator light comes onsteady or blinks while the engine is running,
it may indicate a potential emission control
problem.
The malfunction indicator light will come on
in one of two ways:
cMalfunction indicator light on steady - -
An emission control system malfunction
has been detected. Have the vehicle
inspected by an authorized NISSAN
dealer. You do not need to have your
vehicle towed to the dealer.
cMalfunction indicator light blinking - - An
engine misfire has been detected which
may damage the emission control sys-
tem. To reduce or avoid emission control
system damage:
cdo not drive at speeds above 45 MPH
(72 km/h).
c
avoid hard acceleration or deceleration.
cavoid steep uphill grades.
cif possible, reduce the amount of cargo
being hauled or towed.
The malfunction indicator light may stop
blinking and come on steady.
Have the vehicle inspected by an autho-
rized NISSAN dealer. You do not need to
have your vehicle towed to the dealer.
1-9
ZX
Page 22 of 204

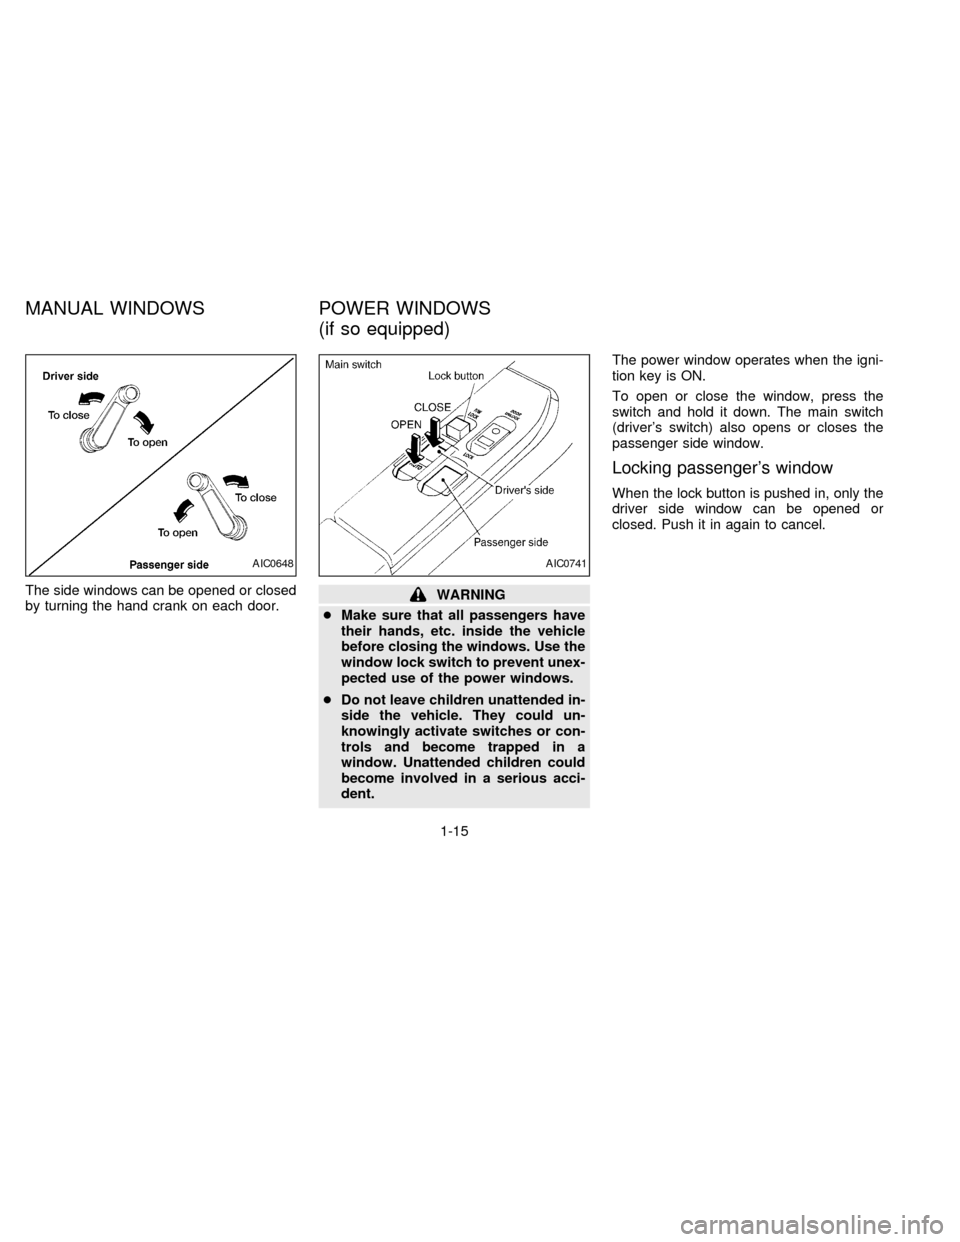
The side windows can be opened or closed
by turning the hand crank on each door.WARNING
cMake sure that all passengers have
their hands, etc. inside the vehicle
before closing the windows. Use the
window lock switch to prevent unex-
pected use of the power windows.
cDo not leave children unattended in-
side the vehicle. They could un-
knowingly activate switches or con-
trols and become trapped in a
window. Unattended children could
become involved in a serious acci-
dent.The power window operates when the igni-
tion key is ON.
To open or close the window, press the
switch and hold it down. The main switch
(driver's switch) also opens or closes the
passenger side window.
Locking passenger's window
When the lock button is pushed in, only the
driver side window can be opened or
closed. Push it in again to cancel.
AIC0648AIC0741
MANUAL WINDOWS POWER WINDOWS
(if so equipped)
1-15
ZX
Page 25 of 204

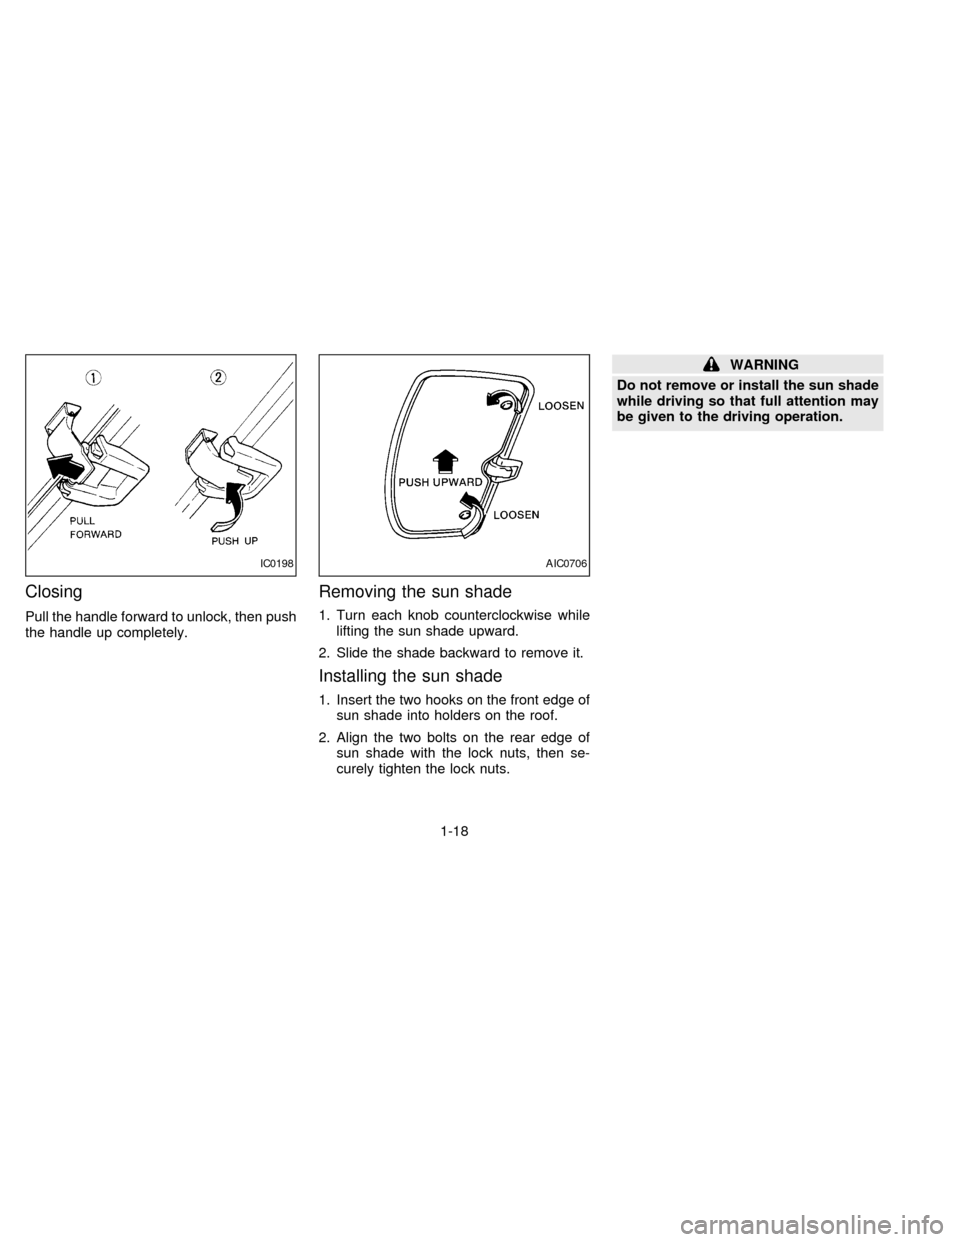
Closing
Pull the handle forward to unlock, then push
the handle up completely.
Removing the sun shade
1. Turn each knob counterclockwise while
lifting the sun shade upward.
2. Slide the shade backward to remove it.
Installing the sun shade
1. Insert the two hooks on the front edge of
sun shade into holders on the roof.
2. Align the two bolts on the rear edge of
sun shade with the lock nuts, then se-
curely tighten the lock nuts.
WARNING
Do not remove or install the sun shade
while driving so that full attention may
be given to the driving operation.
IC0198AIC0706
1-18
ZX
Page 28 of 204

2Pre-driving checks and adjustments
Key .........................................................................2-2
Door locks ..............................................................2-2
Power door lock (if so equipped) ...........................2-3
Hood release ..........................................................2-4
Glove box lock (if so equipped) .............................2-4
Fuel filler cap ..........................................................2-5
Tailgate latch ..........................................................2-5
Tie down hooks ......................................................2-7
Front separate seats ..............................................2-8
Seat adjustment .....................................................2-8
Head restraints .....................................................2-11
Tilting front separate seat ....................................2-11
Bench seat ...........................................................2-12
Seat adjustment ...................................................2-12
Tilting bench seat .................................................2-12
Jump seat .............................................................2-13
Supplemental restraint system (supplemental
air bag system).....................................................2-14
Supplemental air bag system...............................2-15
Warning labels......................................................2-17
Supplemental air bag warning light......................2-17Seat belts .............................................................2-19
Precautions on seat belt usage ...........................2-19
Child safety...........................................................2-20
3-point type with retractor ....................................2-21
2-point type without retractor (center of bench
seat and jump seats)............................................2-23
Seat belt extenders ..............................................2-24
Seat belt maintenance .........................................2-24
Child restraints for infants and small children......2-24
Installation on front passenger seat (3-point
type with retractor) ...............................................2-26
Installation in center of bench seat (2-point
type without retractor) ..........................................2-27
Top strap child restraint .......................................2-28
Tilting steering wheel (if so equipped) .................2-29
Outside mirror remote control
(if so equipped) ....................................................2-30
Outside mirrors .....................................................2-30
Inside mirror .........................................................2-31
Vanity mirror (if so equipped)...............................2-31
ZX
Page 29 of 204

A key number plate is supplied with your key.
Record the key number found on the key
number plate and keep it in a safe place
(such as your wallet), NOT IN THE VEHICLE.
If you lose your keys, see your NISSAN
dealer for duplicates by using the key num-
ber. NISSAN does not record key numbers so
it is very important to keep track of your key
number plate.
A key number is only necessary when you
have lost all keys and do not have one to
duplicate from. If you still have a key, this
key can be duplicated by your NISSAN
dealer or locksmith.
Locking doors with key
To lock the door, turn the key towards the
back of the vehicle. To unlock, turn it to-
wards the front.
On power door lock equipped models, lock-
ing the driver's door simultaneously locks
the passenger's door.
Locking doors without key
To lock the doors from the outside without a
key, push the inside lock knob to the lock
position, then close the door.
When locking the door this way, be certain
not to leave the key inside the vehicle.
PD1296IC1309MIC0184
KEY DOOR LOCKS
2-2
ZX