1997 NISSAN FRONTIER brake
[x] Cancel search: brakePage 103 of 204
cBefore operating the vehicle, ensure
that the driver and all passengers
have their seat belts fastened.
cAlways drive with the floor mats in
place as the floor may become very
hot. Particular care should be taken
if you are barefoot.
cLower your speed when encounter-
ing strong crosswinds. With its
higher center of gravity, your
NISSAN is more affected by gusty
side winds. Slower speeds ensure
better vehicle control.
cDo not drive beyond the perfor-
mance of the tires even with 4WD.
Accelerating quickly, steering or
braking may cause loss of control or
the vehicle to stick in the road.
cInstall the same size of winter tires
on all four (4) wheels (such as stud-
less tires) or install tire chains to the
rear wheels when driving on slippery
roads (e.g., after a snow) and drive
carefully using 4WD.
cBe sure to check the brakes immedi-
ately after driving in mud or water as
specified in ``Wet brakes'' under theheading ``Brake system,'' later in this
section.
cAvoid parking your vehicle on steep
hills. If you get out of the vehicle and
it rolls forward, backward or side-
ways, you could be injured.
cWhenever you drive off-road
through sand, mud or water as deep
as the wheel hub, more frequent
maintenance may be required. For
details, refer to ``Maintenance for off-
road driving'' in the ``Maintenance
schedule'' section.CAUTION
Always use tires of the same size,
brand, construction (bias, bias-belted
or radial), and tread pattern on all four
wheels. Failure to do so may result in a
circumference difference between tires
on the front and rear axles which will
cause excessive tire wear and may
damage the transmission, transfer
case and differential gears.
If excessive tire wear is found, it is recom-
mended that all four tires be replaced with
tires of the same size, brand, construction
and tread pattern. The tire pressure and
wheel alignment should also be checked
and corrected as necessary. Contact your
NISSAN dealer.
Snow tires
If you install snow tires, they must also be
the same size, brand, construction and
tread pattern on all four wheels.
CAUTION
ONLY use spare tires specified for each
4-wheel drive model.
TIRES OF 4-WHEEL
DRIVE
4-22
ZX
Page 104 of 204
Tire inflation pressure
Periodically check the pressure in all tires,
including the spare, with a gauge. Adjust to
the specified pressure if necessary. Tire
pressures are shown on the tire placard
affixed to the glove box.
Tire chain
Tire chains must be installed only on the
rear wheels and not on the front wheels.
Do not drive with tire chains on paved roads
which are clear of snow. Driving with chains
in such conditions can cause damage to the
various mechanisms of the vehicle due to
some overstress. When driving on clear
paved roads, be sure to change to 2WD.
WARNING
cDo not park the vehicle over flam-
mable materials such as dry grass,
waste paper or rags. They may ignite
and cause a fire.
c
The transfer control lever
must be in the 2H, 4H or 4L position
and the parking brake set to prevent
the vehicle from rolling.
cNever place the transfer control le-
ver in the N position. Otherwise, the
vehicle could roll unexpectedly evenif the manual transmission is in gear or
the automatic transmission is in the P
position. This could result in serious
personal injury or property damage.
1. Firmly apply the parking brake.
2.Manual transmission models:
Place the gearshift lever in the R (Re-
verse) position. When parking on an up-
hill grade, place the gearshift lever in the
1st position.
MSD0002
PARKING/PARKING ON HILLS
4-23
ZX
Page 105 of 204
Automatic transmission models:
Move the gearshift lever to the P (Park)
position.
WARNING
Safe parking procedures require that
both the parking brake be set and the
transmission placed into P position
(automatic) or in the appropriate gear
(manual). Failure to do so could cause
the vehicle to move unexpectedly or
roll away and result in an accident.
Make sure the gear lever has been
pushed as far forward as it can go and
cannot be moved without depressing
the button at the end of the lever.
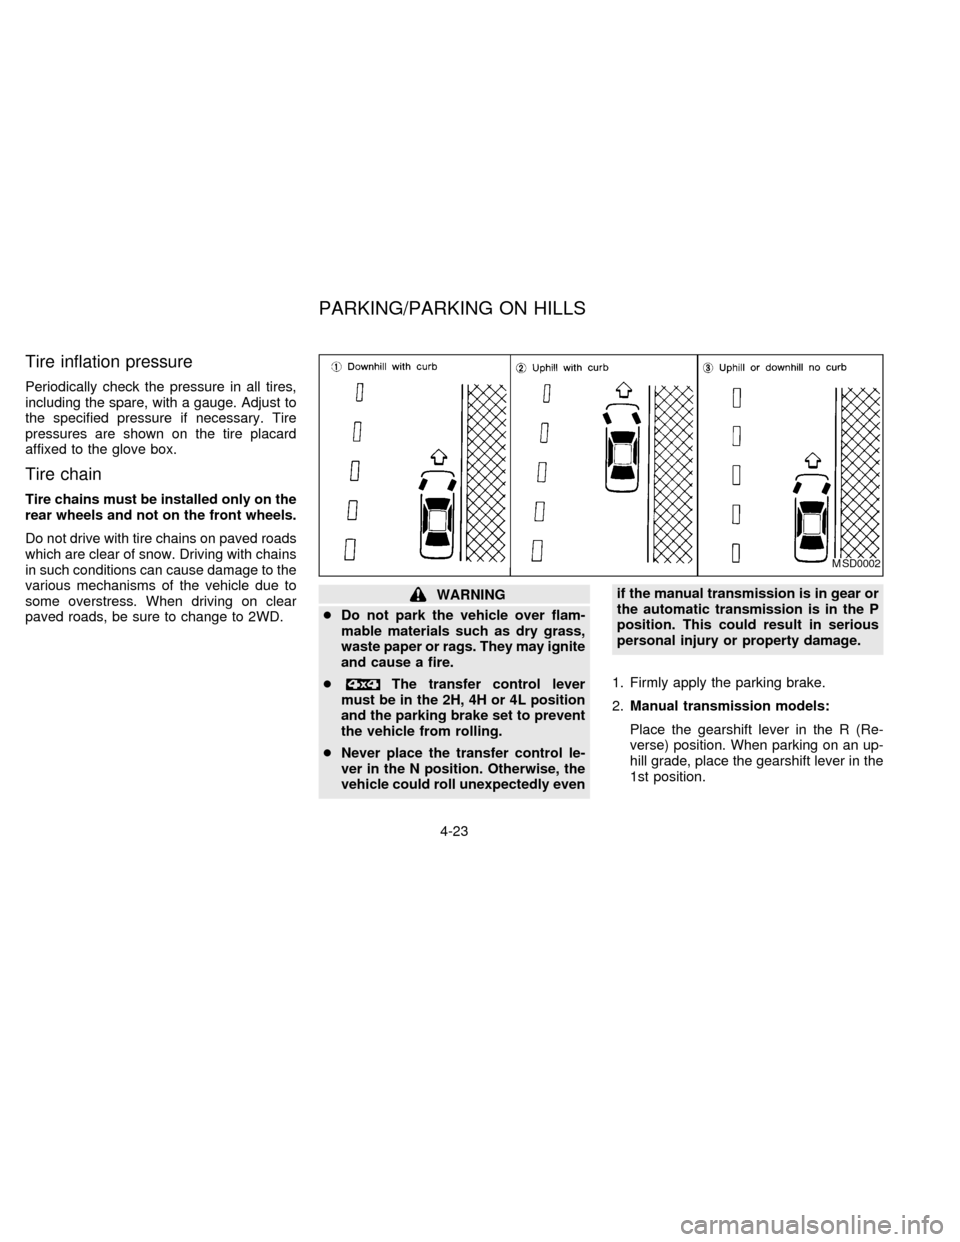
3. To help prevent the vehicle from rolling
into the street when parked on an incline,
it is a good practice to turn the wheels as
illustrated.
cHEADED DOWNHILL WITH CURB:
s1
Turn the wheels into the curb and move
the vehicle forward until the curb side
wheel gently touches the curb.cHEADED UPHILL WITH CURB:
s2
Turn the wheels away from the curb and
move the vehicle back until the curb side
wheel gently touches the curb.
cHEADED UPHILL OR DOWNHILL, NO
CURB:
s3
Turn the wheels toward the side of the
road so the vehicle will move away from
the center of the road if it moves.
4. Turn the ignition key to the LOCK posi-
tion and remove the key.
WARNING
cNever leave children unattended in
the vehicle.
cNever leave the engine running while
the vehicle is unattended.The power assisted steering is designed to
use a hydraulic pump, driven by the engine,
to assist steering.
If the engine stops or drive belt breaks, you
will still have control of the vehicle. How-
ever, much greater steering effort is
needed, especially in sharp turns or at low
speeds.
POWER STEERING SYSTEM
4-24
ZX
Page 106 of 204
The brake system has two separate hydrau-
lic circuits. If one circuit develops a problem,
you will still have braking at two wheels.
Vacuum assisted brakes
The brake booster aids braking by using
engine vacuum. If the engine stops, you can
stop the vehicle by depressing the brake
pedal. However, greater foot pressure on
the brake pedal will be required to stop the
vehicle and the stopping distance will be
longer.
Wet brakes
When the vehicle is washed or driven
through water, the brakes may get wet. As a
result, your braking distance will be longer
and the vehicle may pull to one side during
braking.
To dry brakes, drive the vehicle at a safe
speed while lightly pressing the brake pedal
to heat the brakes. Do this until the brakes
return to normal. Avoid driving the vehicle at
high speeds until the brakes function cor-
rectly.Using the brakes
Avoid resting your foot on the brake pedal
while driving. This will overheat the brakes,
wear out the brake linings and pads faster,
and reduce gas mileage.
To help reduce brake wear, and to prevent
the brakes from overheating, reduce speed
and downshift to a lower gear before going
down a slope or long grade.
WARNING
While driving on a slippery surface, be
careful when braking, accelerating or
downshifting. Abrupt braking actions
or sudden acceleration could cause the
wheels to skid and result in an acci-
dent.
Normal Operation
The rear anti-lock brake system does not
operate at speeds below 3 to 6 MPH (5 to 10
km/h). (The speeds vary according to road
conditions.)
When driving in the 2-wheel drive mode, the
rear anti-lock brake system controls the rear
wheels so they will not lock when braking
abruptly or when braking on a slippery road.
Thus, difficult steering and swerving of the
vehicle due to locked rear wheels is mini-
mized. The system detects the rear wheel
rotation rate and electronically controls the
pressure applied to each rear brake. Slight
vibration on the brake pedal accompanied
by noise usually occurs while the ABS sys-
tem is operating. Such vibration and noise
encountered during abrupt braking is not a
problem, but indicates that the system is
functioning.
Even with the rear anti-lock brake sys-
tem, your front wheels can still lock. If
this happens, release the brake pedal
slightly and then reapply pressure.
Self-test feature
The rear anti-lock brake system consists of
an electronic sensor and two hydraulic so-
BRAKE SYSTEM REAR ANTI-LOCK BRAKE
SYSTEM (R-ABS)
4-25
ZX
Page 107 of 204
lenoids controlled by a computer. The com-
puter has a built-in diagnostic feature that
tests the system each time you start the
engine and move the vehicle at a low speed
in forward or reverse. When the self-test
occurs, you may hear a ``clunk'' noise
and/or feel a pulsation in the brake pedal.
This is normal and is not an indication of any
malfunction. If the computer senses any
malfunction, it switches the rear anti-lock
brake system off and turns on the ABS
brake warning light in the dashboard. The
brake system then operates normally, but
without anti-lock assistance.
If an abnormality occurs in the system, the rear
anti-lock function will cease but the ordinary
brakes will continue to operate normally. The
ABS brake warning light will then come on.
If the light comes on while you are driving,
contact your NISSAN dealer for repair.
The rear anti-lock brake system
may only be effective when driving in the
2-wheel drive mode.
When driving in the 4-wheel drive mode, the
rear anti-lock brake system may not be
effective in many cases because the front
axle is connected with the rear axle throughthe transfer gear. The rear wheels lock if the
front wheels lock. If this happens, the rear
anti-lock brake system may cease function-
ing but the ordinary brakes will continue to
operate normally. The ABS brake warning
light will then come on.
The above condition is not a malfunction
and the rear anti-lock brake system recov-
ers when the engine is started again. The
ABS brake warning light then goes off.
Using the System
Depress the brake pedal and hold it down.
WARNING
Do not pump the brake pedal. Doing so
may result in increased stopping dis-
tances.
WARNING
The rear anti-lock brake system is a
sophisticated device. But it cannot pre-
vent accidents resulting from careless
or dangerous driving techniques. It can
help maintain vehicle control undersome conditions, but remember that
the stopping distance on slippery sur-
faces will be longer than on normal
surfaces even with rear wheel ABS.
Stopping distances may also be longer
on rough, gravel, or snow covered
roads, or if you are using tire chains.
Always maintain a safe distance from
the vehicle in front of you. Ultimately,
the responsibility for safety of self and
others rests in the hands of the driver.
Tire type and condition may also affect
braking effectiveness.
cWhen replacing tires, install the
specified size of tires on all four
wheels.
cWhen installing a spare tire, make
sure it is the proper size and type as
specified on the tire placard. See
``Tire placard'' in the ``Technical and
consumer information'' section.
4-26
ZX
Page 109 of 204
2. A sturdy, flat board to be placed under
the jack to give it firm support.
3. A shovel to dig the vehicle out of snow-
drifts.
4. Extra window washer fluid to refill the
reservoir tank.
Driving on snow or ice
WARNING
cWet ice (32ÉF, 0ÉC and freezing rain),
very cold snow, or ice can be slick
and very hard to drive on. The ve-
hicle will have a lot less traction or
``grip'' under these conditions. Try to
avoid driving on wet ice until the
road is salted or sanded.
cWhatever the condition, drive with
caution. Accelerate and slow down
with care. If accelerating or down-
shifting too fast, the drive wheels
will lose even more traction.
c
Allow more stopping distance under
these conditions. Braking should be
started sooner than on dry pavement.
cAllow greater following distances on
slippery roads.cWatch for slippery spots (glare ice).
These may appear on an otherwise
clear road in shaded areas. If a patch
of ice is seen ahead, brake before
reaching it. Try not to brake while
actually on the ice, and avoid any
sudden steering maneuvers.
cDo not use the cruise control on
slippery roads.
cSnow can trap dangerous exhaust
gases under your vehicle. Keep
snow clear of the exhaust pipe and
from around your vehicle.
Engine block heater/Engine heater
(if so equipped)
An engine block heater/engine heater to
assist extreme cold temperature starting is
available through your NISSAN dealer.
WARNING
Do not use your heater with an un-
grounded electrical system or two-
pronged (cheater) adapters. You can be
injured by an electrical shock if you use
an ungrounded connection.
4-28
ZX
Page 111 of 204
If you have a flat tire, follow the instructions
below:
Stopping the vehicle
1. Safely move the vehicle off the road and
away from traffic.
2. Turn on the hazard warning flashers.
3. Park on a level surface and apply the
parking brake. Shift the manual transmis-
sion into R (Reverse), or the automatic
transmission into P (Park).
WARNING
c
The transfer control lever
must be in the 2H, 4H or 4L position.
cNever place the transfer control le-
ver in the N position. Otherwise, the
vehicle could roll unexpectedly even
if the manual transmission is in gear
or the automatic transmission is in
the P position. This could result in
serious personal injury or property
damage.
4. Turn off the engine.
5. Raise the hood to warn other traffic and
to signal professional road assistancepersonnel that you require assistance.
6. Have all passengers get out of the ve-
hicle and stand in a safe place away from
traffic and clear of the vehicle.
WARNING
cMake sure that the parking brake is
securely applied and the manual
transmission is shifted into R (Re-
verse), or the automatic transmis-
sion into P (Park).
cNever change tires when the vehicle
is on a slope, ice or a slippery area.
This is hazardous.
cNever change tires if oncoming traf-
fic is close to your vehicle. Wait for
professional road assistance.
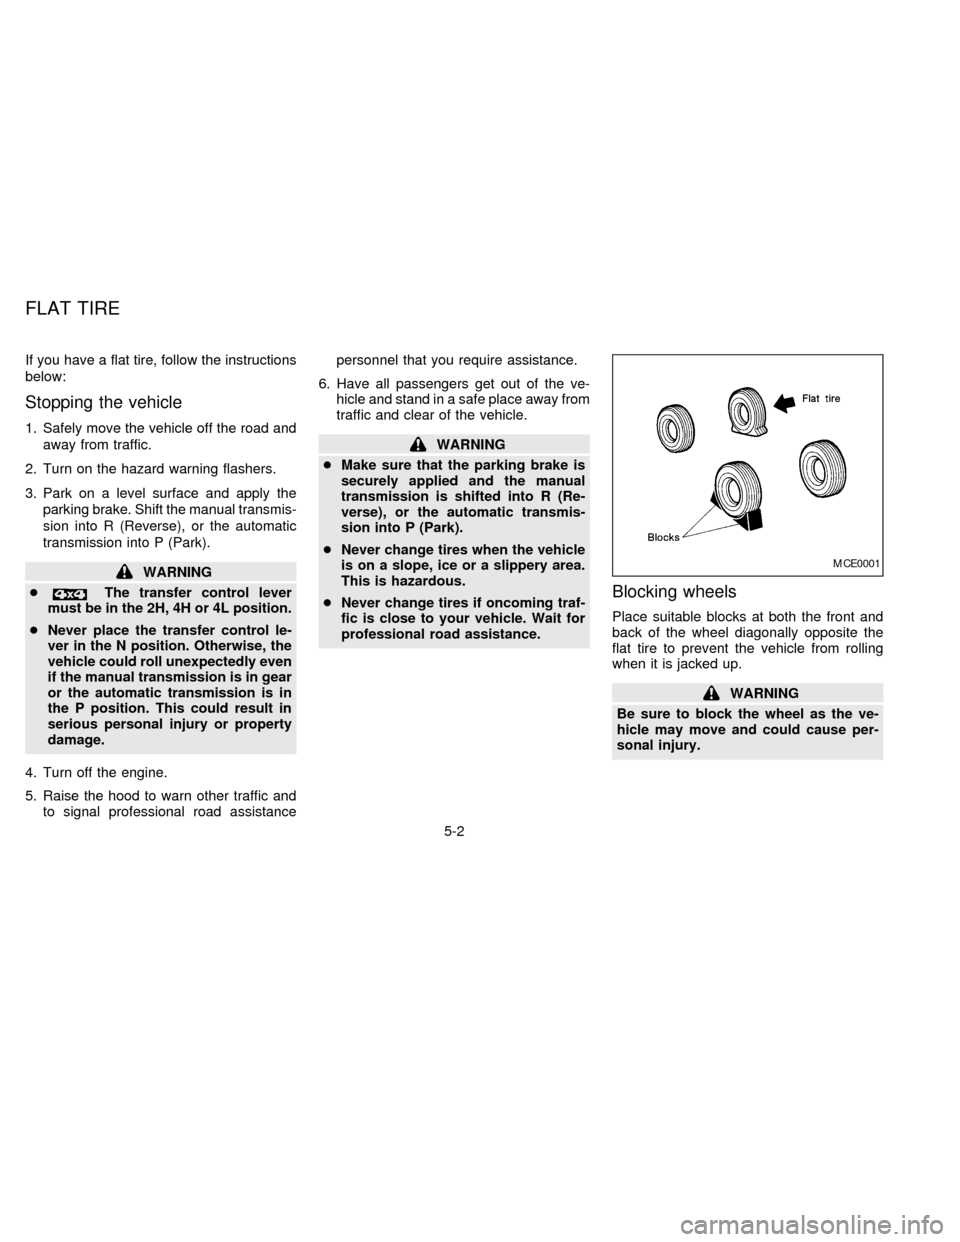
Blocking wheels
Place suitable blocks at both the front and
back of the wheel diagonally opposite the
flat tire to prevent the vehicle from rolling
when it is jacked up.
WARNING
Be sure to block the wheel as the ve-
hicle may move and could cause per-
sonal injury.
MCE0001
FLAT TIRE
5-2
ZX
Page 115 of 204

Carefully read the following instructions.
1. On 4-wheel drive models with a screw
type jack, put the adapter stored in the
tool bag on the jack when jacking up the
front side.
Do not use the jack adapter for the
rear.
2. Place the jack directly under the jack-up
point.
The jack should be used on level, firm
ground.
3. Loosen each wheel nut on the flat tireone or two turns by turning counterclock-
wise with the wheel nut wrench.
Do not remove the wheel nuts until the
tire is off the ground.
4. Carefully raise the vehicle until the flat
tire clears the ground. Remove the wheel
nuts, and then remove the wheel. Do not
remove the brake drum with the wheel.
CE0046MA
SCREW TYPE JACK
5-6
ZX