1997 NISSAN FRONTIER ECO mode
[x] Cancel search: ECO modePage 3 of 204

Welcome To The World Of NISSAN
Your new Nissan is the result of our dedication to
produce the finest in safe, reliable and economi-
cal transportation. Your vehicle is the product of
a successful worldwide company that manufac-
tures cars and trucks in over 17 countries and
distributes them in 170 nations.
Nissan vehicles are designed and manufactured
by Nissan Motor Co., Ltd. which was founded in
Tokyo, Japan in 1933, and Nissan affiliates world
wide, collectively growing to become the fifth
largest automaker in the world. In addition to cars
and trucks, Nissan also makes textile machinery,
fork-lift trucks, marine engines, boats and other
products.
Nissan has made a substantial and growing
investment in North America, starting with the
opening of Nissan Motor Corporation U.S.A. in
1960, and continuing with the production of some
cars and trucks at one of the world's mostmodern manufacturing facilities, Nissan Motor
Manufacturing Corporation U.S.A. in Smyrna,
Tennessee, vehicle styling at Nissan Design
International in San Diego, California, and engi-
neering at Nissan Research and Development in
Farmington Hills, Michigan.
Nissan Motor Corporation U.S.A. and its dealers
indirectly employ about 60,000 Americans.
Nissan is also a substantial contributor to the
Canadian economy. Nissan Canada Inc., its sup-
pliers and over 170 dealers employ approxi-
mately 4,500 people. These include company
employees and the staffs of Nissan dealers all
across Canada. In addition, many Canadians
work for companies that supply Nissan and Nis-
san dealers with materials and services ranging
from operation of port facilities and transportation
services to the supply of lubricants, parts and
accessories.Nissan pioneered the use of electronics and
computers in automobiles, and has led the indus-
try in improving both performance and fuel effi-
ciency through new engine designs and the use
of synthetic materials to reduce vehicle weight.
The company has also developed ways to build
quality into its vehicles at each stage of the
production process, both through extensive use
of automation and Ð most importantly Ð
through an awareness thatpeopleare the cen-
tral element in quality control.
From the time the parts arrived from our suppli-
ers until you took delivery of your new Nissan,
dozens of checks were made to ensure that only
the best job was being done in producing and
delivering your vehicle. Nissan also takes great
care to ensure that when you take your Nissan to
your dealer for maintenance, the service techni-
cian will perform his work according to the quality
standards that have been established by the
factory.
Safety has also been built into your Nissan. As
you know, seat belts are an integral part of the
safety systems that will help protect you and your
passengers in the event of a sudden stop or an
accident. We urge you to use the belts every time
you drive the vehicle.
The Nissan story of growth and achievement
reflects our major goal: to provide you, our
customer, with a vehicle that is built with quality
and craftsmanship Ð a product that we can be
proud to build and you can be proud to own.
AFW0001
The inside pages of this manual contain
a minimum of 50% recycled fibers,
including 10% post-consumer fibers.
ZX
Page 16 of 204

orRear anti-lock brake
warning light
If the light comes on while the engine is
running, it may indicate a potential problem
with the rear anti-lock brake system. Have the
system checked by your NISSAN dealer.
If an abnormality occurs in the system, the
rear anti-lock function ceases but the ordi-
nary brakes continue to operate normally.
If the light comes on while you are driving,
contact your NISSAN dealer for repair.
The rear anti-lock brake system may only
be effective when driving in the 2-wheel
drive mode.
When driving in the 4-wheel drive mode, if the
front wheels lock, the rear wheels also lock. If
this happens, the rear anti-lock brake system
may stop functioning, but the ordinary brakes
operate normally. The warning light then
comes on. The above condition is not a mal-
function, and the rear anti-lock brake system
recovers once the engine is turned off and
restarted. The warning light then goes off. For
further description of the rear anti-lock brake
system, refer to ``Rear anti-lock brake system''
in the ``Starting and driving'' section.
Overdrive off indicator light
(if so equipped)
This light comes on when the overdrive
switch is pushed to the OFF position.
Key reminder chime
The chime sounds when the driver's door is
opened and the key is left in the ignition
switch. Take the ignition key when you
leave the vehicle.
Light reminder chime
A chime sounds if the driver's door is opened
with the headlight switch on unless the ignition
key is in the ON position. Turn the headlight
switch off when you leave the vehicle.
Brake pad wear warning
The disc brake pads have audible wear
warnings. When a brake pad requires re-
placement, it makes a high pitched scraping
sound when the vehicle is in motion whether
or not the brake pedal is depressed. Have
the brakes checked as soon as possible if
the warning sound is heard.
orMalfunction indi-
cator light (MIL)
If the malfunction indicator light comes onsteady or blinks while the engine is running,
it may indicate a potential emission control
problem.
The malfunction indicator light will come on
in one of two ways:
cMalfunction indicator light on steady - -
An emission control system malfunction
has been detected. Have the vehicle
inspected by an authorized NISSAN
dealer. You do not need to have your
vehicle towed to the dealer.
cMalfunction indicator light blinking - - An
engine misfire has been detected which
may damage the emission control sys-
tem. To reduce or avoid emission control
system damage:
cdo not drive at speeds above 45 MPH
(72 km/h).
c
avoid hard acceleration or deceleration.
cavoid steep uphill grades.
cif possible, reduce the amount of cargo
being hauled or towed.
The malfunction indicator light may stop
blinking and come on steady.
Have the vehicle inspected by an autho-
rized NISSAN dealer. You do not need to
have your vehicle towed to the dealer.
1-9
ZX
Page 29 of 204

A key number plate is supplied with your key.
Record the key number found on the key
number plate and keep it in a safe place
(such as your wallet), NOT IN THE VEHICLE.
If you lose your keys, see your NISSAN
dealer for duplicates by using the key num-
ber. NISSAN does not record key numbers so
it is very important to keep track of your key
number plate.
A key number is only necessary when you
have lost all keys and do not have one to
duplicate from. If you still have a key, this
key can be duplicated by your NISSAN
dealer or locksmith.
Locking doors with key
To lock the door, turn the key towards the
back of the vehicle. To unlock, turn it to-
wards the front.
On power door lock equipped models, lock-
ing the driver's door simultaneously locks
the passenger's door.
Locking doors without key
To lock the doors from the outside without a
key, push the inside lock knob to the lock
position, then close the door.
When locking the door this way, be certain
not to leave the key inside the vehicle.
PD1296IC1309MIC0184
KEY DOOR LOCKS
2-2
ZX
Page 47 of 204

cDo not wear the belt inside out or
twisted. Doing so may reduce its
effectiveness.
cDo not allow more than one person
to use the same belt.
cNever carry more people in the ve-
hicle than there are seat belts.
c
Never allow anyone to ride in the
cargo area or in a slide-in camper or
other type cargo area cover while the
vehicle is in motion. These areas do
not contain seat belts. It is not de-
signed for passengers. They could be
injured in sudden braking or collision.
cIf the seat belt warning lamp glows
continuously while the ignition is
turned ON with all doors closed and
all seat belts fastened, it may indi-
cate a malfunction in the system.
Have the system checked by your
NISSAN dealer.
cAll seat belt assemblies including
retractors and attaching hardware
should be inspected after any colli-
sion at your NISSAN dealer. NISSAN
recommends that all seat belt as-
semblies in use during a collision bereplaced unless the collision was
minor and the belts show no damage
and continue to operate properly.
Seat belt assemblies not in use dur-
ing a collision should also be in-
spected and replaced if either dam-
age or improper operation is noted.
CHILD SAFETY
Children need adults to help protect them.
WARNING
cDo not install a child restraint in the
jump seats (King Cab model). These
seats are not suitable for child re-
straint installation.
c
Infants and children need special pro-
tection. The vehicle's seat belts may
not fit them properly. The shoulder
belt may come too close to the face or
neck. The lap belt may not fit over
their small hip bones. In an accident
an improperly fitting seat belt could
cause serious or fatal injury. Always
use appropriate child restraints.
All U.S. states and provinces of Canada
require the use of approved child restraints
for infants and small children. (See ``Childrestraints for infants and small children''
later in this section for more information.)
In addition, there are many types of child
restraints available for larger children which
should be used for maximum protection.
Infant or small child
NISSAN recommends that infants or small
children be seated in child restraints that
comply with Federal Motor Vehicle Safety
Standards or Canadian Motor Vehicle
Safety Standards. You should choose a
child restraint which fits your vehicle and
always follow the manufacturer's instruc-
tions for installation and use.
Children
Children who are too large for child re-
straints should be seated and restrained by
the seat belts which are provided.
If the child's seating position has a shoulder
belt that fits close to the face or neck, the
use of a booster seat (commercially avail-
able) may help overcome this. The booster
seat should raise the child so the shoulder
belt is properly positioned across the top,
middle portion of the shoulder and the lap
belt is low on the hips. The booster seat
should fit the vehicle seat and have a label
2-20
ZX
Page 52 of 204

cAn improperly installed child re-
straint could lead to serious injury or
death in an accident.
In general, child restraints are designed to
be installed with a lap belt or the lap portion
of a 3-point type seat belt. Child restraints
specially designed for infants and small
children are offered by several manufactur-
ers. When selecting any child restraint,
keep the following points in mind:
1) Choose only a restraint with a label cer-
tifying that it complies with Federal Motor
Vehicle Safety Standard 213 or Cana-
dian Motor Vehicle Safety Standard 213.
2) Check the child restraint in your vehicle
to be sure it is compatible with the vehi-
cle's seat and seat belt system. Choose
a child restraint that meets the guidelines
of the Society of Automotive Engineers
recommended practice J1819 for child
restraint installation.
3) If the child restraint is compatible with
your vehicle, place your child in the child
restraint and check the various adjust-
ments to be sure the child restraint is
compatible with your child. Always follow
all of the recommended procedures.All U.S. states and provinces of Canada
require that infants and small children be
restrained in an approved child restraint
at all times while the vehicle is being
operated.
WARNING
cDo not install a child restraint in the
jump seats (King Cab model). These
seats are not suitable for child re-
straint installation.
cImproper use of a child restraint can
result in increased injuries for both
the infant or child and other occu-
pants in the vehicle.
cFollow all of the child restraint
manufacturer's instructions for in-
stallation and use. When purchasing
a child restraint, be sure to select
one which will fit your child and
vehicle as it may not be possible to
properly install some types of child
restraints in your vehicle.
cIf the child restraint is not anchored
properly, the risk of a child being
injured in a collision or a sudden
stop greatly increases.cAdjustable seatbacks should be po-
sitioned to fit the child restraint, but
as upright as possible.
c
After attaching the child restraint,
test it before you place the child in it.
Tilt it from side to side. Try to tug it
forward and check to see if the belt
holds the restraint in place. If the
restraint is not secure, tighten the
belt as necessary, or put the restraint
in another seat and test it again.
cFor a front facing child restraint,
check to make sure the shoulder belt
does not go in front of the child's
face or neck. If it does, put the shoul-
der belt behind the child restraint.
cWhen your child restraint is not in
use, keep it secured with a seat belt
to prevent it from being thrown
around in case of a sudden stop or
accident.
CAUTION
Remember that a child restraint left in a
closed vehicle can become very hot.
Check the seating surface and buckles
before placing your child in the child
restraint.
2-25
ZX
Page 62 of 204

WARNING
cThe air conditioner cooling function
operates only when the engine is
running.
cDo not leave children, unreliable
adults, or pets alone in your vehicle.
On hot sunny days, temperatures in
a closed vehicle could quickly be-
come high enough to cause severe
or possibly fatal injuries to people or
animals.
cDo not use the recirculation mode
for long periods as it may cause theinterior air to become stale and the
windows to fog up.
cPositioning of the heating or air con-
ditioning controls should not be
done while driving, so that full atten-
tion may be given to the driving
operation.
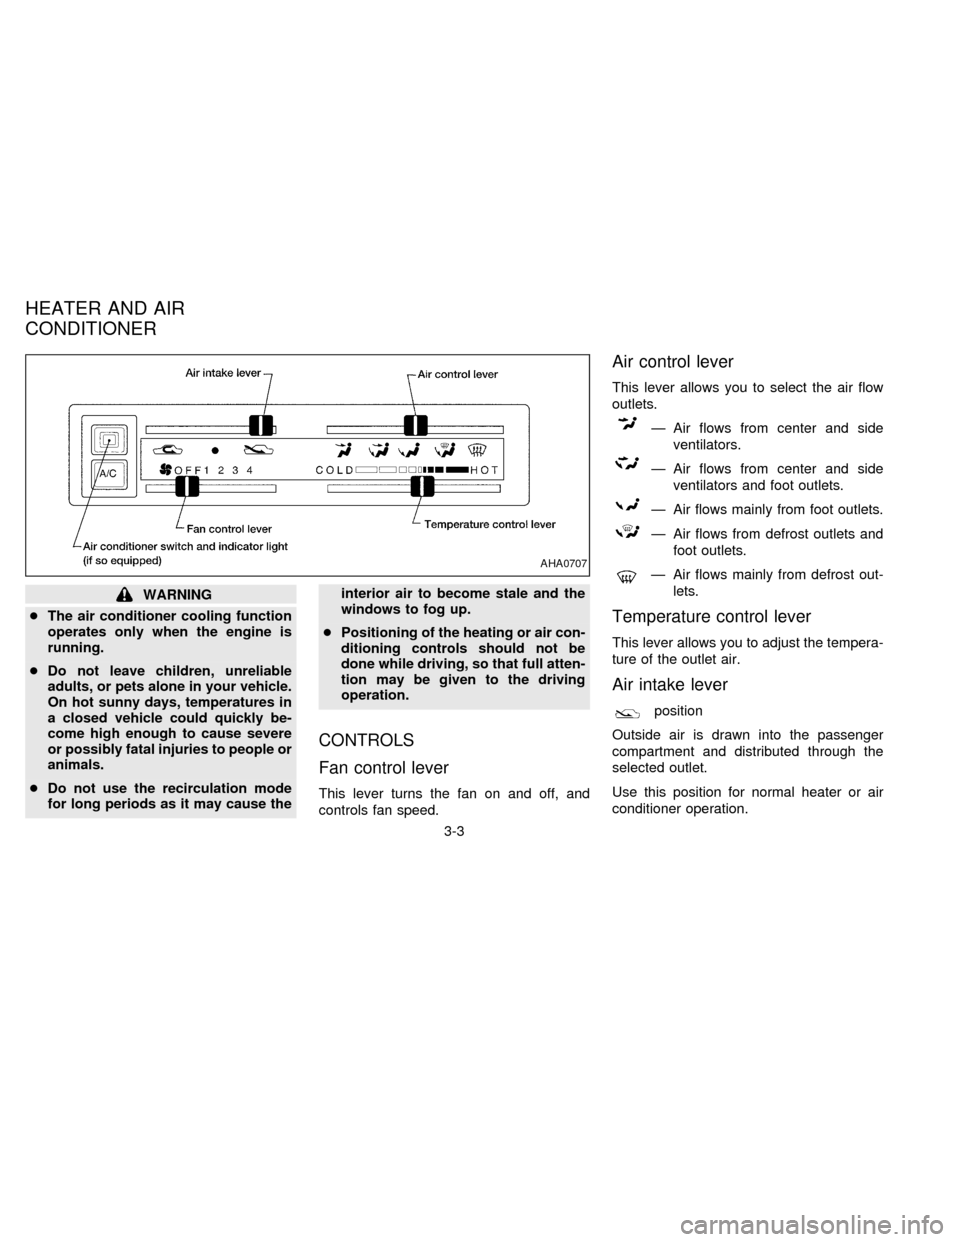
CONTROLS
Fan control lever
This lever turns the fan on and off, and
controls fan speed.
Air control lever
This lever allows you to select the air flow
outlets.
Ð Air flows from center and side
ventilators.
Ð Air flows from center and side
ventilators and foot outlets.
Ð Air flows mainly from foot outlets.
Ð Air flows from defrost outlets and
foot outlets.
Ð Air flows mainly from defrost out-
lets.
Temperature control lever
This lever allows you to adjust the tempera-
ture of the outlet air.
Air intake lever
position
Outside air is drawn into the passenger
compartment and distributed through the
selected outlet.
Use this position for normal heater or air
conditioner operation.
AHA0707
HEATER AND AIR
CONDITIONER
3-3
ZX
Page 70 of 204

AM-FM RADIO WITH CASSETTE
PLAYER (30 W)
RADIO OPERATION
Push the ON-OFF/VOL knob to turn the
radio on. Push the ON-OFF/VOL button
once more to turn the radio off.
Turn the ON-OFF/VOL knob to adjust the
volume.
Inserting a cassette tape into the cassette
player while the radio is on turns the radio
off and turns the cassette player on.
Pushing the ON-OFF/VOL knob while the
cassette tape is playing turns the cassette
player off.
Clock Operation
By pressing the CLOCK button, you can
alternate the clock and the radio/cassette
tape options in the display.
Clock Set
Depressing the CLOCK and thebut-
tons together sets hours. Depressing the
CLOCK and
buttons together sets min-
utes.
Clock Priority Mode
In this mode the clock is shown in the
display. If any radio or cassette tape func-
tions are activated, the radio (or cassette
tape) display illuminates for ten seconds
then returns to the clock mode.
NOTE:
After clock adjustment, the radio is in the
clock priority mode.
Radio/cassette tape priority mode
In this mode, the radio station illuminates in
the display during radio operation. During
cassette tape operation, TAPE illuminates
in the display.
Selecting the desired band
Push the band select button (FM/AM) to
change from AM to FM reception.
The stereo indicator illuminates during FM
stereo reception. When the stereo broad-cast signal is weak, the radio automatically
changes from stereo to monaural reception.
Tuning
WARNING
The radio should not be tuned while
driving so that full attention may be
given to the driving operation.
Manual tuning
Push down either manual tuning button
or.
SEEK tuning
Push the SEEK/SCAN tuning button
for less than 1.5 seconds. SEEK tun-
ing begins from low to high frequencies and
stops at the next broadcasting station. Push
the button again for less than 1.5 seconds,
and the next highest broadcasting station is
tuned. Once the highest broadcasting sta-
tion is reached, the radio continues in the
SEEK mode at the lowest broadcast station.
SCAN tuning
Push the SEEK/SCAN tuning button
for more than 1.5 seconds. SCAN
3-11
ZX
Page 73 of 204

The cassette tape automatically changes
direction to play the other side when the first
side is complete. At this time, the arrow in
the display window changes direction.
Fast forwarding or rewinding the
tape
Push either the FF (fast forward) or REW
(rewind) button for the desired direction.
The
orsymbol illuminates in the
display. To stop the FF or REW function,
press the PLAY/STOP button.
Automatic Program Search (APS)
fast forwarding or APS rewinding
the tape
Push either the APS FF or APS REW button
while the tape is playing. The tape runs
quickly, stops, then plays the next selection.
The
orsymbol illuminates in
the display.
This system searches for the blank intervals
between selections. If there is a blank inter-
val within one program or there is no interval
between programs, the system may not
stop in the desired or expected location.
Changing the direction of tape play
Push the PROG (program) select button.
The
orsymbol illuminates in the
display window to indicate which program
side is playing.
PLAY/STOP button
Push the PLAY/STOP button to stop cas-
sette tape play and turn the audio system
off. Press the PLAY/STOP button again to
resume cassette tape play.
Also use the PLAY/STOP button to resume
play when the tape is in the fast forward or
rewind mode.
Dolby NR (noise reduction)
Push theDOLBY NR button for
Dolby NR encoded tapes to reduce high
frequency tape noise. The indicator light
comes on.
Dolby NR is manufactured under license
from Dolby Laboratories Licensing Corpora-
tion. DOLBY NR and the double-D symbol
are trademarks of Dolby Laboratories Li-
censing Corporation.
If in the clock priority mode when the
button is pressed,and TAPE il-luminate in the display window for about ten
seconds. The clock mode than returns to
the display window.
Metal or chrome tape usage
The cassette player is automatically set to
high performance play when playing a metal
or chrome cassette tape. The indicator
METAL comes on when playing a metal or
chrome cassette tape.
Ejecting the cassette tape
Push the EJECT button. The cassette tape
automatically comes out.
Precautions on cassette player op-
eration
cTo maintain good quality sound,
NISSAN recommends using cassette
tapes of 60 minutes or shorter in
length.
cCassette tapes should be removed
from the player when not in use. Store
cassettes in their protective cases,
away from direct sunlight, heat, mois-
ture and magnetic sources.
3-14
ZX