Page 8 of 204

1Instruments and controls
Meters and gauges ................................................1-2
Speedometer and odometer ..................................1-3
Tachometer (if so equipped) ..................................1-3
Engine coolant temperature gauge........................1-4
Fuel gauge .............................................................1-4
Instrument cluster clock (if so equipped) ...............1-5
Warning/indicator lights and chimes ......................1-6
Headlight and turn signal switch ..........................1-10
Daytime running light system (Canada only) .......1-10
Windshield wiper and washer switch ...................1-11
Instrument brightness control ...............................1-12Hazard warning flasher switch .............................1-12
Cigarette lighter (accessory) and ash tray ...........1-13
Cup holder (if so equipped) .................................1-13
Interior light and cargo light .................................1-14
Spotlights (if so equipped) ...................................1-14
Manual windows ...................................................1-15
Power windows (if so equipped) ..........................1-15
Automatic power window switch ..........................1-16
Rear sliding window (if so equipped) ...................1-16
Opera window (if so equipped) ............................1-17
Sunroof (if so equipped).......................................1-17
ZX
Page 15 of 204

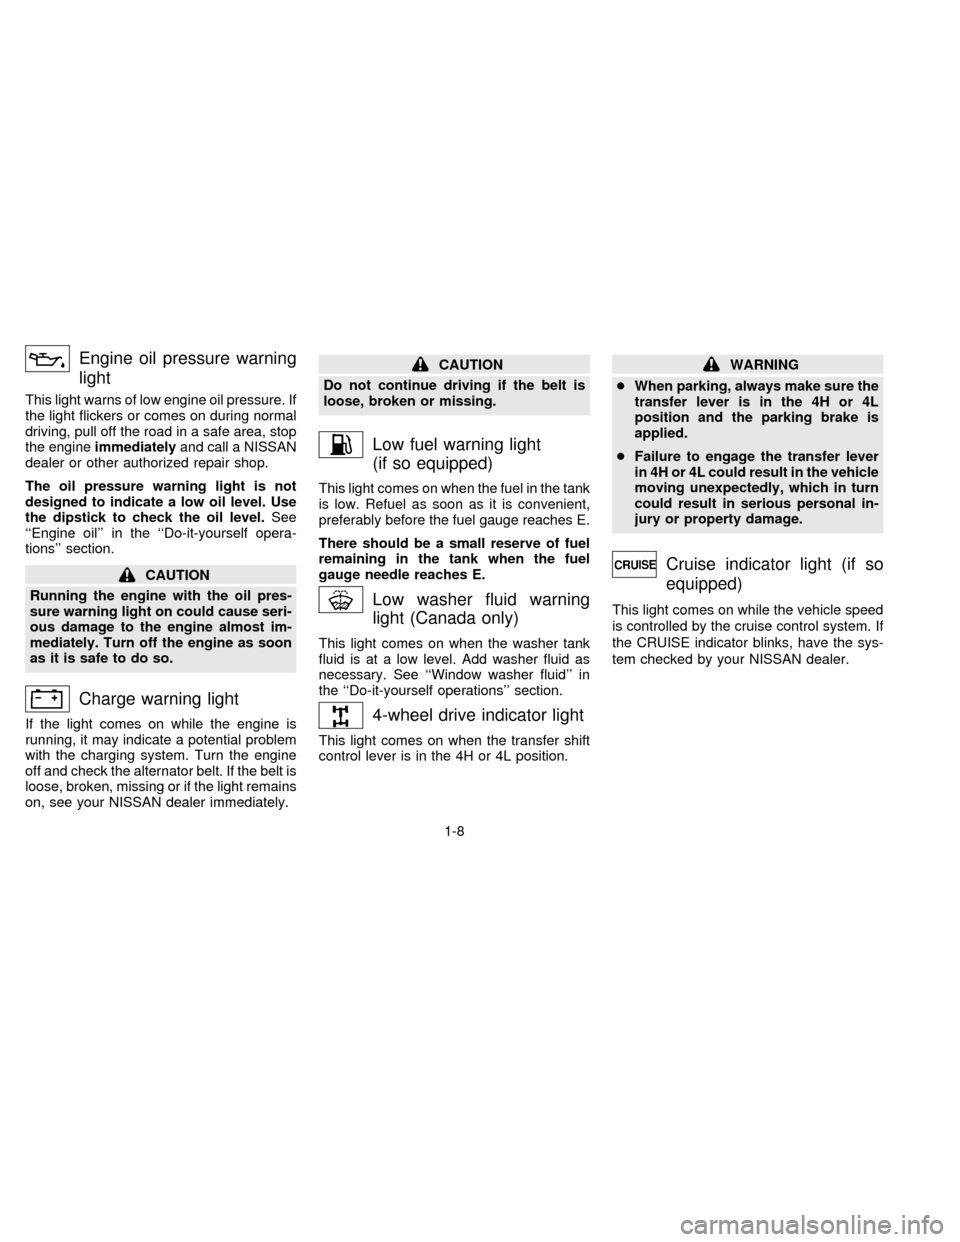
Engine oil pressure warning
light
This light warns of low engine oil pressure. If
the light flickers or comes on during normal
driving, pull off the road in a safe area, stop
the engineimmediatelyand call a NISSAN
dealer or other authorized repair shop.
The oil pressure warning light is not
designed to indicate a low oil level. Use
the dipstick to check the oil level.See
``Engine oil'' in the ``Do-it-yourself opera-
tions'' section.
CAUTION
Running the engine with the oil pres-
sure warning light on could cause seri-
ous damage to the engine almost im-
mediately. Turn off the engine as soon
as it is safe to do so.
Charge warning light
If the light comes on while the engine is
running, it may indicate a potential problem
with the charging system. Turn the engine
off and check the alternator belt. If the belt is
loose, broken, missing or if the light remains
on, see your NISSAN dealer immediately.
CAUTION
Do not continue driving if the belt is
loose, broken or missing.
Low fuel warning light
(if so equipped)
This light comes on when the fuel in the tank
is low. Refuel as soon as it is convenient,
preferably before the fuel gauge reaches E.
There should be a small reserve of fuel
remaining in the tank when the fuel
gauge needle reaches E.
Low washer fluid warning
light (Canada only)
This light comes on when the washer tank
fluid is at a low level. Add washer fluid as
necessary. See ``Window washer fluid'' in
the ``Do-it-yourself operations'' section.
4-wheel drive indicator light
This light comes on when the transfer shift
control lever is in the 4H or 4L position.
WARNING
cWhen parking, always make sure the
transfer lever is in the 4H or 4L
position and the parking brake is
applied.
cFailure to engage the transfer lever
in 4H or 4L could result in the vehicle
moving unexpectedly, which in turn
could result in serious personal in-
jury or property damage.
Cruise indicator light (if so
equipped)
This light comes on while the vehicle speed
is controlled by the cruise control system. If
the CRUISE indicator blinks, have the sys-
tem checked by your NISSAN dealer.
1-8
ZX
Page 22 of 204
The side windows can be opened or closed
by turning the hand crank on each door.WARNING
cMake sure that all passengers have
their hands, etc. inside the vehicle
before closing the windows. Use the
window lock switch to prevent unex-
pected use of the power windows.
cDo not leave children unattended in-
side the vehicle. They could un-
knowingly activate switches or con-
trols and become trapped in a
window. Unattended children could
become involved in a serious acci-
dent.The power window operates when the igni-
tion key is ON.
To open or close the window, press the
switch and hold it down. The main switch
(driver's switch) also opens or closes the
passenger side window.
Locking passenger's window
When the lock button is pushed in, only the
driver side window can be opened or
closed. Push it in again to cancel.
AIC0648AIC0741
MANUAL WINDOWS POWER WINDOWS
(if so equipped)
1-15
ZX
Page 23 of 204
Passenger's switch
The passenger's switch opens or closes the
passenger's window. To open or close the
window, hold the switch down.
AUTOMATIC POWER WINDOW
SWITCH
To fully open the driver's side window, press
the switch down completely and release it; it
need not be held. The window automatically
opens all the way. To stop the window, just
press the opposite side of the switch.Squeeze the handles of the lever, then slide
the window open.
AIC0718AIC0719AIC0745
REAR SLIDING WINDOW
(if so equipped)
1-16
ZX
Page 24 of 204
Tilting up
Pull the handle down, then push the handle
up to the fully tilted position.
WARNING
cIn an accident you could be thrown
from the vehicle through an open
sunroof. Always use seat belts and
child restraints.cDo not allow anyone to stand up or
extend any portion of their body out
of the sunroof opening while the
vehicle is in motion or while the
sunroof is closing.
CAUTION
cRemove water drops, snow, ice or
sand from the sunroof before
opening.
cDo not place heavy objects on the
sunroof or surrounding area.
IC1300-AIC0197
OPERA WINDOW
(if so equipped)SUNROOF
(if so equipped)
1-17
ZX
Page 56 of 204
Anchor point locations
Anchor points are located under the rear
window. On King Cab models, the back
panel carpet is perforated to allow access to
the anchor points.
Your NISSAN dealer can assist you with the
installation of your child restraint.
Tilt operation
Pull the lock lever down and adjust the
steering wheel up or down to the desired
position.
Push the lock lever up firmly to lock the
steering wheel in place.
WARNING
Do not adjust the steering wheel while
driving. You could lose control of your
vehicle and cause an accident.
APD0707APD0700
TILTING STEERING WHEEL
(if so equipped)
2-29
ZX
Page 62 of 204

WARNING
cThe air conditioner cooling function
operates only when the engine is
running.
cDo not leave children, unreliable
adults, or pets alone in your vehicle.
On hot sunny days, temperatures in
a closed vehicle could quickly be-
come high enough to cause severe
or possibly fatal injuries to people or
animals.
cDo not use the recirculation mode
for long periods as it may cause theinterior air to become stale and the
windows to fog up.
cPositioning of the heating or air con-
ditioning controls should not be
done while driving, so that full atten-
tion may be given to the driving
operation.
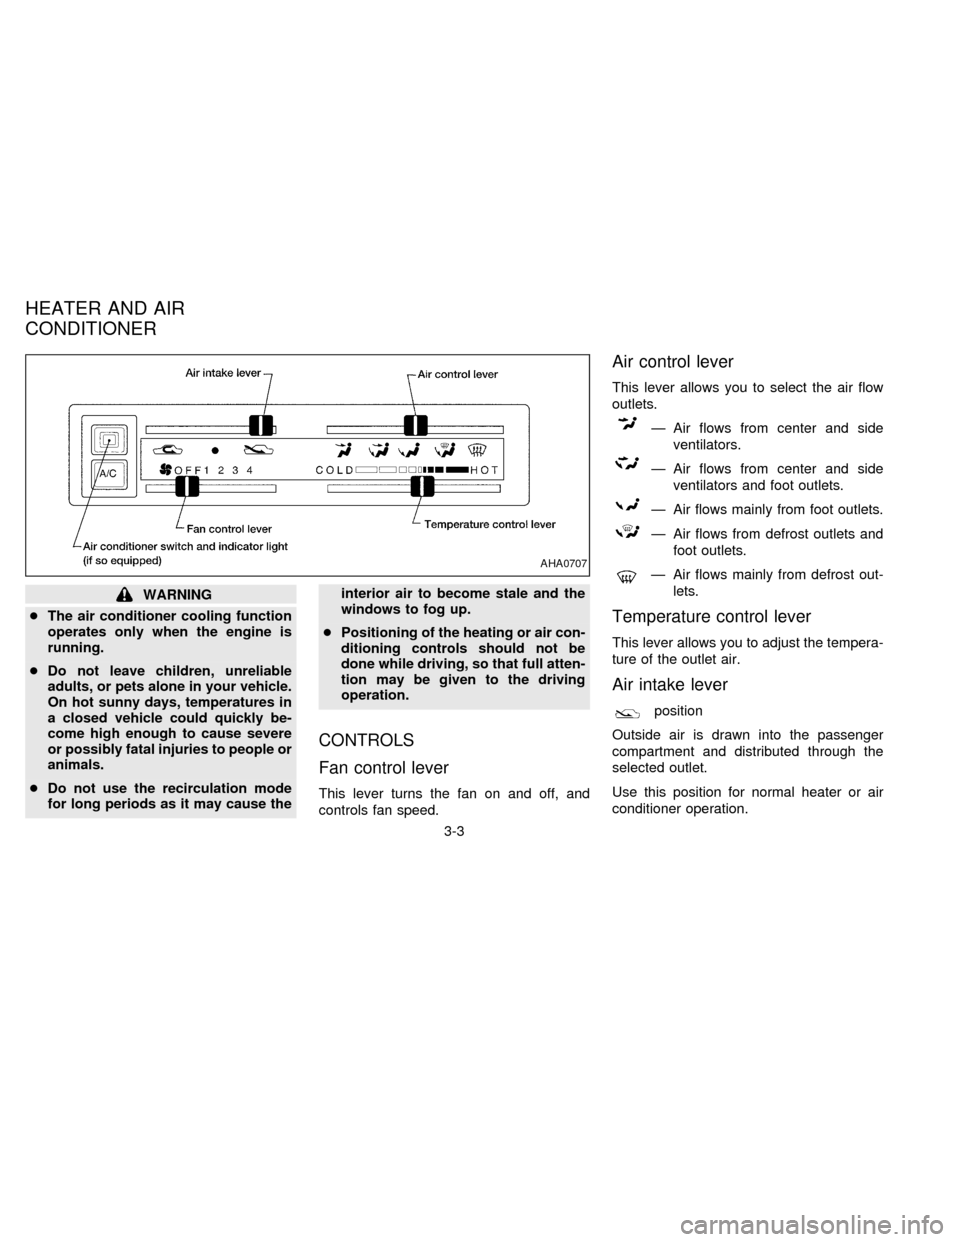
CONTROLS
Fan control lever
This lever turns the fan on and off, and
controls fan speed.
Air control lever
This lever allows you to select the air flow
outlets.
Ð Air flows from center and side
ventilators.
Ð Air flows from center and side
ventilators and foot outlets.
Ð Air flows mainly from foot outlets.
Ð Air flows from defrost outlets and
foot outlets.
Ð Air flows mainly from defrost out-
lets.
Temperature control lever
This lever allows you to adjust the tempera-
ture of the outlet air.
Air intake lever
position
Outside air is drawn into the passenger
compartment and distributed through the
selected outlet.
Use this position for normal heater or air
conditioner operation.
AHA0707
HEATER AND AIR
CONDITIONER
3-3
ZX
Page 63 of 204

position
Interior air is recirculated inside the vehicle.
Move the air intake lever to the
posi-
tion:
cwhen driving on a dusty road.
cto prevent traffic fumes from entering the
passenger compartment.
cfor maximum cooling when using the air
conditioner.
Air conditioner switch
(if so equipped)
This button is provided only for vehicles with
an air conditioner.
Start the engine, push the switch and move
the fan control lever to the desired speed.
The indicator light comes on when the air
conditioner is on.
HEATER OPERATION
Heating
This mode directs hot air to the foot outlets.
A small amount of air is also directed to the
defrost outlets.
1. Move the air intake lever to the
po-sition for normal heating.
2. Move the air control lever to the
position.
3. Move the fan control lever to the desired
speed.
4. Move the temperature control lever to the
desired position between the middle and
the HOT position.
Ventilation
This mode directs outside air to the side and
center ventilators.
1. Move the air intake lever to the
po-
sition.
2. Move the air control lever to the
position.
3. Move the fan control lever to the desired
speed.
4. Move the temperature control lever to the
desired position.
Defrosting or defogging
This mode defrosts/defogs the windows.
1. Move the air intake lever to the
po-
sition.2. Move the air control lever to the
position.
3. Move the fan control lever to the desired
speed.
4. Move the temperature control lever to the
desired position between the middle and
the HOT position.
cIf it is difficult to defog the windshield,
turn the air conditioner switch on (if so
equipped).
Bi-level heating
This mode directs cooler air from the side
and center ventilators and warmer air from
the foot outlets.
1. Move the air intake lever to the
po-
sition.
2. Move the air control lever to the
position.
3. Move the fan control lever to the desired
speed.
4. Move the temperature control lever to the
desired position.
3-4
ZX