Page 700 of 4133
233
Engine compartment
Te ch n ica l
data
Instruments
and controls Operation Driving
Instrument
cluster display Practical hints
Car care Index
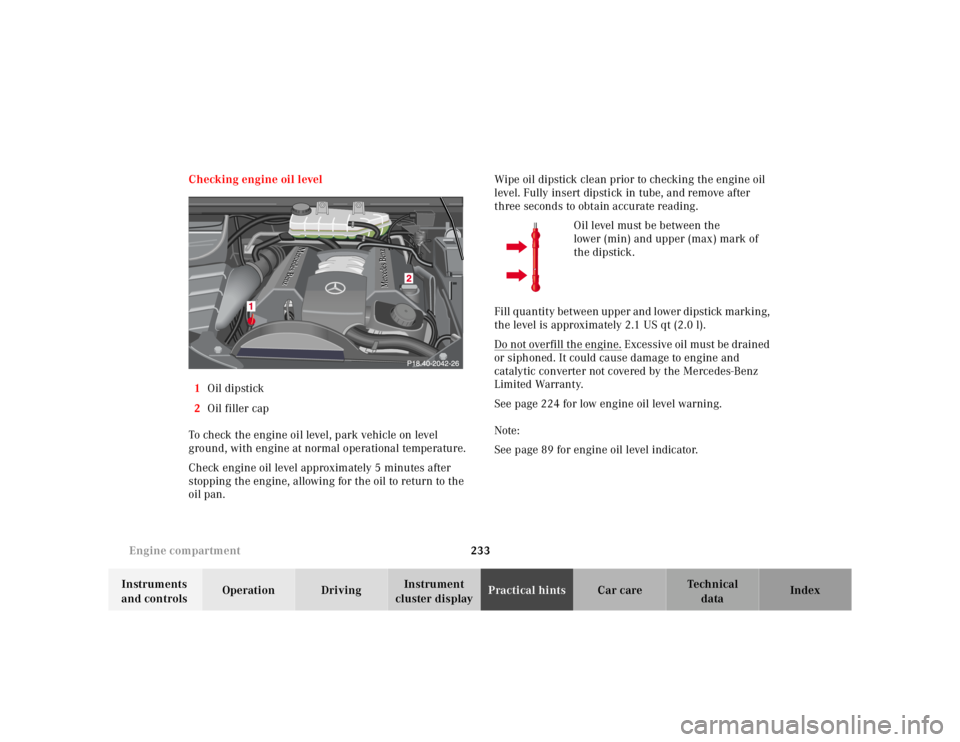
Checking engine oil level
1 Oil dipstick
2 Oil filler cap
To check the engine oil level, park vehicle on level
ground, with engine at normal operational temperature.
Check engine oil level approximately 5 minutes after
stopping the engine, allowing for the oil to return to the
oil pan. Wipe oil dipstick clean prior to checking the engine oil
level. Fully insert dipstick in tube, and remove after
three seconds to obtain accurate reading.
Oil level must be between the
lower (min) and upper (max) mark of
the dipstick.
Fill quantity between upper and lower dipstick marking,
the level is approximately 2.1 US qt (2.0 l).
Do not overfill the engine.
Excessive oil must be drained
or siphoned. It could cause damage to engine and
catalytic converter not covered by the Mercedes-Benz
Limited Warranty.
See page 224 for low engine oil level warning.
Note:
See page 89 for engine oil level indicator.
Page 701 of 4133
234
Engine compartment
Te ch n ica l
data
Instruments
and controls Operation Driving
Instrument
cluster display Practical hints
Car care Index
Automatic transmission fluid level
The transmission has a permanent fill of automatic
transmission fluid.
Regular automatic transmission fluid level checks and
changes are not required. For this reason the dipstick is
omitted.
If you notice fluid leaks or gear shifting malfunctions,
have your authorized Mercedes-Benz Light Truck Center
check the transmission fluid level.
Engine oil consumption
Engine oil consumption checks should only be made
after the break-in period. During the break-in period,
higher oil consumption may be noticed and is normal.
Frequent driving at high engine speeds results in
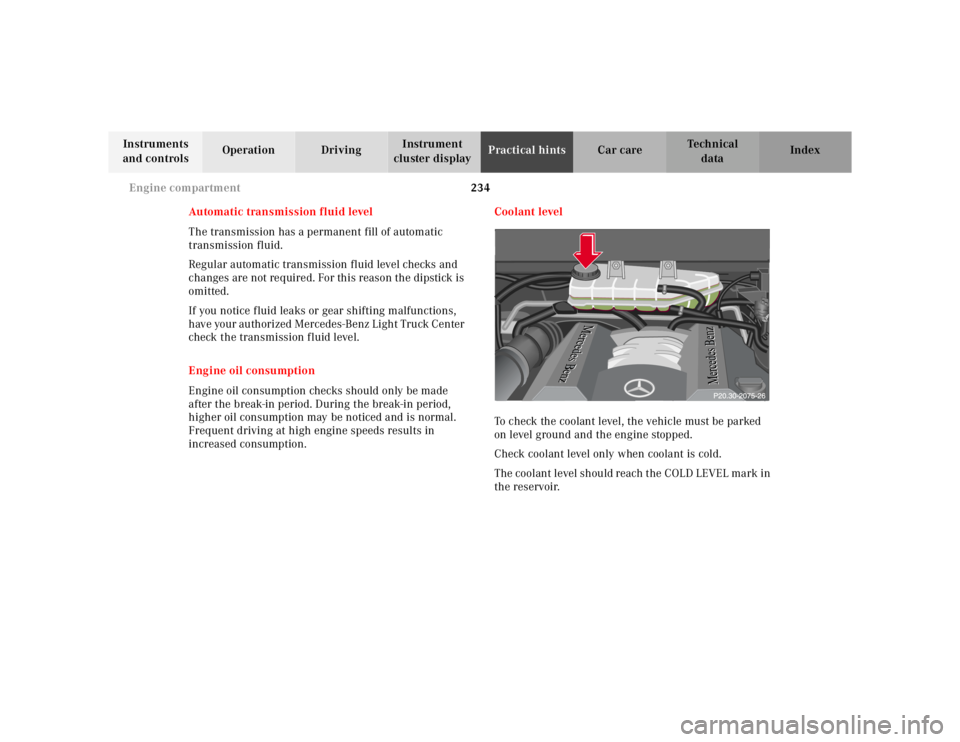
increased consumption. Coolant level
To check the coolant level, the vehicle must be parked
on level ground and the engine stopped.
Check coolant level only when coolant is cold.
The coolant level should reach the COLD LEVEL mark in
the reservoir.P20.30-0241-20
Page 715 of 4133
248
Tires, Wheels
Te ch n ica l
data
Instruments
and controls Operation Driving
Instrument
cluster display Practical hints
Car care Index
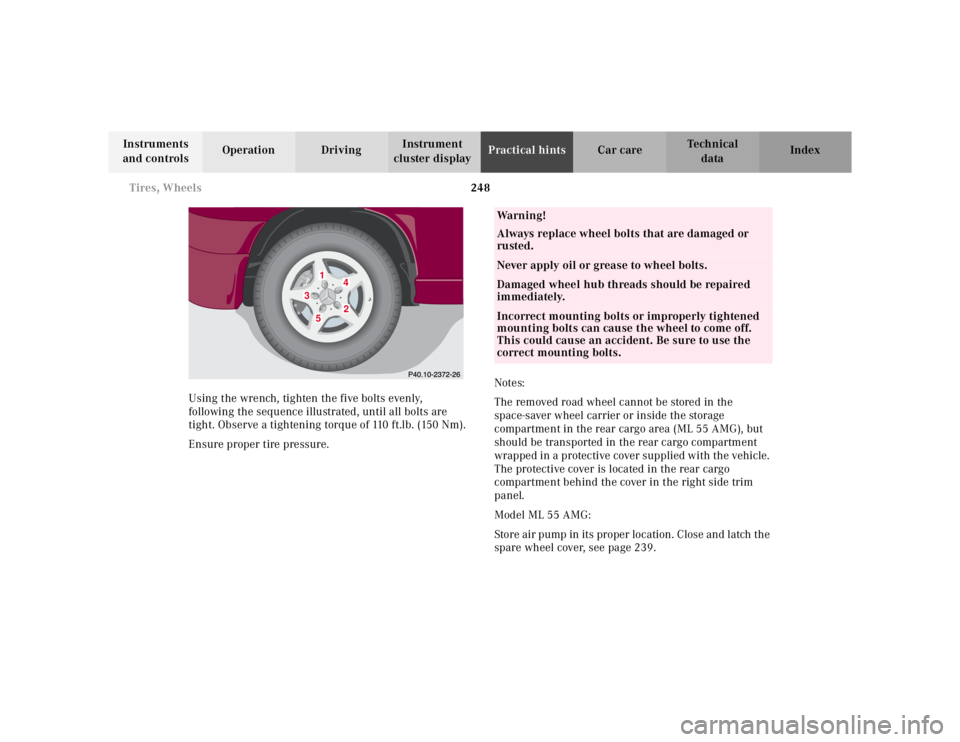
Using the wrench, tighten the five bolts evenly,
following the sequence illustrated, until all bolts are
tight. Observe a tightening torque of 110 ft.lb. (150 Nm).
Ensure proper tire pressure. Notes:
The removed road wheel cannot be stored in the
space-saver wheel carrier or inside the storage
compartment in the rear cargo area (ML 55 AMG), but
should be transported in the rear cargo compartment
wrapped in a protective cover supplied with the vehicle.
The protective cover is located in the rear cargo
compartment behind the cover in the right side trim
panel.
Model ML 55 AMG:
Store air pump in its proper location. Close and latch the
spare wheel cover, see page 239.
1
2
3
4
5
Wa r n i n g !
Always replace wheel bolts that are damaged or
rusted.Never apply oil or grease to wheel bolts.Damaged wheel hub threads should be repaired
immediately.Incorrect mounting bolts or improperly tightened
mounting bolts can cause the wheel to come off.
This could cause an accident. Be sure to use the
correct mounting bolts.
Page 742 of 4133
275
Replacing wiper blades
Te ch n ica l
data
Instruments
and controls Operation Driving
Instrument
cluster display Practical hints
Car care Index
Replacing wiper blades
For safety reasons, remove key from steering lock before
replacing the wiper blade, otherwise the motor can
suddenly turn on and cause injury.
Notes:
Do not open engine hood with wiper arm folded forward.
Do not allow the wiper arm to contact the windshield
glass without a wiper blade inserted. The glass may be
scratched or broken.
Make certain that the wiper blade is properly installed.
An improperly installed wiper blade may cause
windshield damage.
The wiper with air spoiler should be mounted on the
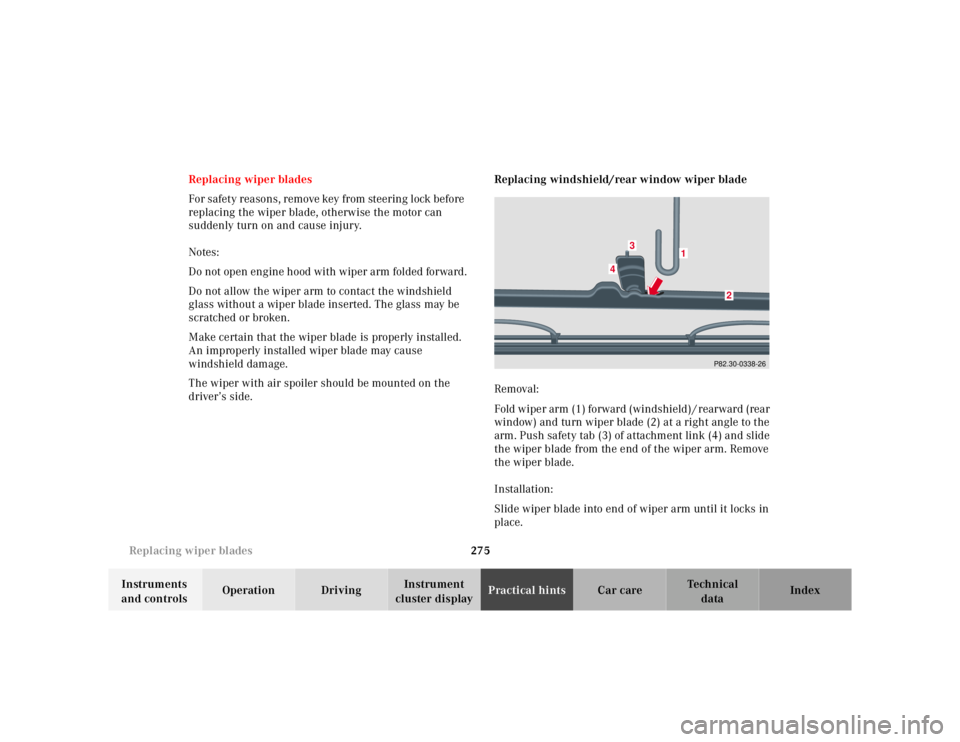
driver’s side. Replacing windshield/rear window wiper blade
Removal:
Fold wiper arm (1) forward (windshield) / rearward (rear
window) and turn wiper blade (2) at a right angle to the
arm. Push safety tab (3) of attachment link (4) and slide
the wiper blade from the end of the wiper arm. Remove
the wiper blade.
Installation:
Slide wiper blade into end of wiper arm until it locks in
place.
P82.30-0338-26
1
2
3
4
Page 745 of 4133
278
Cleaning and care of the vehicle
Te ch n ica l
data
Instruments
and controls Operation Driving
Instrument
cluster display Practical hints
Car care Index
Cleaning and care of the vehicle
In operation, your vehicle is subjected to varying
external inf luences which, if gone unchecked, can
attack the paintwork as well as the underbody and
cause lasting damage.
Such damage is caused not only by extreme and varying
climatic conditions, but also by air polution, road salt,
tar, gravel and stone chipping. Grease and oil, fuel,
coolant, brake fluid, bird droppings, insects, tree resins
etc. should be removed immediately to avoid paint
damage. Frequent washing reduces and / or eliminates
the aggressiveness and potency of the above adverse
influences. More frequent washings are necessary to deal with
unfavorable conditions; for example, near the ocean, in
industrial areas (smoke, exhaust emissions), or during
winter operation.
You should check your vehicle from time to time for
stone chipping or other damage. Any damage should be
repaired as soon as possible to prevent the start of
corrosion.
In doing so, do not neglect the underside of the vehicle.
A prerequisite for a thorough check is a washing of the
underbody followed by a thorough inspection. Damaged
areas need to be reundercoated.
Your vehicle has been treated at the factory with a wax-
base ru stproof ing in th e body cavities w hich will la st for
the lifetime of the vehicle. Post-production treatment is
neither necessary nor recommended by Mercedes-Benz
because of the possibility of incompatibility between
materials used in the production process and others
applied later.
We have selected car-care products and compiled
recommendations which are specially matched to our
vehicles and which always reflect the latest technology.
You can obtain Mercedes-Benz approved car-care
products at your authorized Mercedes-Benz Light Truck
Center.
Wa r n i n g !
Many cleaning products can be hazardous. Some
are poisonous, others are flammable. Always follow
the instructions on the particular container.
Always open your vehicle’s doors or windows when
cleaning the inside.Never use fluids or solvents that are not designed
for cleaning your vehicle.
Page 749 of 4133
282
Cleaning and care of the vehicle
Te ch n ica l
data
Instruments
and controls Operation Driving
Instrument
cluster display Practical hints
Car care Index
Cup holder
Use a gentle dishwashing detergent or mild detergent
for delicate fabrics as a washing solution. Wipe with a
cloth moistened in lukewarm solution. Do not use
scouring agents.
Seat belts
The webbing must not be treated with chemical
cleaning agents. Use only clear, lukewarm water and
soap. Do not dry the webbing at temperatures above
176 °F (80 °C) or in direct sunlight.
Headliner
Clean with soft bristle brush, or use a dry-shampoo
cleaner in case of excessive dirt. Upholstery
Using aftermarket seat covers or wearing clothing that
have the tendency to give off coloring (e.g. when wet
etc.) may cause the upholstery to become permanently
discolored. By lining the seats with a proper
intermediate cover, contact-discoloration will be
prevented.
Leather Upholstery
Wipe leather upholstery with a damp cloth and dry
thoroughly or clean with Mercedes-Benz approved
Leather Care. Exercise particular care when cleaning
perforated leather as its underside should not become
wet.
Cloth Upholstery
Clean with soft bristle brush, or use a dry-shampoo
cleaner in case of excessive dirt.
Hard plastic trim items
Pour Mercedes-Benz approved Interior Care onto soft
lint-free cloth and apply with light pressure.
Plastic and rubber parts
Do not use oil or wax on these parts.
Wa r n i n g !
Do not bleach or dye seat belts as this may severely
weaken them. In a crash they may not be able to
provide adequate protection.
Page 750 of 4133
283
Contents - Technical data
Te ch n ica l
data
Instruments
and controls Operation Driving
Instrument
cluster display Practical hints Car care Index
Technical dataSpare parts service ........................284
Warranty coverage .........................284
Identification labels .......................285
Layout of poly-V-belt drive ............286
Technical data ................................287
Fuels, coolants, lubricants etc. – capacities .........................292 Engine oils ...................................... 294
Engine oil additives ...................... 294
Air conditioner refrigerant .......... 294
Brake fluid ...................................... 294
Premium unleaded gasoline ........ 295
Fuel requirements ........................ 295
Gasoline additives ......................... 296
Coolants .......................................... 296
Consumer information ................. 298
Page 759 of 4133
292
Fuels, coolants, lubricants etc. - capacities
Te ch n ica l
data
Instruments
and controls Operation Driving
Instrument
cluster display Practical hints Car care Index
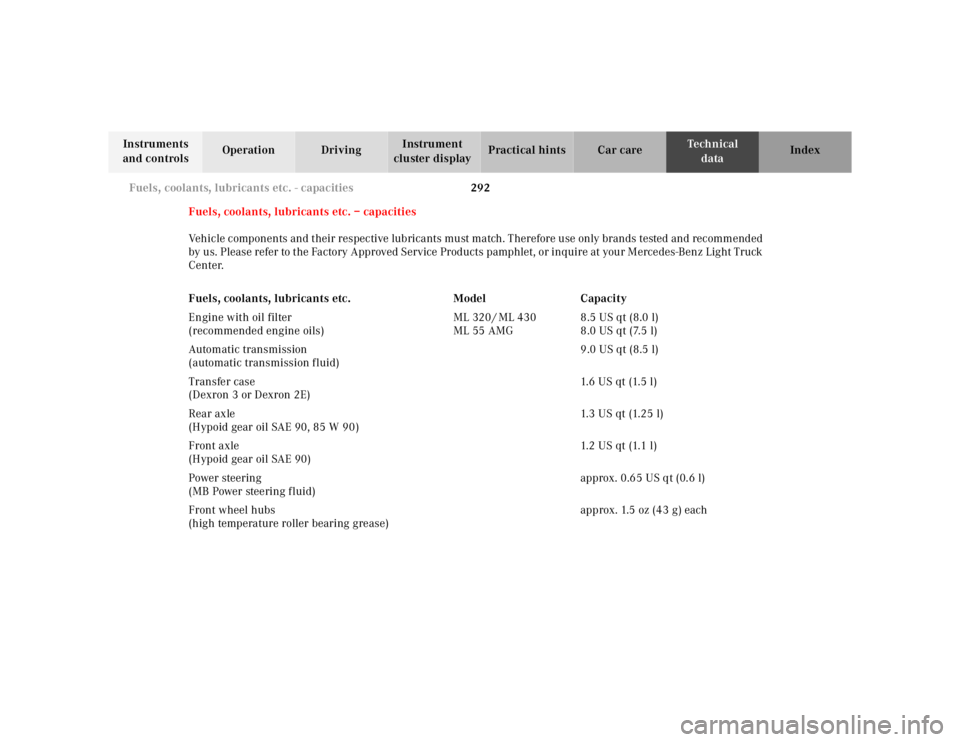
Fuels, coolants, lubricants etc. – capacities
Vehicle components and their respective lubricants must match. Therefore use only brands tested and recommended
by us. Please refer to the Factory Approved Service Products pamphlet, or inquire at your Mercedes-Benz Light Truck
Center.
Fuels, coolants, lubricants etc. Model Capacity
Engine with oil filter
(recommended engine oils) ML 320 / ML 430
ML 55 AMG 8.5 US qt (8.0 l)
8.0 US qt (7.5 l)
Automatic transmission
(automatic transmission fluid) 9.0 US qt (8.5 l)
Transfer case
(Dexron 3 or Dexron 2E) 1. 6 U S q t (1. 5 l )
Rear axle
(Hypoid gear oil SAE 90, 85 W 90) 1.3 US qt (1.25 l)
Front axle
(Hypoid gear oil SAE 90) 1. 2 U S q t (1. 1 l )
Power steering
(MB Power steering fluid) approx. 0.65 US qt (0.6 l)
Front wheel hubs
(high temperature roller bearing grease) approx. 1.5 oz (43 g) each