Page 1744 of 4133
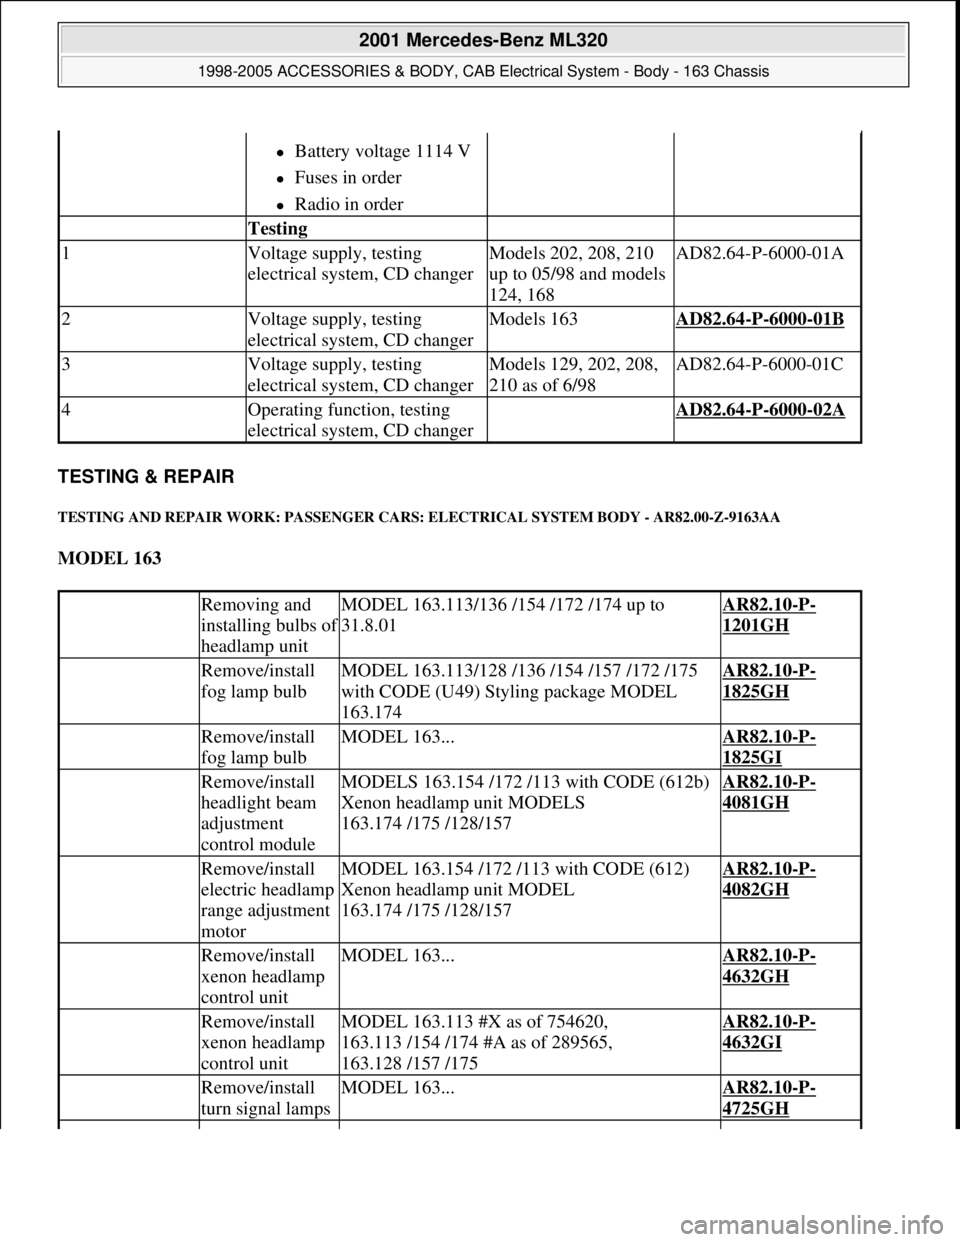
TESTING & REPAIR
TESTING AND REPAIR WORK: PASSENGER CARS: ELECTRICAL SYSTEM BODY - AR82.00-Z-9163AA
MODEL 163
Battery voltage 1114 V
Fuses in order
Radio in order
Testing
1Voltage supply, testing
electrical system, CD changerModels 202, 208, 210
up to 05/98 and models
124, 168AD82.64-P-6000-01A
2Voltage supply, testing
electrical system, CD changerModels 163AD82.64-P-6000-01B
3Voltage supply, testing
electrical system, CD changerModels 129, 202, 208,
210 as of 6/98AD82.64-P-6000-01C
4Operating function, testing
electrical system, CD changer AD82.64-P-6000-02A
Removing and
installing bulbs o
f
headlamp unit
MODEL 163.113/136 /154 /172 /174 up to
31.8.01AR82.10-P-
1201GH
Remove/install
fog lamp bulbMODEL 163.113/128 /136 /154 /157 /172 /175
with CODE (U49) Styling package MODEL
163.174AR82.10-P-
1825GH
Remove/install
fog lamp bulbMODEL 163...AR82.10-P-
1825GI
Remove/install
headlight beam
adjustment
control moduleMODELS 163.154 /172 /113 with CODE (612b)
Xenon headlamp unit MODELS
163.174 /175 /128/157AR82.10-P-
4081GH
Remove/install
electric headlamp
range adjustment
motorMODEL 163.154 /172 /113 with CODE (612)
Xenon headlamp unit MODEL
163.174 /175 /128/157AR82.10-P-
4082GH
Remove/install
xenon headlamp
control unitMODEL 163...AR82.10-P-
4632GH
Remove/install
xenon headlamp
control unitMODEL 163.113 #X as of 754620,
163.113 /154 /174 #A as of 289565,
163.128 /157 /175AR82.10-P-
4632GI
Remove/install
turn signal lampsMODEL 163...AR82.10-P-
4725GH
2001 Mercedes-Benz ML320
1998-2005 ACCESSORIES & BODY, CAB Electrical System - Body - 163 Chassis
me
Saturday, October 02, 2010 3:30:08 PMPage 249 © 2006 Mitchell Repair Information Company, LLC.
Page 1747 of 4133
REMOVING AND INSTALLING BULBS OF HEADLAMP UNIT - AR82.10-P-1201GH
MODEL 163.113 /136 /154 /172 /174 up to 31.8.01
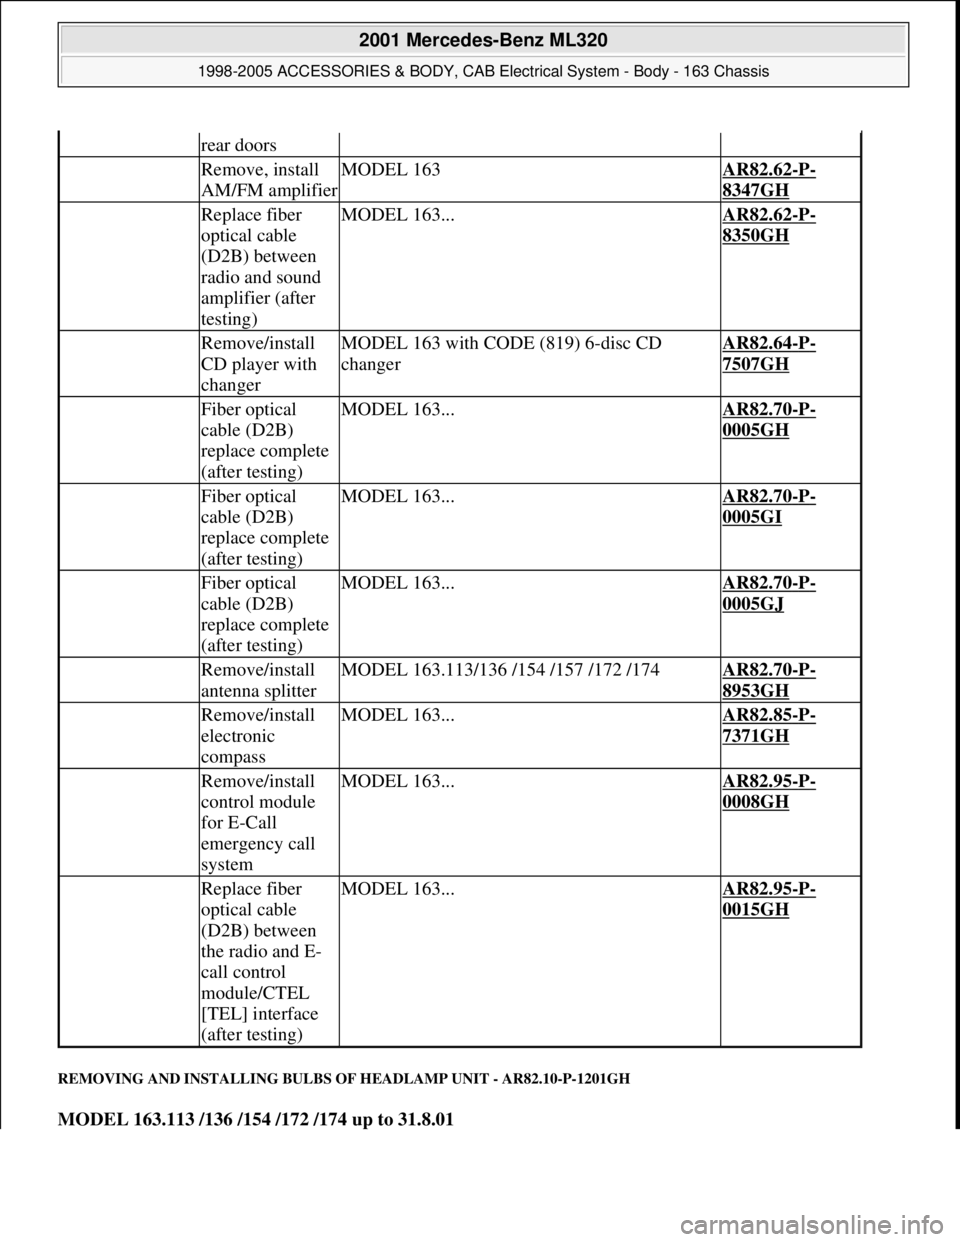
rear doors
Remove, install
AM/FM amplifierMODEL 163AR82.62-P-
8347GH
Replace fiber
optical cable
(D2B) between
radio and sound
amplifier (after
testing)MODEL 163...AR82.62-P-
8350GH
Remove/install
CD player with
changerMODEL 163 with CODE (819) 6-disc CD
changerAR82.64-P-
7507GH
Fiber optical
cable (D2B)
replace complete
(after testing)MODEL 163...AR82.70-P-
0005GH
Fiber optical
cable (D2B)
replace complete
(after testing)MODEL 163...AR82.70-P-
0005GI
Fiber optical
cable (D2B)
replace complete
(after testing)MODEL 163...AR82.70-P-
0005GJ
Remove/install
antenna splitterMODEL 163.113/136 /154 /157 /172 /174AR82.70-P-
8953GH
Remove/install
electronic
compassMODEL 163...AR82.85-P-
7371GH
Remove/install
control module
for E-Call
emergency call
systemMODEL 163...AR82.95-P-
0008GH
Replace fiber
optical cable
(D2B) between
the radio and E-
call control
module/CTEL
[TEL] interface
(after testing)MODEL 163...AR82.95-P-
0015GH
2001 Mercedes-Benz ML320
1998-2005 ACCESSORIES & BODY, CAB Electrical System - Body - 163 Chassis
me
Saturday, October 02, 2010 3:30:08 PMPage 252 © 2006 Mitchell Repair Information Company, LLC.
Page 1798 of 4133
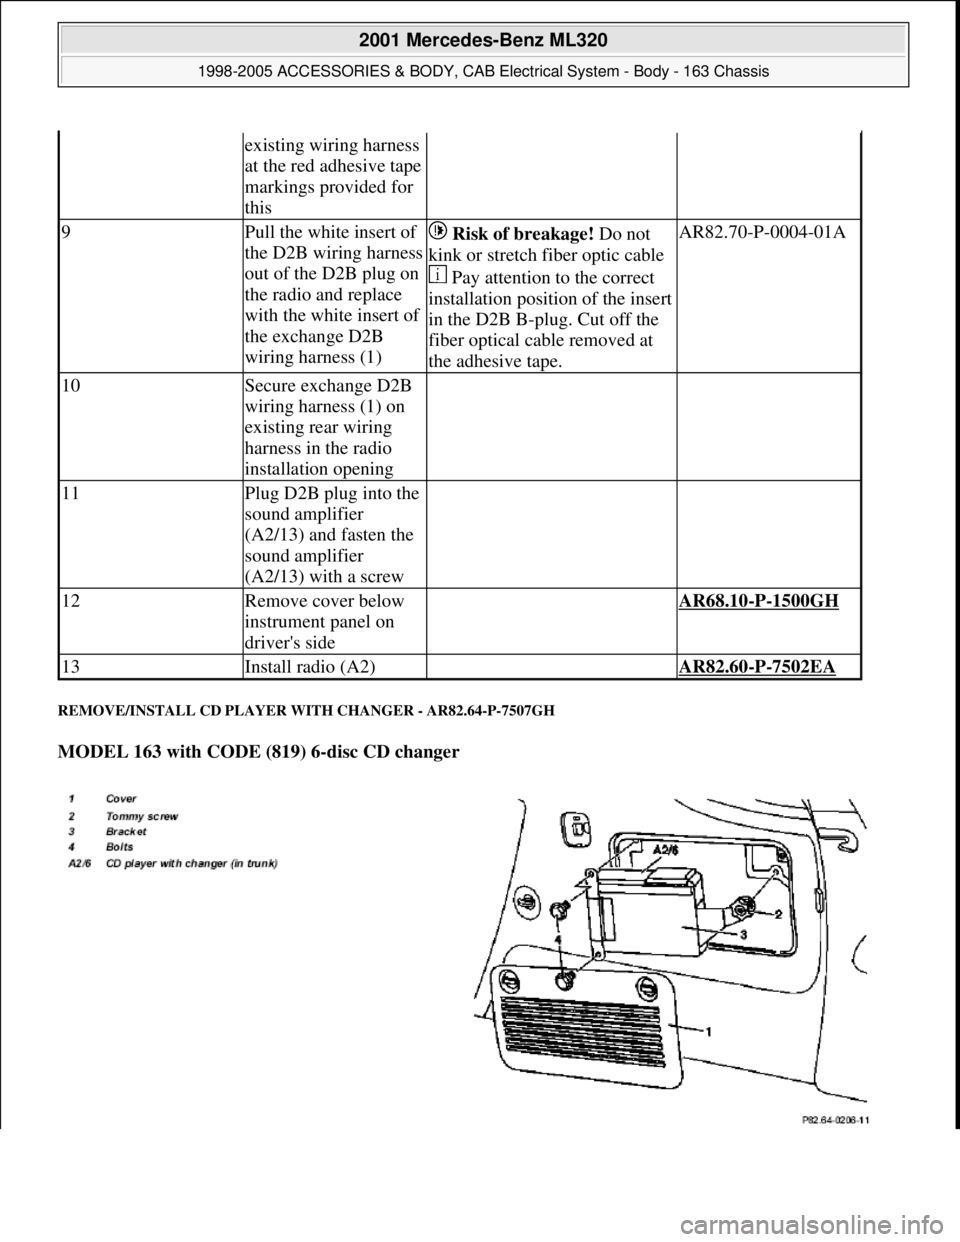
REMOVE/INSTALL CD PLAYER WITH CHANGER - AR82.64-P-7507GH
MODEL 163 with CODE (819) 6-disc CD changer
existing wiring harness
at the red adhesive tape
markings provided for
this
9Pull the white insert of
the D2B wiring harness
out of the D2B plug on
the radio and replace
with the white insert of
the exchange D2B
wiring harness (1) Risk of breakage! Do not
kink or stretch fiber optic cable
Pay attention to the correct
installation position of the insert
in the D2B B-plug. Cut off the
fiber optical cable removed at
the adhesive tape.AR82.70-P-0004-01A
10Secure exchange D2B
wiring harness (1) on
existing rear wiring
harness in the radio
installation opening
11Plug D2B plug into the
sound amplifier
(A2/13) and fasten the
sound amplifier
(A2/13) with a screw
12Remove cover below
instrument panel on
driver's side AR68.10-P-1500GH
13Install radio (A2) AR82.60-P-7502EA
2001 Mercedes-Benz ML320
1998-2005 ACCESSORIES & BODY, CAB Electrical System - Body - 163 Chassis
me
Saturday, October 02, 2010 3:30:10 PMPage 303 © 2006 Mitchell Repair Information Company, LLC.
Page 1799 of 4133
Fig. 205: Identifying CD Player Components
Fig. 206: Identifying CD Player Components
Remove/Install
1Open tailgate
2Open cover (1) and
remove
3Loosen butterfly screw (2)
for mount (3)
4Remove bolts (4).
5Pull CD player with
changer (in trunk) (A2/6)
forward
6Disconnect electrical plug
(8)
7Remove CD player with
changer Installation: Ensure
that the vertical
installation position is set
on the side of the CD
player.
8Unhook electric lead (5)
from retaining clips (6)
9Unscrew screws (7) and
remove CD player with
changer from mount
10Install in the reverse order
11Perform a function test
2001 Mercedes-Benz ML320
1998-2005 ACCESSORIES & BODY, CAB Electrical System - Body - 163 Chassis
me
Saturday, October 02, 2010 3:30:10 PMPage 304 © 2006 Mitchell Repair Information Company, LLC.
Page 1800 of 4133
FIBER OPTICAL CABLE (D2B) REPLACE COMPLETE (AFTER TESTING) - AR82.70-P-0005GH
MODEL 163.154 #A as of 145273, 163.154 #X as of 708319, 163.172 #A as of 145273, 163.172 #X as of
708319, 163.113 /128 /157 /174 /175 with CODE (819) 6-disk CD changer
ECE version
MODEL 163.154/172#A as of 221506, 163.157/174/175 with CODE (494a) USA version with CODE (819)
6-disk CD changer
Fig. 207: Identifying Fiber Optical Cable Components
2001 Mercedes-Benz ML320
1998-2005 ACCESSORIES & BODY, CAB Electrical System - Body - 163 Chassis
me
Saturday, October 02, 2010 3:30:10 PMPage 305 © 2006 Mitchell Repair Information Company, LLC.
Page 1802 of 4133
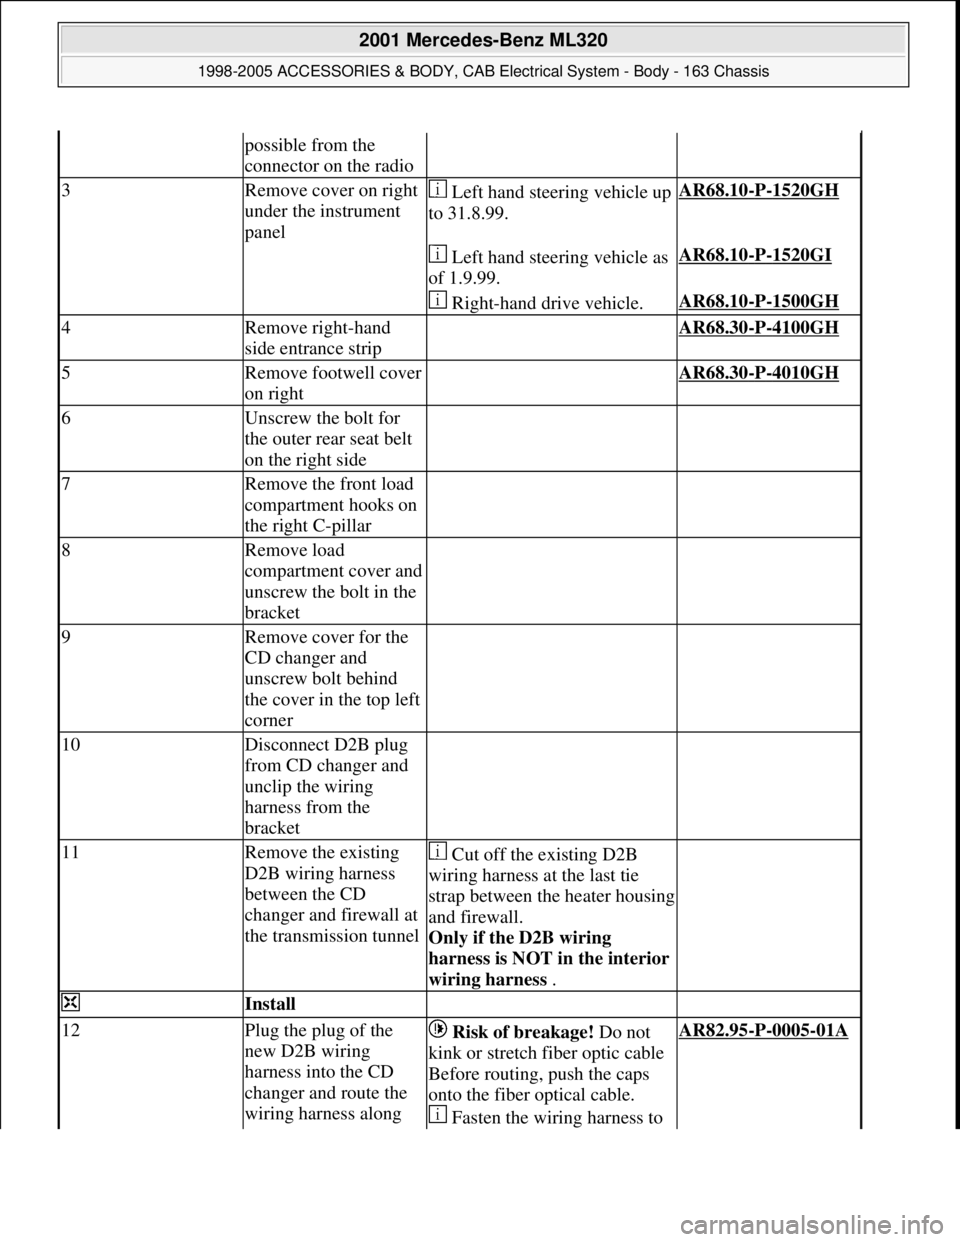
possible from the
connector on the radio
3Remove cover on right
under the instrument
panel Left hand steering vehicle up
to 31.8.99.AR68.10-P-1520GH
Left hand steering vehicle as
of 1.9.99.AR68.10-P-1520GI
Right-hand drive vehicle.AR68.10-P-1500GH
4Remove right-hand
side entrance strip AR68.30-P-4100GH
5Remove footwell cover
on right AR68.30-P-4010GH
6Unscrew the bolt for
the outer rear seat belt
on the right side
7Remove the front load
compartment hooks on
the right C-pillar
8Remove load
compartment cover and
unscrew the bolt in the
bracket
9Remove cover for the
CD changer and
unscrew bolt behind
the cover in the top left
corner
10Disconnect D2B plug
from CD changer and
unclip the wiring
harness from the
bracket
11Remove the existing
D2B wiring harness
between the CD
changer and firewall at
the transmission tunnel Cut off the existing D2B
wiring harness at the last tie
strap between the heater housing
and firewall.
Only if the D2B wiring
harness is NOT in the interior
wiring harness .
Install
12Plug the plug of the
new D2B wiring
harness into the CD
changer and route the
wiring harness along Risk of breakage! Do not
kink or stretch fiber optic cable
Before routing, push the caps
onto the fiber optical cable.
Fasten the wiring harness to AR82.95-P-0005-01A
2001 Mercedes-Benz ML320
1998-2005 ACCESSORIES & BODY, CAB Electrical System - Body - 163 Chassis
me
Saturday, October 02, 2010 3:30:10 PMPage 307 © 2006 Mitchell Repair Information Company, LLC.
Page 1803 of 4133
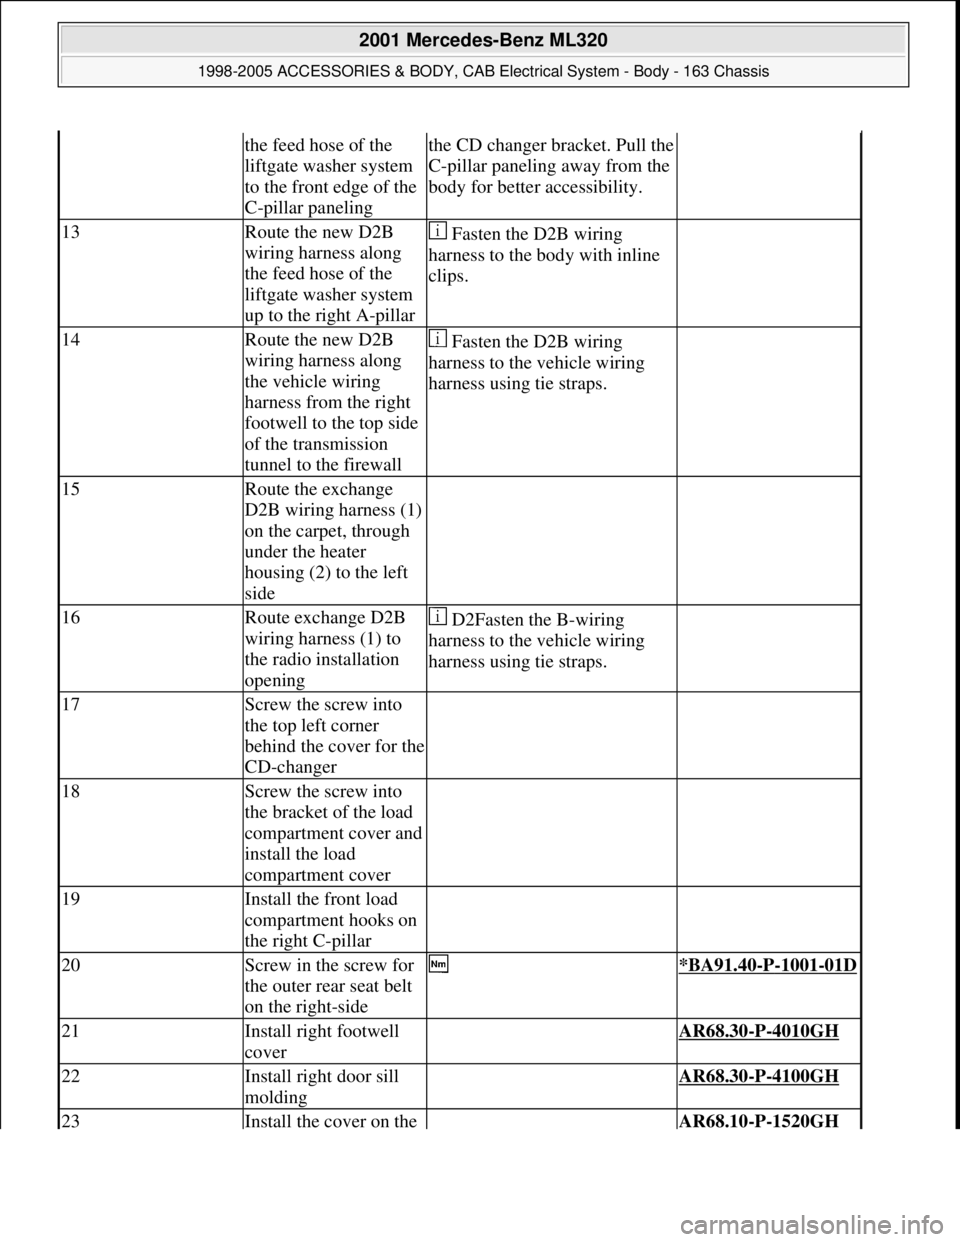
the feed hose of the
liftgate washer system
to the front edge of the
C-pillar panelingthe CD changer bracket. Pull the
C-pillar paneling away from the
body for better accessibility.
13Route the new D2B
wiring harness along
the feed hose of the
liftgate washer system
up to the right A-pillar Fasten the D2B wiring
harness to the body with inline
clips.
14Route the new D2B
wiring harness along
the vehicle wiring
harness from the right
footwell to the top side
of the transmission
tunnel to the firewall Fasten the D2B wiring
harness to the vehicle wiring
harness using tie straps.
15Route the exchange
D2B wiring harness (1)
on the carpet, through
under the heater
housing (2) to the left
side
16Route exchange D2B
wiring harness (1) to
the radio installation
opening D2Fasten the B-wiring
harness to the vehicle wiring
harness using tie straps.
17Screw the screw into
the top left corner
behind the cover for the
CD-changer
18Screw the screw into
the bracket of the load
compartment cover and
install the load
compartment cover
19Install the front load
compartment hooks on
the right C-pillar
20Screw in the screw for
the outer rear seat belt
on the right-side *BA91.40-P-1001-01D
21Install right footwell
cover AR68.30-P-4010GH
22Install right door sill
molding AR68.30-P-4100GH
23Install the cover on the AR68.10-P-1520GH
2001 Mercedes-Benz ML320
1998-2005 ACCESSORIES & BODY, CAB Electrical System - Body - 163 Chassis
me
Saturday, October 02, 2010 3:30:10 PMPage 308 © 2006 Mitchell Repair Information Company, LLC.
Page 1826 of 4133
Fig. 235: Identifying Retrofitting Diagnostic Cable
If a lead is already present in chamber 12 connect it to the green (gn) lead using a solder connector.
RETROFIT NAVIGATION SYSTEM AUDIO 30 APS - AN82.61-P-0001H
MODEL 163 up to 30.6.99 except CODE (819) 6-disk CD changer in trunk
MODEL 163 as of 1.7.99 in combination with CD changer with D2B fiber optic cable system
System illustration with GPS and telephone roof antenna
2001 Mercedes-Benz ML320
1998-2005 ACCESSORIES & BODY, CAB Electrical System - Body - 163 Chassis
me
Saturday, October 02, 2010 3:30:10 PMPage 331 © 2006 Mitchell Repair Information Company, LLC.