Page 1057 of 4133
253 Practical hints
What to do if …
Problem
Possible cause
Suggested solution
:
The yellow warning lamp flashes
after starting the engine or while
driving.
The engine oil level has sunk to the minimum
level. If the engine oil level continues to sink,
the warning lamp will light up.
�
Add approved oil at the next gas
station (
�page 302).
�
If oil loss is visible on the engine, have
the malfunction corrected as soon as
possible at a Mercedes-Benz Light
Truck Center.
_
The red indicator lamp does not
go out after starting the engine.
The adjustable telescoping steering column
is not properly locked.
�
Lock the adjustable steering column
(�page 39).
‡
The green front fog lamp indica-
tor lamp lights up when ignition
is turned on.
The front fog lamps are switched on.
�
Fog lamps (
�page 111).
<
The red seat belt warning lamp
illuminates for a brief period
after starting the engine.
The warning lamp reminds you to fasten seat
belts.
�
Fasten your seat belt (
�page 64).
W
The yellow low washer system
fluid level lamp comes on after
starting the engine or while driv-
ing.
There is approximately 1.3 US qt. (1.25 l) of
washer fluid remaining in the reservoir.
�
Add washer fluid (
�page 224).
The washer fluid may have frozen.
�
Move the vehicle to a warmer environ-
ment so that the washer fluid will
thaw.
�
Correct the concentration level after
the washer fluid in the reservoir
thaws.
Page 1059 of 4133
255 Practical hints
What to do if …
Problem
Possible cause
Suggested solution
1
The red SRS indicator lamp lights
up while driving.
There is a malfunction in the restraint sys-
tems. The airbags or emergency tensioning
device (ETDs) could deploy unexpectedly or
fail to activate in an accident.
�
Drive with added caution to the near-
est authorized Mercedes-Benz Light
Truck Center.
Warning!
G
In the event a malfunction of the SRS is indi-
cated as outlined above, the SRS may not be
operational. For your safety, we strongly
recommend that you visit an authorized
Mercedes-Benz Light Truck Center immedi-
ately to have the system checked, otherwise
the SRS may not be activated when needed
in an accident, which could result in serious
or fatal injury, or it might deploy unexpect-
edly and unnecessarily which could result in
an accident / or injury to you or to others.
Page 1063 of 4133
259 Practical hints
Where will I find ...?
Spare wheel (space-saver tire)
Use the spare wheel only temporarily,
while observing the following restrictions:�
Do not exceed vehicle speed of
50 mph (80 km / h).
�
Drive to the nearest repair facility to
have the flat tire repaired or replaced
as appropriate.
�
Do not operate vehicle with more than
one spare wheel mounted.Removing spare wheel
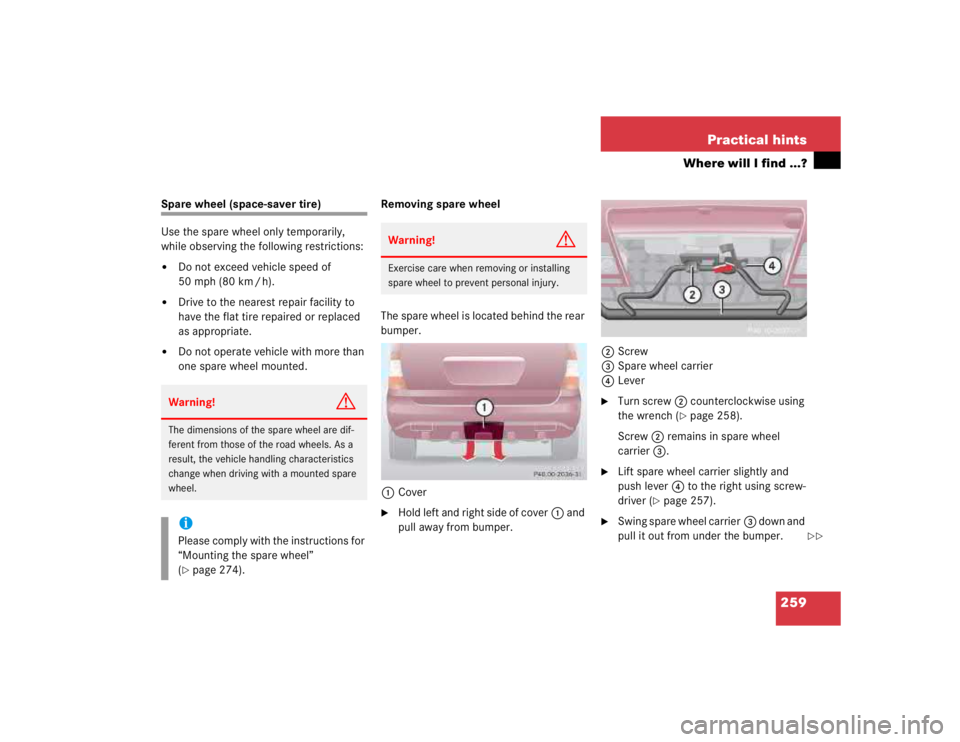
The spare wheel is located behind the rear
bumper.
1Cover
�
Hold left and right side of cover1 and
pull away from bumper.2Screw
3Spare wheel carrier
4Lever
�
Turn screw2 counterclockwise using
the wrench (
�page 258).
Screw2 remains in spare wheel
carrier3.
�
Lift spare wheel carrier slightly and
push lever4 to the right using screw-
driver (
�page 257).
�
Swing spare wheel carrier3 down and
pull it out from under the bumper.
Warning!
G
The dimensions of the spare wheel are dif-
ferent from those of the road wheels. As a
result, the vehicle handling characteristics
change when driving with a mounted spare
wheel.iPlease comply with the instructions for
“Mounting the spare wheel”
(�page 274).
Warning!
G
Exercise care when removing or installing
spare wheel to prevent personal injury.
��
Page 1066 of 4133
262 Practical hintsUnlocking / locking in an emergencyLocking the vehicle
If you are unable to lock the vehicle with
the remote control, lock it with the me-
chanical key as follows:�
Close the passenger doors and the lift-
gate.
�
Press the upper part of the central
locking button in the cockpit
(�page 93).
�
Check to see whether the locking
knobs on the passenger doors are still
visible. If necessary push them down
manually.
�
Lock the liftgate if necessary from in-
side (
�page 91).
�
Lock the driver’s door with the me-
chanical key.Changing batteries in the remote
control
If the batteries in the remote control are
discharged, the vehicle can no longer be
locked or unlocked. It is recommended to
have the batteries replaced at an autho-
rized Mercedes-Benz Light Truck Center.
Batteries contain materials that can harm
the environment if disposed of improperly.
Recycling of batteries is the preferred
method of disposal. Many states require
sellers of batteries to accept old batteries
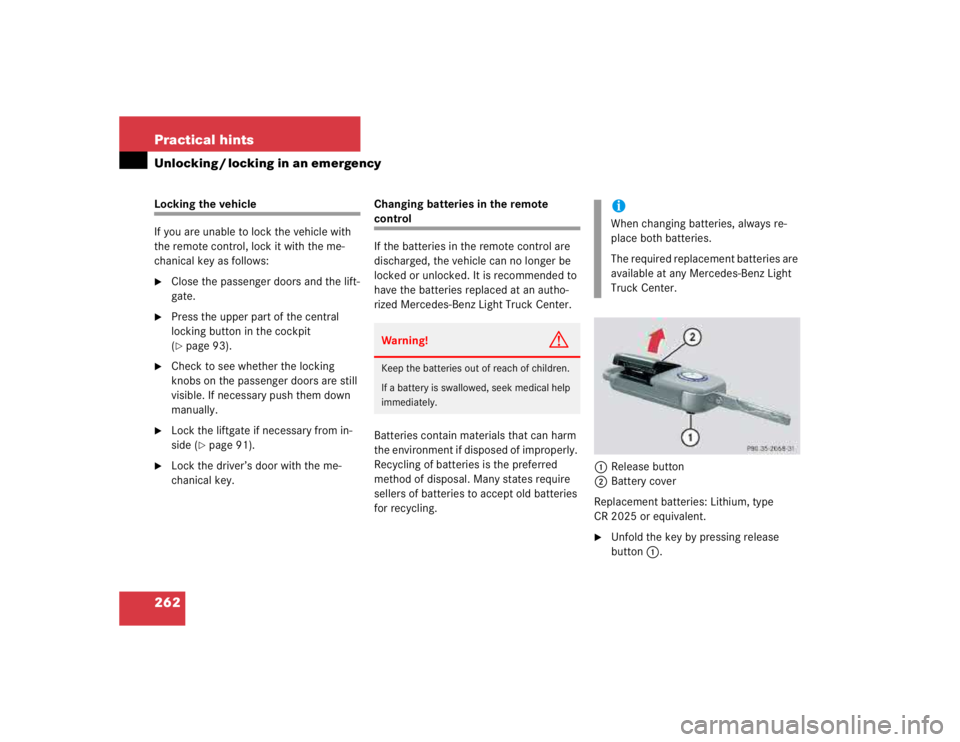
for recycling.1Release button
2Battery cover
Replacement batteries: Lithium, type
CR 2025 or equivalent.
�
Unfold the key by pressing release
button1.
Warning!
G
Keep the batteries out of reach of children.
If a battery is swallowed, seek medical help
immediately.
iWhen changing batteries, always re-
place both batteries.
The required replacement batteries are
available at any Mercedes-Benz Light
Truck Center.
Page 1071 of 4133
267 Practical hints
Replacing bulbs
Rear lamps Notes on bulb replacement
�
Use only 12-volt bulbs of the same type
and with the specified watt rating.
�
Switch lights off before changing a bulb
to prevent short circuits.
�
Always use a clean lint-free cloth when
handling bulbs.
�
Your hands should be dry and free of oil
and grease.
�
If the newly installed bulb does not light
up, visit an authorized Mercedes-Benz
Light Truck Center.
�
Have the LEDs and bulbs for the follow-
ing lamps replaced by an authorized
Mercedes-Benz Light Truck Center:�
Additional turn signals in the exteri-
or rear view mirrors
�
Bi-Xenon lamps*
�
Front fog lamps (vehicles with sport
package)*
Lamp
Type
6
Brake lamp
1073
(32 cp bulb)
7
Backup lamp
1073
(32 cp bulb)
8
Turn signal lamp
PY 21 W
9
Tail, parking and
standing lamp
Rear fog lamp, driv-
er’s side
P 21 / 4 W
a
Side marker lamp
W5W
b
High mounted brake
lamp
1073
(32 cp bulb)
c
License plate lamps
C 5 W
Warning!
G
Keep bulbs out of reach of children.
Bulbs and bulb sockets can be very hot. Al-
low the lamp to cool down before changing
a bulb.
Halogen lamps contain pressurized gas. A
bulb can explode if you:�
touch or move it when hot
�
drop the bulb
�
scratch the bulb
Wear eye and hand protection.
Because of high voltage in xenon lamps, it is
dangerous to replace the bulb or repair the
lamp and its components. We recommend
that you have such work done by a qualified
technician.
Page 1072 of 4133
268 Practical hintsReplacing bulbsReplacing bulbs for front lamps
Replacing low beam bulbs
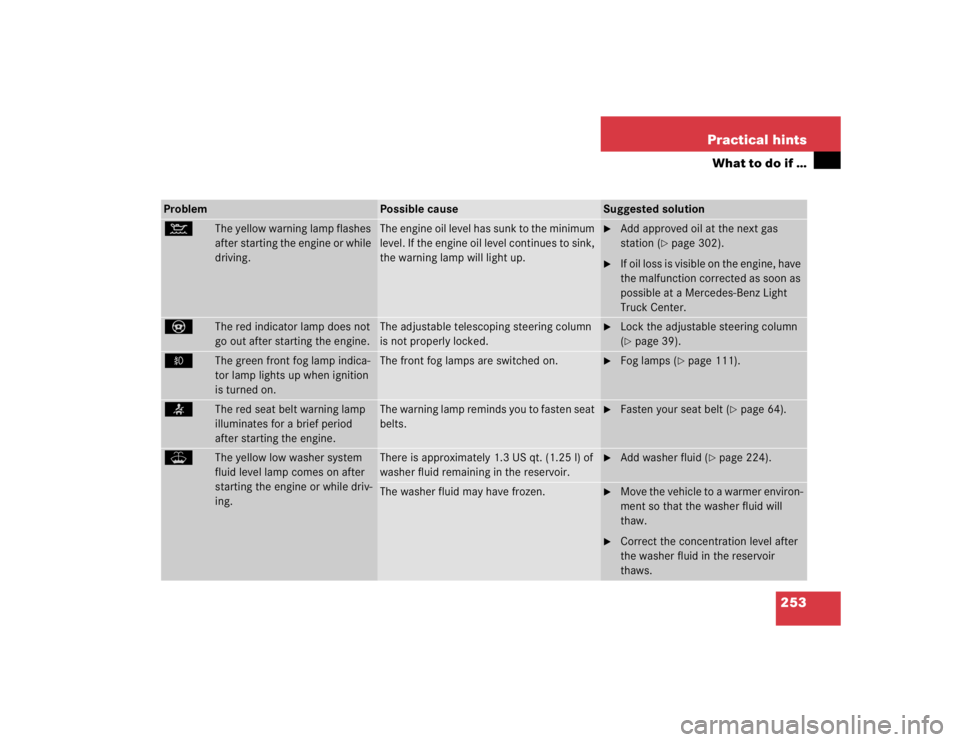
1Low beam halogen or Bi-Xenon* head-
lamp cover with locking tab2Electrical connector
Bi-Xenon* headlampHalogen headlamp
�
Switch off the lights.
�
Open the hood (
�page 217).
�
Push down tab at top end of cover1
and remove.
�
Pull electrical connector2 off.
�
Unclip the retainer springs and take out
the bulb.
�
Insert the new bulb so that the base lo-
cates in the recess on the holder.
�
Clip the retainer springs.
�
Plug the connector2 onto the bulb.
�
Align headlamp cover and click into
place.
Warning!
G
Do not remove the cover
1
for the
Bi-Xenon headlamp. Because of high voltage
in xenon lamps, it is dangerous to replace
the bulb or repair the lamp and its compo-
nents. We recommend that you have such
work done by a qualified technician.
Page 1078 of 4133
274 Practical hintsFlat tire
�Flat tireMounting the spare wheel Preparing the vehicle
�
Park the vehicle as far as possible from
moving traffic on a hard surface.
�
Turn on the hazard warning flashers.
�
Engage the steering wheel lock in the
straight ahead position and set the
parking brake.
�
Move the gear selector lever toP.
�
Have any passenger exit the vehicle at
a safe distance from the roadway.
�
Take the spare wheel out of its carrier
(�page 259).Lifting the vehicle
�
Prevent the vehicle from rolling away
by blocking wheels with wheel chocks
(not included) or other sizable objects.
When changing wheel on a level surface:
�
Place one chock in front of and one be-
hind the wheel that is diagonally oppo-
site to the wheel being changed.
When changing wheel on a hill:
�
Place chocks on the downhill side
blocking both wheels of the other axle.
�
Take the two-piece wheel wrench and
the jack out of the rear compartment
area (
�page 257). Assemble wheel
wrench.
Warning!
G
The dimensions of the spare wheel are dif-
ferent from those of the road wheels. As a
result, the vehicle handling characteristics
change when driving with a mounted spare
wheel. Adapt your driving style accordingly.
The spare wheel is for temporary use only.
When driving with spare wheel mounted, en-
sure proper tire pressure and do not exceed
vehicle speed of 50 mph (80 km / h).
Drive to the nearest Mercedes-Benz Light
Truck Center as soon as possible to have the
spare wheel replaced with a regular road
wheel.
Never operate the vehicle with more than
one spare wheel mounted.
Page 1080 of 4133
276 Practical hintsFlat tireRemoving the wheel�
Unscrew and remove all wheel bolts.
�
Remove the remaining bolts.
�
Grip the wheel from the sides and re-
move it.
Mounting the new wheel
�
Clean contact surfaces of wheel and
wheel hub.
�
Install spare wheel on wheel hub.
�
Insert wheel bolts and tighten them
slightly.Lowering the vehicle
�
Lower vehicle by turning crank coun-
terclockwise until vehicle is resting ful-
ly on its own weight.
�
Remove the jack.
!Do not place wheel bolts in sand or dirt.
This could result in damage to the bolt
and wheel hub threads.!To avoid paint damage, place wheel flat
against hub and hold it there while in-
stalling first wheel bolt.
Warning!
G
Always replace wheel bolts that are dam-
aged or rusted.
Never apply oil or grease to wheel bolts.
Damaged wheel hub threads should be re-
paired immediately. Do not continue to drive
under these circumstances! Contact an au-
thorized Mercedes-Benz Light Truck Center
or call Roadside Assistance.
Incorrect wheel bolts or improperly tight-
ened wheel bolts can cause the wheel to
come off. This could cause an accident.
Make sure to use the correct wheel bolts.
Warning!
G
Use only genuine equipment
Mercedes-Benz wheel bolts. Other wheel
bolts may come loose.
Do not tighten the wheel bolts when the ve-
hicle is raised. Otherwise the vehicle could
tip over.