Page 1056 of 4133
252 Practical hintsWhat to do if …Problem
Possible cause
Suggested solution
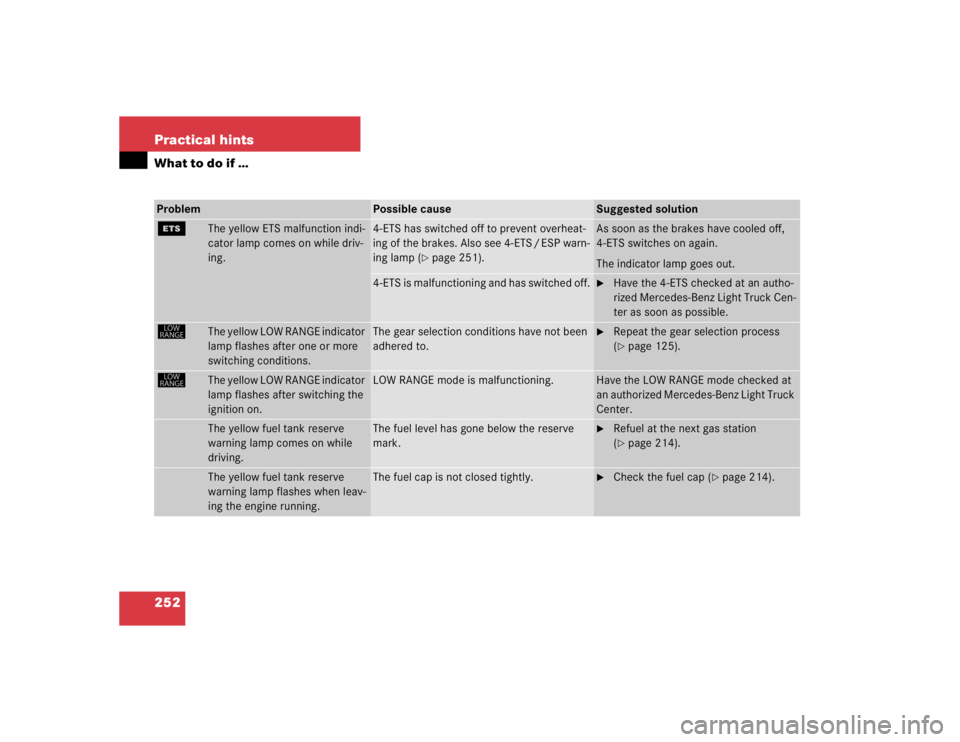
{
The yellow ETS malfunction indi-
cator lamp comes on while driv-
ing.
4-ETS has switched off to prevent overheat-
ing of the brakes. Also see 4-ETS / ESP warn-
ing lamp (
�page 251).
As soon as the brakes have cooled off,
4-ETS switches on again.
The indicator lamp goes out.
4-ETS is malfunctioning and has switched off.
�
Have the 4-ETS checked at an autho-
rized Mercedes-Benz Light Truck Cen-
ter as soon as possible.
ê
The yellow LOW RANGE indicator
lamp flashes after one or more
switching conditions.
The gear selection conditions have not been
adhered to.
�
Repeat the gear selection process
(�page 125).
ê
The yellow LOW RANGE indicator
lamp flashes after switching the
ignition on.
LOW RANGE mode is malfunctioning.
Have the LOW RANGE mode checked at
an authorized Mercedes-Benz Light Truck
Center.
The yellow fuel tank reserve
warning lamp comes on while
driving.
The fuel level has gone below the reserve
mark.
�
Refuel at the next gas station
(�page 214).
The yellow fuel tank reserve
warning lamp flashes when leav-
ing the engine running.
The fuel cap is not closed tightly.
�
Check the fuel cap (
�page 214).
Page 1058 of 4133
254 Practical hintsWhat to do if …Problem
Possible cause
Suggested solution
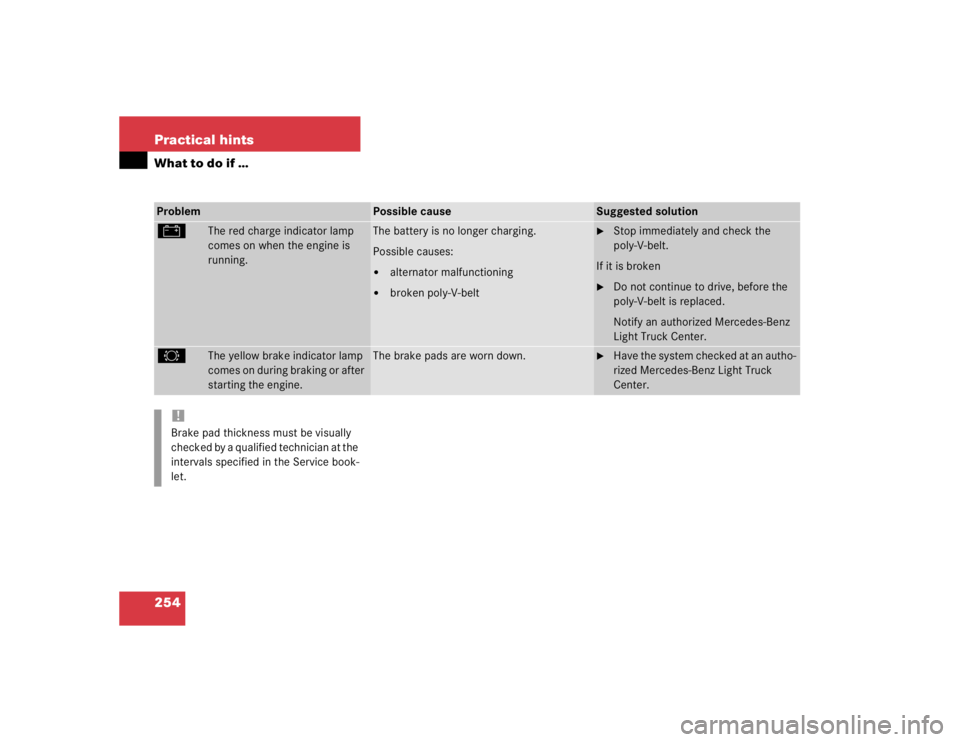
#
The red charge indicator lamp
comes on when the engine is
running.
The battery is no longer charging.
Possible causes:�
alternator malfunctioning
�
broken poly-V-belt
�
Stop immediately and check the
poly-V-belt.
If it is broken
�
Do not continue to drive, before the
poly-V-belt is replaced.
Notify an authorized Mercedes-Benz
Light Truck Center.
2
The yellow brake indicator lamp
comes on during braking or after
starting the engine.
The brake pads are worn down.
�
Have the system checked at an autho-
rized Mercedes-Benz Light Truck
Center.
!Brake pad thickness must be visually
checked by a qualified technician at the
intervals specified in the Service book-
let.
Page 1071 of 4133
267 Practical hints
Replacing bulbs
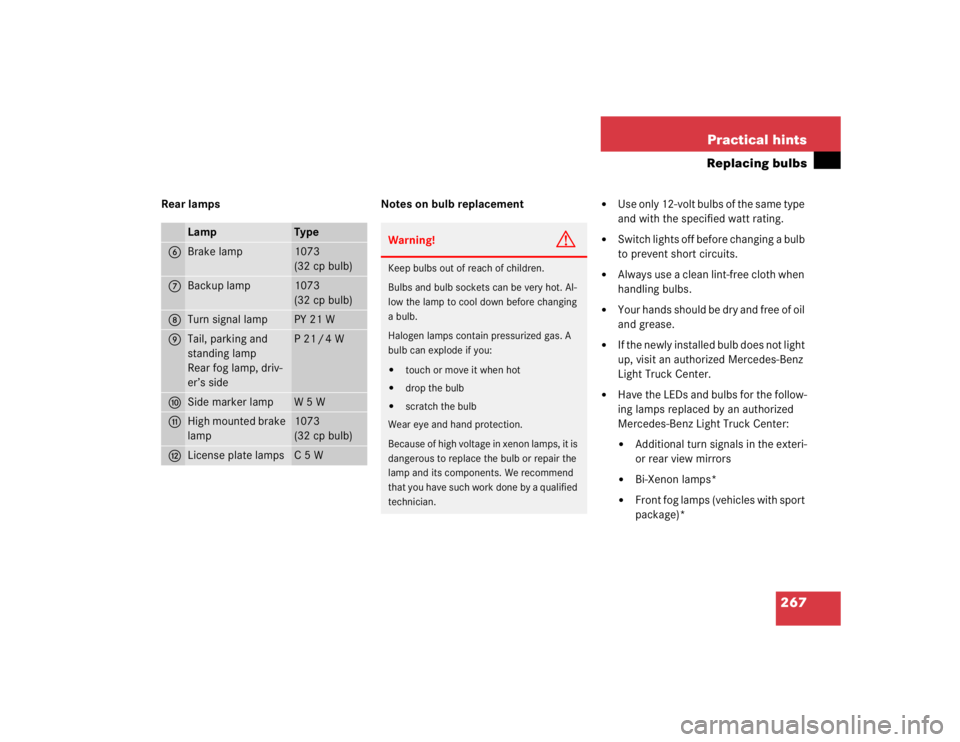
Rear lamps Notes on bulb replacement
�
Use only 12-volt bulbs of the same type
and with the specified watt rating.
�
Switch lights off before changing a bulb
to prevent short circuits.
�
Always use a clean lint-free cloth when
handling bulbs.
�
Your hands should be dry and free of oil
and grease.
�
If the newly installed bulb does not light
up, visit an authorized Mercedes-Benz
Light Truck Center.
�
Have the LEDs and bulbs for the follow-
ing lamps replaced by an authorized
Mercedes-Benz Light Truck Center:�
Additional turn signals in the exteri-
or rear view mirrors
�
Bi-Xenon lamps*
�
Front fog lamps (vehicles with sport
package)*
Lamp
Type
6
Brake lamp
1073
(32 cp bulb)
7
Backup lamp
1073
(32 cp bulb)
8
Turn signal lamp
PY 21 W
9
Tail, parking and
standing lamp
Rear fog lamp, driv-
er’s side
P 21 / 4 W
a
Side marker lamp
W5W
b
High mounted brake
lamp
1073
(32 cp bulb)
c
License plate lamps
C 5 W
Warning!
G
Keep bulbs out of reach of children.
Bulbs and bulb sockets can be very hot. Al-
low the lamp to cool down before changing
a bulb.
Halogen lamps contain pressurized gas. A
bulb can explode if you:�
touch or move it when hot
�
drop the bulb
�
scratch the bulb
Wear eye and hand protection.
Because of high voltage in xenon lamps, it is
dangerous to replace the bulb or repair the
lamp and its components. We recommend
that you have such work done by a qualified
technician.
Page 1074 of 4133
270 Practical hintsReplacing bulbs�
Align headlamp cover and click into
place.
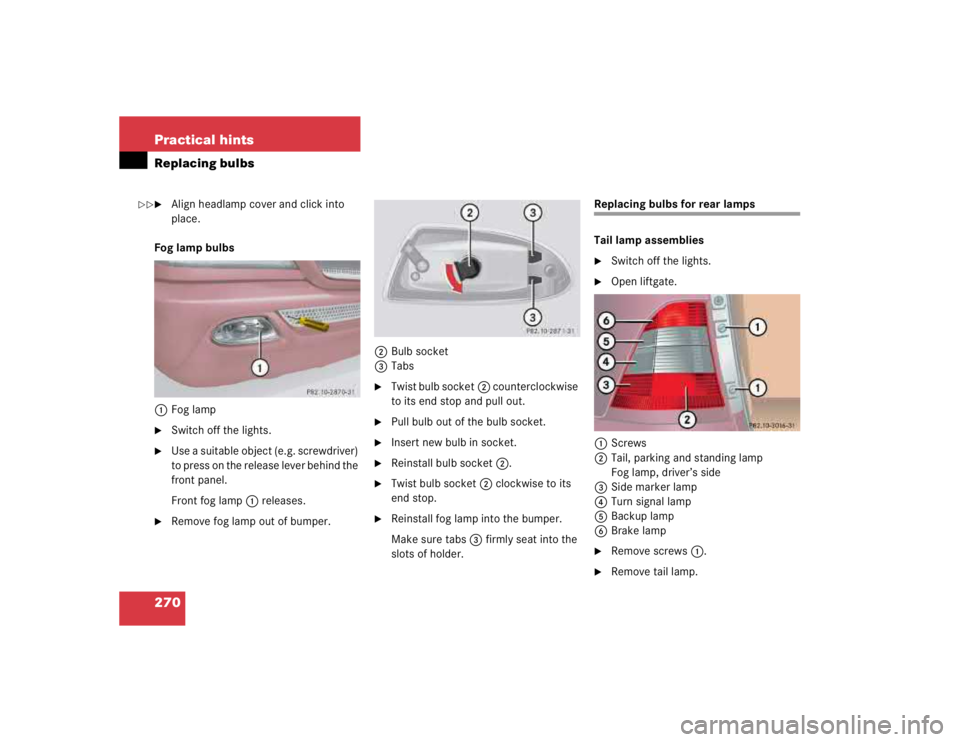
Fog lamp bulbs
1Fog lamp
�
Switch off the lights.
�
Use a suitable object (e.g. screwdriver)
to press on the release lever behind the
front panel.
Front fog lamp1 releases.
�
Remove fog lamp out of bumper.2Bulb socket
3Tabs
�
Twist bulb socket2 counterclockwise
to its end stop and pull out.
�
Pull bulb out of the bulb socket.
�
Insert new bulb in socket.
�
Reinstall bulb socket2.
�
Twist bulb socket2 clockwise to its
end stop.
�
Reinstall fog lamp into the bumper.
Make sure tabs3 firmly seat into the
slots of holder.
Replacing bulbs for rear lamps
Tail lamp assemblies�
Switch off the lights.
�
Open liftgate.
1Screws
2Tail, parking and standing lamp
Fog lamp, driver’s side
3Side marker lamp
4Turn signal lamp
5Backup lamp
6Brake lamp
�
Remove screws1.
�
Remove tail lamp.
��
Page 1075 of 4133
271 Practical hints
Replacing bulbs
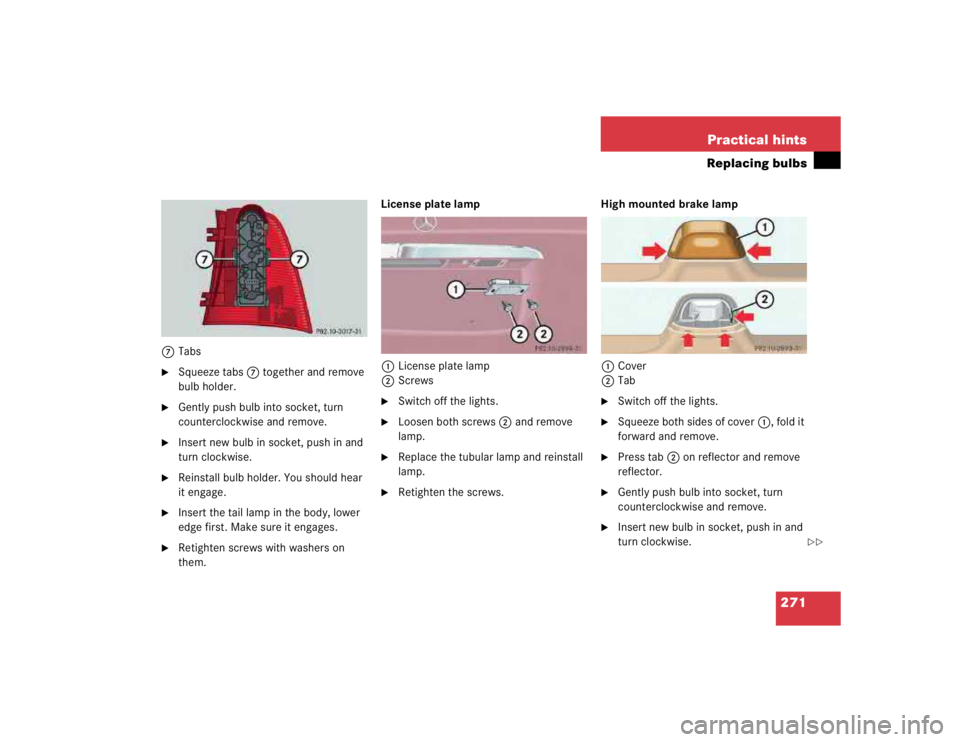
7Tabs�
Squeeze tabs7 together and remove
bulb holder.
�
Gently push bulb into socket, turn
counterclockwise and remove.
�
Insert new bulb in socket, push in and
turn clockwise.
�
Reinstall bulb holder. You should hear
it engage.
�
Insert the tail lamp in the body, lower
edge first. Make sure it engages.
�
Retighten screws with washers on
them.License plate lamp
1License plate lamp
2Screws
�
Switch off the lights.
�
Loosen both screws2 and remove
lamp.
�
Replace the tubular lamp and reinstall
lamp.
�
Retighten the screws.High mounted brake lamp
1Cover
2Tab
�
Switch off the lights.
�
Squeeze both sides of cover1, fold it
forward and remove.
�
Press tab2 on reflector and remove
reflector.
�
Gently push bulb into socket, turn
counterclockwise and remove.
�
Insert new bulb in socket, push in and
turn clockwise.
��
Page 1078 of 4133
274 Practical hintsFlat tire
�Flat tireMounting the spare wheel Preparing the vehicle
�
Park the vehicle as far as possible from
moving traffic on a hard surface.
�
Turn on the hazard warning flashers.
�
Engage the steering wheel lock in the
straight ahead position and set the
parking brake.
�
Move the gear selector lever toP.
�
Have any passenger exit the vehicle at
a safe distance from the roadway.
�
Take the spare wheel out of its carrier
(�page 259).Lifting the vehicle
�
Prevent the vehicle from rolling away
by blocking wheels with wheel chocks
(not included) or other sizable objects.
When changing wheel on a level surface:
�
Place one chock in front of and one be-
hind the wheel that is diagonally oppo-
site to the wheel being changed.
When changing wheel on a hill:
�
Place chocks on the downhill side
blocking both wheels of the other axle.
�
Take the two-piece wheel wrench and
the jack out of the rear compartment
area (
�page 257). Assemble wheel
wrench.
Warning!
G
The dimensions of the spare wheel are dif-
ferent from those of the road wheels. As a
result, the vehicle handling characteristics
change when driving with a mounted spare
wheel. Adapt your driving style accordingly.
The spare wheel is for temporary use only.
When driving with spare wheel mounted, en-
sure proper tire pressure and do not exceed
vehicle speed of 50 mph (80 km / h).
Drive to the nearest Mercedes-Benz Light
Truck Center as soon as possible to have the
spare wheel replaced with a regular road
wheel.
Never operate the vehicle with more than
one spare wheel mounted.
Page 1086 of 4133
282 Practical hintsJump startingThe battery is located on the right side of
the engine compartment.�
Make sure the two vehicles do not
touch.
�
Turn off all electrical consumers.
�
Apply parking brake.
�
Shift gear selector lever to positionP.
�
Open the hood.
�
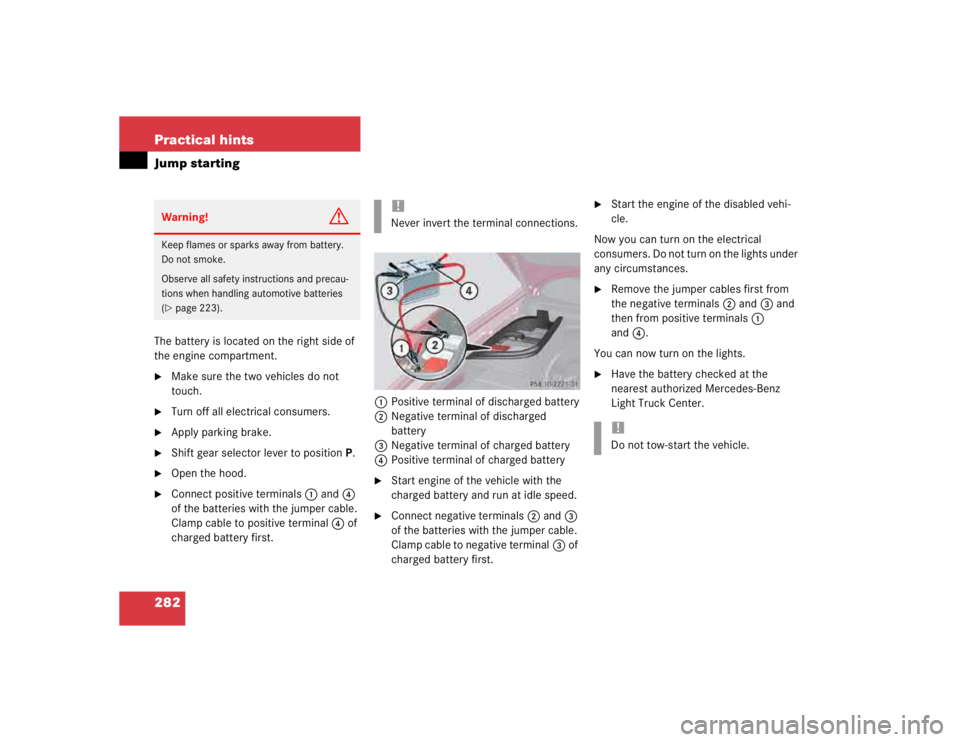
Connect positive terminals1 and4
of the batteries with the jumper cable.
Clamp cable to positive terminal4 of
charged battery first.1Positive terminal of discharged battery
2Negative terminal of discharged
battery
3Negative terminal of charged battery
4Positive terminal of charged battery
�
Start engine of the vehicle with the
charged battery and run at idle speed.
�
Connect negative terminals2 and3
of the batteries with the jumper cable.
Clamp cable to negative terminal3 of
charged battery first.
�
Start the engine of the disabled vehi-
cle.
Now you can turn on the electrical
consumers. Do not turn on the lights under
any circumstances.
�
Remove the jumper cables first from
the negative terminals2 and3 and
then from positive terminals1
and4.
You can now turn on the lights.
�
Have the battery checked at the
nearest authorized Mercedes-Benz
Light Truck Center.
Warning!
G
Keep flames or sparks away from battery.
Do not smoke.
Observe all safety instructions and precau-
tions when handling automotive batteries
(�page 223).
!Never invert the terminal connections.
!Do not tow-start the vehicle.
Page 1106 of 4133

302 Technical dataFuels, coolants, lubricants etc.Engine oils
Engine oils are specifically tested for their
suitability in our engines. Therefore, use
only engine oils approved by
Mercedes-Benz. Information on approved
engine oils is available in the Factory
Approved Service Products pamphlet, or at
your authorized Mercedes-Benz Light
Truck Center.
Engine oil additives
Do not blend oil additives with engine oil.
They may damage the engine.
Damage or malfunctions resulting from
blending oil additives are not covered by
the Mercedes-Benz Limited Warranty.Air conditioning refrigerant
R-134a (HFC) refrigerant and special PAG
lubricating oil is used in the air condition-
ing system.
Never use R-12 (CFC) or mineral-based lu-
bricating oil. Otherwise damage to the
system will occur.
Brake fluid
During vehicle operation, the boiling point
of the brake fluid is continuously reduced
through the absorption of moisture from
the atmosphere. Under extremely strenu-
ous operating conditions, this moisture
content can lead to the formation of bub-
bles in the system, thus reducing the sys-
tem’s efficiency.
Therefore, the brake fluid must be re-
placed every two years, preferably in the
spring.
Only brake fluid approved by
Mercedes-Benz is recommended. Your au-
thorized Mercedes-Benz Light Truck
Center will provide you with additional in-
formation.
!Always check the oil filler cap
(�page 221) for important information
pertaining to the engine oil needing to
meet a specific Mercedes-Benz specifi-
cation (e.g. MB 229.5). If such informa-
tion is printed on the oil filler cap, only
use an engine oil from the list of ap-
proved engine oils in the Factory Ap-
proved Service Products pamphlet that
meets the specification indicated on
the oil filler cap.
Using engine oils of other specification
may cause the FSS to incorrectly deter-
mine the next service interval and will
result in engine damage not covered by
the Mercedes-Benz Limited Warranty.