1997 MAZDA MIATA Shift
[x] Cancel search: ShiftPage 64 of 514

1. Inspect ATF level and condition. Correct as needed. If fluid level and condition is okay, check line
pressure. See LINE PRESSURE TEST under TESTING in MAZDA NC4A-EL OVERHAUL article.
Follow repair recommendations if line pressure is not within specifications. If line pressure is okay, go to
next step.
2. Inspect lock-up solenoid. See SOLENOID VALVES
under COMPONENT TESTING. Repair as
needed. If solenoid valve is okay, go to next step.
3. Inspect lock-up control valve in valve body. If valve is okay, go to next step.
4. Using an EC-AT tester connected to TCM, ensure that engine speed and turbine speed during TCC lock-
up in 4th gear are the same. If speeds are different, replace torque converter. If speeds are the same, go to
next step.
5. Clear DTC. See CLEARING CODES
. Retrieve DTC. If DTC P0740 is still present, replace TCM. If
code is no longer present and symptom still exists, problem may be caused by intermittent TCC slippage.
Further investigation may be required. See MAZDA NC4A-EL OVERHAUL article.
DTC P0750: 1-2 SHIFT SOLENOID MALFUNCTION
Possible Causes:
Short or open circuit between TCM and solenoid.
TCM malfunction.
Shift solenoid malfunction.
Diagnosis & Repair Procedure
1. Ensure all connections are clean and tight. Repair as needed. Turn ignition on. Access TCM connectors.
Using voltmeter, backprobe harness connectors. DO NOT disconnect connectors. Go to next step.
2. Measure voltage between ground and terminal No. 2E (Blue/Yellow wire) on TCM connector. During
test drive, voltage should be less than one volt when solenoid is off and battery voltage when solenoid is
on. See SOLENOID OPERATION
table under TCM OUTPUT DEVICES. If voltage is within
specification, go to step 5 . If voltage is not within specification, go to next step.
3. Turn ignition off. Disconnect TCM harness connector. Measure resistance between ground and terminal
No. 2E. If resistance is 13-27 ohms at 68°F (20°C), go to step 5 . If resistance is not 13-27 ohms at 68°F
(20°C), go to next step.
4. Inspect 1-2 shift solenoid and related circuits. See SOLENOID VALVES
under COMPONENT
TESTING. Repair as needed. If solenoid valve and related circuits are okay, go to next step.
5. Clear DTC and road test vehicle. Retrieve DTC. If DTC P0750 is still present, replace TCM. If code is no
longer present, system is okay.
DTC P0755: 2-3 SHIFT SOLENOID MALFUNCTION
Possible Causes:
Short or open circuit between TCM and solenoid.
TCM malfunction.
1997 Mazda MX-5 Miata
1997 AUTOMATIC TRANSMISSIONS NC4A-EL Electronic Controls
Microsoft
Sunday, July 05, 2009 1:35:04 PMPage 16 © 2005 Mitchell Repair Information Company, LLC.
Page 65 of 514

Shift solenoid malfunction.
Diagnosis & Repair Procedure
1. Ensure all connections are clean and tight. Repair as needed. Turn ignition on. Access TCM connectors.
Using voltmeter, backprobe harness connectors. DO NOT disconnect connectors. Go to next step.
2. Measure voltage between ground and terminal No. 2G (Orange wire) on TCM connector. During test
drive, voltage should be less than one volt when solenoid is off and battery voltage when solenoid is on.
See SOLENOID OPERATION
table under TCM OUTPUT DEVICES. If voltage is within
specification, go to step 5 . If voltage is not within specification, go to next step.
3. Turn ignition off. Disconnect TCM harness connector. Measure resistance between ground and terminal
No. 2G. If resistance is 13-27 ohms at 68°F (20°C), go to step 5 . If resistance is not 13-27 ohms at 68°F
(20°C), go to next step.
4. Inspect 2-3 shift solenoid and related circuits. See SOLENOID VALVES
under COMPONENT
TESTING. Repair as needed. If solenoid valve and related circuits are okay, go to next step.
5. Clear trouble codes and road test vehicle. Retrieve DTC. If DTC P0755 is still present, replace TCM. If
code is no longer present, system is okay.
DTC P0760: 3-4 SHIFT SOLENOID MALFUNCTION
Possible Causes:
Short or open circuit between TCM and solenoid.
TCM malfunction.
Shift solenoid malfunction.
Diagnosis & Repair Procedure
1. Ensure all connections are clean and tight. Repair as needed. Turn ignition on. Access TCM connectors.
Using voltmeter, backprobe harness connectors. DO NOT disconnect connectors. Go to next step.
2. Measure voltage between ground and terminal No. 2I (Blue wire) on TCM connector. During test drive,
voltage should be less than one volt when solenoid is off and battery voltage when solenoid is on. See
SOLENOID OPERATION
table under TCM OUTPUT DEVICES. If voltage is within specification, go
to step 5 . If voltage is not within specification, go to next step.
3. Turn ignition off. Disconnect TCM harness connector. Measure resistance between ground and terminal
No. 2E. If resistance is 13-27 ohms at 68°F (20°C), go to step 5 . If resistance is not 13-27 ohms at 68°F
(20°C), go to next step.
4. Inspect 3-4 shift solenoid and related circuits. See SOLENOID VALVES
under COMPONENT
TESTING. Repair as needed. If solenoid valve and related circuits are okay, go to next step.
5. Clear codes and road test vehicle. Retrieve DTC. If DTC P0760 is still present, replace TCM. If code is
no longer present, problem is intermittent. Further investigation may be necessary.
DTC P1720: VEHICLE SPEED SENSOR SIGNAL MISSING
1997 Mazda MX-5 Miata
1997 AUTOMATIC TRANSMISSIONS NC4A-EL Electronic Controls
Microsoft
Sunday, July 05, 2009 1:35:04 PMPage 17 © 2005 Mitchell Repair Information Company, LLC.
Page 67 of 514

4. Inspect lock-up solenoid and related circuits. See SOLENOID VALVES under COMPONENT
TESTING. Repair as needed. If solenoid valve and related circuits are okay, go to next step.
5. Clear codes and road test vehicle. Retrieve DTC. If DTC P1743 is still present, replace TCM. If code is
no longer present, problem may be caused by poor connection. Repair as needed.
DTC P1765: 3-2 CONTROL SOLENOID VALVE MALFUNCTION
Possible Causes:
Short or open circuit between TCM and solenoid.
TCM malfunction.
3-2 control solenoid malfunction.
Diagnosis & Repair Procedure
1. Ensure all connections are clean and tight. Repair as needed. Turn ignition on. Access TCM connectors.
Using voltmeter, backprobe harness connectors. DO NOT disconnect connectors. Go to next step.
2. Drive vehicle and measure voltage between ground and terminal No. 2M (Blue/Orange wire). Battery
voltage should be present with solenoid on during 3-2 or 4-3 downshift, and zero volts with solenoid off.
If voltage is within specifications, go to step 5 . If voltage is not within specifications, go to next step.
3. Turn ignition off. Disconnect TCM harness connector. Measure resistance between ground and terminal
No. 2M. If resistance is 13-27 ohms at 68°F (20°C), go to step 5 . If resistance is not 13-27 ohms at 68°F
(20°C), go to next step.
4. Inspect 3-2 control clutch solenoid and related circuits. See SOLENOID VALVES
under
COMPONENT TESTING. Repair as needed. If solenoid valve and related circuits are okay, go to next
step.
5. Clear codes and road test vehicle. Retrieve DTC. If DTC P1765 is still present, replace TCM. If code is
no longer present, problem may be caused by poor connection. Repair as needed.
DTC P1790: THROTTLE POSITION (TP) SENSOR MALFUNCTION
Condition
TP sensor voltage is less than one volt or more than 4.9 volts. Possible causes are:
Poor harness connection at TP sensor.
Circuit fault between TP sensor and ECM or TCM.
TP sensor malfunction.
ECM or TCM malfunction.
Diagnosis & Repair Procedure
NOTE: If DTC P0725 is also present, repair it first and then proceed with this test.
1997 Mazda MX-5 Miata
1997 AUTOMATIC TRANSMISSIONS NC4A-EL Electronic Controls
Microsoft
Sunday, July 05, 2009 1:35:04 PMPage 19 © 2005 Mitchell Repair Information Company, LLC.
Page 70 of 514

Disconnect output speed sensor connector. See Fig. 3. Measure resistance between terminals. Resistance
should be 245 ohms. Replace as needed.
SOLENOID VALVES (EXCEPT TCC SOLENOID)
Disconnect negative battery cable. Disconnect transmission solenoid harness connector. See Fig. 3
. Note that
solenoids ground through transmission case. Check resistance between connector terminals and ground. See
Fig. 7
. Resistance should be 13-27 ohms. Replace solenoids as necessary. See SOLENOID VALVE
IDENTIFICATION table. Ensure transmission case is grounded.
Fig. 7: Identifying Solenoid Valve Terminals
Courtesy of MAZDA MOTORS CORP.
SOLENOID VALVE IDENTIFICATION
TCC SOLENOID
Disconnect ne
gative battery cable. Disconnect TCC solenoid harness connector. See Fig. 3 . Check resistance
Solenoid Valve(1) Terminal No.
1-2 Shift SolenoidC
2-3 Shift SolenoidD
3-4 Shift SolenoidA
3-2 ControlB
(1)See Fig. 7 for terminal identification.
1997 Mazda MX-5 Miata
1997 AUTOMATIC TRANSMISSIONS NC4A-EL Electronic Controls
Microsoft
Sunday, July 05, 2009 1:35:04 PMPage 22 © 2005 Mitchell Repair Information Company, LLC.
Page 75 of 514

Fig. 11: TCM Pin Voltage Table (2 Of 2)
Courtesy of MAZDA MOTORS CORP.
ELECTRICAL SPECIFICATIONS
SOLENOID RESISTANCE SPECIFICATIONS
ComponentResistance Ohms
Solenoids
Shift Solenoids13-27
TCC Solenoid13-25
Sensor
TSS245
1997 Mazda MX-5 Miata
1997 AUTOMATIC TRANSMISSIONS NC4A-EL Electronic Controls
Microsoft
Sunday, July 05, 2009 1:35:04 PMPage 27 © 2005 Mitchell Repair Information Company, LLC.
Page 160 of 514

Submerge other end of hose in container of brake fluid.
2. Fill reservoir with DOT 3 brake fluid. Have an assistant press and release clutch pedal several times, then
hold pedal down. With pedal pressed, loosen bleeder screw to let air and fluid escape.
3. Repeat step 2) until no more air bubbles emerge from hose. Tighten bleeder screw. Fill reservoir. Operate
clutch while inspecting for leaks. Check clutch and brake operation.
REMOVAL & INSTALLATION
CLUTCH ASSEMBLY
Removal (B2300, B2500, B3000 & B4000)
1. Disconnect negative battery cable. Shift transmission into Neutral. Remove gearshift lever. Raise and
support vehicle. Mark drive shaft flanges for installation reference. Remove drive shaft. Using Clutch
Disconnect Tool (T88T-70522-A), disconnect hydraulic line at transmission. See Fig. 2
. Plug hydraulic
line to prevent contamination. Disconnect wiring at transmission.
2. Remove starter. Remove exhaust components as necessary for clearance. On 4WD models, remove skid
plate and transfer case. On all models, secure transmission jack under transmission. Remove transmission
mount-to-crossmember nuts and bolts.
3. Remove nuts securing crossmember to frame side rails, and remove crossmember. Lower transmission
enough to gain access to transmission-to-engine block bolts. Remove transmission-to-engine block bolts.
Remove transmission.
4. If clutch parts are going to be reused, mark clutch cover and flywheel for reassembly reference. Loosen
pressure plate bolts evenly in crisscross pattern until springs are not under tension. Remove clutch cover
and clutch disc.
Inspection (B2300, B2500, B3000 & B4000)
1. Inspect disc for loose rivets, worn or defective springs, excessive wear, or oil contamination. Inspect
flywheel and clutch cover for burns, scoring, or grooves.
2. Measure flywheel and clutch cover runout. Resurface or replace flywheel and clutch cover if beyond
specification. See CLUTCH RUNOUT (MAXIMUM)
table.
3. Measure clutch disc runout. Replace disc if it is not to specification. See CLUTCH RUNOUT
(MAXIMUM) table. Inspect disc hub and input shaft splines for excessive wear. Hub must slide
smoothly on input shaft splines.
4. Inspect pilot bearing for wear. Apply inward pressure while rotating pilot bearing. If bearing sticks or has
excessive resistance, replace bearing. Check for tight fit in crankshaft. Replace as necessary. Inspect
release bearing for smooth operation, wear, damage, or looseness. Replace bearing as necessary.
CLUTCH RUNOUT (MAXIMUM)
ApplicationIn. (mm)
Disc0.028 (0.7)
Flywheel0.008 (0.20)
1997 Mazda MX-5 Miata
CLUTCH 1997-98 CLUTCHES Mazda - RWD
Microsoft
Sunday, July 05, 2009 1:36:47 PMPage 4 © 2005 Mitchell Repair Information Company, LLC.
Page 161 of 514

Installation (B2300, B2500, B3000 & B4000)
1. Lightly coat input shaft splines, release bearing, and fork contact areas with molybdenum disulfide
grease. Align clutch cover dowel holes with flywheel dowels. Tighten clutch cover bolts evenly in a
crisscross pattern to specification. See TORQUE SPECIFICATIONS
.
2. Raise transmission into position. Install and tighten transmission-to-engine block bolts. See TORQUE
SPECIFICATIONS . Install crossmember.
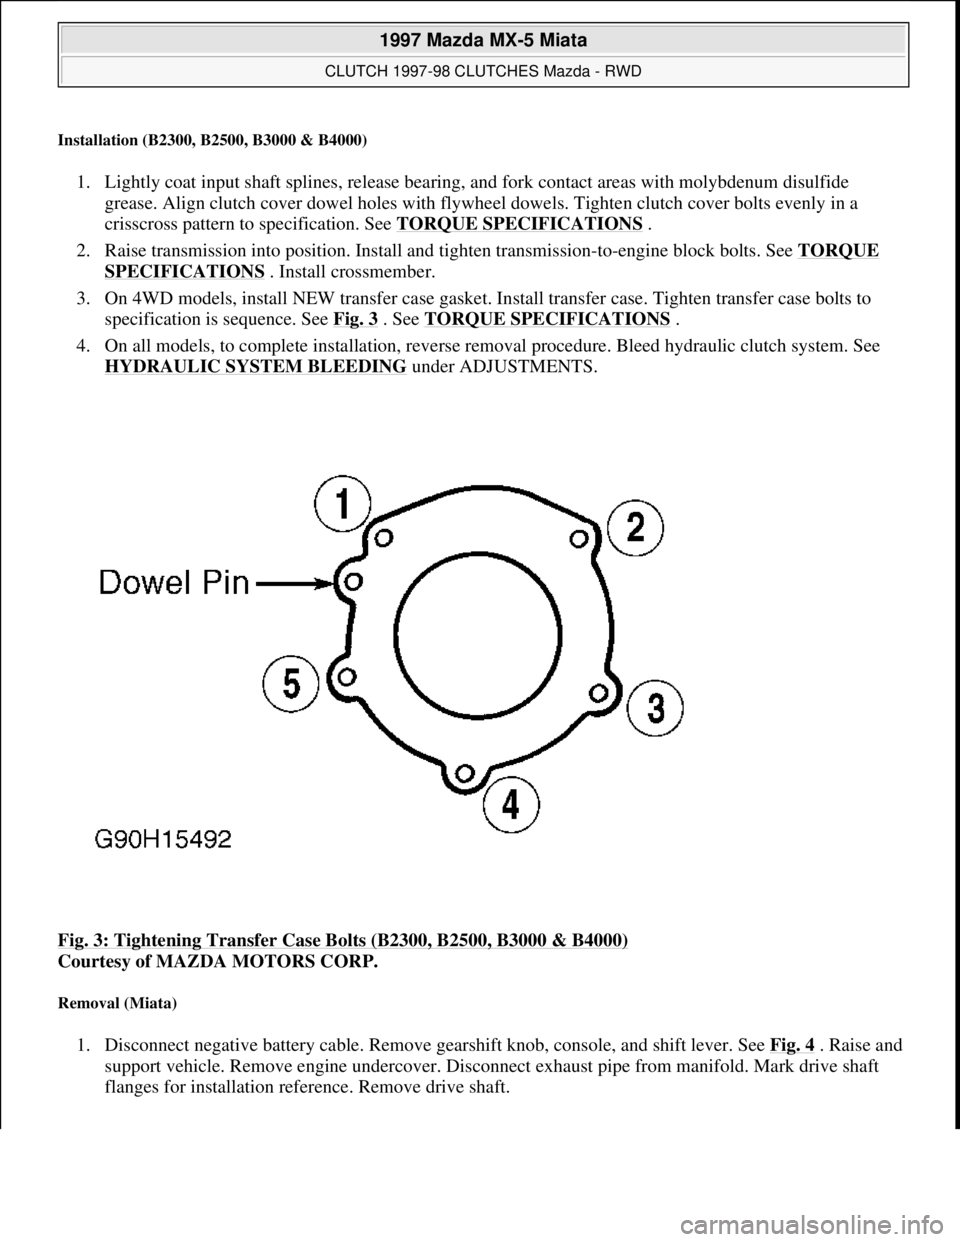
3. On 4WD models, install NEW transfer case gasket. Install transfer case. Tighten transfer case bolts to
specification is sequence. See Fig. 3
. See TORQUE SPECIFICATIONS .
4. On all models, to complete installation, reverse removal procedure. Bleed hydraulic clutch system. See
HYDRAULIC SYSTEM BLEEDING
under ADJUSTMENTS.
Fig. 3: Tightening Transfer Case Bolts (B2300, B2500, B3000 & B4000)
Courtesy of MAZDA MOTORS CORP.
Removal (Miata)
1. Disconnect negative battery cable. Remove gearshift knob, console, and shift lever. See Fig. 4. Raise and
support vehicle. Remove engine undercover. Disconnect exhaust pipe from manifold. Mark drive shaft
flanges for installation reference. Remove drive shaft.
1997 Mazda MX-5 Miata
CLUTCH 1997-98 CLUTCHES Mazda - RWD
Microsoft
Sunday, July 05, 2009 1:36:47 PMPage 5 © 2005 Mitchell Repair Information Company, LLC.
Page 171 of 514

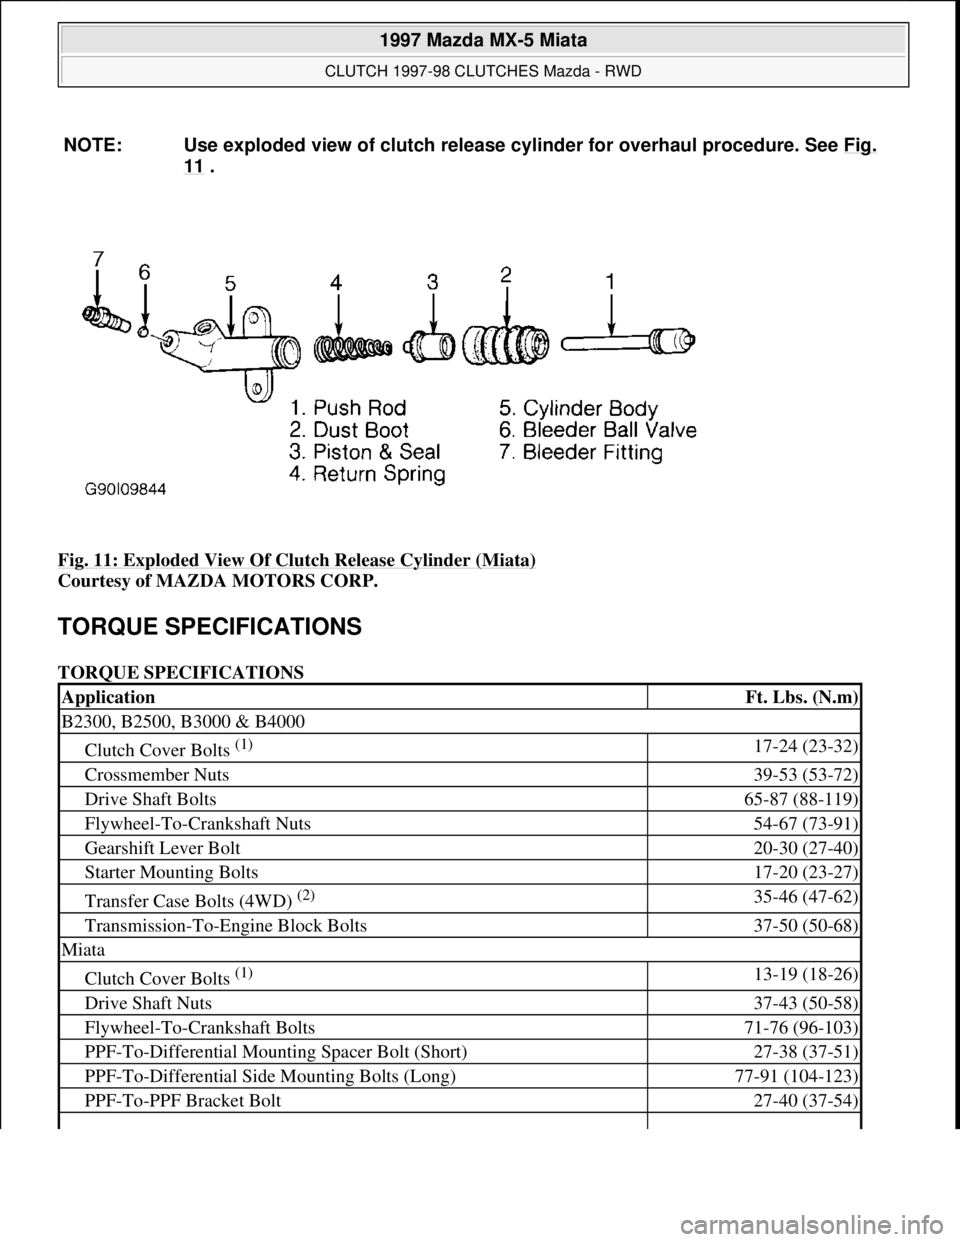
Fig. 11: Exploded View Of Clutch Release Cylinder (Miata)
Courtesy of MAZDA MOTORS CORP.
TORQUE SPECIFICATIONS
TORQUE SPECIFICATIONS NOTE: Use exploded view of clutch release cylinder for overhaul procedure. See Fig.
11 .
ApplicationFt. Lbs. (N.m)
B2300, B2500, B3000 & B4000
Clutch Cover Bolts (1) 17-24 (23-32)
Crossmember Nuts39-53 (53-72)
Drive Shaft Bolts65-87 (88-119)
Flywheel-To-Crankshaft Nuts54-67 (73-91)
Gearshift Lever Bolt20-30 (27-40)
Starter Mounting Bolts17-20 (23-27)
Transfer Case Bolts (4WD) (2) 35-46 (47-62)
Transmission-To-Engine Block Bolts37-50 (50-68)
Miata
Clutch Cover Bolts (1) 13-19 (18-26)
Drive Shaft Nuts37-43 (50-58)
Flywheel-To-Crankshaft Bolts71-76 (96-103)
PPF-To-Differential Mounting Spacer Bolt (Short)27-38 (37-51)
PPF-To-Differential Side Mounting Bolts (Long)77-91 (104-123)
PPF-To-PPF Bracket Bolt27-40 (37-54)
1997 Mazda MX-5 Miata
CLUTCH 1997-98 CLUTCHES Mazda - RWD
Microsoft
Sunday, July 05, 2009 1:36:47 PMPage 15 © 2005 Mitchell Repair Information Company, LLC.