Page 9 of 18
ELECTRICAL COMPONENTS
225
NOTICE
For non±maintenance battery:
Do not refill the battery with water.Adding distilled water
(Maintenance type battery only)
�Low O.K.
1. Remove the vent plugs.
2. Add distilled water to cells needing fluid.
If the side of the battery is covered, check the water level by
looking down directly above the cell as illustrated above.
3. Retighten the vent plugs securely.
NOTICE
�Do not overfill the cells. Excess electrolyte could
squirt out of the battery during heavy charging,
causing corrosion or damage.
�Use a cover on the battery for longer life.
Page 10 of 18
ELECTRICAL COMPONENTS
226
BATTERY RECHARGING
PRECAUTIONS
During recharging, the battery is producing hydrogen
gas.
Therefore, before recharging:
1. Maintenance type batteries ± Remove the vent plugs.
2. If recharging with the battery installed on the vehicle, be
sure to disconnect the ground cable.
3. Make sure the power switch on the recharger is off when
connecting the charger cables to the battery and when
disconnecting them.
CAUTION!
�Always charge the battery in an unconfined area.
Do not charge the battery in a garage or closed
room where there is not sufficient ventilation.
�Non±maintenance batteries: Only do a slow
charge (5A or less). Charging at a quicker rate is
dangerous. The battery may explode causing
personal injuries.
Maintenance type batteries: Be sure to remove
the vent plugs before recharging.
NOTICE
Never recharge the battery while the engine is
running. Also, be sure all accessories are turned
off.
Page 11 of 18
ELECTRICAL COMPONENTS
227
CHECKING AND REPLACING THE
BLADE TYPE FUSES
Engine compartment�Pull±out tool
Spare fuses
Driver's side instrument panel
1. Turn the ignition switch off and remove the
auxiliary box.
Determine which fuse may be causing the problem. The
auxiliary box shows the name of the circuit for each fuse.
Page 12 of 18

ELECTRICAL COMPONENTS
228
2. Make sure the inoperative component is turned off.
Pull the suspected fuse straight out with the pull±out
tool and check it. If it has blown, push a new fuse into
the clips.
Good
Blown
a. Look carefully at the fuse. If the thin wire is broken, the
fuse has blown. If you are not sure or if it is too dark to see,
try replacing the suspected fuse with one of the same value
that you know is good.
b. Only install a fuse with the amperage rating designated
on the fuse box lid.
If you do not have a spare fuse, in an emergency you can pull
out the ªRAD NO.1º, ªRAD NO.2ºª or ªPWR OUTLETº fuse,
which may be dispensable for normal driving, and use it if its
amperage rating is the same.
If you cannot use one of the same amperage, use one lower
than, but as close as possible to, the amperage. If the
amperage is lower than the specified, the fuse might blow
out again but this does not indicate anything wrong. Be sure
to get the correct fuse as soon as possible and return the
substitute to its original clips.
It is a good idea to purchase a set of spare fuses and keep
them in your vehicle for emergencies.
If the new fuse immediately blows out, there is a problem
with the electrical system. Have your Lexus dealer correct
it as soon as possible.
CAUTION!
Never use a fuse with a higher amperage rating, or
any other object, in place of a fuse. This may cause
extensive damage and possibly a fire.
Page 13 of 18
ELECTRICAL COMPONENTS
229
CHECKING THE CARTRIDGE TYPE
FUSES
Engine compartment
Driver's side instrument panel
If the headlights or other electrical components do not
work and the blade type fuses are O.K., check the
cartridge type fuses. If any of the cartridge type fuses
are blown, they must be replaced.
Page 14 of 18
ELECTRICAL COMPONENTS
230
�Type A Type B �Good�Blown
If there is an overload in the circuits from the battery, the
fuses are designed to blow before the entire wiring harness
is damaged.
NOTICE
Before replacing the fuses, have the cause of
electrical overload determined and repaired by your
Lexus dealer.
CAUTION!
Always use a genuine Lexus fuse or equivalent for
replacement. Never install an ordinary wire ± even
for a temporary fix. This may cause extensive
damage and possibly a fire.
ADDING WASHER FLUID
If the washer tank becomes nearly empty, add washer
fluid.
You may use plain water as washer fluid. However, in cold
areas where temperatures range below the freezing point,
use washer fluid containing antifreeze. This product is
available at your Lexus dealer and most auto parts stores.
Follow the manufacturer's directions for how much to mix
with water.
NOTICE
Do not use engine antifreeze or any other substitute
because it may damage your vehicle's paint.
Page 15 of 18
ELECTRICAL COMPONENTS
231
CHECKING THE HEADLIGHT AIM
�Beam angle gauge (horizontal movement)
Beam angle gauge (vertical movement)
Before checking the headlight aim:
1. Be sure that the body around the headlights is not
deformed.
2. Park the vehicle on a level spot.
3. The driver gets into the driver's seat so that the vehicle
has its normal load (with the tank full).
4. Bounce the vehicle several times.
�Bubble Acceptable range
Vertical movement gauge: The bubble of the gauge should
not deviate from the center of the gauge by more than two
marks to either side of the gauge.
Page 16 of 18
ELECTRICAL COMPONENTS
232
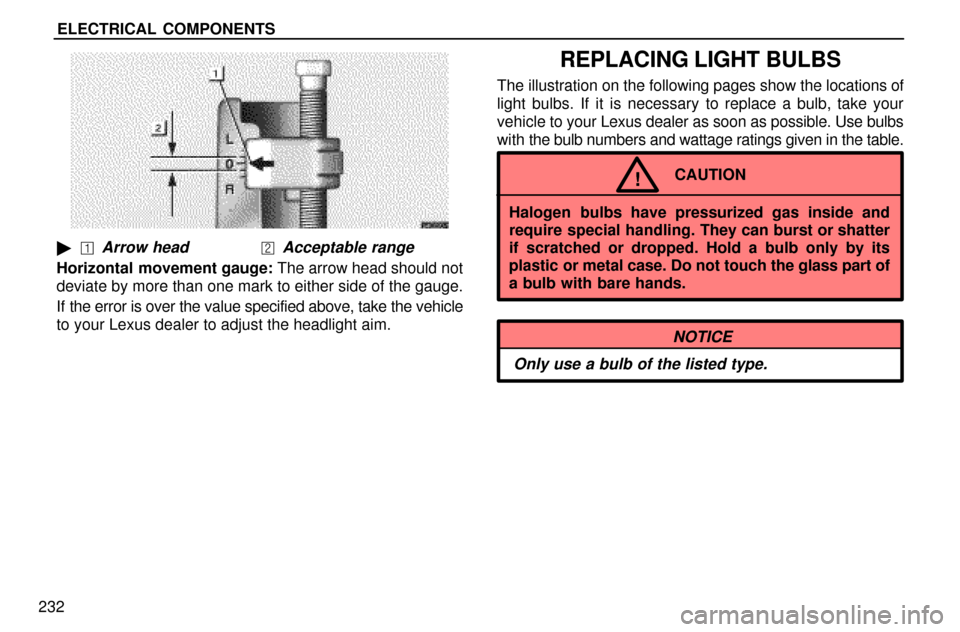
�Arrow head Acceptable range
Horizontal movement gauge: The arrow head should not
deviate by more than one mark to either side of the gauge.
If the error is over the value specified above, take the vehicle
to your Lexus dealer to adjust the headlight aim.
REPLACING LIGHT BULBS
The illustration on the following pages show the locations of
light bulbs. If it is necessary to replace a bulb, take your
vehicle to your Lexus dealer as soon as possible. Use bulbs
with the bulb numbers and wattage ratings given in the table.
CAUTION!
Halogen bulbs have pressurized gas inside and
require special handling. They can burst or shatter
if scratched or dropped. Hold a bulb only by its
plastic or metal case. Do not touch the glass part of
a bulb with bare hands.
NOTICE
Only use a bulb of the listed type.