1997 HONDA ODYSSEY audio
[x] Cancel search: audioPage 103 of 241
Audio System
Press the CD button until "CD"
appears in the display. The system
will start to play the first track of the
first disc in the magazine.
When that disc ends, the next disc in the magazine is loaded and played.
After the last disc finishes, the system returns to disc 1.
To select a different disc, press the appropriate preset button (1 — 6). If
you select an empty slot in the magazine, the changer will, after
finding that slot empty, try to load the CD in the next slot. This
continues until it finds a CD to load
and play.
You can use the TUNE/SEEK switch to select tracks within a disc.
If you push and release the TUNE/
SEEK switch, the system will move
to the beginning of a track. Push the switch up to move to the beginning
of the next track, and push the
switch down to move to the begin-
ning of the current track. If you push and hold the TUNE/
SEEK switch, you will hear a beep
and the system will continue to move
across tracks. Release the switch
when you think it has reached the desired place on the disc.
RPT —
When you activate the
Repeat feature by pressing the
A. SEL/RPT button, the system continuously replays the current
track. You will see RPT in the display as a reminder. Press the button
again to turn it off.
RANDOM PLAY —
This feature,
when activated, plays the tracks on a CD in random order, rather than in
the order they are recorded on the CD. To activate Random Play, press
the A. SEL/RPT button until you see
A. SEL in the display. The system will then select and play tracksrandomly on the current disc. When
all tracks on that disc have been
played, the next disc is loaded and played randomly. This continues
until you deactivate Random Play by
pressing A. SEL/RPT again.
If the system is in Repeat mode, you must turn it off by pressing A. SEL/RPT before you can select Random
Play. Then press the button again
until you see A. SEL displayed.
To take the system out of CD mode, press the AM or FM button, or inserta cassette in the player. When you
return to CD mode, play will contin-
ue at the same disc and track.
If you turn the system off while a CD
is playing, either with the PWR/VOL
knob or the ignition switch, play will continue at the same point when you
turn it back on.
Comfort and Convenience FeaturesProCarManuals.comMain Menu Table of Contents s t
Page 104 of 241
Audio System
Protecting Compact Discs
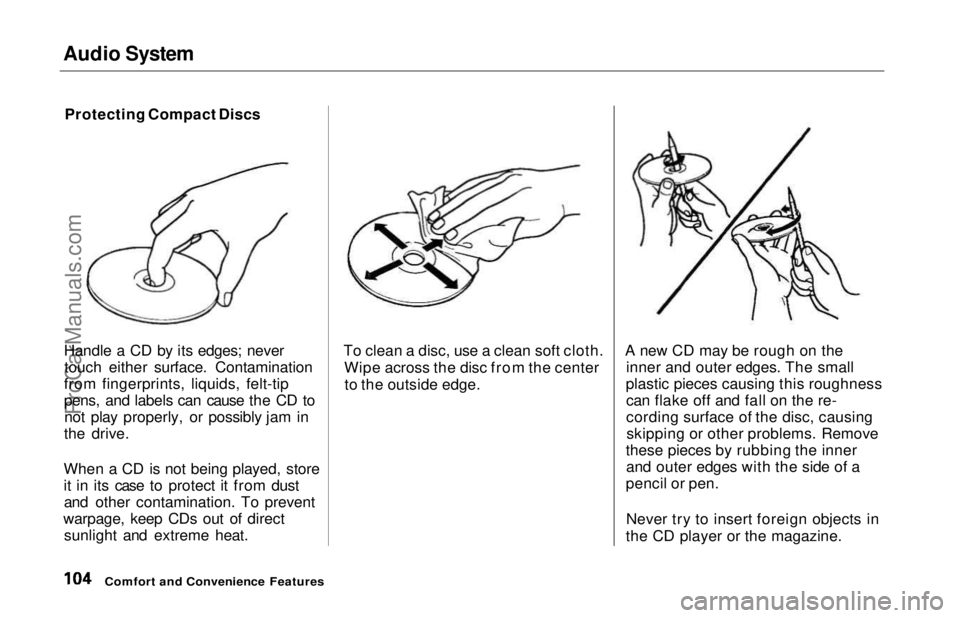
Handle a CD by its edges; never touch either surface. Contamination
from fingerprints, liquids, felt-tip
pens, and labels can cause the CD to not play properly, or possibly jam in
the drive.
When a CD is not being played, store
it in its case to protect it from dust and other contamination. To prevent
warpage, keep CDs out of direct sunlight and extreme heat. To clean a disc, use a clean soft cloth.
Wipe across the disc from the centerto the outside edge. A new CD may be rough on the
inner and outer edges. The small
plastic pieces causing this roughness can flake off and fall on the re-
cording surface of the disc, causingskipping or other problems. Remove
these pieces by rubbing the inner and outer edges with the side of a
pencil or pen.
Never try to insert foreign objects in
the CD player or the magazine.
Comfort and Convenience FeaturesProCarManuals.comMain Menu Table of Contents s t
Page 105 of 241
Audio System
CD Changer Error Indications
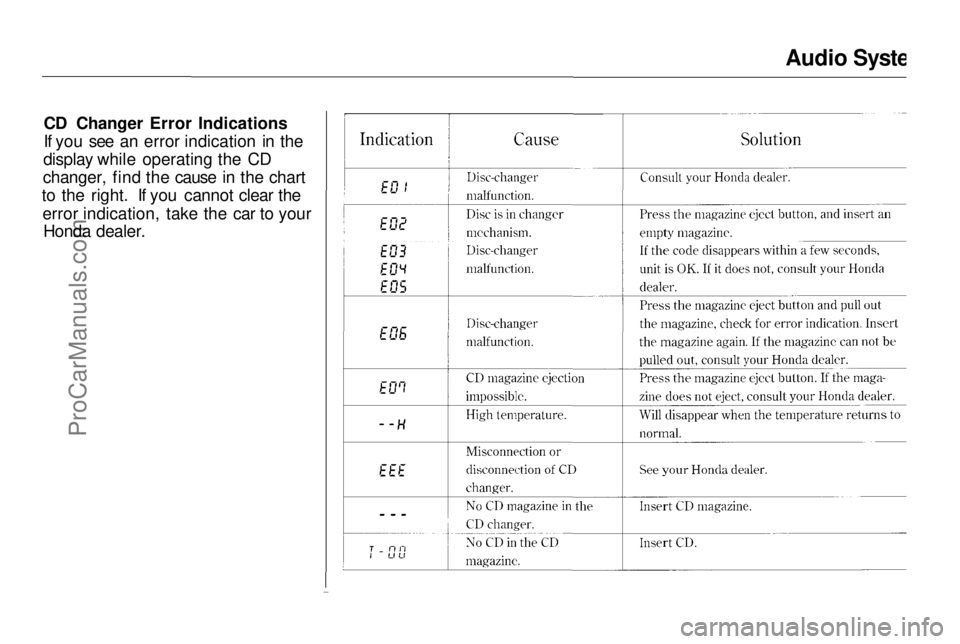
If you see an error indication in the
display while operating the CD
changer, find the cause in the chart
to the right. If you cannot clear the
error indication, take the car to your Honda dealer.
Comfort and Convenience FeaturesProCarManuals.comMain Menu Table of Contents s t
Page 106 of 241
Audio System
Theft Protection
On U.S. EX model
Your car's audio system will disable itself if it is disconnected from
electrical power for any reason. To
make it work again, the user must
enter a specific five-digit code in the
Preset buttons. Because there are
hundreds of number combinations
possible from five digits, making the system work without knowing the
exact code is nearly impossible.
You should have received a card that lists your audio system's codenumber and serial number. It is best
to store this card in a safe place at
home. In addition, you should write
the audio system's serial number in
this Owner's Manual. If you should
happen to lose the card, you must obtain the code number from your
Honda dealer. To do this, you will
need the system's serial number. If your car's battery is disconnected
or goes dead, the audio system will
disable itself. If this happens, you
will see "Code" in the frequency display the next time you turn on the
system. Use the Preset buttons to
enter the five-digit code. If it is
entered correctly, the radio will start
playing.
If you make a mistake entering the
code, do not start over or try to
correct your mistake. Complete the
five-digit sequence, then enter the correct code. You have three tries toenter the correct code. If you are
unsuccessful in three attempts, you
must then leave the system on for
one hour before trying again. You will have to store your favorite
stations in the Preset buttons after
the system begins working. Your
original settings were lost when
power was disconnected.
Comfort and Convenience FeaturesProCarManuals.comMain Menu Table of Contents s t
Page 164 of 241
Battery
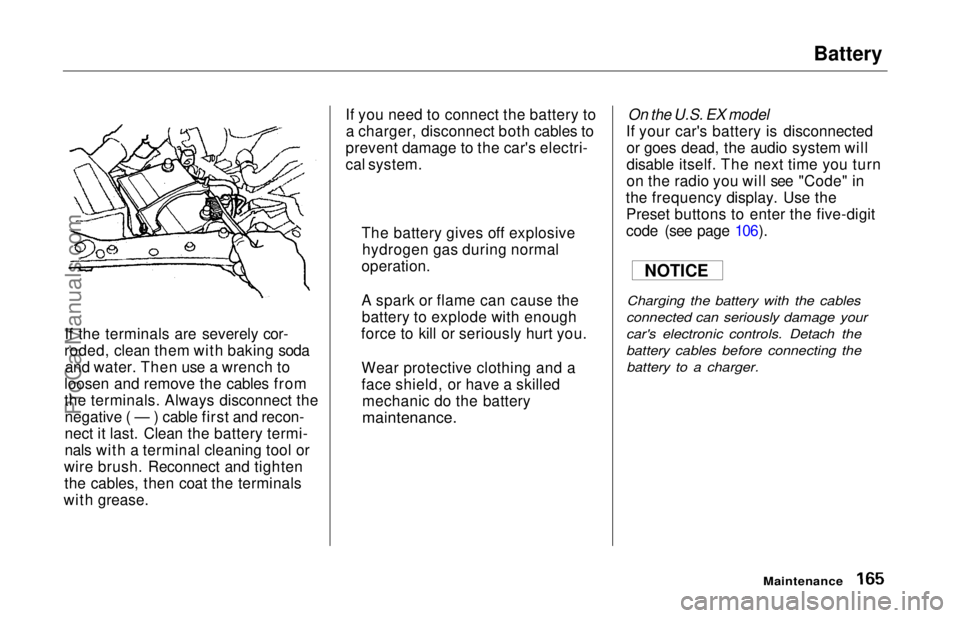
If the terminals are severely cor-
roded, clean them with baking soda and water. Then use a wrench to
loosen and remove the cables from
the terminals. Always disconnect the negative ( — ) cable first and recon-
nect it last. Clean the battery termi-
nals with a terminal cleaning tool or
wire brush. Reconnect and tighten the cables, then coat the terminals
with grease. If you need to connect the battery to
a charger, disconnect both cables to
prevent damage to the car's electri-
cal system.
On the U.S. EX model
If your car's battery is disconnected or goes dead, the audio system will
disable itself. The next time you turn
on the radio you will see "Code" in
the frequency display. Use the Preset buttons to enter the five-digit
code (see page 106).
Charging the battery with the cables
connected can seriously damage your
car's electronic controls. Detach the
battery cables before connecting the battery to a charger.
Maintenance
The battery gives off explosive
hydrogen gas during normal
operation.
A spark or flame can cause the battery to explode with enough
force to kill or seriously hurt you.
Wear protective clothing and a
face shield, or have a skilled mechanic do the battery
maintenance.
NOTICEProCarManuals.comMain Menu Table of Contents s t
Page 233 of 241
Index
Accessories
Installation.................................. 115
ACCESSORY (Ignition Key Position)........................................ 50
Adding Automatic Transmission
Fluid........................................ 152
Brake Fluid................................. 158
Engine Coolant........................... 152
Engine Oil................................... 148 Power Steering Fluid................. 159
Windshield Washer Fluid......... 156
Additional Safety Information........ 18 Door Locks................................... 19
Driving with Pets......................... 19
Head Restraint Position.............. 18
Seat-back Position........................ 18
Storing Cargo Safely................... 19
Additives, Engine Oil..................... 150
Adjustments
Mirrors.......................................... 64
Head Restraints........................... 56
Seats.............................................. 54
Steering Wheel............................ 44
Airbag (SRS).................................... 12
Air Cleaner Element...................... 160
Air Conditioning............................... 74
Maintenance............................... 169
Usage............................................. 74
Air Outlets (Vents).......................... 76
Air Pressure, Tires........................ 171
Alcohol and Drugs........................... 28
Alcohol in Gasoline........................ 108
Antifreeze....................................... 152 Anti-lock Brakes (ABS) Indicator Light..................... 35, 127
Operation.................................... 126
Anti-theft Steering Column Lock .. 50
Appearance Care........................... 185
Ashtray.............................................. 69
Audio System................................... 83
Automatic Speed Control................ 46
Automatic Transmission............... 120 Capacity, Fluid........................... 218
Checking Fluid Level................ 157
Shifting........................................ 120
Shift Lever Positions................. 120
Shift Position Indicator............. 120
Shift Lock Release..................... 123
Battery
Charging SystemIndicator............................ 34, 207
Jump Starting............................. 202
Maintenance............................... 164
Specifications............................. 221
Before Driving............................... 107
Belts, Seat........................................... 5
Beverage Holder.............................. 66 Body Repair.................................... 191
Brakes
Anti-lock System (ABS)............ 126
Break-in, New Linings .............. 108
Fluid............................................ 158
Light, Burned-out...................... 181
Parking.......................................... 65
System Indicator.......................... 34
Wear Indicators......................... 125
Brakes, ABS Operation.................................... 126
System Indicator.................. 35, 127
Braking System.............................. 125
CONTINUEDProCarManuals.comMain Menu s t