1997 HONDA ODYSSEY ECO mode
[x] Cancel search: ECO modePage 95 of 241
Audio SystemAUTO SELECT — If you are
traveling far from home and can no
longer receive the stations you
preset, you can use the Auto Select
feature to find stations in the local
area.
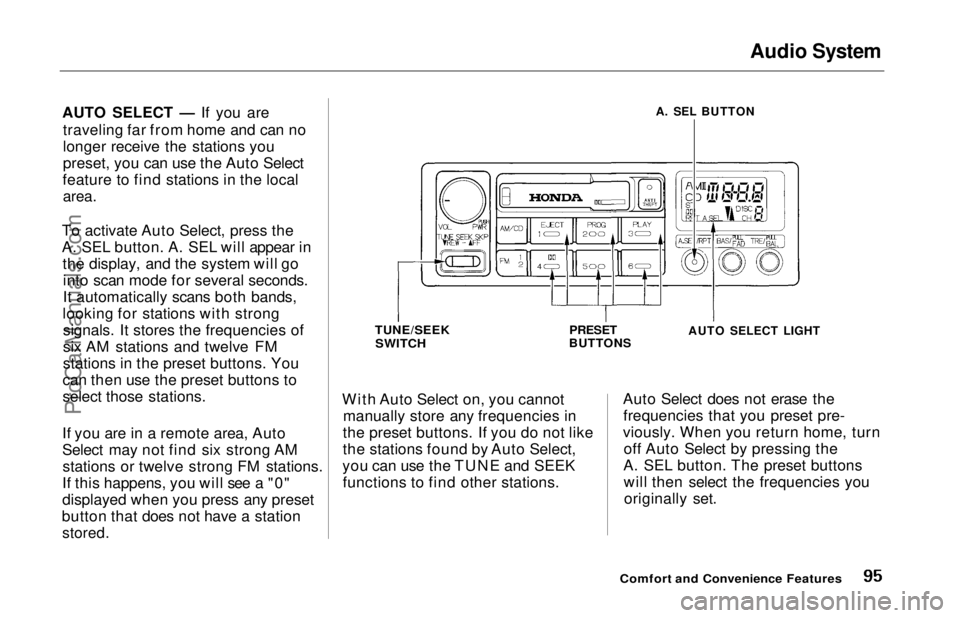
To activate Auto Select, press the
A. SEL button. A. SEL will appear in the display, and the system will gointo scan mode for several seconds.
It automatically scans both bands,
looking for stations with strong signals. It stores the frequencies of
six AM stations and twelve FM
stations in the preset buttons. You
can then use the preset buttons to
select those stations.
If you are in a remote area, Auto
Select may not find six strong AM stations or twelve strong FM stations.
If this happens, you will see a "0"
displayed when you press any preset
button that does not have a station
stored.
With Auto Select on, you cannot
manually store any frequencies in
the preset buttons. If you do not like
the stations found by Auto Select,
you can use the TUNE and SEEK functions to find other stations. Auto Select does not erase the
frequencies that you preset pre-
viously. When you return home, turn off Auto Select by pressing the
A. SEL button. The preset buttons will then select the frequencies youoriginally set.
Comfort and Convenience Features
A. SEL BUTTON
TUNE/SEEK
SWITCH
PRESET
BUTTONS
AUTO SELECT LIGHT
ProCarManuals.comMain Menu Table of Contents s t
Page 101 of 241
Audio System
Caring for the Cassette Player
The cassette player picks up dirt and oxides from the tape. This
contamination builds up over time
and causes the sound quality to degrade. To prevent this, you should
clean the player after every 30 hours
of use.
If you do not clean the cassette
player regularly, it may eventually
become impossible to remove the contamination with a normal
cleaning kit.
Use 100-minute or shorter cassettes. Cassettes longer than that use
thinner tape that may break or jam
the drive.
Look at the cassette before you
insert it. If the tape is loose, tighten
it by turning a hub with a pencil or
your finger.
If the label is peeling off, remove it
from the cassette or it could cause
the cassette to jam in the player.
Never try to insert a warped or
damaged cassette in the player.
The player automatically ejects
cassettes that do not play properly. If
it ejects a cassette before it begins to
play, it is probably defective and should not be inserted again. You
may have a cassette suddenly stop
playing, reverse directions once or
twice and then eject. This is normally an indication the tape is wound
unevenly. It should play after the
tape is manually rewound.
When they are not in use, store cassettes in their cases to protect
them from dust and moisture. Never
place cassettes where they will be exposed to direct sunlight, high heat,
or high humidity. If a cassette is
exposed to extreme heat or cold, let
it reach a moderate temperature
before inserting it in the player.
Never try to insert foreign objects
into the cassette player.
U.S. LX and Canadian models
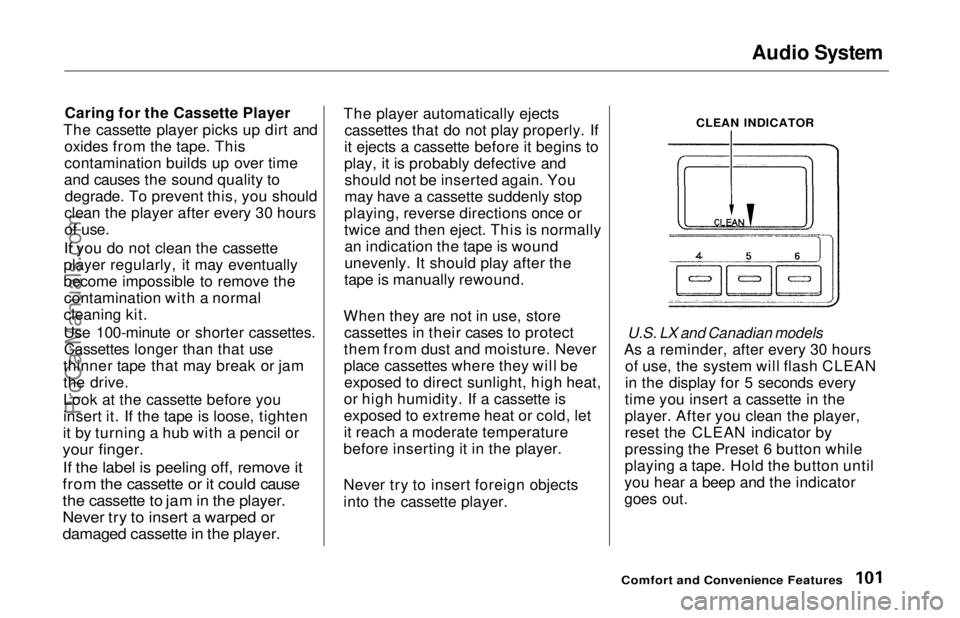
As a reminder, after every 30 hours of use, the system will flash CLEAN
in the display for 5 seconds every
time you insert a cassette in the
player. After you clean the player,
reset the CLEAN indicator by
pressing the Preset 6 button while
playing a tape. Hold the button until
you hear a beep and the indicator
goes out.
Comfort and Convenience Features
CLEAN INDICATORProCarManuals.comMain Menu Table of Contents s t
Page 103 of 241
Audio System
Press the CD button until "CD"
appears in the display. The system
will start to play the first track of the
first disc in the magazine.
When that disc ends, the next disc in the magazine is loaded and played.
After the last disc finishes, the system returns to disc 1.
To select a different disc, press the appropriate preset button (1 — 6). If
you select an empty slot in the magazine, the changer will, after
finding that slot empty, try to load the CD in the next slot. This
continues until it finds a CD to load
and play.
You can use the TUNE/SEEK switch to select tracks within a disc.
If you push and release the TUNE/
SEEK switch, the system will move
to the beginning of a track. Push the switch up to move to the beginning
of the next track, and push the
switch down to move to the begin-
ning of the current track. If you push and hold the TUNE/
SEEK switch, you will hear a beep
and the system will continue to move
across tracks. Release the switch
when you think it has reached the desired place on the disc.
RPT —
When you activate the
Repeat feature by pressing the
A. SEL/RPT button, the system continuously replays the current
track. You will see RPT in the display as a reminder. Press the button
again to turn it off.
RANDOM PLAY —
This feature,
when activated, plays the tracks on a CD in random order, rather than in
the order they are recorded on the CD. To activate Random Play, press
the A. SEL/RPT button until you see
A. SEL in the display. The system will then select and play tracksrandomly on the current disc. When
all tracks on that disc have been
played, the next disc is loaded and played randomly. This continues
until you deactivate Random Play by
pressing A. SEL/RPT again.
If the system is in Repeat mode, you must turn it off by pressing A. SEL/RPT before you can select Random
Play. Then press the button again
until you see A. SEL displayed.
To take the system out of CD mode, press the AM or FM button, or inserta cassette in the player. When you
return to CD mode, play will contin-
ue at the same disc and track.
If you turn the system off while a CD
is playing, either with the PWR/VOL
knob or the ignition switch, play will continue at the same point when you
turn it back on.
Comfort and Convenience FeaturesProCarManuals.comMain Menu Table of Contents s t
Page 108 of 241
Break-in Period, Gasoline
Break-in Period
Help assure your car's future
reliability and performance by paying
extra attention to how you drive
during the first 600 miles (1,000 km).
During this period:
Avoid full-throttle starts and rapidacceleration.
Avoid hard braking. New brakes need to be broken-in by moderate
use for the first 200 miles (300
km).
You should follow these same re-
commendations with an overhauled
or exchanged engine, or when the
brakes are relined.
Gasoline
Your Honda is designed to operate on unleaded gasoline with a pump
octane number of 86 or higher. Use
of a lower octane gasoline can cause
a persistent, heavy metallic rapping
noise in the engine that can lead to
mechanical damage.
We recommend gasolines containing detergent additives that help prevent
fuel system and engine deposits.
Using gasoline containing lead willdamage your car's emission controls.
This contributes to air pollution.
In Canada, some gasolines containan octane-enhancing additive called
MMT. If you use such gasolines,
your emission control system performance may deteriorate and
the Malfunction Indicator Lamp on
your instrument panel may turn on. If this happens, contact your
authorized Honda dealer for service. Oxygenated Fuels
Some conventional gasolines are
being blended with alcohol or an ether compound. These gasolines
are collectively referred to as oxygenated fuels. To meet clean air
standards, some areas of the United
States and Canada use oxygenated
fuels to help reduce emissions.
If you use an oxygenated fuel, besure it is unleaded and meets the
minimum octane rating requirement.
Before using an oxygenated fuel, try
to confirm the fuel's contents. Some
states/provinces require this
information to be posted on the
pump.
Before DrivingProCarManuals.comMain Menu Table of Contents s t
Page 114 of 241
Fuel Economy
The condition of your car and your driving habits are the two most
important things that affect the fuel
mileage you get.
Vehicle Condition
Always maintain your car according to the maintenance schedule. This
will keep it in top operating condition.
An important part of that mainte- nance is the Owner Maintenance
Checks (see page 146). For
example, an underinflated tire
causes more "rolling resistance,"
which uses fuel. It also wears out
faster, so check the tire pressure at
least monthly.
In winter, the build-up of snow on
your car's underside adds weight and
rolling resistance. Frequent cleaning
helps your fuel mileage and reduces
the chance of corrosion. Driving Habits
You can improve fuel economy by driving moderately. Rapid acceler-
ation, abrupt cornering, and hard
braking use more fuel.
Always drive in the highest gear that allows the engine to run and acceler-
ate smoothly.
Depending on traffic conditions, try
to maintain a constant speed. Every
time you slow down and speed up,
your car uses extra fuel. Use the cruise control, when appropriate, to
increase fuel economy. A cold engine uses more fuel than a
warm engine. It is not necessary to"warm-up" a cold engine by letting it
idle for a long time. You can drive
away in about a minute, no matter
how cold it is outside. The engine
will warm up faster, and you get better fuel economy. To cut down on
the number of "cold starts," try to combine several short trips into one.
The air conditioning puts an extra load on the engine which makes it use more fuel. Turn off the A/C to
cut down on air conditioning use. Use the flow-through ventilation
when the outside air temperature is moderate.
Before DrivingProCarManuals.comMain Menu Table of Contents s t
Page 116 of 241
Loading Cargo
The maximum load you can carry in your Honda is 1,150 Ibs (535 kg). It
includes the total weight of all
passengers and their belongings, any
accessories, and the tongue weight
of a trailer. This 1,150 Ibs (535 kg)
figure is shown as the Vehicle Capacity Weight on the tire infor-
mation label attached to the driver's doorjamb.
To figure out how much cargo you
can cany: Figure the total "occupant weight"
you will be transporting. To do this, multiply the number of people (driver and all passengers) by 150
Ibs (70 kg). Subtract this number from the
Vehicle Capacity Weight (1,150 lbs/535 kg). If you are towing a trailer, subtract
the tongue weight. See Towing a
Trailer on page 130 .
This final number is the total weight of cargo you can load in or on the car.
With seven occupants (driver and six passengers), the maximum recom-
mended weight for cargo is 100 Ibs
(45 kg).
Where you store this cargo, and how
well you secure it, are just as important as how much it weighs.
Make sure you load cargo so it will
not shift while driving. Items stored
in the cargo area behind the third
seat should be stored as far forward
as possible. You could store addi-
tional items on the floor behind the
front seats. Make sure they cannot roll under the front seat and
interfere with the pedals.
For greater cargo capacity, the thirdseat can be folded into the floor and
the second row seats can either be removed or folded up (depending onmodel). Passengers should never sit
in the open cargo area while the car
is moving. They should sit in one of
the seats and wear their seat belts.
If you must carry large objects that
prevent you from closing the tailgate,
be aware that exhaust gas can enter the interior. See Carbon Monoxide
Hazard on page 29 .
Before DrivingProCarManuals.comMain Menu Table of Contents s t
Page 164 of 241
Battery
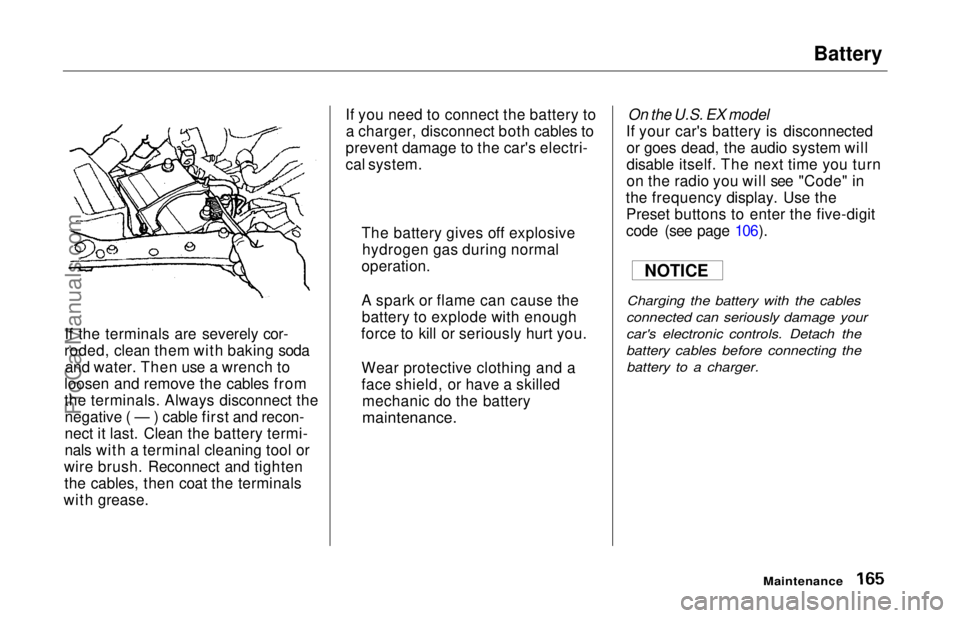
If the terminals are severely cor-
roded, clean them with baking soda and water. Then use a wrench to
loosen and remove the cables from
the terminals. Always disconnect the negative ( — ) cable first and recon-
nect it last. Clean the battery termi-
nals with a terminal cleaning tool or
wire brush. Reconnect and tighten the cables, then coat the terminals
with grease. If you need to connect the battery to
a charger, disconnect both cables to
prevent damage to the car's electri-
cal system.
On the U.S. EX model
If your car's battery is disconnected or goes dead, the audio system will
disable itself. The next time you turn
on the radio you will see "Code" in
the frequency display. Use the Preset buttons to enter the five-digit
code (see page 106).
Charging the battery with the cables
connected can seriously damage your
car's electronic controls. Detach the
battery cables before connecting the battery to a charger.
Maintenance
The battery gives off explosive
hydrogen gas during normal
operation.
A spark or flame can cause the battery to explode with enough
force to kill or seriously hurt you.
Wear protective clothing and a
face shield, or have a skilled mechanic do the battery
maintenance.
NOTICEProCarManuals.comMain Menu Table of Contents s t
Page 206 of 241
Malfunction Indicator Lamp
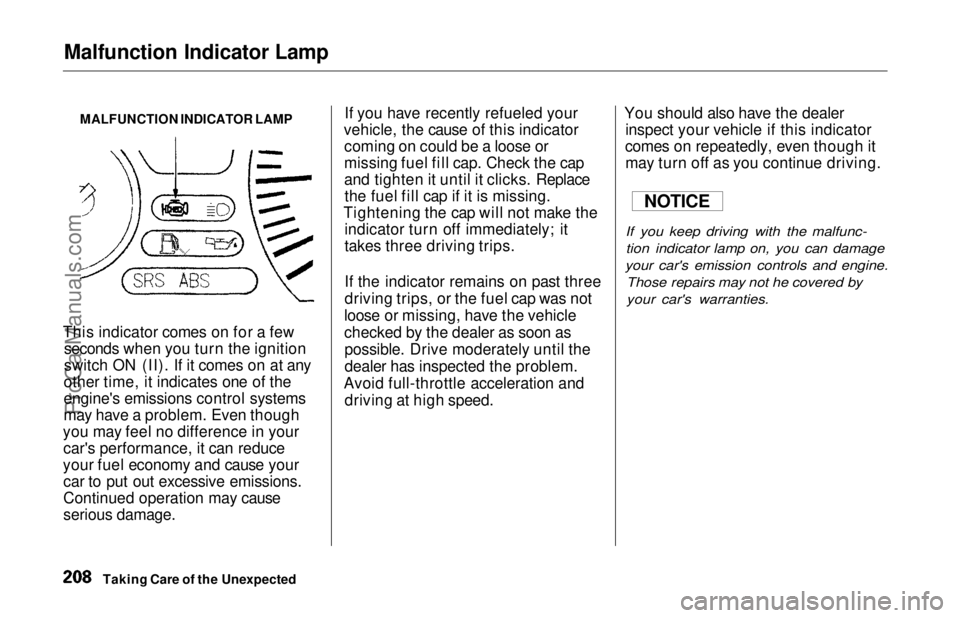
MALFUNCTION INDICATOR LAMP
This indicator comes on for a few seconds when you turn the ignition
switch ON (II). If it comes on at any
other time, it indicates one of the
engine's emissions control systems
may have a problem. Even though
you may feel no difference in your car's performance, it can reduce
your fuel economy and cause your car to put out excessive emissions.
Continued operation may cause
serious damage. If you have recently refueled your
vehicle, the cause of this indicator coming on could be a loose or
missing fuel fill cap. Check the cap
and tighten it until it clicks. Replacethe fuel fill cap if it is missing.
Tightening the cap will not make the indicator turn off immediately; it
takes three driving trips.
If the indicator remains on past three
driving trips, or the fuel cap was not
loose or missing, have the vehicle
checked by the dealer as soon as possible. Drive moderately until the
dealer has inspected the problem.
Avoid full-throttle acceleration and driving at high speed. You should also have the dealer
inspect your vehicle if this indicator
comes on repeatedly, even though it may turn off as you continue driving.
If you keep driving with the malfunc-
tion indicator lamp on, you can damage
your car's emission controls and engine. Those repairs may not he covered by
your car's warranties.
Taking Care of the Unexpected
NOTICEProCarManuals.comMain Menu Table of Contents s t