Page 135 of 241
Towing a Trailer
If you have to stop while going uphill,
do not hold the car in place by
pressing on the accelerator. This can cause the automatic transmission to
overheat. Use the parking brake or
footbrake.
When parking your car and trailer, especially on a hill, be sure to follow
all the normal precautions. Turn
your front wheels into the curb, set the parking brake firmly, and put the
transmission in Park. In addition,
place wheel chocks at each of the
trailer's tires. Backing up with a trailer is difficult
and takes practice. Drive slowly,
make small movements with the
steering wheel, and have someone
stand outside to guide you. Grip the
steering wheel on the bottom (rather
than the usual position near the top).
Move your hand to the left to get the
trailer to move to the left, and right
to move the trailer right.
DrivingProCarManuals.comMain Menu Table of Contents s t
Page 136 of 241
Maintenance
This section explains why it is important to keep your car well
maintained and to follow basic
maintenance safety precautions.
This section also includes Maintenance Schedules for normaldriving and severe driving conditions,
a Maintenance Record, and instruc-
tions for simple maintenance tasks
you may want to take care of
yourself.
If you have the skills and tools to per-
form more complex maintenance
tasks on your Honda, you may want to purchase the Service Manual. See
page 235 for information on how toobtain a copy, or see your Honda
dealer.
Maintenance Safety....................... 138
Important Safety Precautions.. 139
Maintenance Schedule.................. 140
Maintenance Record..................... 144
Owner Maintenance Checks........ 146
Fluid Locations............................... 147
Engine Oil....................................... 148
Adding Oil................................... 148Recommended Oil..................... 148
Synthetic Oil............................... 149
Additives..................................... 150
Changing the Oil and Filter...... 150
Cooling System.............................. 152
Adding Engine Coolant............. 152Replacing Engine Coolant........ 154
Windshield Washers..................... 156
Automatic Transmission Fluid..... 157
Brake Fluid..................................... 158
Brake System............................. 158
Anti-lock Brake System............ 159
Power Steering............................... 159
Air Cleaner Element...................... 160
Spark Plugs..................................... 162
Replacement............................... 162
Specifications............................. 163
Battery............................................ 164
Windshield Wipers........................ 166
Air Conditioning System............... 169
Drive Belts...................................... 170
Timing Belt..................................... 170
Tires................................................ 171 Inflation....................................... 171
Inspection................................... 173
Maintenance............................... 173
Tire Rotation.............................. 174 Replacing Tires and Wheels .... 174
Wheels and Tires....................... 175
Winter Driving........................... 175 Snow Tires.............................. 176
Tire Chains............................. 176
Lights.............................................. 177
Headlight Aiming...................... 177
Replacing Bulbs......................... 179
Storing Your Car............................ 184
MaintenanceProCarManuals.comMain Menu s t
Page 145 of 241
Owner Maintenance Checks
You should check the following items at the specified intervals. If
you are unsure of how to perform any check, turn to the page given. Engine oil level — Check every
time you fill the fuel tank. See
page 112.
Engine coolant level — Check the
radiator reserve tank every time
you fill the fuel tank. See page 113.
Windshield washer fluid — Check the level in the reservoir monthly.
If weather conditions cause you to
use the washers frequently, check
the reservoir each time you stop
for fuel. See page 156.
Automatic transmission — Check the fluid level monthly. See page
157.
Brakes — Check the fluid level
monthly. See page 158. Tires — Check the tire pressure
monthly. Examine the tread for
wear and foreign objects. See page
171.
Lights — Check the operation of
the headlights, parking lights,
taillights, high-mount brake light,
turn signals, brake lights, and
license plate lights monthly. See
page 177.
MaintenanceProCarManuals.comMain Menu Table of Contents s t
Page 146 of 241
Fluid Locations
Maintenance
BRAKE FLUID
(Gray cap)
ENGINE OIL
FILL CAP
COOLANT
RESERVOIR
AUTOMATIC
TRANSMISSION
FLUID DIPSTICK
(Yellow loop)
ENGINE OIL DIPSTICK
(Orange loop)
ANTI-LOCK BRAKE
RESERVOIR
(Gray cap)
POWER STEERING
FLUID (Red cap)
WASHER FLUID (Blue cap)ProCarManuals.comMain Menu Table of Contents s t
Page 149 of 241
Engine Oil
Additives Your Honda does not need any oil additives. Purchasing additives for
the engine or transmission will not
increase your car's performance or
longevity. It only increases the cost of operating your car. Changing the Oil and Filter
Always change the oil and filter according to the time and distance (miles/kilometers) recommenda-
tions in the maintenance schedule.
The oil and filter collect contami- nants that can damage your engine if
they are not removed regularly.
Changing the oil and filter requiresspecial tools and access from
underneath the car. The car should
be raised on a service station-type
hydraulic lift for this service. Unless
you have the knowledge and proper equipment, you should have this
maintenance done by a skilled
mechanic.
1. Run the engine until it reaches normal operating temperature,
then shut it off. 2. Open the hood and remove the
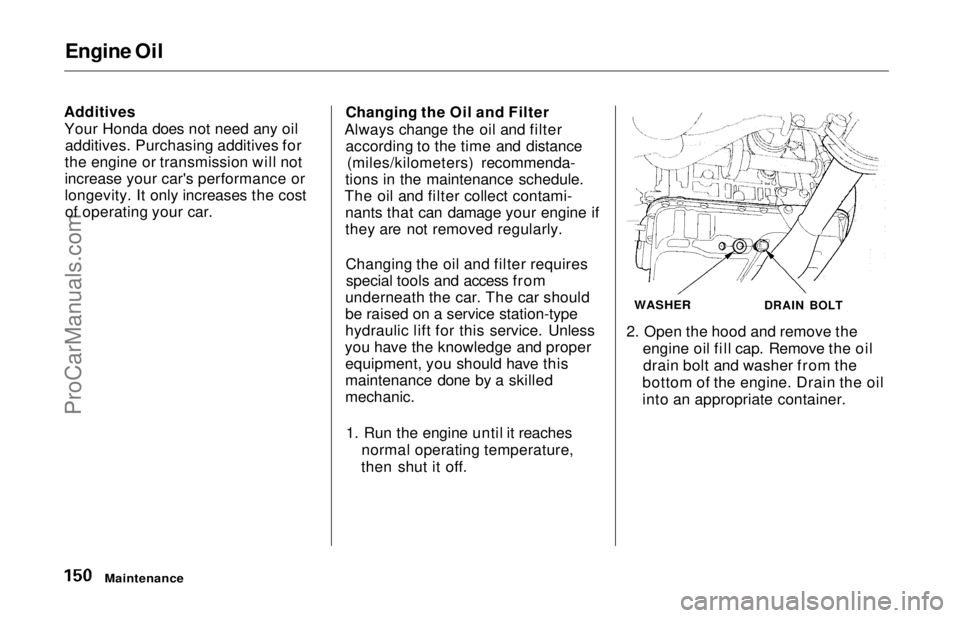
engine oil fill cap. Remove the oildrain bolt and washer from the
bottom of the engine. Drain the oil
into an appropriate container.
Maintenance
WASHER
DRAIN BOLTProCarManuals.comMain Menu Table of Contents s t
Page 156 of 241
Automatic Transmission Fluid
Check the fluid level with the engine
at normal operating temperature.
1. Park the car on level ground. Shut off the engine.
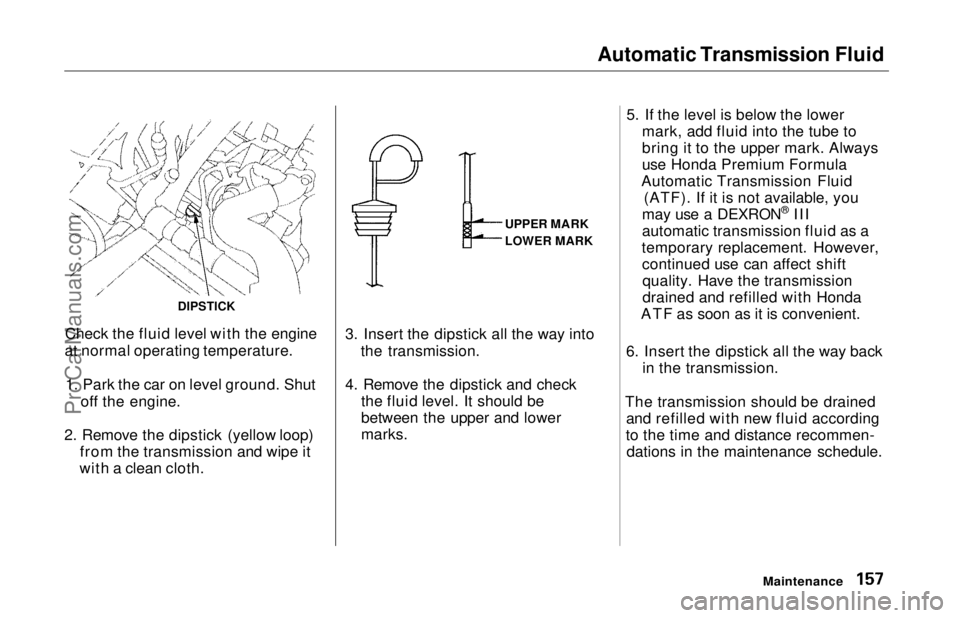
2. Remove the dipstick (yellow loop) from the transmission and wipe it
with a clean cloth. 3. Insert the dipstick all the way into
the transmission.
4. Remove the dipstick and check the fluid level. It should be
between the upper and lower
marks. 5. If the level is below the lower
mark, add fluid into the tube to
bring it to the upper mark. Always
use Honda Premium Formula
Automatic Transmission Fluid (ATF). If it is not available, you
may use a DEXRON ®
III
automatic transmission fluid as a
temporary replacement. However, continued use can affect shiftquality. Have the transmission
drained and refilled with Honda
ATF as soon as it is convenient.
6. Insert the dipstick all the way back in the transmission.
The transmission should be drained and refilled with new fluid according
to the time and distance recommen- dations in the maintenance schedule.
Maintenance
DIPSTICK
UPPER MARK
LOWER MARKProCarManuals.comMain Menu Table of Contents s t
Page 183 of 241
Storing Your Car
If you need to park your car for an
extended period (more than one
month), there are several things you should do to prepare it for storage.
Proper preparation helps prevent deterioration and makes it easier to
get your car back on the road. If
possible, store your car indoors.
Fill the fuel tank.Change the engine oil and filter (see page 150).
Wash and dry the exterior completely.
Clean the interior. Make sure the
carpeting, floor mats, etc. are
completely dry.
Leave the parking brake off. Put
the transmission in Park. Block the rear wheels.
If the car is to be stored for a
longer period, it should be supported on jackstands so the
tires are off the ground.
Leave one window open slightly (if
the car is being stored indoors).
Disconnect the battery.
Support the front and rear wiper
blade arms with a folded towel or
rag so they do not touch the
windshield.
To minimize sticking, apply a silicone spray lubricant to all door
and trunk seals. Also, apply a car
body wax to the painted surfaces
that mate with the door and trunk
seals.
Cover the car with a "breathable"
car cover, one made from a porous
material such as cotton.
Nonporous materials, such as
plastic sheeting, trap moisture,
which can damage the paint.
If possible, run the engine for a
while periodically (preferably once a month).
If you store your car for 12 months
or longer, have your Honda dealer
perform the inspections called for in the 24 months/30,000 miles (48,000
km) maintenance schedule (Normal Conditions) as soon as you take it
out of storage (see page 142). The
replacements called for in the maintenance schedule are not
needed unless the car has actually
reached that time or mileage.
MaintenanceProCarManuals.comMain Menu Table of Contents s t
Page 193 of 241
Changing a Flat Tire
If you have a flat tire while driving, stop in a safe place to change it.
Stopping in traffic or on the shoulder
of a busy road is dangerous. Drive
slowly along the shoulder until you
get to an exit or an area to stop that
is far away from the traffic lanes.
1. Park the car on firm, level groundaway from traffic. Turn on the
hazard warning lights and turn the ignition to LOCK (0).
2. Put the transmission in Park. Set the parking brake. Have all of thepassengers get out of the car while
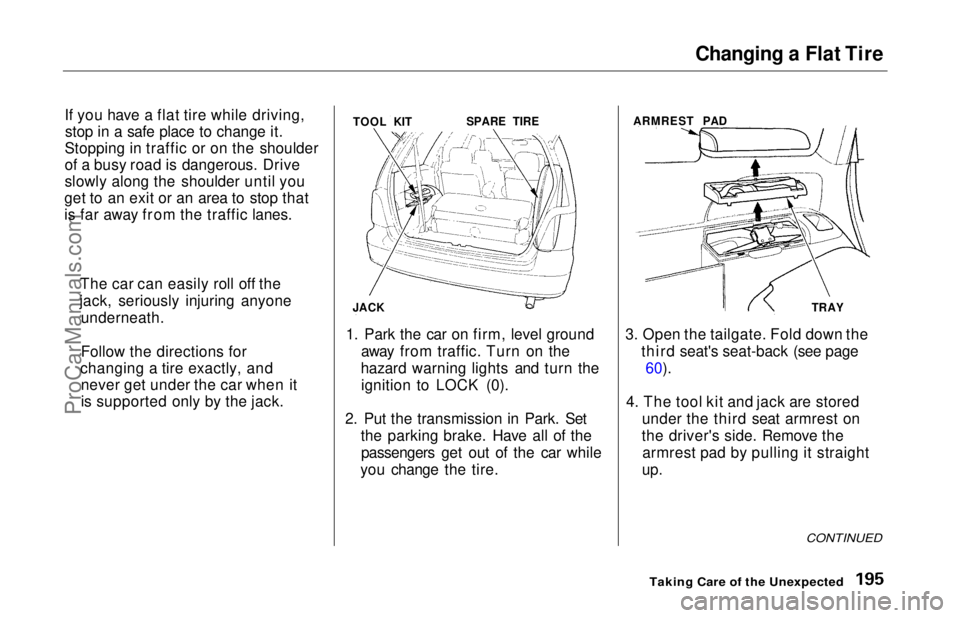
you change the tire. 3. Open the tailgate. Fold down the
third seat's seat-back (see page60).
4. The tool kit and jack are stored under the third seat armrest on
the driver's side. Remove the armrest pad by pulling it straight
up.
CONTINUED
Taking Care of the Unexpected
The car can easily roll off the
jack, seriously injuring anyone underneath.
Follow the directions for
changing a tire exactly, and never get under the car when it
is supported only by the jack. TOOL KIT
JACK SPARE TIRE
ARMREST PAD
TRAYProCarManuals.comMain Menu Table of Contents s t