Page 39 of 241
Gauges
Temperature Gauge
This shows the temperature of the engine's coolant. During normal
operation, the pointer should rise
from the bottom white mark to about the middle white mark. In severedriving conditions, such as very hot
weather or a long period of uphill driving, the pointer may rise to the
upper white mark. If it reaches the
red (Hot) mark, pull safely to the side of the road. Turn to page 204 for
instructions and precautions on checking the engine's cooling
system.
Fuel Gauge
This shows how much fuel you have. It is most accurate when the car is on
level ground. It may show slightly
more or less than the actual amount
when you are driving on curvy or hilly roads. The gauge stays at the same fuel
level reading after you turn off the
ignition. When you add fuel, the
gauge slowly changes to the new
reading after you turn the ignition
back ON (II).
Maintenance Required Indicator
This indicator reminds you that it is
nearing 7,500 miles (12,000 km)
since the last scheduled maintenance.
Refer to the Maintenance Schedules
for Normal and Severe Driving Conditions on pages 142 —143.
When the distance driven since the last scheduled maintenance nears
7,500 miles (12,000 km), the
indicator will turn yellow. If you
exceed 7,500 miles (12,000 km), the
indicator will turn red.
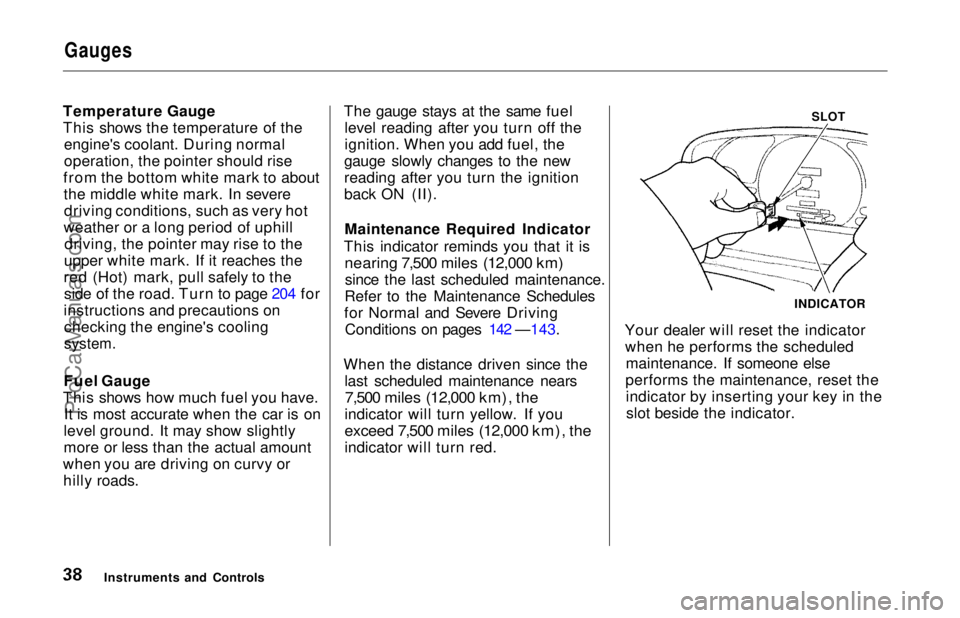
SLOT
Your dealer will reset the indicator when he performs the scheduled maintenance. If someone else
performs the maintenance, reset the indicator by inserting your key in theslot beside the indicator.
Instruments and Controls INDICATORProCarManuals.comMain Menu Table of Contents s t
Page 107 of 241
Before Driving
Before you begin driving your Honda,
you should know what gasoline to use, and how to check the levels of
important fluids. You also need to
know how to properly store luggage or packages. The information in thissection will help you. If you plan to
add any accessories to your car,
please read the information in this section first.
Break-in Period.............................. 108
Gasoline.......................................... 108
Oxygenated Fuels...................... 108
Driving in Foreign Countries... 109
Service Station Procedures .......... 110
Filling the Fuel Tank................. 110Opening the Hood..................... 111
Oil Check.................................... 112
Engine Coolant Check.............. 113
Fuel Economy................................ 114 Vehicle Condition...................... 114Driving Habits............................ 114
Accessories..................................... 115 Loading Cargo................................ 116
Before DrivingProCarManuals.comMain Menu s t
Page 113 of 241
Service Station Procedures
4. Remove the dipstick again and check the level. It should be
between the upper and lower
marks.
If it is near or below the lower mark,
see Adding Oil on page 148 . Engine Coolant Check
Look at the coolant level in the
radiator reserve tank. Make sure it is
between the MAX and MIN lines. If
it is below the MIN line, see Adding
Engine Coolant on page 152 for
information on adding the proper
coolant.
Refer to Owner Maintenance
Checks on page 146 for information
on checking other items in your
Honda.
Before Driving
UPPER MARK
LOWER MARK MIN
MAX
RESERVE TANKProCarManuals.comMain Menu Table of Contents s t
Page 145 of 241
Owner Maintenance Checks
You should check the following items at the specified intervals. If
you are unsure of how to perform any check, turn to the page given. Engine oil level — Check every
time you fill the fuel tank. See
page 112.
Engine coolant level — Check the
radiator reserve tank every time
you fill the fuel tank. See page 113.
Windshield washer fluid — Check the level in the reservoir monthly.
If weather conditions cause you to
use the washers frequently, check
the reservoir each time you stop
for fuel. See page 156.
Automatic transmission — Check the fluid level monthly. See page
157.
Brakes — Check the fluid level
monthly. See page 158. Tires — Check the tire pressure
monthly. Examine the tread for
wear and foreign objects. See page
171.
Lights — Check the operation of
the headlights, parking lights,
taillights, high-mount brake light,
turn signals, brake lights, and
license plate lights monthly. See
page 177.
MaintenanceProCarManuals.comMain Menu Table of Contents s t
Page 151 of 241
Cooling System
Adding Engine Coolant
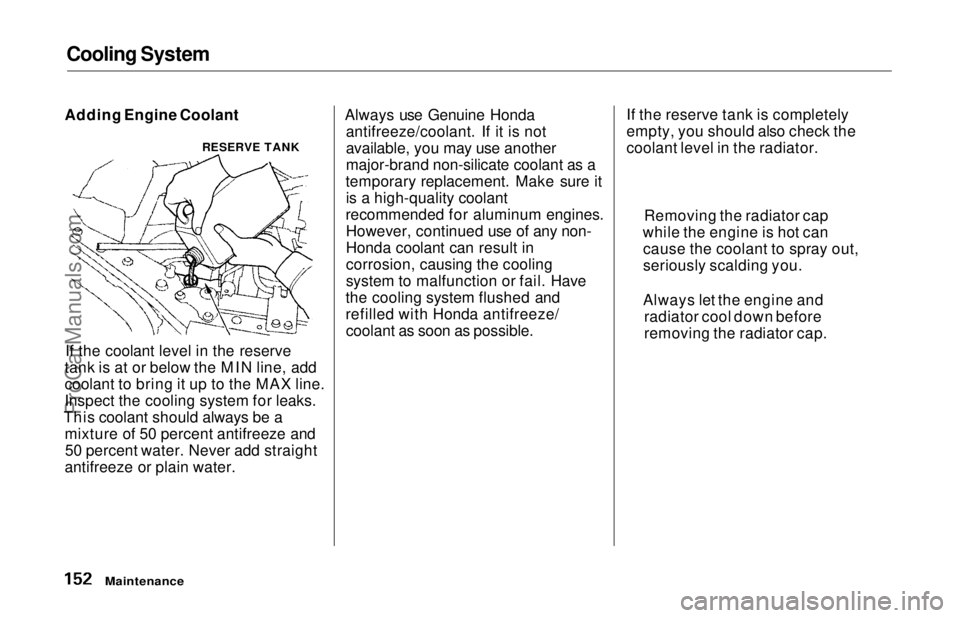
If the coolant level in the reserve
tank is at or below the MIN line, add
coolant to bring it up to the MAX line.
Inspect the cooling system for leaks.
This coolant should always be a mixture of 50 percent antifreeze and50 percent water. Never add straight
antifreeze or plain water. Always use Genuine Honda
antifreeze/coolant. If it is not
available, you may use another
major-brand non-silicate coolant as a
temporary replacement. Make sure it is a high-quality coolant
recommended for aluminum engines. However, continued use of any non-
Honda coolant can result in
corrosion, causing the cooling
system to malfunction or fail. Have
the cooling system flushed and
refilled with Honda antifreeze/ coolant as soon as possible. If the reserve tank is completely
empty, you should also check the
coolant level in the radiator.
Maintenance
RESERVE TANK
Removing the radiator cap
while the engine is hot can cause the coolant to spray out,
seriously scalding you.
Always let the engine and radiator cool down before
removing the radiator cap.ProCarManuals.comMain Menu Table of Contents s t
Page 152 of 241
Cooling System
1. Make sure the engine and radiator
are cool.
2. Turn the radiator cap counter- clockwise, without pressing down
on it, until it stops. This relieves
any pressure remaining in the
cooling system.
3. Remove the radiator cap by pushing down and turningcounterclockwise.
4. The coolant level should be up to
the base of the filler neck. Addcoolant if it is low.
5. Put the radiator cap back on. Tighten it fully.
6. Pour coolant into the reserve tank. Fill it to halfway between the MAX
and MIN marks. Put the cap back
on the reserve tank.
Do not add any rust inhibitors or
other additives to your car's cooling
system. They may not be compatible
with the coolant or engine compo- nents.
Maintenance
RADIATOR CAP
RESERVE TANKProCarManuals.comMain Menu Table of Contents s t
Page 155 of 241
Cooling System, Windshield Washers
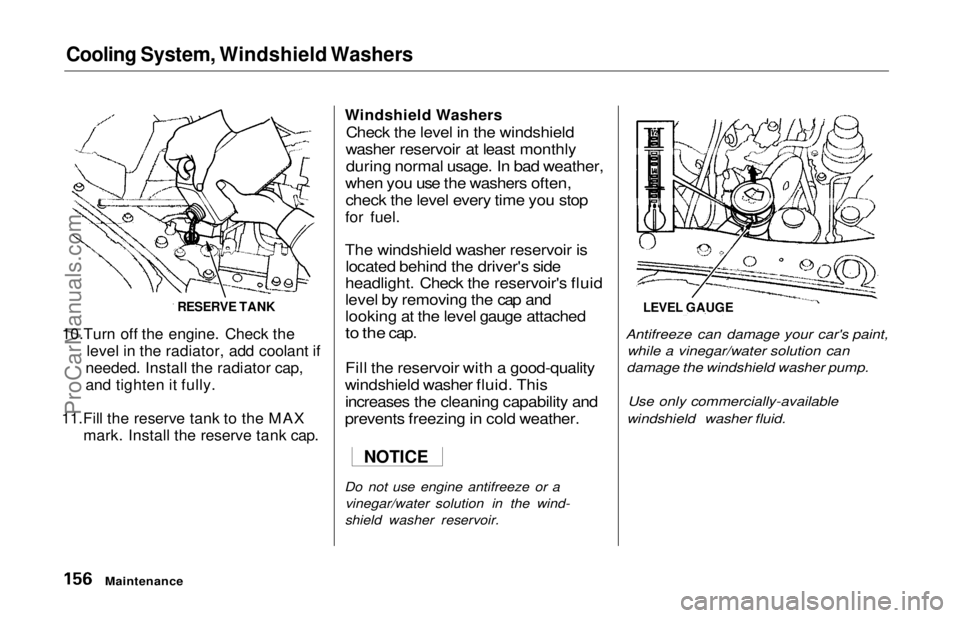
10.Turn off the engine. Check the level in the radiator, add coolant if
needed. Install the radiator cap,
and tighten it fully.
11.Fill the reserve tank to the MAX mark. Install the reserve tank cap. Windshield Washers
Check the level in the windshield
washer reservoir at least monthly during normal usage. In bad weather,
when you use the washers often, check the level every time you stop
for fuel.
The windshield washer reservoir is located behind the driver's side
headlight. Check the reservoir's fluid
level by removing the cap and
looking at the level gauge attached
to the
cap.
Fill the reservoir with a good-quality
windshield washer fluid. This increases the cleaning capability and
prevents freezing in cold weather.
Do not use engine antifreeze or a vinegar/water solution in the wind-
shield washer reservoir.
Antifreeze can damage your car's paint,
while a vinegar/water solution can
damage the windshield washer pump.
Use only commercially-available
windshield washer fluid.
Maintenance
RESERVE TANK
LEVEL GAUGE
NOTICEProCarManuals.comMain Menu Table of Contents s t
Page 203 of 241
If Your Engine Overheats
4. If the temperature gauge stays at the red mark, turn off the engine.
5. Wait until you see no more signs of steam or spray, then open the
hood.
6. Look for any obvious coolant leaks, such as a split radiator hose.
Everything is still extremely hot, so use caution. If you find a leak, it
must be repaired before you
continue driving (see Towing on
page 215).
7. If you don't find an obvious leak, check the coolant level in the
radiator reserve tank (see page113). If the level is below the
MIN mark, add coolant to halfway
between the MIN and MAX marks.
8. If there was no coolant in the reserve tank, you may also have to
add coolant to the radiator. Let the
engine cool down until the pointer reaches the middle of the tempera-
ture gauge, or lower, before check-
ing the radiator.
9. Using gloves or a large heavy cloth, turn the radiator cap
counterclockwise, without pushing
down, to the first stop. This
releases any remaining pressure in
the cooling system. After the
pressure releases, push down on
the cap and turn it until it comes
off.
10.Start the engine and set the
temperature control lever tomaximum. Add coolant to the
radiator up to the base of the filler
neck. If you do not have the
proper coolant mixture available,
you can add plain water. Remember to have the coolingsystem drained and refilled with
the proper mixture as soon as you
can.
11. Put the radiator cap back on tightly. Run the engine and watch
the temperature gauge. If it goes
back to the red mark, the engine
needs repair. (See Towing on
page 215.)
12.If the temperature stays normal, check the coolant level in the
radiator reserve tank. If it has
gone down, add coolant to the MAX mark. Put the cap back on
tightly.
Taking Care of the Unexpected
Removing the radiator cap
while the engine is hot can cause the coolant to spray out,seriously scalding you.
Always let the engine and radiator cool down before
removing the radiator cap.ProCarManuals.comMain Menu Table of Contents s t