Page 75 of 236
1. Enter the original permanent
code.
2. Press 1/2 within five seconds of
step one.
3. Wait six seconds.
For maximum security, do not set
a code that presents the numbers
in sequential order or uses the
same button five times.
Operating your perimeter
anti-theft system (if equipped)
from the keyless entry pad
The keyless entry system arms by
pressing 7/8 and 9/0.
To disarm or reset a triggered
anti-theft alarm, enter the five digit
code.
All doors must be fully closed for
the anti-theft system to arm. Refer
to theAnti-theft systemsection, if
equipped, in this chapter for more
details.
Autolock (if equipped)
The autolock feature is part of
your remote keyless entry system
which locks all of the doors when:
²all vehicle doors are closed
²the ignition key is turned to the
ON position
²the brake pedal is pressed
123
45678
90
123
45678
90
com_keyless_perimeter.01
uno_keyless_autolock
Controls and features
76
Page 82 of 236
SAFETY RESTRAINTS
Important safety restraints
precautions
The use of safety belts helps to
restrain both driver and passengers
in case of a collision. In most
states and Canada, the law
requires the use of safety belts.
Always drive and ride with
your seatback upright and
the lap belt snug and low across
the hips.
Lock the doors of your
vehicle before driving to
lessen the risk of the door
coming open in a collision.
Cargo should always be
secured to prevent it from
shifting and causing damage to
the vehicle or harm to
passengers.
To prevent the risk of
injury, make sure children
sit where they can be properly
restrained.
uno_safety_res_prec
uno_using_sr_properly
Seating and safety restraints
83
Page 97 of 236
anchorage. For more information
on top tether straps seeAttaching
safety seats with tether strapsin
this chapter.
When installing a child safety seat:
²Use the correct safety belt
buckle for that seating position.
²Make sure the tongue is
securely fastened in the buckle.
²Keep the buckle release button
pointing up and away from the
safety seat, with the tongue
between the child seat and the
release button, to prevent
accidental unbuckling.
²Place seatbacks in the upright
position.
²Put the safety belt in the
automatic locking mode. Refer
toUsing the automatic locking
modein this chapter.
Installing child safety seats in
combination lap and shoulder
belt seating positions
1. Position the child safety seat in
a seat with a combination lap and
shoulder belt.
If you choose to install a child
safety seat in the front passenger
com_installing_seats.01
Seating and safety restraints
98
Page 98 of 236
seat, move the seat as far back as
possible.
Rear-facing child seats or
infant carriers should
never be placed in the front
seats.
2. Pull down on the shoulder belt
and then grasp the shoulder belt
and lap belt together.
3. While holding the shoulder and
lap belt portions together, route
the tongue through the child seat
according to the child seat
manufacturers' instructions. Be
sure the belt webbing is not
twisted.
4. Insert the belt tongue into the
proper buckle for that seating
position until you hear and feel the
latch engage. Make sure the
tongue is latched securely by
pulling on it.
Seating and safety restraints
99
Page 99 of 236
5. To put the retractor in the
automatic locking mode, grasp the
shoulder portion of the belt and
pull downward until all of the belt
is extracted and a click is heard.
6. Allow the belt to retract. The
belt will click as it retracts to
indicate it is in the automatic
locking mode.
7. Pull the lap belt portion across
the child seat toward the buckle
and pull up on the shoulder belt
while pushing down with knee on
the child seat.
8. Allow the safety belt to retract
to remove any slack in the belt.
9. Before placing the child in the
seat, forcibly tilt the seat forward
and back to make sure the seat is
securely held in place.
10. Try to pull the belt out of the
retractor to make sure the
retractor is in the automatic
locking mode (you should not be
Seating and safety restraints
100
Page 100 of 236

able to pull more belt out). If the
retractor is not locked, unbuckle
the belt and repeat steps two
through nine.
Check to make sure the child seat
is properly secured before each
use.
Attaching safety seats with
tether strap
Some manufacturers make safety
seats that include a tether strap
that goes over the back of the
vehicle seat and attaches to an
anchoring point. Other
manufacturers offer the tether
strap as an accessory. Contact the
manufacturer of your child safety
seat for information about ordering
a tether strap.
Tether anchor hardware
Attachment holes (at each rear
seating position) have been
provided in your vehicle to attach
anchor hardware, if required.
Tether anchor hardware kits (part
number 613D74), including
instructions, may be obtained at no
charge from any Ford or
Lincoln-Mercury dealer.
Only use the tether
attachment hole locations
shown in the illustrations. The
tether anchor may not perform
properly if the wrong mounting
location is used.
uno_tether_straps
uno_integrated_info
Seating and safety restraints
101
Page 101 of 236
Built-in child seat (if equipped)
The rear seat may be equipped
with a built-in child safety seat.
This child seat conforms to all
federal and Canadian motor vehicle
safety standards. Read the labels
located on the child seat cushion
and shoulder belt for more
information on the built-in child
seat.
Use the built-in child seatonly
under the following conditions:
Child's age Child's weight Child's height
At least one year 10-27 kg (22-60 lb)Shoulders must be
below the shoulder
harness slots on the
built-in seat.
Children not meeting these
requirements should be secured in
an approved aftermarket seat.
Refer toChildren and infant or
child safety seatsin this chapter.
Placing your child in the built-in
child seat
Failure to follow all of the
instructions on the use of
this child restraint system can
result in your child striking the
vehicle's interior during a sudden
stop or crash.
uno_placing_child_in_seat
Seating and safety restraints
102
Page 105 of 236

If both tongues do not
latch in the buckle, do not
use the child seat. See your
dealer for repairs.
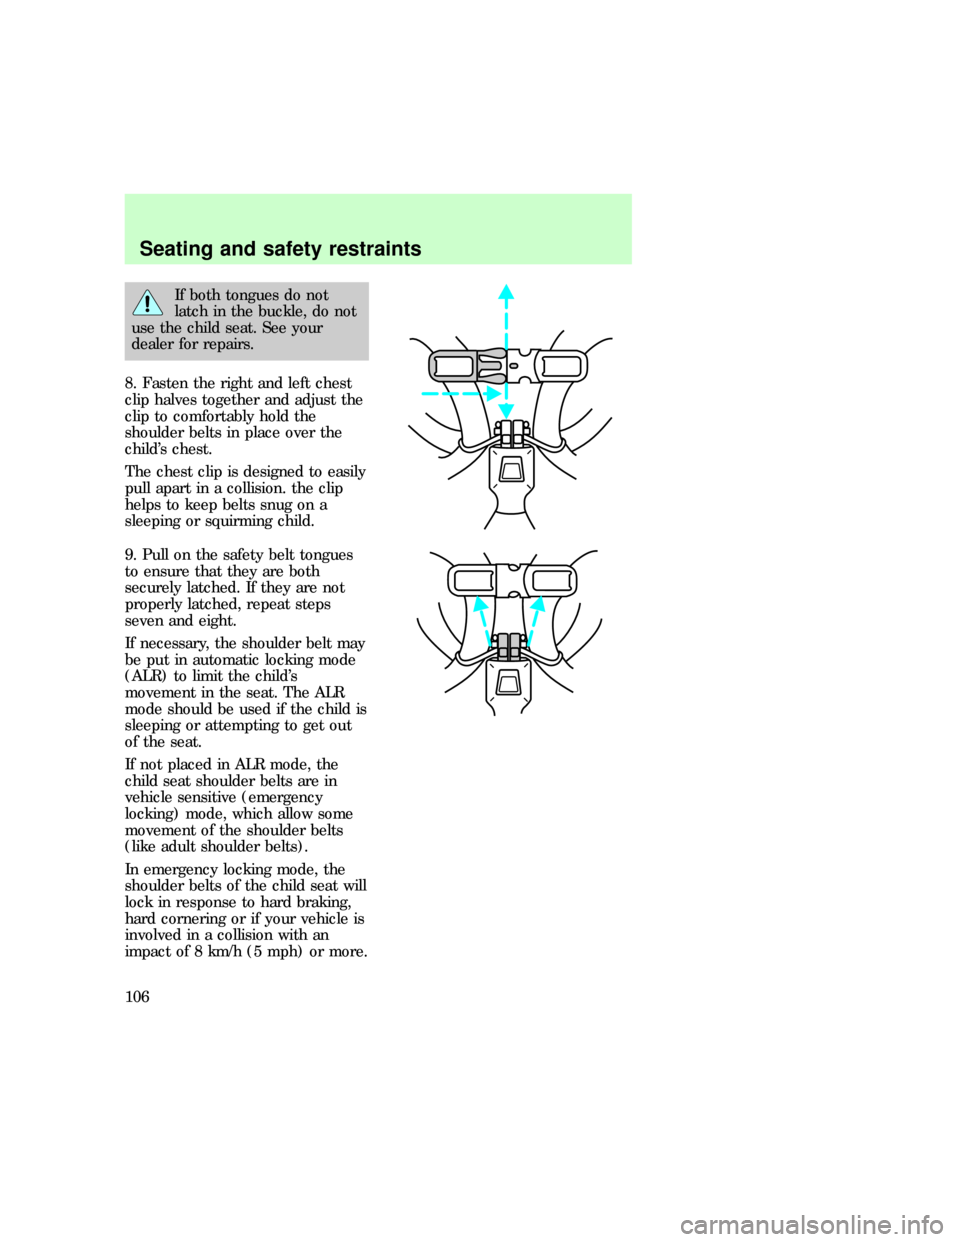
8. Fasten the right and left chest
clip halves together and adjust the
clip to comfortably hold the
shoulder belts in place over the
child's chest.
The chest clip is designed to easily
pull apart in a collision. the clip
helps to keep belts snug on a
sleeping or squirming child.
9. Pull on the safety belt tongues
to ensure that they are both
securely latched. If they are not
properly latched, repeat steps
seven and eight.
If necessary, the shoulder belt may
be put in automatic locking mode
(ALR) to limit the child's
movement in the seat. The ALR
mode should be used if the child is
sleeping or attempting to get out
of the seat.
If not placed in ALR mode, the
child seat shoulder belts are in
vehicle sensitive (emergency
locking) mode, which allow some
movement of the shoulder belts
(like adult shoulder belts).
In emergency locking mode, the
shoulder belts of the child seat will
lock in response to hard braking,
hard cornering or if your vehicle is
involved in a collision with an
impact of 8 km/h (5 mph) or more.
uno_alr_in_seat
Seating and safety restraints
106