Page 103 of 422

Performance Shifting (If Equipped)
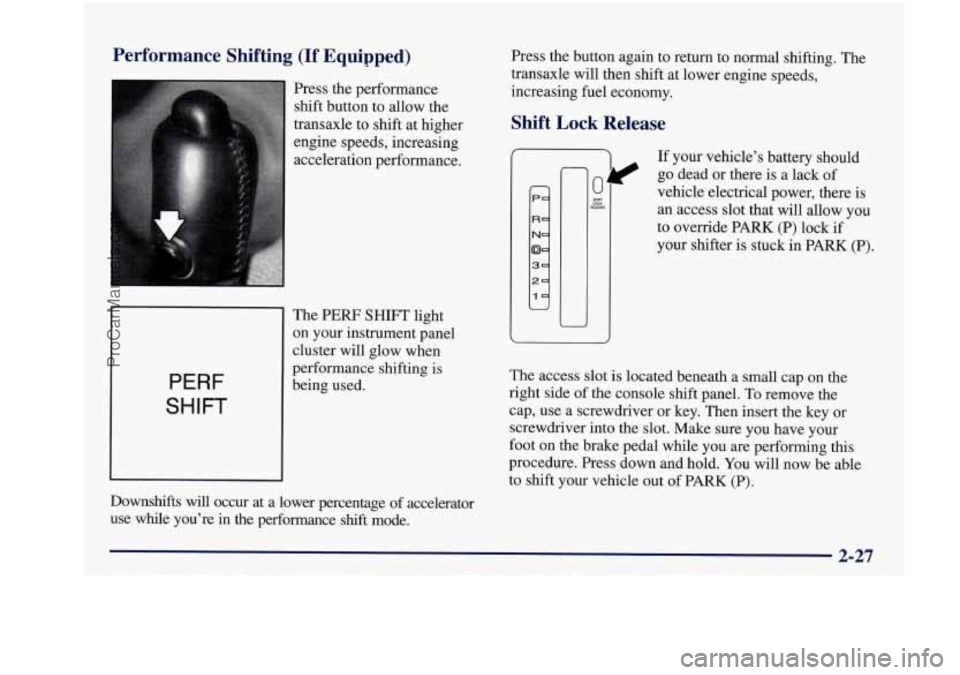
Press the performance shift button to allow the
transaxle
to shift at higher
engine speeds, increasing
acceleration performance.
PERF
SHIFT
The PERF SHIFT light
on your instrument panel
cluster will glow when
performance shifting is
being used.
Downshifts will occur at a lower percentage of accelerator
use while you’re
in the performance shift mode. Press the button again to return to normal shifting. The
transaxle will then shift at lower engine speeds,
increasing
fuel economy.
Shift Lock Release
P
1
If your vehicle’s battery should
vehicle electrical power, there is an access slot that will allow you
to override PARK (P) lock if
your shifter is stuck in PARK
(P).
I( go dead or there is a lack of
The access slot
is located beneath a small cap on the
right side of the console shift panel.
To remove the
cap, use a screwdriver or key. Then insert the key or screwdriver into the slot. Make sure you have your
foot on the brake pedal while you are performing this
procedure. Press down and hold.
You will now be able
to shift your vehicle out
of PARK (P).
2-27
ProCarManuals.com
Page 242 of 422
6. Check that the jumper cables don’t have loose or
missing insulation.
If they do, you could get a shock.
The vehicles could be damaged too.
Before you connect the cables, here are some basic
things you should know. Positive
(+) will go to
positive
(+) and negative (-) will go to negative (-)
or a metal engine part. Don’t connect positive (+) to
negative
(-) or you’ll get a short that would damage
the battery
and maybe other parts too.
A CAUTION:
Fans or other moving engine parts can injure you
badly. Keep your hands away from moving parts
once the engine is running.
-1
I
7. Connect the red positive (+) cable to the positive (+)
terminal of the vehicle with the dead battery. Use a
remote positive
(+) terminal if the vehicle has one.
5-6
ProCarManuals.com
Page 243 of 422
I
8. Don’t let the other end
touch metal. Connect
it
to the positive (+)
terminal of the good
battery. Use
a remote
positive
(+) terminal if
the vehicle has one.
9. Now connect the
black negative
(-) cable
to the good battery’s
negative
(-) terminal.
Don’t let the other end
touch anything
until the
next step. The other end
of the negative cable
doesn’t go to the
dead battery.
It goes to a heavy, unpainted, metal part on the engine of
the vehicle with the dead battery.
5-7
ProCarManuals.com
Page 244 of 422
10.
11.
12.
13.
14.
Attach the cable at least 18 inches (45 cm) away
from the dead battery, but not near engine parts that
move. The electrical connection
is just as good
there, but the chance
of sparks getting back to the
battery
is much less.
Now start the vehicle with the good battery and run
the engine
for a while.
Try to start the vehicle with the dead battery. If
it won’t start after a few tries, it probably
needs service.
Remove the cables in reverse order to prevent
electrical shorting. Take care that they don’t touch
each other or
any other metal.
Reinstall the red protective remote jump start cover
on the vehicle that was jump started.
A. Heavy Metal Engine Part
B.
Good Battery
C. Dead Battery
5-8
ProCarManuals.com
Page 409 of 422

Cleaning ...................................... 6-48
Aluminum Wheels
............................ 6-53
Built-in Child Restraint
........................ 6-5 1
Built-in Child Restraint Harness
................. 6-5 1
Glass
....................................... 6-51
Inside of
Your Buick .......................... 6-48
Fabric
...................................... 6-48
Instrumentpanel
............................. 6-50
Leather
..................................... 6-50
Outside of Your Buick
......................... 6-52
Special Problems
............................. 6-49
Stains
...................................... 6-48
Vinyl
....................................... 6-50
Windshield and Wiper Blades
................... 6-52
Clock, Setting the
............................... 3-12
Comfort Controls
............................ 3-1, 3-2
Compact Disc Care
............................. 3-36
Compact Disc Player
....................... 3-24, 3-30
Compact Disc Player
Errors .................. 3-24, 3-30
Compact Spare Tire
............................. 5-37
Console Storage
................................ 2-49
Control, Loss of
................................ 4-16
Control of a Vehicle
.............................. 4-6
Convenience Net
............................... 2-50
Convex Outside
Mirror .......................... 2-48
Coolant
....................................... 6-22
Bleedvalves
................................. 5-22
RecoveryTank
............................... 5-19
Tires
....................................... 6-54
Wheels
..................................... 6-53 Coolant Heater. Engine
.......................... 2-21
Cooling System
................................ 5-17
Courtesy Transportation
........................... 8-6
Cruise Control
................................. 2-38
Cupholders
............................... 2-49, 2-50
Customer Assistance for Text Telephone Users
......... 8-4
Customer Assistance Information
................... 8-1
Customer Satisfaction Procedure
.................... 8-2
CourtesyLamps
................................ 2-44
CruiseLight
................................... 2-74
Damage. Finish
............................... 6-54
Damage. Sheet Metal
............................ 6-54
Daytime Running
Lamps ......................... 2-42
DeadBattery
................................... 5-3
Defects, Reporting Safety
......................... 8-8
Defensive Driving
............................... 4-2
Defogger, Rear Window
......................... 3-11
Defogging ............................ 3-4,3-6, 3-10
Defrosting
............................ 3-4,3-6, 3-10
Delayed Entry Lighting
.......................... 2-45
Delayed
Exit Lighting ........................... 2-45
Dimensions, Vehicle
............................ 6-64
Dolby@ B Noise Reduction
............. 3-18,3-21, 3-29
Dome Lamp Bulb Replacement
.................... 6-37
Door/Trunk Ajar Warning Light
................... 2-75
Driver Information Center
........................ 2-77
Driver Position
................................. 1-11
DoorLocks
..................................... 2-4
9-3
ProCarManuals.com