1997 BMW 540i windshield
[x] Cancel search: windshieldPage 813 of 1002

Downloaded from www.Manualslib.com manuals search engine
Fenders, Engine ~ood/
Hood, removing and installing
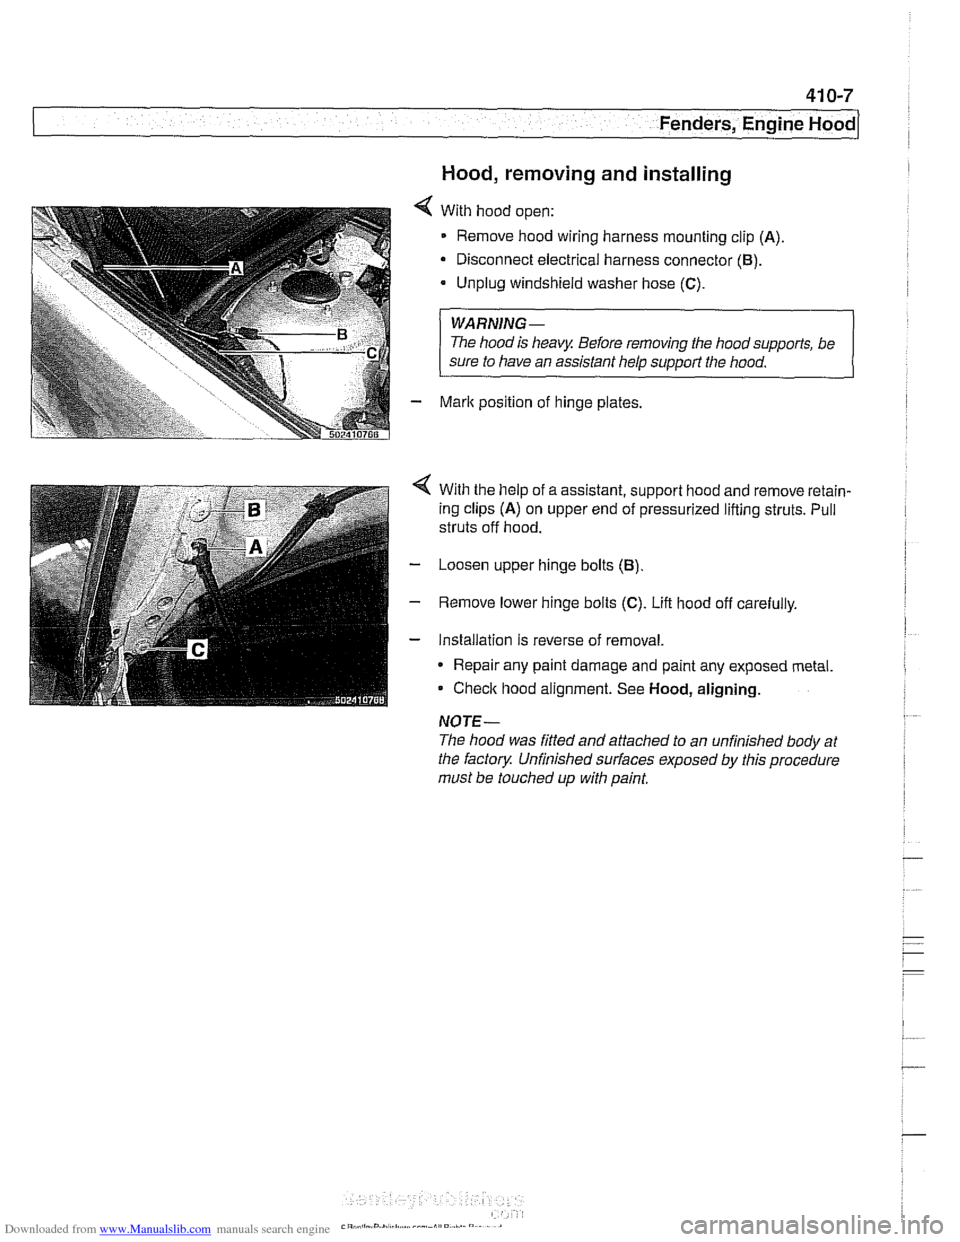
With hood open:
Remove hood wiring harness mounting clip
(A)
Disconnect electrical harness connector (B).
Unplug windshield washer hose (C).
WARNING-
The hood is heavy Before removing the hoodsupports, be
sure to have an assistant help
support the hood.
Mark position of hinge plates.
With the help of a assistant, support hood and remove retain-
ing clips
(A) on upper end of pressurized lifting struts. Pull
struts off hood.
Loosen upper hinge bolts
(B)
Remove lower hinge bolts (C). Lift hood off carefully.
Installation is reverse of removal.
* Repair any paint damage and paint any exposed metal
Check hood alignment. See
Hood, aligning.
NOTE-
The hood was fitted and attached to an unfinished body at
the factory Unfinished
sun'aces exposed by this procedure
must be touched up with paint,
Page 866 of 1002

Downloaded from www.Manualslib.com manuals search engine
51 2-2
I Door Windows 1
This repair group covers door glass, window regulator and
power window motor repair information.
CA U JIO&
All E39 models are equipped with side-impact airbags in the
front doors. Some models are also equipped with
airbags in
the rear doors. Be sure to read the
airbag warnings and cau-
tions in 721
Airbag System (SRS).
Electric window switch replacement is covered in 612
Switches.
The windshield, rear window, fixed rear doorglass, and cargo
compartment glass (Sport Wagon only) are bonded using
special adhesives and tools. It is recommended that bonded
glass replacement be done by an authorized
BMW service fa-
cility or an automotive glass installer.
Special tools
Some window repair operations require special tools.
Power windows
- Power window features in E39 models include:
Control of the front and rear door window motors is carried
out directly by the General Module (GM
Ill).
One-touch operation in both directions on all four windows.
Cable type window regulator used for all door windows.
. Anti-trap protection provided by pressure sensitive finger
guard.
Right front and each rear door has a single window switch
located in door handle trim.
Rear door window switches can be deactivated by press-
ing child lock-out switch in the driver's window switch block.
Convenience closinglopening of the windows from driver's
loci( cylinder or convenience opening only from remote un-
lociting feature (FZV) remote key.
Window (FZV) operation can be owner customized with
Car Memory function. See 515 Central Locking and Anti-
Theft.
After ignition is switched off, electric windows can be oper-
ated until a door is opened or until
I6 minutes has elapsed.
The GM
IiI bases window motor end position on current
draw (load). There is a maximum window motor run time of
6 seconds. The motor is then switched off even if the end
position load sensor fails.
Page 889 of 1002

Downloaded from www.Manualslib.com manuals search engine
Interior ~riml
Upper dash assembly, removing and
installing
- Remove lower dash assembly. See Lower dash panel as-
sembly, removing and installing.
I I 4 Remove instrument cluster fasteners (arrows) and swing
cluster out to remove.
Disconnect wiring harnesses from instrument cluster.
4 Remove A-pillar (windshield pillar) trim on left and right sides
by prying out
HPS cover (arrow).
- Remove screws beneath covers.
- Remove passenger side airbag. See 721 Airbag System
(SRS).
Page 890 of 1002

Downloaded from www.Manualslib.com manuals search engine
513-12
Interior Trim
< Remove steering column trim panel by releasing clips (ar-
rows).
< Remove left side mounting fasteners (arrows).
Lilt dash panel upwards and remove through passenger
door.
- Installation is the reverse of removal.
Window and door post trim panels,
removing and installing
Windshield post trim (A pillar), removing and Installing
- On 1998 and later cars, disconnect battery negative (-) cable
I
WARNING-
On 1998 and later models, front Head Protection System
(HPS)
airbags are installed in the driver and passenger side
windshieldpost
trim (A-pillar). See 721 Airbag System
(SRS) for warnings and cautions regarding airbags.
< Remove A-p~llar trim panel fastener cap (arrow)
Page 960 of 1002

Downloaded from www.Manualslib.com manuals search engine
721-12
Airbag System (SRS)
Head protection airbag (HPS)
4 Replacement of a head protection airbag (HPS) is an exten-
sive operation, including removal of the following:
Complete dashboard
Complete headliner
Windshield pillar (A-pillar) trim
Door pillar (B-pillar) trim
- Before starting work on the HPS airbag, disconnect negative
(-) cable from battery and cover negative terminal with insu-
lating material.
Prior to disconnecting the battery, read the battery discon-
nection cautionsgiven in001 General Warnings and Cau-
tions.
Tightening torque HPS
airbag to body 11 Nm (8 ft-lb)
HPS airbag mounting bracket
to A or B-pillar
HPS gas generator to
dashboard reinforcement
(M6
self-tapping screw) 2.5
Nm (22 in-lb)
4 Nm (35 in-lb)
Page 997 of 1002

Downloaded from www.Manualslib.com manuals search engine
INDEX 7
WARNING
Your common sense, good
judgement, and general alertness are
crucial to safe and successful service
work. Before
attempting any work on
your BMW, be sure to read 001
General Warnings and Cautions
and the copyright page at the front of
the manual. Review these warnings
and cautions each time you prepare
to
work on your BMW. Please also
read any warnings and
caulions that
accompany
/he procedures in the
manual.
Jack stands
010-16
Jump starting 010-19
Keys
515-1 1
Knock sensor
see Ignition system
Leak detection,
fuel tanlr
see Fuel tank, leak detection unit
Leather upholstery
see Maintenance, leather
upholstery and trim
LDP
(leak detection pump)
see Fuel
tanir, leal( detection unit
Level sender
see Fuel tank
see also Fuel pump
License
plate iight
630-1 1
Lifters see Cylinder head and vaivetrain
Lifting the car
010-5 Lights
bulb applications
630-2
control module (LCM) 630-3
foglights 630-8 headiighls 630-4
automatic headlight adjustment
(LWR)
630-7
vertical aim system 630-8 interior lights 630-12
bulb applications 630-13
side turn signal 630-9
taillight 630.10 trunk light bulb 630-14
turn signals, taillights 630-12
LOClCS see Central loci(ing
see also Door loclrs
Lubrication system
oil
level warning switch, replacing
119-20
oil pan, removinglinstalling
6-cylinder 119-10
V-E lower 119-13 V-8 upper 119-15
oil pressure
checiring 11
9-4
warning system, testing 119-5 warning switch, replacing 119-20
oil pressure
reliel valve
6-cylinder 119-26
V-8 11 9-27
oil pump, removinglinstalling
6-cylinder
119-22
V-8 1 19-4
troubieshooting 119-3
Luggage compartment
seeTrunk
MAF (mass air flow) sensor
see 130 under appropriate fuel
injection system Maintenance
accelerator linkage
020-14 air filter 020-14
automatic transmission 020-29
battery 020-22
body lubrication 020-31 body and interior 020-31
braire fluid 020-24
brake padlrotor wear 020-24
brake system 020-25 clutch fluid 020-26
cooling system 020-15
CV ioint boots 020-27
differential oil level 020-26
drive bells 020-16 engine comparlmenl 020-14
engine cooling system 020-16
engine oil 020-1 1 exhaust system 020-27
exterior washing 020-31
fluid and lubricant specifications 020-9
fuel lilter 020-27 fuel lanir and fuel lines 20-28
idle speed 020-19
inspection 020-5
interior care 020-31
lealher upholslery and trim 020-31
maintenance tables 020-6
manual transmission oil 020-30
microiilter 020-22 oxygen sensors 130-72, 180-8
parlcing brake 020-25
power steering fluid level 020-20
seat belts
020-32 service indicator 020-3
spark plugs 020-20
special cleaning 020-32 suspension, front 020-29
suspension, rear 020-29
tires 020-29
washing
020-32
waxing 020-32 windshield wiper blade 020-33
wheels, aligning 020-30
Malfunction indicator iight (MIL)
OED-2
Manifold, exhaust
see Exhaust system
Manifold,
intake
see Intake maniiold
Page 1002 of 1002

Downloaded from www.Manualslib.com manuals search engine
112 INDEX
Warnings 001-1
Warnings, cautions and notes
01
0-3
Washer fluid pump
see Wipers and washers
Washers see Wipers and washers
Washing see Maintenance
Water pump
see Cooling system, coolant
pump
Waxing
see Mainienance
Wheel, steering
see Steering
Wheel alignment
320-33 ride [height 300-14
see also Maintenance
Wheel bearing
see Front suspension
see also Rear suspension
Wheels
300-1 1
Window motor see Door window
Window regulator
see Door window
Window switch
512-3
see Switches
Windows, door
see Door window
Windshield wipers and washers
see Wipers and washers
see also Maintenance
Wiper motor
see Wipers and washers Wipers and
washers
rain sensor 61
1-6 rear window (Sport Wagon) wiper motor, removingiinstaiiing
611-15 wiper shaft, removing.instaiiing
611-15
wiperiwasher system 61
1-8 washer system 611-16
wiper
assembly 611-12
wiper blades and arms 61 1-9
Wiring codes and abbreviations
600-12
Wirinq diaarams ELF-I -
see also Electrical system
Working under car safely
010-6
Xenon headlght
630-6
ZKE (central body electronics)
600-8