Page 17 of 26
40-30
1 -
Drive axle with triple-rotor joint
Replacement part supplied with boot and
filled with grease
2 -
Clamp Always replaceTightening Fig.1
3 -
Boot for inner triple-rotor joint
Check for splits and abrasionsOnly 32 mm diameter shafts have
replaceable inner boots To replace, drive off outer constant velocity
joint When slipping onto profiled shaft, apply
small quantity of grease to bead on profiled
shaft and use VAG1474/5 wedge (part of
VAG1474) to carefully position boot Fig. 4
Pa
ge 17 of 26 Front drive axles, removin
g and installin
g
11/20/2002 htt
p://127.0.0.1:8080/audi/servlet/Dis
play?action=Goto&t
yp
e=re
pair&id=AUDI.B5.SU01.40.3
Page 18 of 26
40-31
4 -
Clamps
Always replaceTightening Fig.1
5 -
Boot for outer constant velocity joint
Check for splits and abrasionsBefore tightening clamp, briefly lift end of
boot to equalize pressure (ventilate) Fig. 3 As of chassis no. 8DTA 279 794, new
boots were introduced for 88 mm outer
joint (wheel end) Fig. 1
6 -
Clamp
Always replaceTightening Fig. 1
7 -
Spring washer
Installation position Fig. 5
Pa
ge 18 of 26 Front drive axles, removin
g and installin
g
11/20/2002 htt
p://127.0.0.1:8080/audi/servlet/Dis
play?action=Goto&t
yp
e=re
pair&id=AUDI.B5.SU01.40.3
Page 19 of 26
40-32
8 -
Spacer washer (plastic)
Installation position Fig. 5
9 -
Circlip
Always replaceInstall into circular groove on axle shaft
before installing joint Not visible with joint installed
10 -
Outer constant velocity joint Outer diameter 88 or 98 mm, depending on
engine/transmission combination Replace as complete part onlyPressing off Fig. 2
(with hollow shaft
page 40
-36
)
Installing: use plastic hammer to drive onto
axle shaft until circlip engages Greasing page 40
-29
Pa
ge 19 of 26 Front drive axles, removin
g and installin
g
11/20/2002 htt
p://127.0.0.1:8080/audi/servlet/Dis
play?action=Goto&t
yp
e=re
pair&id=AUDI.B5.SU01.40.3
Page 20 of 26
40-33
Clamps used on rubber joint boots are
tightened using VAG1275 pliers
Instructions in Fig. 1
are only for stainless
steel clamps
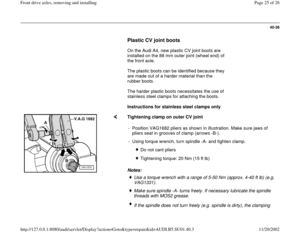
Notes: Fig. 1 Tightening clamp on outer CV joint
- Position VAG1682 pliers as shown in illustration. Make sure jaws of
pliers seat in grooves of clamp (arrows -B-).
- Using torque wrench, turn spindle -A- and tighten clamp.
Do not cant pliers
Tightening torque: 20 Nm (15 ft lb)
Use a torque wrench with a range of 5-50 Nm (approx. 4-40 ft lb) (e.g.
VAG1331). Make sure spindle -A- turns freely. If necessary lubricate the spindle
threads with MOS2 grease. If the spindle does not turn freely (e.g. spindle is dirty), the clamping
force required on the clamp will not be achieved even though the
correct tightening torque is indicated.
Pa
ge 20 of 26 Front drive axles, removin
g and installin
g
11/20/2002 htt
p://127.0.0.1:8080/audi/servlet/Dis
play?action=Goto&t
yp
e=re
pair&id=AUDI.B5.SU01.40.3
Page 21 of 26
40-34
Fig. 2 Pressing off outer constant velocity joint
- Clamp drive axle in vise using protective jaw covers.
- Remove large clamp and slide back boot.
- Thread special tool into end of constant velocity joint until joint is
pressed off of axle shaft.
Only for rubber joint boot
The joint boot is often pressed in while being installed on the body of the
joint. This creates a vacuum inside the boot which draws it inward with a
fold (arrow) while driving. Therefore after installing, lift the boot at the
small diameter end to equalize pressure. Fig. 3 Ventilating joint boot
Pa
ge 21 of 26 Front drive axles, removin
g and installin
g
11/20/2002 htt
p://127.0.0.1:8080/audi/servlet/Dis
play?action=Goto&t
yp
e=re
pair&id=AUDI.B5.SU01.40.3
Page 22 of 26
40-35
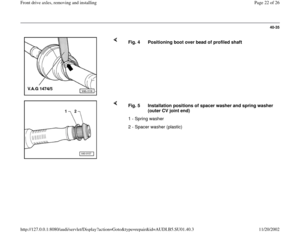
Fig. 4 Positioning boot over bead of profiled shaft
Fig. 5 Installation positions of spacer washer and spring washer
(outer CV joint end)
1 - Spring washer
2 - Spacer washer (plastic)
Pa
ge 22 of 26 Front drive axles, removin
g and installin
g
11/20/2002 htt
p://127.0.0.1:8080/audi/servlet/Dis
play?action=Goto&t
yp
e=re
pair&id=AUDI.B5.SU01.40.3
Page 23 of 26
40-36
Axle shaft (hollow shaft), servicing
The axle shaft can be identified by a circlip on
the axle shaft at the outer joint
Removing outer joint
- Clamp drive axle in vise using protective jaw
covers.
- Remove clamps (large and small) and slide back
boot.
Driving off outer joint - Remove circlip using pointed pliers (arrow) and push back spring
washer and spacer washer.
- Only drive off using drift (brass or copper) at ball hub (arrow).
Pa
ge 23 of 26 Front drive axles, removin
g and installin
g
11/20/2002 htt
p://127.0.0.1:8080/audi/servlet/Dis
play?action=Goto&t
yp
e=re
pair&id=AUDI.B5.SU01.40.3
Page 24 of 26
40-37
Assembly
- When slipping boot onto profiled shaft, apply
small quantity of grease to bead on profiled shaft
and carefully position boot.
1 - Circlip
2 - Dished washer
3 - Spacer washer (plastic)
4 - Circlip (snap ring)
- Use plastic headed hammer to drive joint onto shaft until circlip
engages.
Tightening clamp
Pa
ge 24 of 26 Front drive axles, removin
g and installin
g
11/20/2002 htt
p://127.0.0.1:8080/audi/servlet/Dis
play?action=Goto&t
yp
e=re
pair&id=AUDI.B5.SU01.40.3


Installation position Fig. 5
9 -
Circlip
Always replaceInstall into circular groove on axle shaft
before installing joint Not visible with joint installed")


1 - Spring washer
2 - Spacer washer (pla")
, servicing
The axle shaft can be identified by a circlip on
the axle shaft at the outer joint
Removing outer joint
- Clamp drive axle in")
