Page 1 of 24
87-151
Heating and ventilation system,
servicing Instrument panel air outlets and air guide
ducts
CAUTION!
Before working on the electrical system:
Note:
Air is extracted from the passenger compartment
through 2 outlets located on both sides of the rear
luggage compartment area near the bumper
page 87-157
.
Removing and installing Repair Manual, Body
Interior, Repair Group 70
Obtain security code for anti-theft radio.
Note customer's pre-set radio stations.
Disconnect battery Ground (GND) strap.1 -
Instrument panel top cover 2 -
Retaining spring for air guide duct
Pa
ge 1 of 24 Heatin
g and ventilation s
ystem, servicin
g
11/21/2002 htt
p://127.0.0.1:8080/audi/servlet/Dis
play?action=Goto&t
yp
e=re
pair&id=AUDI.B5.HA01.87.22
Page 2 of 24
87-152
3 -
Retaining spring for air guide duct
4 -
Air guide duct
5 -
Defroster duct
6 -
Right instrument panel air outlet
Removing and installing page 87
-155
7 -
Side window defroster vent
Removing and installing Repair Manual, Body Interior, Repair Group 70
8 -
Center instrument panel air outlet
Removing and installing page 87
-154
9 -
Windshield defroster vent
Removing and installing page 87
-156
10 -
Left instrument panel air outlet
Removing and installing page 87
-155
Pa
ge 2 of 24 Heatin
g and ventilation s
ystem, servicin
g
11/21/2002 htt
p://127.0.0.1:8080/audi/servlet/Dis
play?action=Goto&t
yp
e=re
pair&id=AUDI.B5.HA01.87.22
Page 3 of 24
87-153
Tool for removing instrument panel air
outlets, locally made
- Bend 3 mm (1/8 in.) diameter wire as shown.
Dimension X = 6 mm (1/4 in.)
Pa
ge 3 of 24 Heatin
g and ventilation s
ystem, servicin
g
11/21/2002 htt
p://127.0.0.1:8080/audi/servlet/Dis
play?action=Goto&t
yp
e=re
pair&id=AUDI.B5.HA01.87.22
Page 4 of 24
87-154
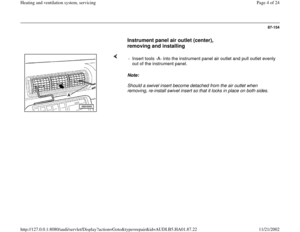
Instrument panel air outlet (center),
removing and installing
Note:
Should a swivel insert become detached from the air outlet when
removing, re-install swivel insert so that it locks in place on both sides. - Insert tools -A- into the instrument panel air outlet and pull outlet evenly
out of the instrument panel.
Pa
ge 4 of 24 Heatin
g and ventilation s
ystem, servicin
g
11/21/2002 htt
p://127.0.0.1:8080/audi/servlet/Dis
play?action=Goto&t
yp
e=re
pair&id=AUDI.B5.HA01.87.22
Page 5 of 24
87-155
Instrument panel air outlets (left and
right), removing and installing
Note:
Should a swivel insert become detached from the air outlet when
removing, re-install swivel insert so that it locks in place on both sides. - Insert tools -A- into the instrument panel air outlet and pull air outlet
evenly out of the instrument panel.
Pa
ge 5 of 24 Heatin
g and ventilation s
ystem, servicin
g
11/21/2002 htt
p://127.0.0.1:8080/audi/servlet/Dis
play?action=Goto&t
yp
e=re
pair&id=AUDI.B5.HA01.87.22
Page 6 of 24
87-156
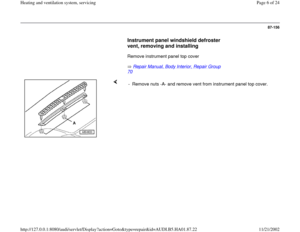
Instrument panel windshield defroster
vent, removing and installing
Remove instrument panel top cover
Repair Manual, Body Interior, Repair Group
70
- Remove nuts -A- and remove vent from instrument panel top cover.
Pa
ge 6 of 24 Heatin
g and ventilation s
ystem, servicin
g
11/21/2002 htt
p://127.0.0.1:8080/audi/servlet/Dis
play?action=Goto&t
yp
e=re
pair&id=AUDI.B5.HA01.87.22
Page 7 of 24
87-157
Air extraction vents, checking
Notes: - Sealing lips -B- in air extraction vents -A- must move freely and close
by themselves.
Illustration shows air extraction vent with rear bumper removed.2 air extraction vents (left and right) are installed for forced ventilation.Extraction of air from the passenger compartment can only function
properly if rear shelf air guides are not blocked.
Pa
ge 7 of 24 Heatin
g and ventilation s
ystem, servicin
g
11/21/2002 htt
p://127.0.0.1:8080/audi/servlet/Dis
play?action=Goto&t
yp
e=re
pair&id=AUDI.B5.HA01.87.22
Page 8 of 24
87-158
Dust and pollen filter, removing and
installing
Remove right air plenum cover
Repair Manual, Body Exterior, Repair Group
66
Notes: - Remove water guide -A-.
- Remove dust and pollen filter -B- from housing.
The water guide and the plenum cover must be properly installed to
ensure no water flows onto the dust and pollen filter and into the
heater housing. Gasket -C- must be attached to the housing of the dust and pollen
filter; before installing the housing, check that it is correctly located
and not damaged. The dust and pollen filter should be replaced at regular intervals
Repair Manual, Maintenance.
Pa
ge 8 of 24 Heatin
g and ventilation s
ystem, servicin
g
11/21/2002 htt
p://127.0.0.1:8080/audi/servlet/Dis
play?action=Goto&t
yp
e=re
pair&id=AUDI.B5.HA01.87.22


 diameter wire as shown.
Dimension X = 6 mm (1/4 in.)
Pa
ge 3 of 24 Heatin
g and ventilation")
,
removing and installing
Note:
Should a swivel insert become detached from the air outlet when
removing, re-install swivel insert so that")
, removing and installing
Note:
Should a swivel insert become detached from the air outlet when
removing, re-install swivel insert")


