Page 9 of 20
13-55
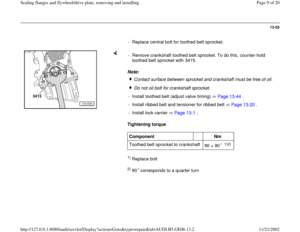
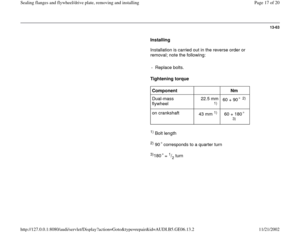
- Replace central bolt for toothed belt sprocket.
Note:
Tightening torque 1) Replace bolt 2) 90 corresponds to a quarter turn - Remove crankshaft toothed belt sprocket. To do this, counter-hold
toothed belt sprocket with 3415. Contact surface between sprocket and crankshaft must be free of oil.Do not oil bolt for crankshaft sprocket.
- Install toothed belt (adjust valve timing) Page 13
-44
.
- Install ribbed belt and tensioner for ribbed belt Page 13
-20
.
- Install lock carrier Page 13
-1 .
Component
Nm
Toothed belt sprocket to crankshaft
90 + 90
1)2)
Pa
ge 9 of 20 Sealin
g flan
ges and fl
ywheel/drive
plate, removin
g and installin
g
11/21/2002 htt
p://127.0.0.1:8080/audi/servlet/Dis
play?action=Goto&t
yp
e=re
pair&id=AUDI.B5.GE06.13.2
Page 10 of 20
13-56
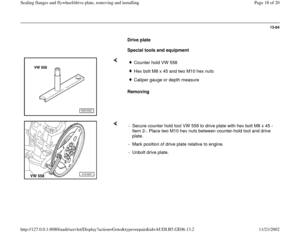
Front sealing flange, removing and
installing
Special tools, material and equipment
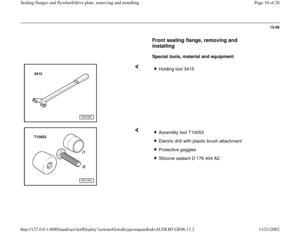
Holding tool 3415
Assembly tool T10053Electric drill with plastic brush attachmentProtective gogglesSilicone sealant D 176 404 A2
Pa
ge 10 of 20 Sealin
g flan
ges and fl
ywheel/drive
plate, removin
g and installin
g
11/21/2002 htt
p://127.0.0.1:8080/audi/servlet/Dis
play?action=Goto&t
yp
e=re
pair&id=AUDI.B5.GE06.13.2
Page 11 of 20
13-57
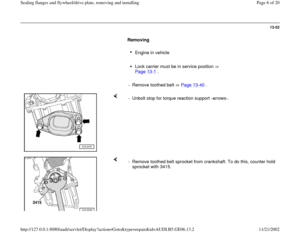
Removing
Engine in vehicle
Lock carrier must be in service position
Page 13
-1 .
- Remove toothed belt Page 13
-40
.
CAUTION!
The air conditioner refrigerant circuit must
not be opened.
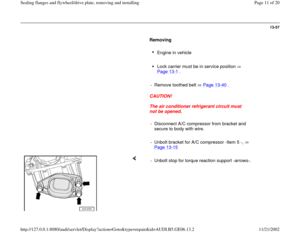
- Disconnect A/C compressor from bracket and
secure to body with wire.
- Unbolt bracket for A/C compressor -Item 5 -,
Page 13
-15
- Unbolt stop for torque reaction support -arrows-.
Pa
ge 11 of 20 Sealin
g flan
ges and fl
ywheel/drive
plate, removin
g and installin
g
11/21/2002 htt
p://127.0.0.1:8080/audi/servlet/Dis
play?action=Goto&t
yp
e=re
pair&id=AUDI.B5.GE06.13.2
Page 12 of 20
13-58
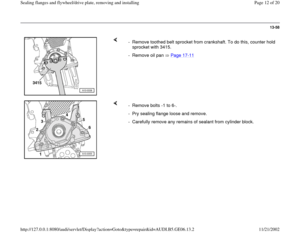
- Remove toothed belt sprocket from crankshaft. To do this, counter hold
sprocket with 3415.
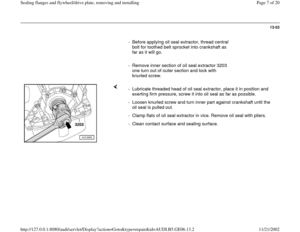
- Remove oil pan Page 17
-11
- Remove bolts -1 to 6-.
- Pry sealing flange loose and remove.
- Carefully remove any remains of sealant from cylinder block.
Pa
ge 12 of 20 Sealin
g flan
ges and fl
ywheel/drive
plate, removin
g and installin
g
11/21/2002 htt
p://127.0.0.1:8080/audi/servlet/Dis
play?action=Goto&t
yp
e=re
pair&id=AUDI.B5.GE06.13.2
Page 13 of 20
13-59
WARNING!
Wear protective glasses.
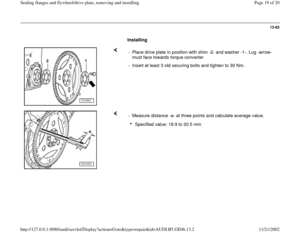
Installing
Note:
The sealing flange must be installed within 5 minutes after applying
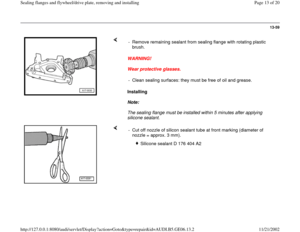
silicone sealant. - Remove remaining sealant from sealing flange with rotating plastic
brush.
- Clean sealing surfaces: they must be free of oil and grease.
- Cut off nozzle of silicon sealant tube at front marking (diameter of
nozzle = approx. 3 mm).
Silicone sealant D 176 404 A2
Pa
ge 13 of 20 Sealin
g flan
ges and fl
ywheel/drive
plate, removin
g and installin
g
11/21/2002 htt
p://127.0.0.1:8080/audi/servlet/Dis
play?action=Goto&t
yp
e=re
pair&id=AUDI.B5.GE06.13.2
Page 14 of 20
13-60
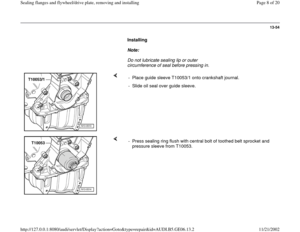
Note:
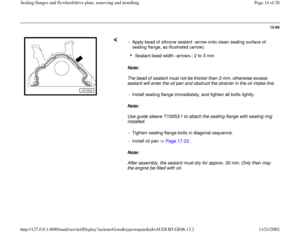
The bead of sealant must not be thicker than 3 mm, otherwise excess
sealant will enter the oil pan and obstruct the strainer in the oil intake line.
Note:
Use guide sleeve T10053/1 to attach the sealing flange with sealing ring
installed.
Note:
After assembly, the sealant must dry for approx. 30 min. Only then may
the engine be filled with oil. - Apply bead of silicone sealant -arrow-onto clean sealing surface of
sealing flange, as illustrated (arrow).
Sealant bead width -arrows-: 2 to 3 mm
- Install sealing flange immediately, and tighten all bolts lightly.
- Tighten sealing flange bolts in diagonal sequence.
- Install oil pan Page 17
-23
.
Pa
ge 14 of 20 Sealin
g flan
ges and fl
ywheel/drive
plate, removin
g and installin
g
11/21/2002 htt
p://127.0.0.1:8080/audi/servlet/Dis
play?action=Goto&t
yp
e=re
pair&id=AUDI.B5.GE06.13.2
Page 15 of 20
13-61
- Install crankshaft oil seal Page 13
-54
.
- Install toothed belt (adjust valve timing) Page
13
-44
.
- Install bracket for A/C compressor -Item 5 -,
Page 13
-15
.
- Install lock carrier Page 13
-1 .
Tightening torques
Component
Nm
Sealing flange to cylinder block 15
Bracket for air conditioner compressor on
cylinder block
33
A/C compressor to bracket 25
Pa
ge 15 of 20 Sealin
g flan
ges and fl
ywheel/drive
plate, removin
g and installin
g
11/21/2002 htt
p://127.0.0.1:8080/audi/servlet/Dis
play?action=Goto&t
yp
e=re
pair&id=AUDI.B5.GE06.13.2
Page 16 of 20
13-62
Dual mass flywheel/drive plate,
removing and installing
Dual-mass flywheel
Special tools and equipment
Removing
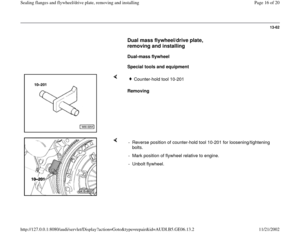
Counter-hold tool 10-201
- Reverse position of counter-hold tool 10-201 for loosening/tightening
bolts.
- Mark position of flywheel relative to engine.
- Unbolt flywheel.
Pa
ge 16 of 20 Sealin
g flan
ges and fl
ywheel/drive
plate, removin
g and installin
g
11/21/2002 htt
p://127.0.0.1:8080/audi/servlet/Dis
play?action=Goto&t
yp
e=re
pair&id=AUDI.B5.GE06.13.2
 Replace bolt 2) 90 corresponds to a quarter turn - Remove crankshaft toothed belt sprocket. To do")


 Page
13
-44
.
- Install bracket for A/C compressor -Item 5 -,
Page 13
-1")
