Page 17 of 33
17-13
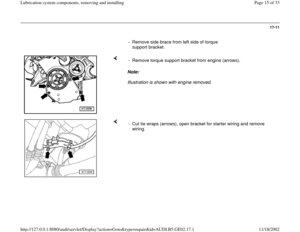
- Remove engine covers.
- Set 10-222A engine support bridge on fender mounting edges.
WARNING!
Mounting hooks and pins on the engine sling must be secured with
the positioning lock (arrows). - Remove mounting eye from 2024A engine sling.
- Insert bolt -1- in center bore of 2024A engine sling and secure using
cotter pin.
- Attach 2024A engine sling bolt to 10-222A engine support bridge
spindle.
- Attach 2024A engine sling to mounting eyes at front and rear of engine.
Pa
ge 17 of 33 Lubrication s
ystem com
ponents, removin
g and installin
g
11/18/2002 htt
p://127.0.0.1:8080/audi/servlet/Dis
play?action=Goto&t
yp
e=re
pair&id=AUDI.B5.GE02.17.1
Page 18 of 33
17-14
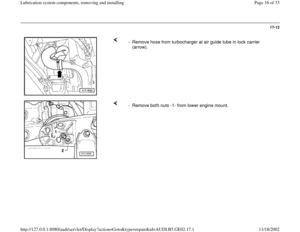
- Using 10-222A engine support bridge spindle, lift
up engine as far as possible.
Note:
Lift engine only as far as possible without over-
stretching or damaging any pipes or coolant
hoses. Check for clearance of viscous fan; if
necessary remove.
- Release tension on ribbed belt Page 13
-
15
.
- Secure belt pulley for viscous fan using M5 x 60 mm bolt and unbolt
using 8mm hex socket wrench.
- Remove viscous fan and place forward in fan frame.
- Use VAG1202A engine hoist to support subframe.
Pa
ge 18 of 33 Lubrication s
ystem com
ponents, removin
g and installin
g
11/18/2002 htt
p://127.0.0.1:8080/audi/servlet/Dis
play?action=Goto&t
yp
e=re
pair&id=AUDI.B5.GE02.17.1
Page 19 of 33
17-15
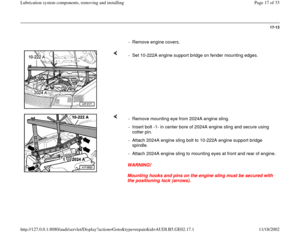
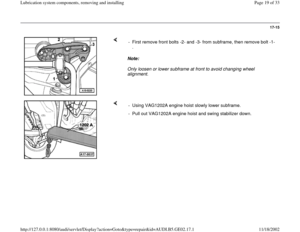
Note:
Only loosen or lower subframe at front to avoid changing wheel
alignment. - First remove front bolts -2- and -3- from subframe, then remove bolt -1-
.
- Using VAG1202A engine hoist slowly lower subframe.
- Pull out VAG1202A engine hoist and swing stabilizer down.
Pa
ge 19 of 33 Lubrication s
ystem com
ponents, removin
g and installin
g
11/18/2002 htt
p://127.0.0.1:8080/audi/servlet/Dis
play?action=Goto&t
yp
e=re
pair&id=AUDI.B5.GE02.17.1
Page 20 of 33
17-16
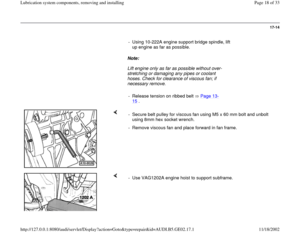
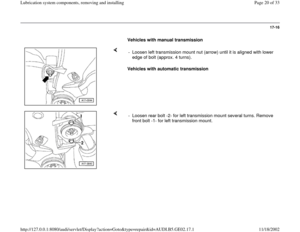
Vehicles with manual transmission
Vehicles with automatic transmission - Loosen left transmission mount nut (arrow) until it is aligned with lower
edge of bolt (approx. 4 turns).
- Loosen rear bolt -2- for left transmission mount several turns. Remove
front bolt -1- for left transmission mount.
Pa
ge 20 of 33 Lubrication s
ystem com
ponents, removin
g and installin
g
11/18/2002 htt
p://127.0.0.1:8080/audi/servlet/Dis
play?action=Goto&t
yp
e=re
pair&id=AUDI.B5.GE02.17.1
Page 21 of 33
17-17
All models
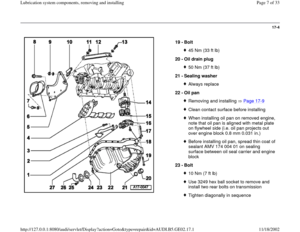
Note: - Loosen rear bolt -2- for right transmission mount several turns.
Remove front bolt -1- for right transmission mount.
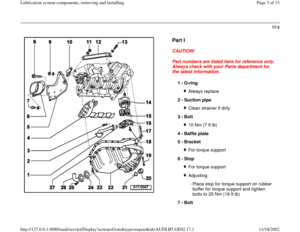
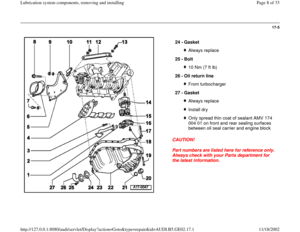
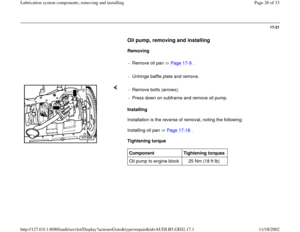
- Remove oil return line for turbocharger at oil pan.
- Unbolt oil pan.
For vehicles with manual transmission: both rear bolts on oil pan can
be reached through opening on flywheel (arrow). Turn flywheel as
needed. Use 3249 hex ball socket to remove rear oil pan bolts.
- Remove oil pan (if necessary tap lightly using rubber hammer to
remove).
Pa
ge 21 of 33 Lubrication s
ystem com
ponents, removin
g and installin
g
11/18/2002 htt
p://127.0.0.1:8080/audi/servlet/Dis
play?action=Goto&t
yp
e=re
pair&id=AUDI.B5.GE02.17.1
Page 22 of 33
17-18
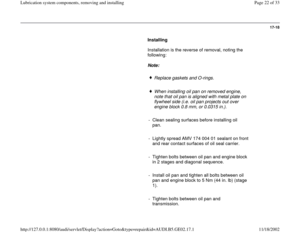
Installing
Installation is the reverse of removal, noting the
following:
Note:
Replace gaskets and O-rings.
When installing oil pan on removed engine,
note that oil pan is aligned with metal plate on
flywheel side (i.e. oil pan projects out over
engine block 0.8 mm, or 0.0315 in.).
- Clean sealing surfaces before installing oil
pan.
- Lightly spread AMV 174 004 01 sealant on front
and rear contact surfaces of oil seal carrier.
- Tighten bolts between oil pan and engine block
in 2 stages and diagonal sequence.
- Install oil pan and tighten all bolts between oil
pan and engine block to 5 Nm (44 in. lb) (stage
1).
- Tighten bolts between oil pan and
transmission.
Pa
ge 22 of 33 Lubrication s
ystem com
ponents, removin
g and installin
g
11/18/2002 htt
p://127.0.0.1:8080/audi/servlet/Dis
play?action=Goto&t
yp
e=re
pair&id=AUDI.B5.GE02.17.1
Page 23 of 33
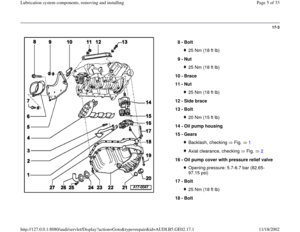
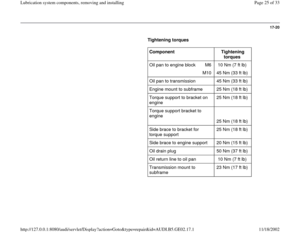
Tightening torque: 45 Nm (33 ft lb)
- Tighten M10 bolts between oil pan and engine
block.
Tightening torque: 45 Nm (33 ft lb)
- Tighten all M6 bolts between oil pan and engine
block to 10 Nm (7 ft lb) (stage 2).
Pa
ge 23 of 33 Lubrication s
ystem com
ponents, removin
g and installin
g
11/18/2002 htt
p://127.0.0.1:8080/audi/servlet/Dis
play?action=Goto&t
yp
e=re
pair&id=AUDI.B5.GE02.17.1
Page 24 of 33
17-19
- Install subframe Repair Manual, Suspension,
Wheels, Steering,Repair Group 40.
- Place torque support on rubber buffer for torque
support and tighten bolts to 25 Nm (18 ft lb).
- Install ribbed belt Page 13
-15
.
Note:
When installing ribbed belt, check for correct
seating on belt pulley.
- Add engine oil and check oil level.
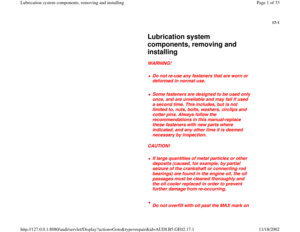
CAUTION!
Do not overfill with oil past the MAX mark on
the oil dipstick. Damage to the Three Way
Catalytic Converter (TWC) could result.
Pa
ge 24 of 33 Lubrication s
ystem com
ponents, removin
g and installin
g
11/18/2002 htt
p://127.0.0.1:8080/audi/servlet/Dis
play?action=Goto&t
yp
e=re
pair&id=AUDI.B5.GE02.17.1


 until it is aligned with lower
edge of bolt (approx. 4 turns).")


- Tighten M10 bolts between oil pan and engine
block.
Tightening torque: 45 Nm (33 ft lb)
- Tighten all M6 bolts between oil pan a")
