Page 9 of 13
34-74
Fig. 5 Pressing ball bearing onto Torsen differential
- Press ball bearing on until stop is reached.
Fig. 6 Pressing out ball bearing for flange shaft
- Remove circlip before pressing out bearing.
Pa
ge 9 of 13 Torsen differential, disassemblin
g and assemblin
g
11/19/2002 htt
p://127.0.0.1:8080/audi/servlet/Dis
play?action=Goto&t
yp
e=re
pair&id=AUDI.B5.TM02.34.6
Page 10 of 13
34-75
Fig. 7 Pressing in ball bearing for flange shaft
- Install circlip after pressing in ball bearing.
Both needle bearings in the Torsen differential are removed using the
same puller. Fig. 8 Pulling out needle bearing
A - Extractor 22-28 mm, e.g. Kukko 21/4
Pa
ge 10 of 13 Torsen differential, disassemblin
g and assemblin
g
11/19/2002 htt
p://127.0.0.1:8080/audi/servlet/Dis
play?action=Goto&t
yp
e=re
pair&id=AUDI.B5.TM02.34.6
Page 11 of 13
34-76
Dimension -a-: 32.5 mm (1.279 in.) Fig. 9 Installation position of front needle bearing
Dimension -a-: 14 mm (0.551 in.) Fig. 10 Installation position of rear needle bearing
Pa
ge 11 of 13 Torsen differential, disassemblin
g and assemblin
g
11/19/2002 htt
p://127.0.0.1:8080/audi/servlet/Dis
play?action=Goto&t
yp
e=re
pair&id=AUDI.B5.TM02.34.6
Page 12 of 13
34-77
Both needle bearings in the Torsen differential are pressed in using the
same special tool. Fig. 11 Pressing in needle bearing
Fig. 12 Pressing in Torsen differential
Pa
ge 12 of 13 Torsen differential, disassemblin
g and assemblin
g
11/19/2002 htt
p://127.0.0.1:8080/audi/servlet/Dis
play?action=Goto&t
yp
e=re
pair&id=AUDI.B5.TM02.34.6
Page 13 of 13
34-78
Fig. 13 Driving in seal
- Lubricate sealing lip and dust lip with gear oil.
- Lightly oil outer circumference of seal.
Installation position: 2 mm (0.078 in.) below surface of cover
Pa
ge 13 of 13 Torsen differential, disassemblin
g and assemblin
g
11/19/2002 htt
p://127.0.0.1:8080/audi/servlet/Dis
play?action=Goto&t
yp
e=re
pair&id=AUDI.B5.TM02.34.6


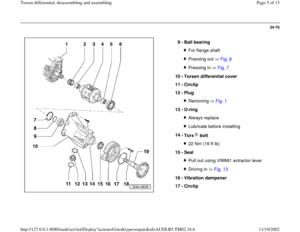


 Fig. 9 Installation position of front needle bearing
Dimension -a-: 14 mm (0.551 in.) Fig. 10 Installation position of rear needle bearing
Pa
g")

 below surface of cove")