Page 122 of 196

11 8Getting
more kilometers/mileage from a li-
ter/gallon of fuel is easyÐjust take it easy.
It will help make your vehicle last longer,
too. Here are some specific tips on how to
save money on both fuel and repairs: � Keep your tires inflated at the cor- rect pressure. Underinflation causes
tire wear and wastes fuel. See Chapter
7-2 for instructions.
� Do not carry unneeded weight in
your vehicle. Excess weight puts a
heavier load on the engine, causinggreater fuel consumption.
� Avoid lengthy warm-up idling.
Once the engine is running smoothly,
begin drivingÐbut gently. Remember,
however, that on cold winter days this
may take a little longer.
� Accelerate slowly and smoothly.
Avoid jackrabbit starts. Get into high
gear as quickly as possible.
� Avoid long engine idling. If you have
a long wait and you are not in traffic, it
is better to turn off the engine and start
again later.
� Avoid engine lug or overrevving.
Use a gear position suitable for the
road on which you are travelling. �
Avoid continuous speeding up and
slowing down. Stop-and-go driving
wastes fuel.
� Avoid unnecessary stopping and braking. Maintain a steady pace. Try
to time the traffic signals so you only
need to stop as little as possible or take
advantage of through streets to avoid
traffic lights. Keep a proper distance
from other vehicles to avoid suddenbraking. This will also reduce wear onyour brakes.
� Avoid heavy traffic or traffic jams
whenever possible.
� Do not rest your foot on the clutch
or brake pedal. This causes needless
wear, overheating and poor fuel econ-
omy.
� Maintain a moderate speed on highways. The faster you drive, the
greater the fuel consumption. By re-
ducing your speed, you will cut down
on fuel consumption.
� Keep the front wheels in properalignment. Avoid hitting the curb and
slow down on rough roads. Improper
alignment not only causes faster tire
wear but also puts an extra load on the
engine, which, in turn, wastes fuel. �
Keep the bottom of your vehicle
free from mud, etc. This not only
lessens weight but also helps prevent corrosion.
� Keep your vehicle tuned-up and in
top shape. A dirty air cleaner, improp-
er valve clearance, dirty plugs, dirty oil
and grease, brakes not adjusted, etc.
all lower engine performance and con-
tribute to poor fuel economy. For lon-
ger life of all parts and lower operating
costs, keep all maintenance work on
schedule, and if you often drive under severe conditions, see that your ve-
hicle receives more frequent mainte-nance. (For scheduled maintenance
information, please refer to the sepa-
rate Owner's Manual Supplement/
Maintenance Scheduleº).
CAUTION
Never turn off the engine to coast
down hills. Your power steering and
brake booster will not function with-
out the engine running. Also, the
emission control system operates
properly only when the engine is
running.!
How to save fuel and make your
vehicle last longer, too
Page 127 of 196

123
1. Reduce
your speed gradually, keeping
a straight line. Move cautiously off the
road to a safe place well away from the
traffic. Avoid stopping on the center divid-
er of a highway. Park on a level spot with firm ground.
2. Stop the engine and turn on your emer-
gency flashers.
3. Firmly set the parking brake and put the transmission in Pº (automatic) or re- verse (manual).
4. Have everyone get out of the vehicle
on the side away from traffic.
5. Read the following instructions thor-
oughly.
When jacking, be sure to observe
the following to reduce the possibil-
ity of personal injury: � Follow jacking instructions.
� Use a jack only for lifting your
vehicle during wheel changing.
� Never get beneath the vehicle
when supported by a jack.
� Do not start or run the engine
while your vehicle is supported by a jack. CAUTION
!
NOTICE
Do not continue driving with a deflated tire. Driving even a short
distance can damage a tire beyondrepair.
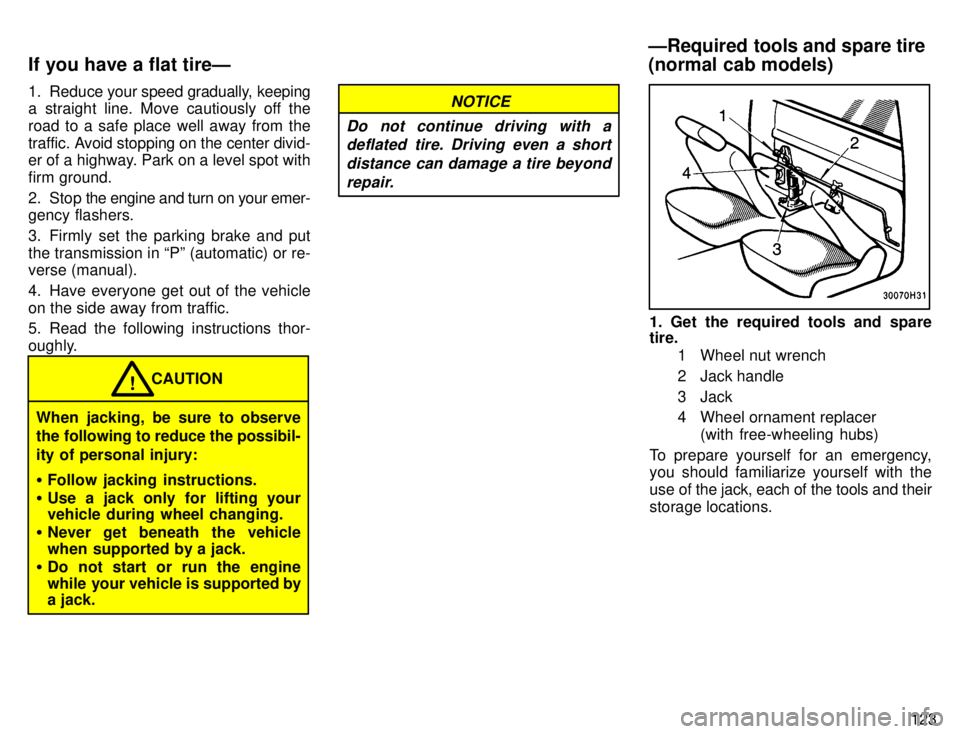
1. Get the required tools and spare tire. 1 Wheel nut wrench
2 Jack handle
3 Jack
4 Wheel ornament replacer (with free-wheeling hubs)
To prepare yourself for an emergency, you should familiarize yourself with the
use of the jack, each of the tools and theirstorage locations.
If you have a flat tireÐ
ÐRequired tools and spare tire
(normal cab models)
Page 128 of 196
124
Turn the jack joint by hand.
To remove: Turn the joint in direction 1 un- til the jack is free.
To store: Turn the joint in direction 2 until the jack is firmly secured to prevent it fly-
ing forward during a collision or suddenbraking.To remove the spare tire:
1. Insert the end of the jack handle into the lowering screw and turn it counter-clockwise.
2. After the tire is lowered completely to the ground, remove the holding bracket.
When storing the spare tire, put it in place with the outer side of the wheel facing up.
Then secure the tire, taking care that thetire goes straight up without catching on
any other part, to prevent it from flying for- ward during a collision or sudden braking.1. Get the required tools and spare tire.1 Tool bag
2 Jack
To prepare yourself for an emergency, you should familiarize yourself with the
use of the jack, each of the tools and theirstorage locations.
ÐRequired tools and spare tire (Xtra-cab models)
Page 129 of 196

125
Turn the jack joint by hand.
To remove: Turn the joint in direction 1 un- til the jack is free.
To store: Turn the joint in direction 2 until the jack is firmly secured to prevent it fly-
ing forward during a collision or suddenbraking.To remove the spare tire:
1. Insert the end of the jack handle exten-
sion into the lowering screw and turn it counterclockwise with the handle, making
sure the handle remains firmly fitted ontothe jack handle extension.
2. After the tire is lowered completely to the ground, remove the holding bracket.
When storing the spare tire, put it in place with the outer side of the wheel facing up.
Then secure the tire, taking care that the tire goes straight up without catching on
any other part, to prevent it from flying for- ward during a collision or sudden braking.2. Block the wheel diagonally oppo-
site the flat tire to keep the vehicle from
rolling when it is jacked up. When blocking the wheel, place a wheel
block from the front for the front wheels or
from the rear for the rear wheels.
ÐBlocking the wheel
Page 130 of 196
126
3. Remove the wheel ornament.
Pry off the wheel ornament, using the bev-
eled end of the wheel nut wrench as shown.
Do not try to pull off the ornament by
hand. Take due care in handling the
ornament to avoid unexpected per-
sonal injury.CAUTION
!
4. Loosen all the wheel nuts. Always l
oosen the wheel nuts before rais-
ing the vehicle.
The nuts turn counterclockwise to loosen.
To get maximum leverage, fit the wrench
to the nut so that the handle is on the right
side, as shown above. Grab the wrench
near the end of the handle and pull up on
the handle. Be careful that the wrench
does not slip off the nut.
Do not remove the nuts yetÐjust unscrew
them about one-half turn.
ÐRemoving wheel ornament
ÐLoosening wheel nuts
Page 131 of 196
127
Two-wheel drive models
Four-wheel drive models5. Position the jack at the correct jack
point as shown.
Make sure the j
ack is positioned on a l evel
and solid place. JACK POINTS:
Two-wheel drive models
FrontÐUnder the frame siderail RearÐUnder the rear axle housing
Four-wheel drive models
FrontÐUnder the front suspensioncrossmember RearÐUnder the rear axle housing
6. After making sure that no one is in
the vehicle, raise it high enough so
that the spare tire can be installed.
Remember you will need more ground
clearance when putting on the spare tirethan when removing the flat tire.
Normal cab modelsÐTo raise the vehicle,
insert the jack handle into the jack (it is a
loose fit) and turn it clockwise. As the jack
touches the vehicle and begins to lift,
double-check that it is properly posi-tioned.
ÐPositioning the jack
ÐRaising your vehicle
Page 132 of 196

128Xtra-cab modelsÐTo raise the vehicle,
insert the jack handle extension into the jack (it is a loose fit) and turn it clockwisewith the handle, making sure the handle remains firmly fitted onto the jack handle
extension. As the j
ack touches the vehicle
and begins to lift, double-check that it is
properly positioned.
Never get under the vehicle when
the vehicle is supported by the jack alone. CAUTION
!
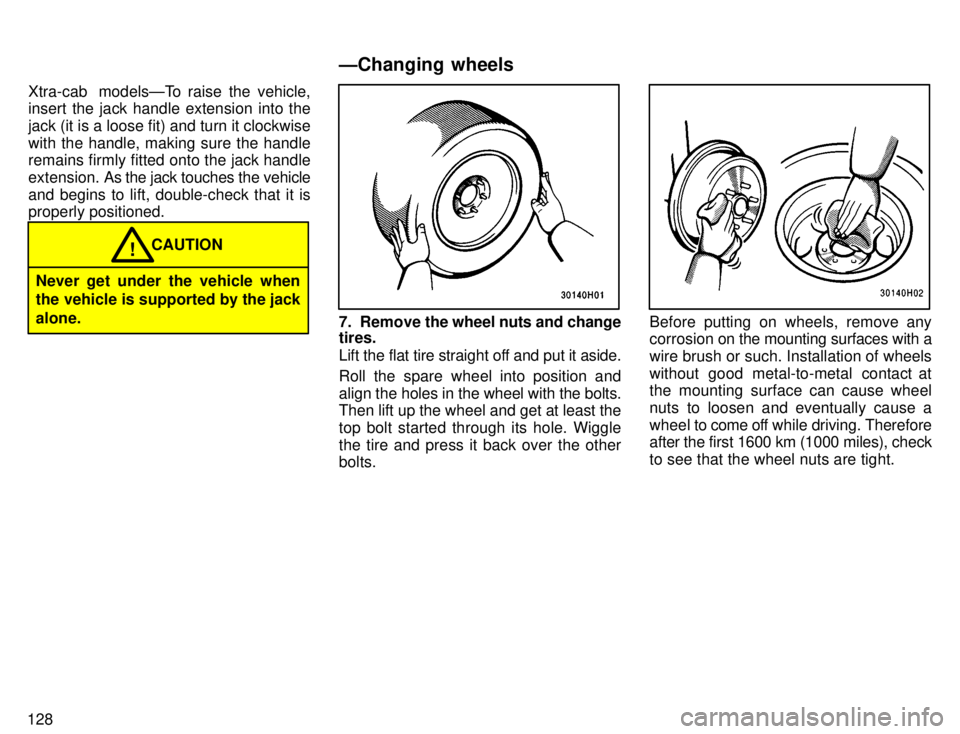
7. Remove the wheel nuts and change tires.
Lift the flat tire straight off and put it aside.
Roll the spare wheel into position and
align the holes in the
wheel with the bolts.
Then lift up the wheel and get at least thetop bolt started through its hole. Wigglethe tire and press it back over the other bolts.Before putting on wheels, remove any
corrosion on the mounting surfaces with a
wire brush or such. Installation of wheels
without good metal-to-metal contact at
the mounting surface can cause wheel
nuts to loosen and eventually cause a
wheel to come off while driving. Therefore
after the first 1600 km (1000 miles), check
to see that the wheel nuts are tight.
ÐChanging wheels
Page 133 of 196
129
8. Reinstall all the wheel nuts finger tight.
Reinstall the wheel nuts (tapered end in-
ward) and tighten them as much as youcan by hand. Press back on the tire back and see if you can tighten them more.Two-wheel drive models
Four-wheel drive models9. Lower the vehicle completely and
tighten the wheel nuts.
Normal cab modelsÐTurn the jack han-
dle counterclockwise to lower the vehicle.
Xtra-cab modelsÐTurn the jack handle
extension counterclockwise with handle
to lower the vehicle, making sure the han-dle remains firmly fitted onto the jack han-
dle extension.
Use only the wheel nut wrench and turn it
clockwise to tighten the nuts. Do not use other
tools or any additional leverage oth-
er than your hands, such as a hammer,
pipe or your foot. Make sure the wrench is
securely engaged over the nut.
Tighten each nut a little at a time in the or-
der shown. Repeat the process until all the nuts are tight.
ÐLowering your vehicle
ÐReinstalling wheel nuts