Page 12 of 188

11
To open the back door from the out-
side, insert the key and turn it clock- wise.
See ``Luggage stowage precautionsº in
Part 2 for precautions to observe in load- ing luggage.
To close the back door, lower it and press
down on it. After closing the back door, try
pulling it up to make sure it is securely closed.
Keep the back door closed while
driving. This not only keeps the
luggage from being thrown out but
also prevents exhaust gases from
entering the vehicle.
CAUTION!
To open the back door from the driv-
er's seat, pull up on the lock release
lever.To open the hood, pull the hood lock
release lever under the dash. The hood
will spring up slightly. In front of the
vehicle, press up on the auxiliary
catch lever and lift the hood. Then
hold the hood open by inserting the
support rod into the slot.
Before closing the hood, check to see that
you have not forgotten any tools, rags,
etc. and return the support rod to its clipÐthis prevents rattles.
Your Supra has two hood locks at the front
edge of the hood. Hood
ÐLock release lever
Back doorÐ
Page 13 of 188
12
To close the hood, lower the hood until it is about 30 cm (12 in.) above the engine
compartment and release it. If the hood is
still not fully closed, press down on it
above the two hood locks. Make sure the
hood is locked securely.
If you notice while driving that the hood is not securely locked, stop the vehicle at
once and close the hood.
CAUTION!
� After inserting the rod, make sure
it supports the hood securely.
� When closing the hood, be care- ful not to get your hands caught
between the hood and the vehicle
body.
NOTICE
Do not press hard on the hood except above the hood locks, or you
may deform the hood.
Page 19 of 188
18
2. Put in the roof from the left side
as shown. Then insert the front edge
of the roof in the front holders, and
engage the rear edge with the rear holders.
Put the front edge on the triangle marks of the front holders.
To engage the rear edge of the roof with
the rear holders, put the rear edge on the holders while pushing the front edge fully forward against the front holders.
To minimize the risk of personal in-
jury, make sure all four corners of
the roof are securely locked in the
holders after installation.
CAUTION!
NOTICE
To avoid damaging the roof panel, do not press on the center of the
stowed roof panel and do not put anything on the stowed roof panel.
ÐReinstalling on vehicle
Page 20 of 188
19
1. Lift up the rear edge while pushing
the roof fully forward, then pull the
front edge out of the holders. Remove
the roof from the right side as shown.
After removing the roof, put back the rear
holders by pulling up the lock release knob.
NOTICE
Do not operate the knob until the roof has been removed.
2. Place the rear edge on first and then
the front edge.
Before installation, be sure to take the
caps and plugs off.
CAUTION!
To minimize the risk of personal in-
jury, make sure all four corners are
securely fixed on the brackets afterinstallation.
Page 21 of 188
20
3. Tighten the bolts and lock the cen-
ter lock in the order shown. (See
ÐDetaching from vehicleº for de-
tails.) Note that all five connections need to be
tight to secure the sport roof. Reverse the wrench handle so the
TIGHTENº side faces toward you and
turn it clockwise.
Check that the roof is correctly installed by
lightly trying to move the roof.
Put the wrench, handle, caps and plugs back in the tool bag in the console box.
Make sure to tighten all four bolts
and to lock the center lock when
installing the sport roof.
CAUTION!
Page 24 of 188

23
ADJUSTING SEAT POSITION
Move the control switch to the desired direction. Releasing the switch will stop the move in
that position.
Do not place anything under the front
seats. It might interfere with the seatmovement.
ADJUSTING SEATBACK ANGLE
Move the control switch to the desired direction. Releasing the switch will stop the move in
that position.
CAUTION!
To reduce the risk of sliding under the
lap belt during a collision, avoid re-
clining the seatback any more than
needed. The seat belts provide maxi-
mum protection when the driver and
the passenger are sitting up straight
and well back in the seats. If you are
reclined, the lap belt may slide past
your hips and apply restraint forces
directly to the abdomen. Therefore, in
the event of a frontal collision, the risk
of personal injury may increase with
increasing recline of the seatback.
ADJUSTING SEAT CUSHION ANGLE
Turn the knob either way.
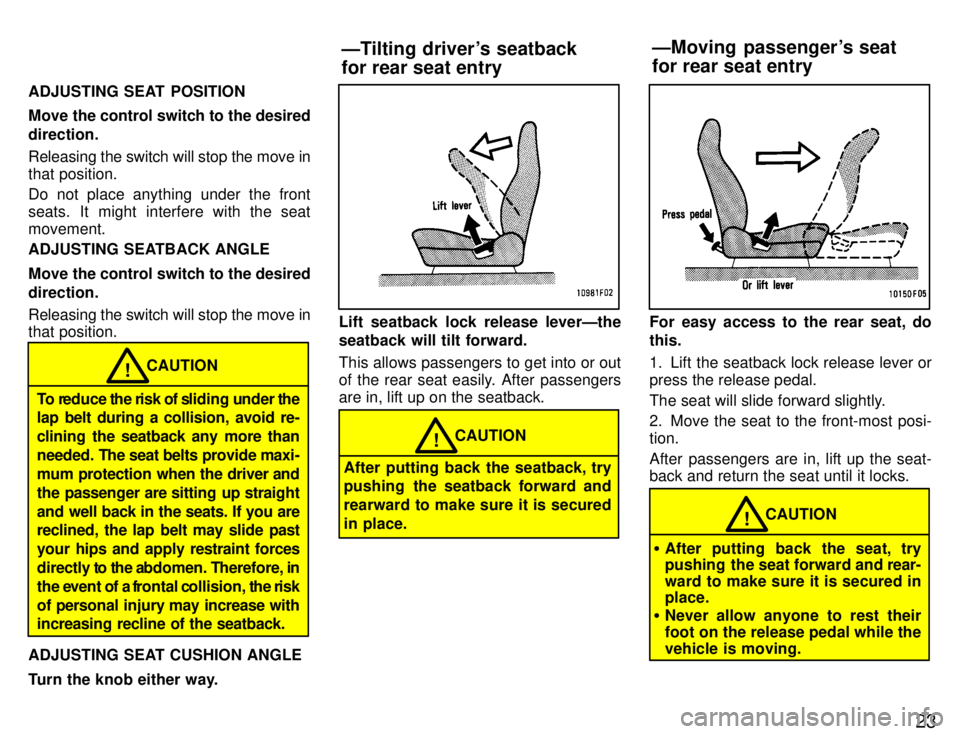
Lift seatback lock release leverÐthe
seatback will tilt forward. This allows passengers to get into or out
of the rear seat easily. After passengersare in, lift up on the seatback.
CAUTION!
After putting back the seatback, try
pushing the seatback forward and rearward to make sure it is secured
in place.
For easy access to the rear seat, do this.
1. Lift the seatback lock release lever or press the release pedal.
The seat will slide forward slightly.
2. Move the seat to the front-most posi- tion.
After passengers are in, lift up the seat- back and return the seat until it locks.
CAUTION!
� After putting back the seat, try
pushing the seat forward and rear-
ward to make sure it is secured inplace.
� Never allow anyone to rest their
foot on the release pedal while the
vehicle is moving.
ÐMoving passenger's seat for rear seat entry
ÐTilting driver's seatbackfor rear seat entry
Page 25 of 188

24
FOLDING DOWN REAR SEAT
Unlock the seatback, and fold it down.
This will enlarge the luggage compart-
ment as far as the front seatbacks. See
Luggage stowage precautionsº in Part 2 for precautions to observe in loading lug- gage.SETTING UP REAR SEAT Unlock the seatback, and set it up.
CAUTION!
When returning the seatback to the
upright position: � Make sure the seat belts are not
twisted or caught in the seatback
and are arranged in their proper
position for ready use.
� Make sure the seatback is securely
locked by pushing forward and
rearward on the top of the seat- back.
To turn on the seat heater, push the Lº
switch for the driver's seat, and Rº
switch for the passenger's seat. The key must be in the ONº position. Once the seat is warmed up, the heat of
the seat heater is reduced automatically.
The indicator light above the switch illumi-nates when the seat heater is operating.
NOTICE
To prevent the battery from being discharged, turn the switch on
when the engine is running.
Fold-down rear seat Seat heaters
Page 26 of 188

25
Toyota strongly urges that the driver and passengers in the vehicle be properly re- strained at all times with the seat belts
provided. Failure to do so could increase
the chance of injury and/or the severity of
injury in accidents.
Baby or
small child. Use a child restraint
system which fits your vehicle. See Child
restraintº for details.Child. If a child is too large for a child re-
straint system, the child should sit in the rear seat and must be restrained using the
vehicle's seat belt. According to accident
statistics, the child is safer when properly
restrained in the rear seat than in the front
seat. Do not allow the child to stand up or
kneel on either rear or front seats. If the
shoulder belt falls across the child's neck
or face, have the child sit slightly closer to the center of the vehicle so that the belt
lays across the shoulder.
Pregnant woman. Toyota recommends
the use of a seat belt. Ask your doctor for
specific recommendations. The lap belt
should be worn securely and as low as
possible over the hips and not on the waist.
Injured person. Toyota recommends the
use of a seat belt. Depending on the injury,
however, first check with your doctor.
CAUTION!
Persons should ride in their seats
properly wearing their seat belts
whenever the vehicle is moving.
Otherwise, they are much more likely
to suffer serious bodily injury in the
event of s udden braking or a collision.
When using the seat belts, observe the following: � Use the belt for only one person at
a time. Do not use a single belt for
two or more peopleÐeven children.
� Avoid reclining the seatbacks too
much. The seat belts provide max-
imum protection when the seat- backs are in the upright position.
(See the seat adjustment instruc- tions.)
� Be careful not to damage the belt
webbing or hardware. Take care
that they do not get caught or
pinched in the seat or doors.
� Inspect the belt system periodical-
ly. Check for cuts, fraying, and
loose parts. Damaged parts
should be replaced. Do not disas-
semble or modify the system.� Keep the belts clean and dry. If they
need cleaning, use a mild soap
solution or lukewarm water. Never
use bleach, dye, or abrasive clean-
ersÐthey may severely weaken the
belts.
� Replace the belt assembly (includ-
ing bolts) if it has been used in a se-
vere impact. The entire assembly
should be replaced even if damage
is not obvious.
Seat beltsÐ ÐSeat belt precautions