1996 TOYOTA PASEO flat tire
[x] Cancel search: flat tirePage 116 of 165

11 3
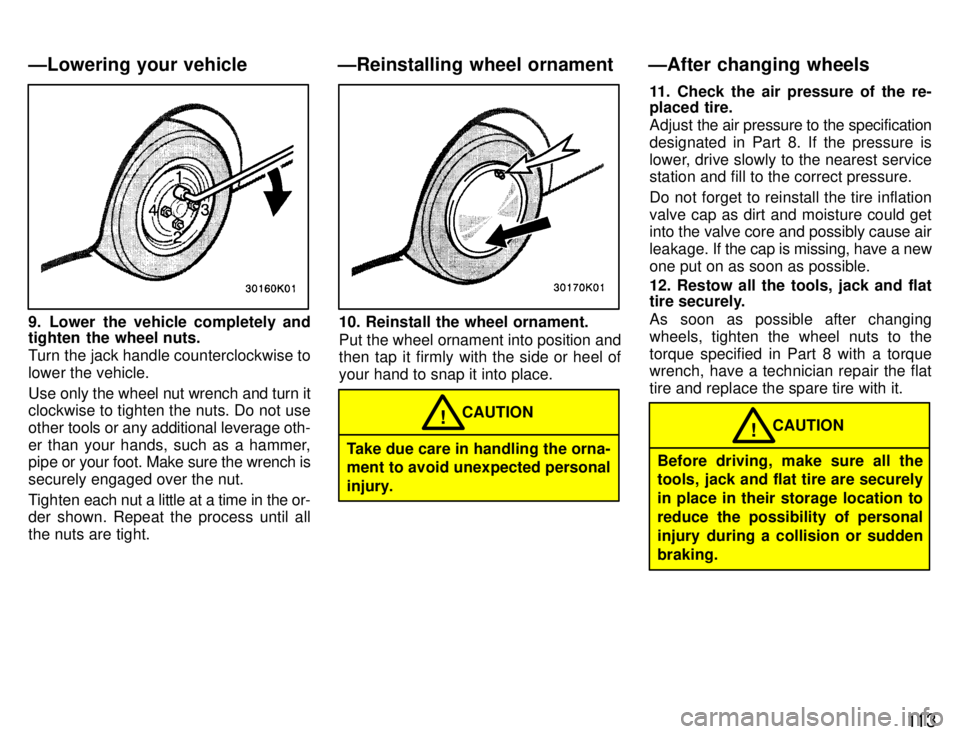
9. Lower the vehicle completely and
tighten the wheel nuts.
Turn the jack handle counterclockwise to lower the vehicle.
Use only the wheel nut wrench and turn it
clockwise to tighten the nuts. Do not use other tools or any additional leverage oth-
er than your hands, such as a hammer,
pipe or your foot. Make sure the wrench is
securely engaged over the nut.
Tighten each nut a little at a time in the or-
der shown. Repeat the process until all the nuts are tight.10. Reinstall the wheel ornament.
Put the wheel ornament into position and
then tap it firmly with the side or heel of your hand to snap it into place.
Take due care in handling the orna-
ment to avoid unexpected personal
injury. CAUTION
! 11. Check the air pressure of the re-
placed tire.
Adjust
the air pressure to the specification
designated in Part 8. If the pressure is
lower, drive slowly to the nearest service station and fill to the correct pressure.
Do not forget to reinstall the tire inflation valve cap as dirt and moisture could get into the valve core and possibly cause air
leakage. If the cap is missing, have a new
one put on as soon as possible. 12. Restow all the tools, jack and flat
tire securely.
As soon as possible after changing
wheels, tighten the wheel nuts to thetorque specified in Part 8 with a torque wrench, have a technician repair the flat tire and replace the spare tire with it.
Before driving, make sure all the
tools, jack and flat tire are securely in place in their storage location to
reduce the possibility of personal
injury during a collision or suddenbraking. CAUTION
!
ÐAfter changing wheels
ÐLowering your vehicle ÐReinstalling wheel ornament
Page 129 of 165

126IN THE ENGINE COMPARTMENT Items listed below should be checked
from
time to time , e.g. each time when
refueling.
Washer fluid
Make sure there is sufficient fluid in the
tank. See Chapter 7-3 for additional infor-
mation.
Engine coolant level Make sure the coolant level is between
the FULLº and LOWº lines on the see-
through reservoir. See Chapter 7-2 for
additional information. Battery electrolyte level Make sure the electrolyte level of all bat-
tery cells is between upper and lower level
lines on the case. Add only distilled water
when replenishing. See Chapter 7-3 for
additional information. Brake fluid level
Make sure the brake fluid level is correct. See Chapter 7-2 for additional informa- tion.
Engine oil level
Check the l evel on the dipstick with the en-
gine turned off and the vehicle parked on
a level spot. See Chapter 7-2 for addition-
al information. Power steering fluid level Check
the level through the reservoir. The
level should be in the HOTº or COLDº
range depending on the fluid t emperature.
See Chapter 7-2 for additional informa-tion.
Exhaust system
If you notice any change in the sound of
the exhaust or smell exhaust fumes, have the cause located and corrected immedi-
ately. (See engine exhaust cautions in
Part 2.) Be on the alert for changes in perfor-
mance, sounds, and visual tip-offs
that in-
dicate service is needed. Some important
clues are as follows: � Engine missing, stumbling, or pinging
� Appreciable loss of power
� Strange engine noises
� A leak under the vehicle (however, wa-
ter dripping from the air conditioning
after use is normal.)
� Change in exhaust sound (This may
indicate a dangerous carbon monox-
ide leak. Drive with the windows open
and have the exhaust system checked
immediately.)
� Flat-looking tire; excessive tire squeal
when cornering; uneven tire wear
� Vehicle pulls to one side when driving straight on a level road
� Strange noises related to suspensionmovement
� Loss of brake effectiveness; spongy
feeling brake or clutch pedal; pedal al-
most touches floor; vehicle pulls to one
side when braking
� Engine coolant temperature continual-
ly higher than normal
Does your vehicle needrepairing?
Page 143 of 165

140�
Take special care when adding air
to the compact spare tire. The small-
er tire size can gain pressure very
quickly. Add compressed air in small
quantities and check the pressure
often until it reaches the specifiedpressure.
� Do not bleed or reduce tire pres-sure after driving. It is normal for the
tire pressure to be higher after driving.
� Never exceed the vehicle capacityweight. The passenger and luggage
weight should be located so that the
vehicle is balanced.
� Be sure to reinstall the tire inflation
valve caps. Without the valve caps,
dirt or moisture could get into the valve
core and cause air leakage. If the capshave been lost, have new ones put onas soon as possible.
CHECKING YOUR TIRES Check the tire tread for the tread wear
indicators. If the indicators show, re-
place the tires.
The tires on your Toyota have built-in tread wear indicators to help you know
when the tires need replacement. When
the tread depth wears to 1.6 mm (0.06 in.)
or less, the indicators will appear. If you
can see the indicators in two or more adja-
cent grooves, the tire should be replaced.
The lower the tread, the higher the risk of skidding. The effectiveness of snow tires is lost
if the tread wears down below 4 mm (0.16 in.). Check the tires regularly for damage
such as cuts, splits and cracks. If any damage is found, consult with a tech-
nician and have the tire repaired or re-placed. Even if the damage does not appear seri-
ous, a qualified technician should ex-
amine the damage. Objects which havepenetrated the tire may have caused in- ternal damage.
Any tires which are over six years old
must be checked by a qualified techni-
cian even if damage is not obvious.
Tires deteriorate with age even if they
have never or seldom been used.
This
also applies to the spare tire and tires
stored for future use.REPLACING YOUR TIRES
When replacing a tire, use only the
same size and construction as origi-
nally installed and with the same or
greater load capacity.
Using any other size or type of tire may se-
riously affect handling, ride, speedome-
ter/odometer calibration, ground clear-
ance, and clearance between the body
and tires or snow chains.
Checking and replacing tires
Page 144 of 165

141
CAUTION
� Do not mix radial, bias belted, or
bias-ply tires on your vehicle. It can
cause dangerous handling charac-
teristics, resulting in loss of con- trol.
� Do not use tires or wheels other
than the manufacturer's recom-
mended size.!
Toyota recommends all four tires, or at
least both of the front or rear tires be
replaced at a time as a set.
See If you have a flat tireº in Part 4 for tire
change procedure.
When a tire is replaced, the wheel
should always be balanced.
An unbalanced wheel may affect vehicle
handling and tire life. Wheels can get out
of balance with regular use and should
therefore be balanced occasionally.
When replacing a tubeless tire, the air
valve should also be replaced with a
new one.
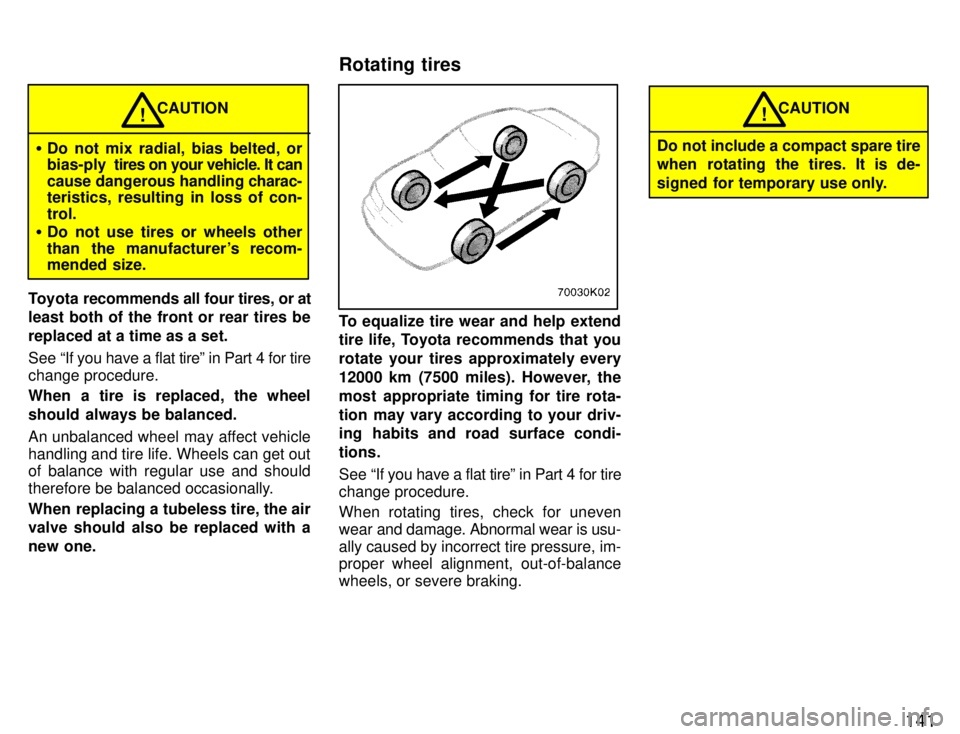
To equalize tire wear and help extend
tire life, Toyota recommends that you
rotate your tires approximately every
12000 km (7500 miles). However, the
most appropriate timing for tire rota-
tion may vary according to your driv-
ing habits and road surface condi- tions.
See If you have a flat tireº in Part 4 for tire
change procedure. When rotating tires, check for uneven
wear and damage. Abnormal wear is usu-
ally caused by incorrect tire pressure, im-
proper wheel alignment, out-of-balance
wheels, or severe braking.
CAUTION
Do not include a compact spare tire
when rotating the tires. It is de-
signed for temporary use only.!
Rotating tires
Page 145 of 165

142WHEN TO USE SNOW TIRES OR CHAINS
Snow tires or chains are recom-
mended when driving on snow or ice.
On wet or dry roads, conventional tires
provide better traction than snow tires. SNOW TIRE SELECTION
If you need snow tires, select the same
size, construction and load capacity
as the original tires on your Toyota.
Do not use tires other than those men-
tioned above. Do not install studded tires
without first checking local regulations for
possible restrictions.
SNOW TIRE INSTALLATION
Snow tires should be installed on all wheels. Installing snow tires on the front wheels
only can lead to an excessive difference
in road grip capability between the front
and rear tires which could cause loss of
vehicle control.
When storing removed tires, you should
store them in a cool dry place.
Mark the direction of rotation and be sure to install them in the same direction whenreplacing.
CAUTION
� Do not drive with the snow tires in- correctly inflated.
� Never drive over 120 km/h (75 mph)
with any type of snow tires.!
TIRE CHAIN SELECTION
Use tire chains of the correct size and type. Use SAE Class Sº type radial tire chains
except radial cable chains or V-bar type chains.
Regulations regarding the use of tire
chains vary according to location or
type of r oad, so always check them be-
fore installing chains.
CHAIN INSTALLATIONInstall the chains on the front tires as
tightly as possible. Do not use tire
chains on the rear tires. Retighten
chains after driving 0.5 '1.0 km
(1/4 '1/2 mile).
When installing chains on your tires, care- fully follow the instructions of the chain
manufacturer. If wheel covers are used, they will be
scratched by the chain band, so remove the covers before putting on the chains.
�
Do not exceed 50 km/h (30 mph) or
the chain manufacturer's recom-
mended speed limit, whichever is
lower.
� Drive carefully avoiding bumps,
holes, and sharp turns, which maycause the vehicle to bounce.
� Avoid sharp turns or locked-wheel
braking, as use of chains may ad- versely affect vehicle handling.
CAUTION!
Do not attempt to use a tire chain on
the compact spare tire, as it may
result in damage to the vehicle as well as the tire.
NOTICE
Installing snow tires and chains
Page 165 of 165

162This
information has been prepared in ac-
cordance with regulations issued by the
National Highway Traffic Safety Adminis-
tration of the U.S. Department of Trans-
portation. It provides the purchasers and/
or prospective purchasers of Toyota
vehicles with information on uniform tire
quality grading.
Your Toyota dealer will help answer any
questions you may have as you read this information.
DOT quality gradesÐAll passenger
vehicle tires must conform to Federal
Safety Requirements in addition to these grades. These quality grades are
molded on the sidewall.
Treadwear ÐThe treadwear grade is a
comparative rating based on the wear
rate of the tire when tested under con-
trolled conditions on a specified govern-
ment test course. For example, a tire
graded 150 would wear one and a half
(1-1/2) times as well on the governmentcourse as a tire graded 100. The relative
performance of tires depends upon the
actual conditions of their use, however,
and may depart significantly from the norm due to variations in driving habits,
service practices and differences in roadcharacteristics and climate. Traction A, B, C
ÐThe traction grades,
from highest to lowest, are A, B, and C,
and they represent the tire's ability to stop
on wet pavement as measured under
controlled conditions on specified govern-
ment test surfaces of asphalt and con-
crete. A tire marked C may have poor trac-
tion performance.
Warning: The traction grade assigned to this tire is based on braking (straight
ahead) traction tests and does not include
cornering (turning) traction.
Temperature A, B, C ÐThe temperature
grades are A (the highest), B, and C, rep-
resenting the tire's resistance to the gen-
eration of heat and its ability to dissipate heat when tested under controlled condi- tions on a specified indoor laboratory test
wheel. Sustained high temperature can
cause the material of the tire to degener- ate and reduce tire life, and excessive
temperature can lead to sudden tire fail-
ure. The grade C corresponds to a level of
performance which all passenger car tires
must meet under the Federal Motor Ve-
hicle Safety Standard No. 109. Grades B
and A represent higher levels of perfor-mance on the laboratory test wheel than
the minimum required by law. Warning: The temperature grade for this
tire is
established for a tire that is properly
inflated and not overloaded. Excessive speed, underinflation, or excessive load- ing, either separately or in combination, can cause heat buildup and possible tirefailure.
Uniform tire quality grading