Page 868 of 1399
EM1Q8−01
−
ENGINE MECHANICAL CYLINDER BLOCK
EM−83
1996 LAND CRUISER (RM451U)
DISASSEMBLY
1. REMOVE DRIVE PLATE
Uniformly loosen and remove the drive plate bolts, in several
passes, in the sequence shown.
2. INSTALL ENGINE TO ENGINE STAND FOR DIS-
ASSEMBLY
3. REMOVE CYLINDER HEAD (See page EM−28 )
4. REMOVE TIMING CHAIN AND GEARS (See page EM−13 )
5. REMOVE OIL FILTER (See page LU−2)
6. REMOVE OIL FILTER UNION
7. REMOVE KNOCK SENSORS
Using SST, remove the 2 knock sensors. SST 09816−30010
8. REMOVE PS PUMP
(a) Remove the 2 nuts and pump.
(b) Remove the O−ring from the pump.
Brought to you by BirfMark
Brought to you by BirfMark
Version 1.11 - 03/16/2010
Page 894 of 1399

−
ENGINE MECHANICAL CYLINDER BLOCK
EM−109
1996 LAND CRUISER (RM451U)
14. INSTALL LH ENGINE MOUNTING BRACKET
(a) Install the bracket with the 4 bolts.
Torque: 69 N·m (700 kgf·cm, 51 ft·lbf)
(b) Install the insulator with the nut. Torque: 72 N·m (730 kgf·cm, 43 ft·lbf)
15. INSTALL RH ENGINE MOUNTING BRACKET
(a) Install the bracket with the 4 bolts. Torque: 69 N·m (700 kgf·cm, 51 ft·lbf)
(b) Install the insulator with the nut. Torque: 72 N·m (730 kgf·cm, 43 ft·lbf)
16. INSTALL PS PUMP
(a) Place a new O−ring to the pump.
(b) Install the pump with the 2 nuts.
Torque: 36 N·m (370 kgf·cm, 27 ft·lbf)
17. INSTALL KNOCK SENSORS
Using SST, install the 2 knock sensors. SST 09816−30010
Torque: 44 N·m (450 kgf·cm, 33 ft·lbf)
18. INSTALL OIL FILTER UNION
Torque: 44 N·m (450 kgf·cm, 33 ft·lbf)
19. INSTALL OIL FILTER (See page LU−2)
20. INSTALL TIMING CHAIN (See page EM−19)
21. INSTALL CYLINDER HEAD (See page EM−54 )
22. REMOVE ENGINE STAND
23. INSTALL DRIVE PLATE
(a) Install the front spacer, drive plate and rear plate on the crankshaft.
(b) Install and uniformly tighten the 10 drive plate bolts, in several passes, in the sequence shown.
Torque: 100 N·m (1,000 kgf·cm, 74 ft·lbf)
Brought to you by BirfMark
Brought to you by BirfMark
Version 1.11 - 03/16/2010
Page 910 of 1399

LU0817
LU08N−03
EM1759
P22601
Oil Pressure Gauge
P08343
Adhesive
−
LUBRICATION OIL AND FILTER
LU−1
712
Author�: Date�:
1996 LAND CRUISER (RM451U)
OIL AND FILTER
INSPECTION
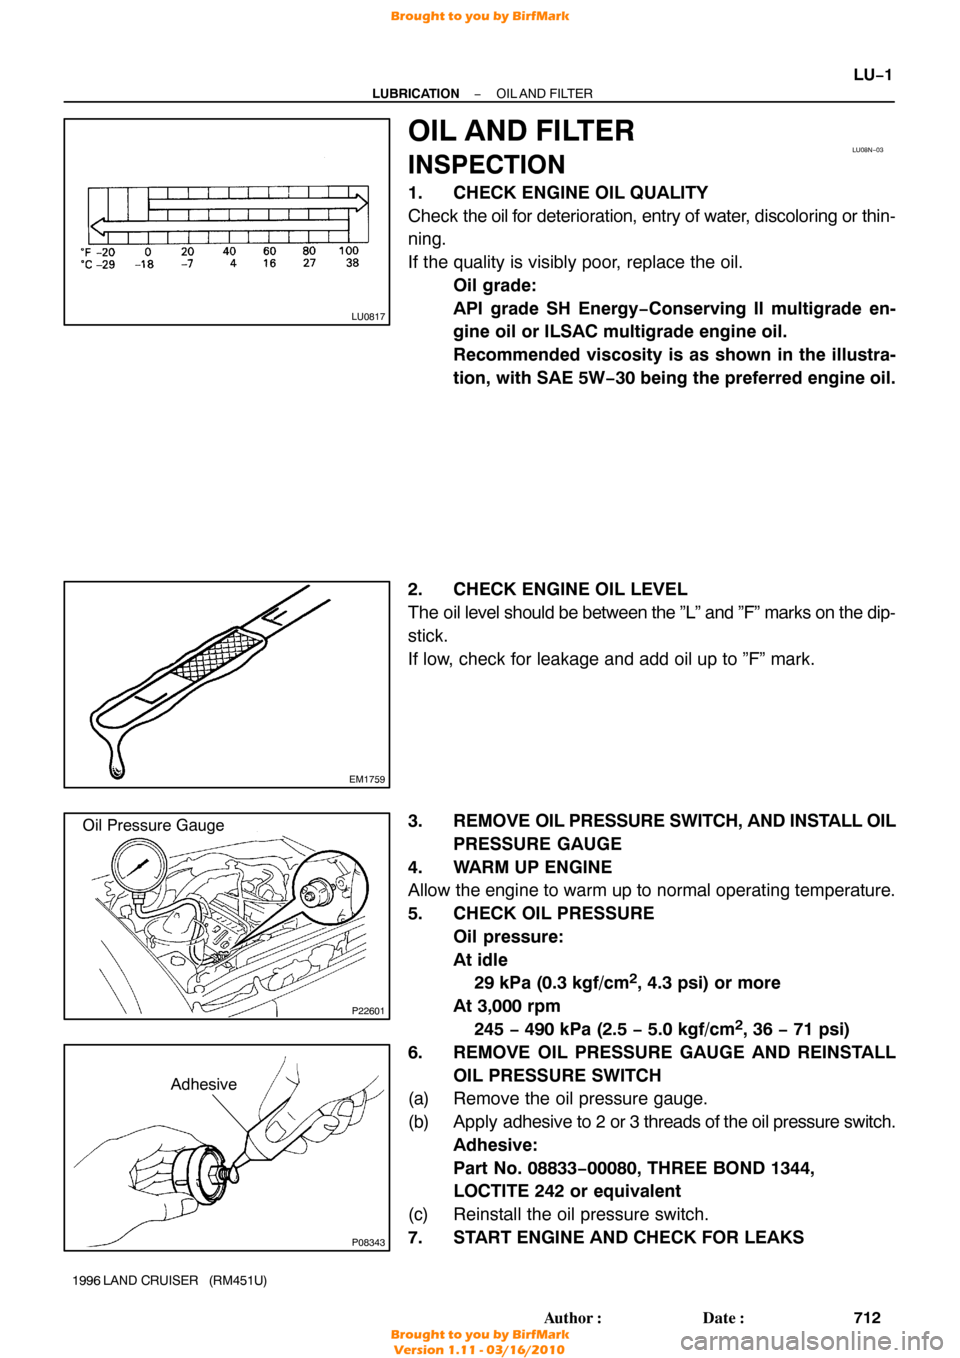
1. CHECK ENGINE OIL QUALITY
Check the oil for deterioration, entry of water, discoloring or thin-
ning.
If the quality is visibly poor, replace the oil.
Oil grade:
API grade SH Energy−Conserving II multigrade en-
gine oil or ILSAC multigrade engine oil.
Recommended viscosity is as shown in the illustra-
tion, with SAE 5W −30 being the preferred engine oil.
2. CHECK ENGINE OIL LEVEL
The oil level should be between the ”L” and ”F” marks on the di\
p-
stick.
If low, check for leakage and add oil up to ”F” mark.
3. REMOVE OIL PRESSURE SWITCH, AND INSTALL OIL
PRESSURE GAUGE
4. WARM UP ENGINE
Allow the engine to warm up to normal operating temperature.
5. CHECK OIL PRESSURE Oil pressure:
At idle
29 kPa (0.3 kgf/cm
2, 4.3 psi) or more
At 3,000 rpm
245 − 490 kPa (2.5 − 5.0 kgf/cm
2, 36 − 71 psi)
6. REMOVE OIL PRESSURE GAUGE AND REINSTALL OIL PRESSURE SWITCH
(a) Remove the oil pressure gauge.
(b) Apply adhesive to 2 or 3 threads of the oil pressure switch.
Adhesive:
Part No. 08833 −00080, THREE BOND 1344,
LOCTITE 242 or equivalent
(c) Reinstall the oil pressure switch.
7. START ENGINE AND CHECK FOR LEAKS
Brought to you by BirfMark
Brought to you by BirfMark
Version 1.11 - 03/16/2010
Page 911 of 1399

LU0KE−03
LU−2
−
LUBRICATION OIL AND FILTER
1996 LAND CRUISER (RM451U)
REPLACEMENT
CAUTION:
Prolonged and repeated contact with mineral oil will result
in the removal of natural fats from the skin, leading to dry-
ness, irritation and dermatitis. In addition, used engine oil
contains potentially harmful contaminants which may
cause skin cancer.Care should be taken, therefore, when
changing engine oil to minimize the frequency and length
of time your skin is exposed to used engine oil. Protective
clothing and gloves that cannot be penetrated by oil should
be worn. The skin should be thoroughly washed with soap
and water, or use water−less hand cleaner, to remove any
used engine oil. Do not used gasoline, thinners, or sol-
vents.In order to preserve the environment, used oil and
used oil filters must be disposed of only at designated dis-
posal sites.
1. DRAIN ENGINE OIL
(a) Remove the oil filler cap.
(b) Remove the oil drain plug, and drain the oil into a contain-
er.
2. REPLACE OIL FILTER
(a) Using SST, remove the oil filter. SST 09228−44011
(b) Check and clean the oil filter installation surface.
(c) Apply clean engine oil to the gasket of a new oil filter.
(d) Lightly screw the oil filter into place, and tighten it until the
gasket contacts the seat.
(e) Using SST, tighten it an additional 3/4 turn. SST 09228−44011
3. FILL WITH ENGINE OIL
(a) Clean and install the oil drain plug with a new gasket.
Torque: 25 N·m (250 kgf·cm, 18 ft·lbf)
(b) Fill with new engine oil. Oil grade:
See step 1 in oil pressure check
Capacity:
Drain and refill
w/ Oil filter change
7.2 liters (7.5 US qts, 6.3 lmp. qts)
w/o Oil filter change
6.9 liters (7.3 US qts, 6.1 lmp. qts)
Dry fill
8.0 liters (8.5 US qts, 7.0 lmp. qts)
(c) Reinstall the oil filler cap.
4. START ENGINE AND CHECK FOR LEAKS
5. RECHECK ENGINE OIL LEVEL
Brought to you by BirfMark
Brought to you by BirfMark
Version 1.11 - 03/16/2010
Page 937 of 1399

MA04U−01
P04771
−
MAINTENANCE ENGINE
MA−5
45
Author�: Date�:
1996 LAND CRUISER (RM451U)
ENGINE
INSPECTION
HINT:
Inspect these items when the engine is cold.
1. INSPECT DRIVE BELT (See page CH−2)
2. INSPECT AIR FILTER
(a) Visually check that the air cleaner element is not exces- sively dirty, damaged or oily.
If necessary, replace the air cleaner element.
(b) Clean the element with compressed air. First blow from the inside thoroughly, then blow off the
outside of the element.
3. REPLACE AIR FILTER
Replace the air cleaner element with a new one.
4. REPLACE SPARK PLUGS (See page IG−1 )
5. REPLACE ENGINE OIL AND OIL FILTER (See page LU−2)
6. REPLACE ENGINE COOLANT (See page CO−2)
7. INSPECT CHARCOAL CANISTER (See page EC−6 )
8. REPLACE GASKET IN FUEL TANK CAP (See page
EC−6)
9. INSPECT FUEL LINES AND CONNECTIONS (See page EC−6)
10. INSPECT EXHAUST PIPES AND MOUNTINGS
Visually inspect the p ipes, hangers and connections for severe
corrosion, leaks or damage.
11. ADJUST VALVE CLEARANCE (See page EM−4)
Brought to you by BirfMark
Brought to you by BirfMark
Version 1.11 - 03/16/2010
Page 957 of 1399
PP30D−04
PP−16
−
PREPARATION LUBRICATION
65
Author�: Date�:
1996 LAND CRUISER (RM451U)
LUBRICATION
SST (Special Service Tools)
09032−00100Oil Pan Seal Cutter
09228−44011Oil Filter Wrench
Brought to you by BirfMark
Brought to you by BirfMark
Version 1.11 - 03/16/2010
Page 960 of 1399
PP30G−03
−
PREPARATION LUBRICATION
PP−19
1996 LAND CRUISER (RM451U)
LUBRICANT
ItemCapacityClassification
Engine oil
Dry fill
Drain and refill w/ Oil filter change
w/o Oil filter change
8.0 liters (8.5 US qts, 7.0 Imp. qts)
7.4 liters (7.8 US qts, 6.5 Imp. qts)6.9 liters (7.3 US qts, 6.1 Imp qts)
API grade SH, Energy −Conserving II multigrade
engine oil or ILSAC multigrade engine oil and
recommended viscosity oil, with SAE 5W −30 be-
ing preferred engine oil
Brought to you by BirfMark
Brought to you by BirfMark
Version 1.11 - 03/16/2010
Page 1196 of 1399

SF1EH−02
−
SFI FUEL PUMP
SF−11
1996 LAND CRUISER (RM451U)
REMOVAL
CAUTION:
Do not smoke or work near an open flame when working on
the fuel pump.
1. REMOVE SECOND SEATS
Torque: 39 N·m (400 kgf·cm, 29 ft·lbf)
2. REMOVE SCUFF PLATE
3. REMOVE SIDE GARNISH
4. REMOVE STEP PLATE
5. DISCONNECT FLOOR MATS
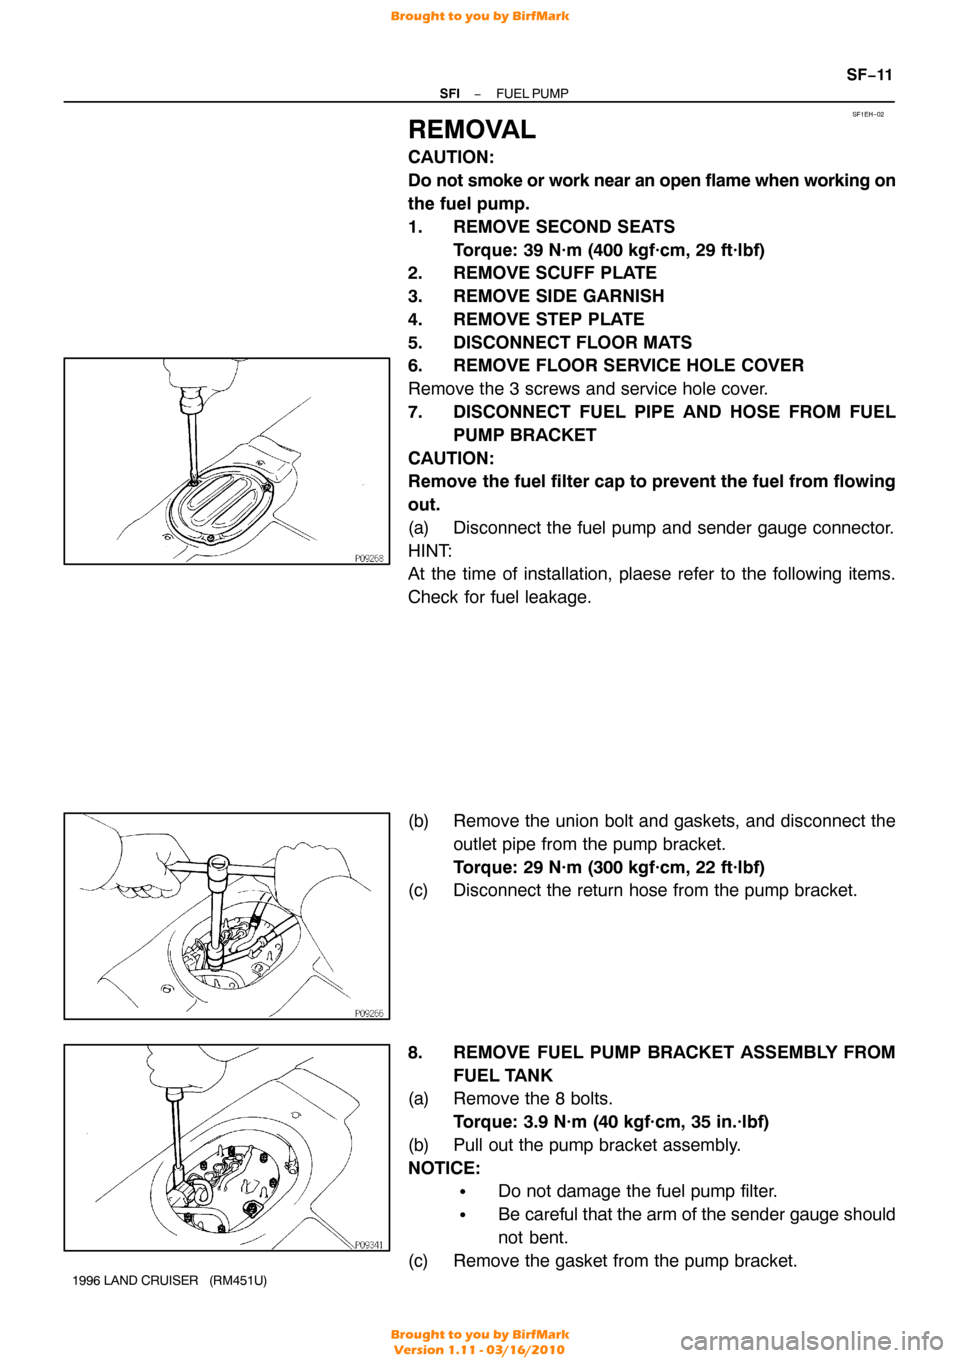
6. REMOVE FLOOR SERVICE HOLE COVER
Remove the 3 screws and service hole cover.
7. DISCONNECT FUEL PIPE AND HOSE FROM FUEL
PUMP BRACKET
CAUTION:
Remove the fuel filter cap to prevent the fuel from flowing
out.
(a) Disconnect the fuel pump and sender gauge connector.
HINT:
At the time of installation, plaese refer to the following items.
Check for fuel leakage.
(b) Remove the union bolt and gaskets, and disconnect the outlet pipe from the pump bracket.
Torque: 29 N·m (300 kgf·cm, 22 ft·lbf)
(c) Disconnect the return hose from the pump bracket.
8. REMOVE FUEL PUMP BRACKET ASSEMBLY FROM
FUEL TANK
(a) Remove the 8 bolts.
Torque: 3.9 N·m (40 kgf·cm, 35 in.·lbf)
(b) Pull out the pump bracket assembly.
NOTICE:
�Do not damage the fuel pump filter.
�Be careful that the arm of the sender gauge should
not bent.
(c) Remove the gasket from the pump bracket.
Brought to you by BirfMark
Brought to you by BirfMark
Version 1.11 - 03/16/2010