Page 277 of 1399
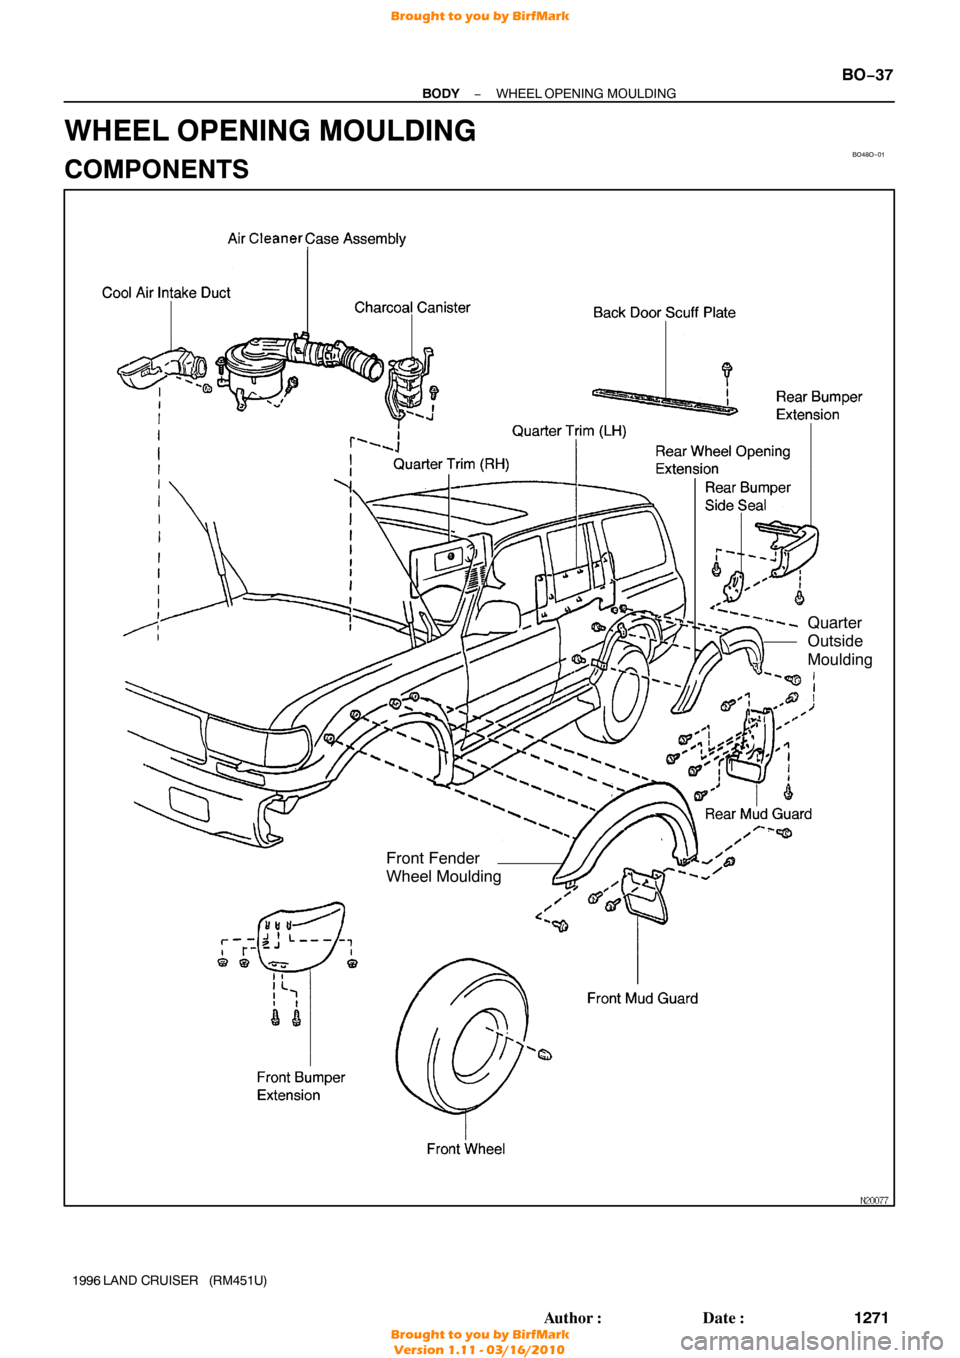
BO48O−01
Front Fender
Wheel Moulding
Quarter
Outside
Moulding
−
BODY WHEEL OPENING MOULDING
BO−37
1271
Author�: Date�:
1996 LAND CRUISER (RM451U)
WHEEL OPENING MOULDING
COMPONENTS
Brought to you by BirfMark
Brought to you by BirfMark
Version 1.11 - 03/16/2010
Page 278 of 1399
BO48P−01
N14081
N14075
BO−38
−
BODY WHEEL OPENING MOULDING
1996 LAND CRUISER (RM451U)
REMOVAL
1. REMOVE FRONT FENDER WHEEL OPENING MOULDING
(a) Remove the charcoal canister.
(b) Remove the air cleaner case assembly.
(c) Remove the cool air intake duct.
(d) Remove the front wheel.
(e) Remove the front mudguard.
(f) Remove the front bumper extension.
(g) Remove the 4 nuts from engine room inside service hole.
(h) Remove the 2 screws.
(i) Remove the front wheel opening extension.
2. REAR DOOR SIDE: REMOVE REAR WHEEL OPENING MOULDING
Remove the 2 bolts and moulding.
3. REMOVE REAR WHEEL OPENING MOULDING
(a) Remove the mud guard, bumper extention and back door
scuff plate.
Brought to you by BirfMark
Brought to you by BirfMark
Version 1.11 - 03/16/2010
Page 279 of 1399
N14076
N14077
N14078
N14079
N14440
−
BODY WHEEL OPENING MOULDING
BO−39
1996 LAND CRUISER (RM451U)
(b) Remove the quarter trim RH.
(c) Remove the quarter trim LH.
4. REMOVE QUARTER OUTSIDE MOULDING
(a) Remove the 2 nuts.
(b) Remove the screw.
(c) Using a screwdriver, pry out the rearwheel moulding.
Brought to you by BirfMark
Brought to you by BirfMark
Version 1.11 - 03/16/2010
Page 280 of 1399
BO48Q−01
N14082
BO−40
−
BODY WHEEL OPENING MOULDING
1996 LAND CRUISER (RM451U)
INSTALLATION
1. INSTALL FRONT WHEEL OPENING MOULDING
(a) Install the front wheel opening moulding.
(b) Install the 4 nuts from the service hole of the engine room
inside.
(c) Install the 2 screws.
(d) Front bumper extension
(e) Front mudguard
(f) Front wheel
(g) Cool air intake duct
(h) Air cleaner case assembly
(i) Charcoal canister
2. INSTALL QUARTER OUTSIDE MOULDING
Install the quarter outside moulding with the 2 bolts.
3. INSTALL REAR WHEEL OPENING MOULDING
(a) Install the rear wheel opening moulding with the 2 nuts.
(b) Install the screw.
(c) Install the quarter trim LH.
(d) Install the quarter trim RH.
(e) Install the back door scuff plate.
(f) Install the rear bumper extension.
(g) Install the rear mudguard.
Brought to you by BirfMark
Brought to you by BirfMark
Version 1.11 - 03/16/2010
Page 316 of 1399
BO398−01
BO−76
−
BODY INSTRUMENT PANEL
1996 LAND CRUISER (RM451U)
REMOVAL
1. REMOVE STEERING WHEEL (See page SR−11)
2. REMOVE COLUMN COVER
3. REMOVE HOOD LOCK RELEASE LEVER
4. REMOVE FUEL LID RELEASE LEVER
5. REMOVE FUSE BOX OPENING COVER
6. REMOVE LOWER FINISH PANEL
7. REMOVE LOWER INSTRUMENT PANEL
8. REMOVE NO. 2 HEATER TO REGISTER DUCT
9. LOOSEN DLC 3 AND FUSE BLOCK
10. REMOVE NO. 2 CENTER CLUSTER FINISH PANEL
11. REMOVE STEERING COLUMN (See page SR−11)
12. REMOVE CLUSTER FINISH PANEL
13. REMOVE COMBINATION METER
14. REMOVE CENTER CLUSTER FINISH PANEL WITH CLOCK
Brought to you by BirfMark
Brought to you by BirfMark
Version 1.11 - 03/16/2010
Page 337 of 1399

BRAKE FLUID
BLEEDING
HINT:
If any work is done on the brake system or if air is suspected in
the")
BR1CE−01
R13494
R00252
BR−4
−
BRAKE BRAKE FLUID
986
Author�: Date�:
1996 LAND CRUISER (RM451U)
BRAKE FLUID
BLEEDING
HINT:
If any work is done on the brake system or if air is suspected in
the brake lines, bleed the system of air.
NOTICE:
Do not let brake fluid remain on a painted surface. Wash it
off immediately.
1. FILL BRAKE RESERVOIR WITH BRAKE FLUID
Check the fluid level in the reservoir after bleeding each wheel.
Add fluid, if necessary. Fluid: SAE J1703 or FMVSS No.116 DOT3
2. BLEED MASTER CYLINDER
HINT:
If the master cylinder has been disassembled or if the reservoir
becomes empty, bleed the air from the master cylinder.
(a) Disconnect the brake lines from the master cylinder.
(b) Slowly depress the brake pedal and hold it.
(c) Block off the outlet plugs with your fingers, and release the brake pedal.
(d) Repeat (b) and (c) 3 or 4 times.
3. CONNECT VINYL TUBE TO BRA KE CALIPER BLEED-
ER PLUG
Insert other end of the tube in a half −full container of brake fluid.
NOTICE:
Begin bleeding air from the brake caliper with the longest
hydraulic line.
4. BLEED BRAKE LINE
(a) Slowly depress the brake pedal several times.
Brought to you by BirfMark
Brought to you by BirfMark
Version 1.11 - 03/16/2010
Page 338 of 1399
−
BRAKE BRAKE FLUID
BR−5
987
Author�: Date�:
1996 LAND CRUISER (RM451U)
(b) While an assistant depresses the pedal, loosen the
bleeder plug until fluid starts to run out. Then tighten the
bleeder plug.
(c) Repeat this procedure until there are no more air bubbles
in the fluid.
Bleeder plug tightening torque:
11 N·m (110 kgf·cm, 8 ft·lbf)
5. REPEAT PROCEDURE FOR EACH WHEEL
6. BLEED LSP & BV
Brought to you by BirfMark
Brought to you by BirfMark
Version 1.11 - 03/16/2010
Page 355 of 1399

REPLACEMENT
1. REMOVE FRONT WHEEL
2. INSPECT PAD LINING THICKNESS
Check the pad thickness and replace pads if not within the
s")
BR1CS−04
BR−22
−
BRAKE FRONT BRAKE PAD
1996 LAND CRUISER (RM451U)
REPLACEMENT
1. REMOVE FRONT WHEEL
2. INSPECT PAD LINING THICKNESS
Check the pad thickness and replace pads if not within the
specification. Minimum thickness: 1.0 mm (0.039 in.)
3. REMOVE THESE PARTS:
�Clip
�2 pins
�Anti−rattle spring
�2 pads
�4 anti−squeal shims
NOTICE:
The anti −rattle spring and clip can be used again provided
that they have sufficient rebound, no deformation, cracks
or wear, and have had all rust, dirt and foreign particles
cleaned off.
4. CHECK DISC THICKNESS AND RUNOUT (See page
BR−27 )
5. INSTALL NEW PADS
NOTICE:
When replacing worn pads, the anti −squeal shims must be
replaced together with the pads.
(a) Draw out a small amount of brake fluid from the reservoir.
(b) Press in the pistons with a hammer handle or an equiva- lent.
HINT:
�Always change the pad on one wheel at a time as there
is a possibility of the opposite piston flying out.
�If the piston is difficult to push in, loosen the bleeder plug
and push in the piston while letting some brake fluid es-
cape.
(c) Install the 2 anti−squeal shims to new pads.
Brought to you by BirfMark
Brought to you by BirfMark
Version 1.11 - 03/16/2010

REMOVAL
1. REMOVE FRONT FENDER WHEEL OPENING MOULDING
(a) Remove the charcoal canister.
(b) Remove the air")

(b) Remove the quarter trim RH.
(c) Remove the quarter trim LH.
4. REMOVE QUARTER OUTSIDE MOULDI")

INSTALLATION
1. INSTALL FRONT WHEEL OPENING MOULDING
(a) Install the front wheel opening moulding.
(b) Install t")

REMOVAL
1. REMOVE STEERING WHEEL (See page SR−11)
2. REMOVE COLUMN COVER
3. REMOVE HOOD LOCK RELEASE LEVER
4. REMOVE FUEL L")
