Page 813 of 1399

REMOVAL
1. DRAIN ENGINE COOLANT
2. REMOVE BATTERY AND BATTERY TRAY
(a) Disconnect the battery cables.
(b) Remove the")
EM1E3−01
EM−28
−
ENGINE MECHANICAL CYLINDER HEAD
1996 LAND CRUISER (RM451U)
REMOVAL
1. DRAIN ENGINE COOLANT
2. REMOVE BATTERY AND BATTERY TRAY
(a) Disconnect the battery cables.
(b) Remove the nuts, hold −down clamp and battery.
(c) Remove the bolt and disconnect the ground strap.
(d) Remove the 5 bolts and battery tray.
3. REMOVE AIR CLEANER HOSE AND CAP
4. DISCONNECT CRUISE CONTROL ACTUATOR CABLE FROM THROTTLE BODY
5. DISCONNECT ACCELERATOR CABLE FROM
THROTTLE BODY
6. DISCONNECT THROTTLE CABLE FROM THROTTLE BODY
7. DISCONNECT ENGINE GROUND STRAPS
(a) Disconnect the ground strap from the No. 1 engine hang-
er.
(b) Disconnect the ground strap from the air intake chamber.
8. DISCONNECT CONNECTOR ON INTAKE MANIFOLD FROM LH FENDER APRON
9. DISCONNECT BRAKE BOOSTER VACUUM HOSE
10. DISCONNECT EVAP HOSE
11. DISCONNECT FUEL RETURN HOSE
12. DISCONNECT HEATER HOSES
13. DISCONNECT ENGINE WIRE AND HEATER VALVE FROM COWL PANEL
(a) Remove the 2 bolts and disconnect the engine wire and
ground strap.
(b) Remove the 2 bolts and disconnect the heater valve.
14. REMOVE NO. 2 AND NO. 3 CYLINDER HEAD COVERS
Remove the 4 bolts and head covers.
15. REMOVE DISTRIBUTOR (See page IG−10 )
Brought to you by BirfMark
Brought to you by BirfMark
Version 1.11 - 03/16/2010
Page 849 of 1399
EM−64
−
ENGINE MECHANICAL CYLINDER HEAD
1996 LAND CRUISER (RM451U)
39. INSTALL AIR CLEANER HOSE AND CAP
40. INSTALL BATTERY TRAY AND BATTERY
(a) Install the battery tray with the 5 bolts.
(b) Connect the ground strap with the bolt.
(c) Install the battery and hold−down clamp with the nuts.
(d) Connect the battery cables.
41. FILL RADIATOR WITH ENGINE COOLANT
42. START ENGINE AND CHECK FOR LEAKS
43. ADJUST IGNITION TIMING (See page EM−10)
44. PERFORM ROAD TEST
Check for abnormal noise, shock, slippage, correct shift points
and smooth operation.
45. RECHECK ENGINE COOLANT LEVEL
Brought to you by BirfMark
Brought to you by BirfMark
Version 1.11 - 03/16/2010
Page 854 of 1399
EM1ED−02
−
ENGINE MECHANICAL ENGINE UNIT
EM−69
1996 LAND CRUISER (RM451U)
REMOVAL
1. DRAIN ENGINE COOLANT
2. DRAIN ENGINE OIL
3. REMOVE HOOD
4. REMOVE BATTERY AND BATTERY TRAY
(a) Disconnect the battery cables.
(b) Remove the nuts, hold−down clamp and battery.
(c) Remove the bolt and disconnect the ground strap.
(d) Remove the 5 bolts and battery tray.
5. REMOVE RADIATOR GRILLE
Remove the 5 screws, clip and radiator grille.
6. REMOVE RADIATOR (See page CO−14 )
7. DISCONNECT OIL COOLER HOSE FROM OIL COOL- ER PIPE
8. REMOVE AIR CLEANER HOSE AND CAP
9. REMOVE AIR CLEANER CASE
10. DISCONNECT CRUISE CONTROL ACTUATOR CABLE FROM THROTTLE BODY
11. DISCONNECT ACCELERATOR CABLE FROM THROTTLE BODY
12. DISCONNECT HEATER HOSES
Brought to you by BirfMark
Brought to you by BirfMark
Version 1.11 - 03/16/2010
Page 866 of 1399

26. CONNECT EVAP HOSE
27. CONNECT BRAKE BOOSTER VACUUM HOSE
28. CONNECT HEATER VALVE AND ENGINE WIRE TO
COWL PANEL
(a) Connect th")
−
ENGINE MECHANICAL ENGINE UNIT
EM−81
1996 LAND CRUISER (RM451U)
26. CONNECT EVAP HOSE
27. CONNECT BRAKE BOOSTER VACUUM HOSE
28. CONNECT HEATER VALVE AND ENGINE WIRE TO
COWL PANEL
(a) Connect the heater valve with the 2 bolts.
(b) Connect the engine wire and ground strap with the 2 bolts.
29. CONNECT HEATER HOSES
30. CONNECT ACCELERATOR CABLE TO THROTTLE BODY
31. CONNECT CRUISE CONTROL ACTUATOR CABLE TO
THROTTLE BODY
32. INSTALL AIR CLEANER CASE
33. INSTALL AIR CLEANER HOSE AND CAP
34. CONNECT OIL COOLER HOSE TO OIL COOLER PIPE
35. INSTALL RADIATOR (See page CO−16)
36. INSTALL RADIATOR GRILLE
Install the radiator grille with the 5 screws and clip.
37. INSTALL BATTERY TRAY AND BATTERY
(a) Install the battery tray with the 5 bolts.
(b) Connect the ground strap with the bolt.
(c) Install the battery and hold−down clamp with the nuts.
(d) Connect the battery cables.
38. FILL WITH ENGINE OIL
39. FILL RADIATOR WITH ENGINE COOLANT
40. START ENGINE AND CHECK FOR LEAKS
41. CHECK AUTOMATIC TRANSMISSION FLUID LEVEL
42. CHECK IGNITION TIMING (See page EM−10)
43. INSTALL HOOD
44. PERFORM ROAD TEST
Check for abnormal noise, shock, slippage, correct shift points
and smooth operation.
45. RECHECK ENGINE COOLANT AND ENGINE OIL LEV-
ELS
Brought to you by BirfMark
Brought to you by BirfMark
Version 1.11 - 03/16/2010
Page 897 of 1399
P22687
P08512
IG−2
−
IGNITION IGNITION SYSTEM
736
Author�: Date�:
1996 LAND CRUISER (RM451U)
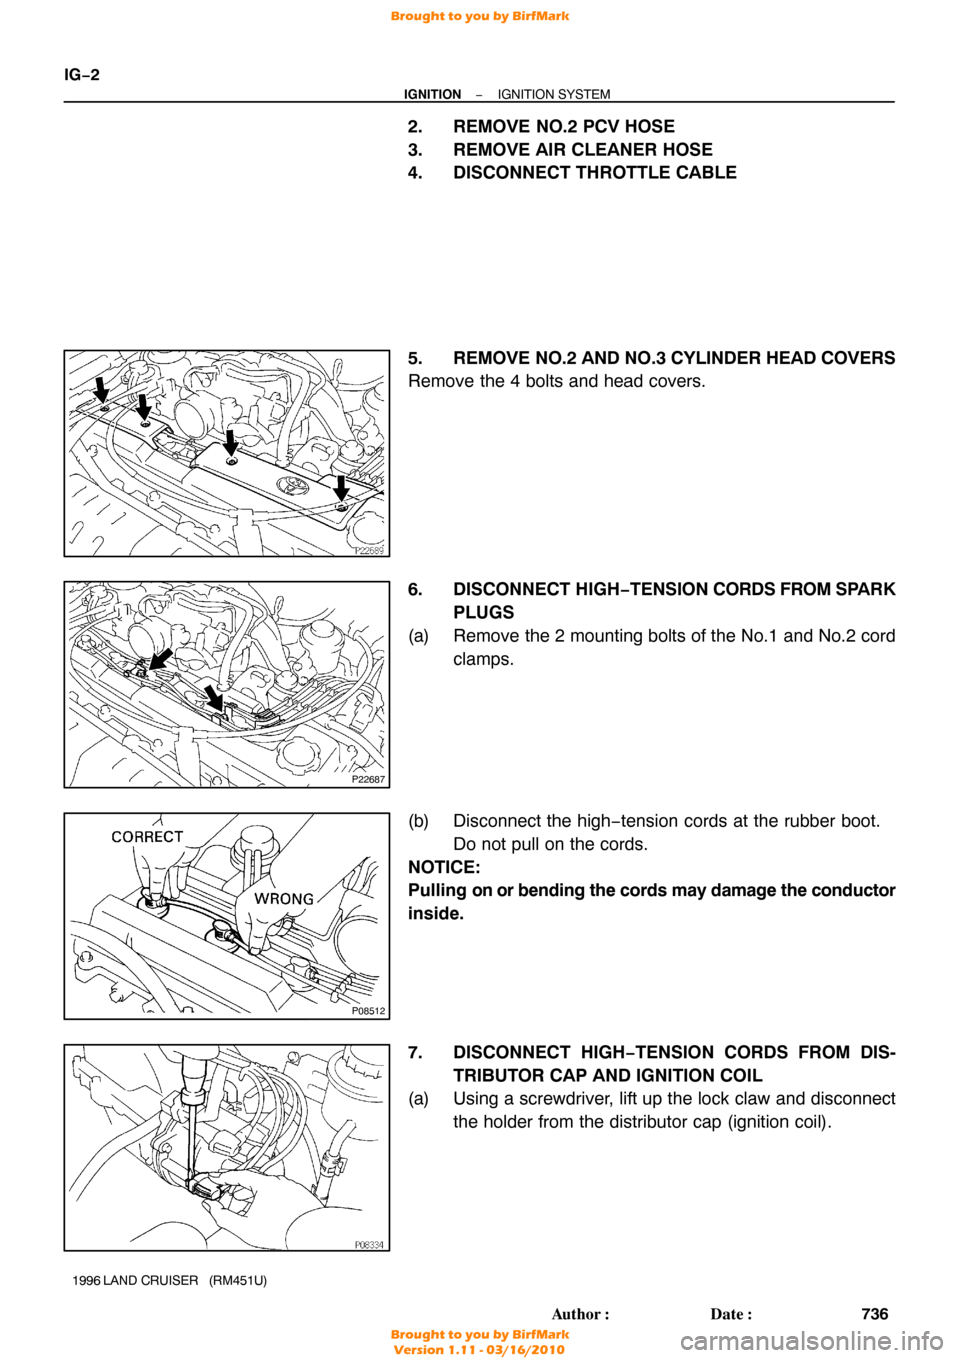
2. REMOVE NO.2 PCV HOSE
3. REMOVE AIR CLEANER HOSE
4. DISCONNECT THROTTLE CABLE
5. REMOVE NO.2 AND NO.3 CYLINDER HEAD COVERS
Remove the 4 bolts and head covers.
6. DISCONNECT HIGH −TENSION CORDS FROM SPARK
PLUGS
(a) Remove the 2 mounting bolts of the No.1 and No.2 cord clamps.
(b) Disconnect the high −tension cords at the rubber boot.
Do not pull on the cords.
NOTICE:
Pulling on or bending the cords may damage the conductor
inside.
7. DISCONNECT HIGH−TENSION CORDS FROM DIS- TRIBUTOR CAP AND IGNITION COIL
(a) Using a screwdriver, lift up the lock claw and disconnect
the holder from the distributor cap (ignition coil).
Brought to you by BirfMark
Brought to you by BirfMark
Version 1.11 - 03/16/2010
Page 900 of 1399
IG0152
P03783
−
IGNITION IGNITION SYSTEM
IG−5
739
Author�: Date�:
1996 LAND CRUISER (RM451U)
(b) Install the No.1 and No.2 cord clamps with the 2 bolts.
11. INSTALL NO.2 AND NO.3 CYLINDER HEAD COVERS
Install the head covers with the 4 bolts.
12. CONNECT THROTTLE CABLE
13. INSTALL AIR CLEANER HOSE
Install the air cleaner hose with the 2 clamp bolts.
14. INSTALL NO.2 PCV HOSE
15. DISCONNECT HIGH −TENSION CORDS FROM SPARK
PLUGS
16. REMOVE SPARK PLUGS
Using a 16 mm plug wrench, remove the spark plug.
17. CLEAN SPARK PLUGS
Using a spark plug cleaner or wire brush, clean the spark plug.
18. VISUALLY INSPECT SPARK PLUGS
Check the spark plug for electrode wear, threads damage and
insulator damage.
If abnormal, replace the plugs. Recommended spark plugs:
ND: K16R −U
NGK: BKR5EYA
Brought to you by BirfMark
Brought to you by BirfMark
Version 1.11 - 03/16/2010
Page 925 of 1399
LU0KK−02
LU−16
−
LUBRICATION OIL COOLER
1996 LAND CRUISER (RM451U)
REMOVAL
1. DRAIN ENGINE COOLANT
2. REMOVE AIR CLEANER CAP AND HOSE
3. REMOVE FRONT EXHAUST PIPE
(a) Disconnect the heated oxygen sensor connector.
(b) Remove the 2 nuts and 2 bolts holding the front exhaust pipe to the rear TWC.
(c) Disconnect the front exhaust pipe, and remove the gas- ket.
(d) Loosen the clamp bolt and disconnect the clamp from the
No.1 support bracket.
(e) Remove the 2 bolts and No.1 support bracket.
(f) Remove the 4 nuts, front exhaust pipe and 2 gaskets.
4. REMOVE NO.1 EXHAUST MANIFOLD
(a) Remove the 3 bolts and No.1 heat insulator.
(b) Remove the 6 nuts, exhaust manifold and gasket.
Brought to you by BirfMark
Brought to you by BirfMark
Version 1.11 - 03/16/2010
Page 928 of 1399

INSTALLATION
1. INSTALL RELIEF VALVE
Install the relief valve, spring and a new gasket with the plug.
Torque:")
LU08Z−04
P08343
Adhesive
−
LUBRICATION OIL COOLER
LU−19
1996 LAND CRUISER (RM451U)
INSTALLATION
1. INSTALL RELIEF VALVE
Install the relief valve, spring and a new gasket with the plug.
Torque: 37 N·m (375 kgf·cm, 27 ft·lbf)
2. ASSEMBLE OIL COOLER AND OIL COOLER COVER
Install 2 new gaskets and the oil cooler to the oil cooler cover
with the 4 nuts. Torque: 17 N·m (170 kgf·cm, 12 ft·lbf)
3. INSTALL OIL COOLER AND OIL COOLER COVER ASSEMBLY
Install a new gasket, the oil cooler and oil cooler cover assembly
with the 10 bolts and 2 nuts. Torque: 21 N·m (210 kgf·cm, 15 ft·lbf)
4. INSTALL OIL PRESSURE SWITCH
(a) Apply adhesive to 2 or 3 threads of the oil pressure switch.
Adhesive:
Part No. 08833 −00080, THREE BOND 1344,
LOCTITE 242 or equivalent
(b) Install the oil pressure switch.
5. INSTALL NO.1 EXHAUST MANIFOLD
(a) Install a new gasket and the exhaust manifold with the 6 nuts.
Torque: 39 N·m (400 kgf·cm, 29 ft·lbf)
(b) Install the heat insulator with the 3 bolts. Torque: 19 N·m (195 kgf·cm, 14 ft·lbf)
6. INSTALL FRONT EXHAUST PIPE
(a) Install 2 new gaskets and the front exhaust pipe with the 4 nuts.
Torque: 63 N·m (630 kgf·cm, 46 ft·lbf)
(b) Install the No.1 support bracket with the 2 bolts. Torque: 24 N·m (240 kgf·cm, 17 ft·lbf)
(c) Connect the clamp and tighten the clamp bolt. Torque: 19.5 N·m (195 kgf·cm, 14 ft·lbf)
(d) Connect the front exhaust pipe to the rear TWC with a new gasket, 2 bolts and 2 nuts.
Torque: 46 N·m (470 kgf·cm, 34 ft·lbf)
7. INSTALL AIR CLEANER CAP AND HOSE
8. FILL RADIATOR WITH ENGINE COOLANT
9. START ENGINE AND CHECK FOR LEAKS
10. CHECK ENGINE OIL
Brought to you by BirfMark
Brought to you by BirfMark
Version 1.11 - 03/16/2010

39. INSTALL AIR CLEANER HOSE AND CAP
40. INSTALL BATTERY TRAY AND BATTERY
(a) Install the battery tray with the 5 bolts.
(b) C")

REMOVAL
1. DRAIN ENGINE COOLANT
2. DRAIN ENGINE OIL
3. REMOVE HOOD
4. REMOVE BATTERY AND BATTERY TRAY
(a) Disconnect t")


REMOVAL
1. DRAIN ENGINE COOLANT
2. REMOVE AIR CLEANER CAP AND HOSE
3. REMOVE FRONT EXHAUST PIPE
(a) Disconnect the heated oxy")