Page 1295 of 1399
SR−42
−
STEERING POWER STEERING GEAR
1996 LAND CRUISER (RM451U)
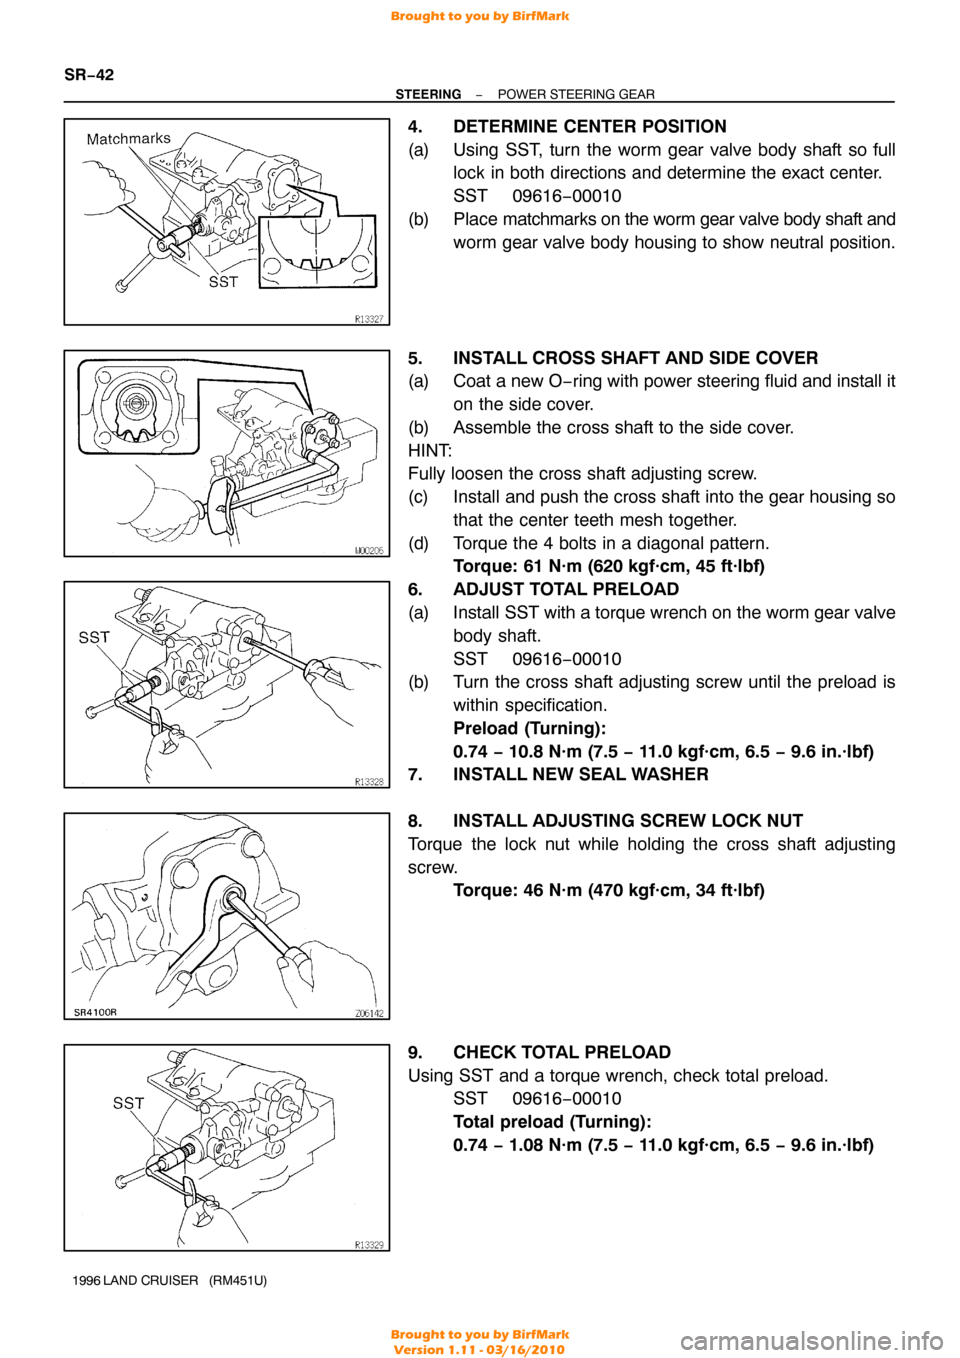
4. DETERMINE CENTER POSITION
(a) Using SST, turn the worm gear valve body shaft so full
lock in both directions and determine the exact center.
SST 09616−00010
(b) Place matchmarks on the worm gear valve body shaft and
worm gear valve body housing to show neutral position.
5. INSTALL CROSS SHAFT AND SIDE COVER
(a) Coat a new O −ring with power steering fluid and install it
on the side cover.
(b) Assemble the cross shaft to the side cover.
HINT:
Fully loosen the cross shaft adjusting screw.
(c) Install and push the cross shaft into the gear housing so that the center teeth mesh together.
(d) Torque the 4 bolts in a diagonal pattern. Torque: 61 N·m (620 kgf·cm, 45 ft·lbf)
6. ADJUST TOTAL PRELOAD
(a) Install SST with a torque wrench on the worm gear valve body shaft.
SST 09616−00010
(b) Turn the cross shaft adjusting screw until the preload is
within specification.
Preload (Turning):
0.74 − 10.8 N·m (7.5 − 11.0 kgf·cm, 6.5 − 9.6 in.·lbf)
7. INSTALL NEW SEAL WASHER
8. INSTALL ADJUSTING SCREW LOCK NUT
Torque the lock nut while holding the cross shaft adjusting
screw. Torque: 46 N·m (470 kgf·cm, 34 ft·lbf)
9. CHECK TOTAL PRELOAD
Using SST and a torque wrench, check total preload. SST 09616−00010
Total preload (Turning):
0.74 − 1.08 N·m (7.5 − 11.0 kgf·cm, 6.5 − 9.6 in.·lbf)
Brought to you by BirfMark
Brought to you by BirfMark
Version 1.11 - 03/16/2010
Page 1296 of 1399
SR16Q−01
SR2922
Alignment Marks
−
STEERING POWER STEERING GEAR
SR−43
1996 LAND CRUISER (RM451U)
INSTALLATION
1. INSTALL PS GEAR ASSEMBLY
Torque the 4 installation bolts and nuts.
Torque: 142 N·m (1,450 kgf·cm, 105 ft·lbf)
2. CONNECT SLIDING YOKE SUB−ASSEMBLY (See page SR−19 )
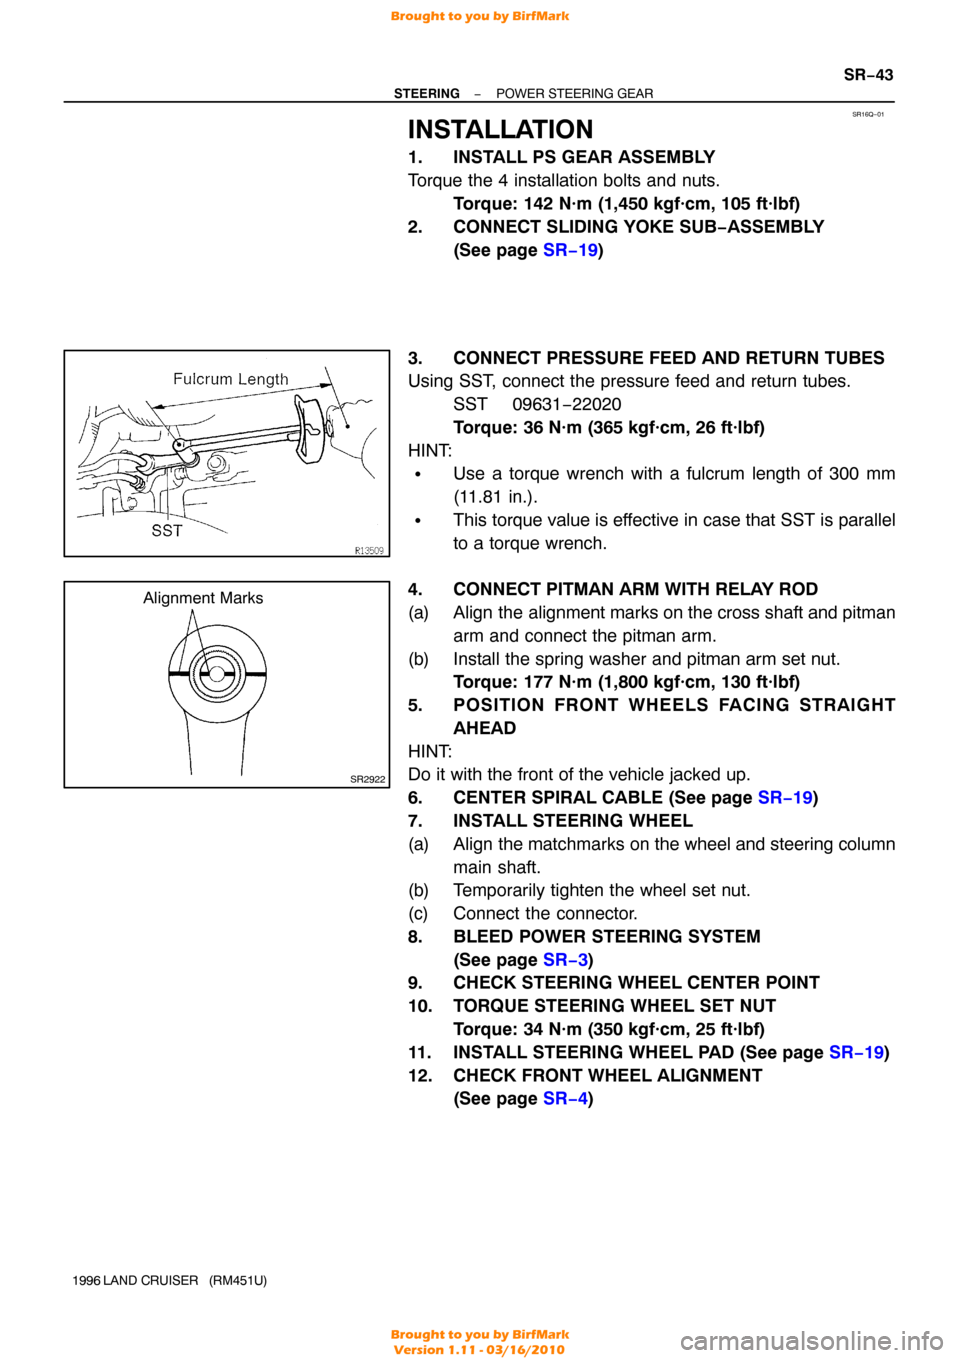
3. CONNECT PRESSURE FEED AND RETURN TUBES
Using SST, connect the pressure feed and return tubes. SST 09631−22020
Torque: 36 N·m (365 kgf·cm, 26 ft·lbf)
HINT:
�Use a torque wrench with a fulcrum length of 300 mm
(11.81 in.).
�This torque value is effective in case that SST is parallel
to a torque wrench.
4. CONNECT PITMAN ARM WITH RELAY ROD
(a) Align the alignment marks on the cross shaft and pitman arm and connect the pitman arm.
(b) Install the spring washer and pitman arm set nut. Torque: 177 N·m (1,800 kgf·cm, 130 ft·lbf)
5. POSITION FRONT WHEELS FACING STRAIGHT AHEAD
HINT:
Do it with the front of the vehicle jacked up.
6. CENTER SPIRAL CABLE (See page SR−19 )
7. INSTALL STEERING WHEEL
(a) Align the matchmarks on the wheel and steering column main shaft.
(b) Temporarily tighten the wheel set nut.
(c) Connect the connector.
8. BLEED POWER STEERING SYSTEM
(See page SR−3 )
9. CHECK STEERING WHEEL CENTER POINT
10. TORQUE STEERING WHEEL SET NUT
Torque: 34 N·m (350 kgf·cm, 25 ft·lbf)
11. INSTALL STEERING WHEEL PAD (See page SR−19)
12. CHECK FRONT WHEEL ALIGNMENT (See page SR−4 )
Brought to you by BirfMark
Brought to you by BirfMark
Version 1.11 - 03/16/2010
Page 1297 of 1399
SR16R−01
SR−44
−
STEERING STEERING LINKAGE
1095
Author�: Date�:
1996 LAND CRUISER (RM451U)
STEERING LINKAGE
COMPONENTS
Brought to you by BirfMark
Brought to you by BirfMark
Version 1.11 - 03/16/2010
Page 1298 of 1399
SR16S−03
SR4102
SST
SR4103
SST
SR4104
SST
−
STEERING STEERING LINKAGE
SR−45
1996 LAND CRUISER (RM451U)
REMOVAL
NOTICE:
When using a vise, do not overtighten it.
1. REMOVE ENGINE UNDER COVER
Remove the 4 bolts.
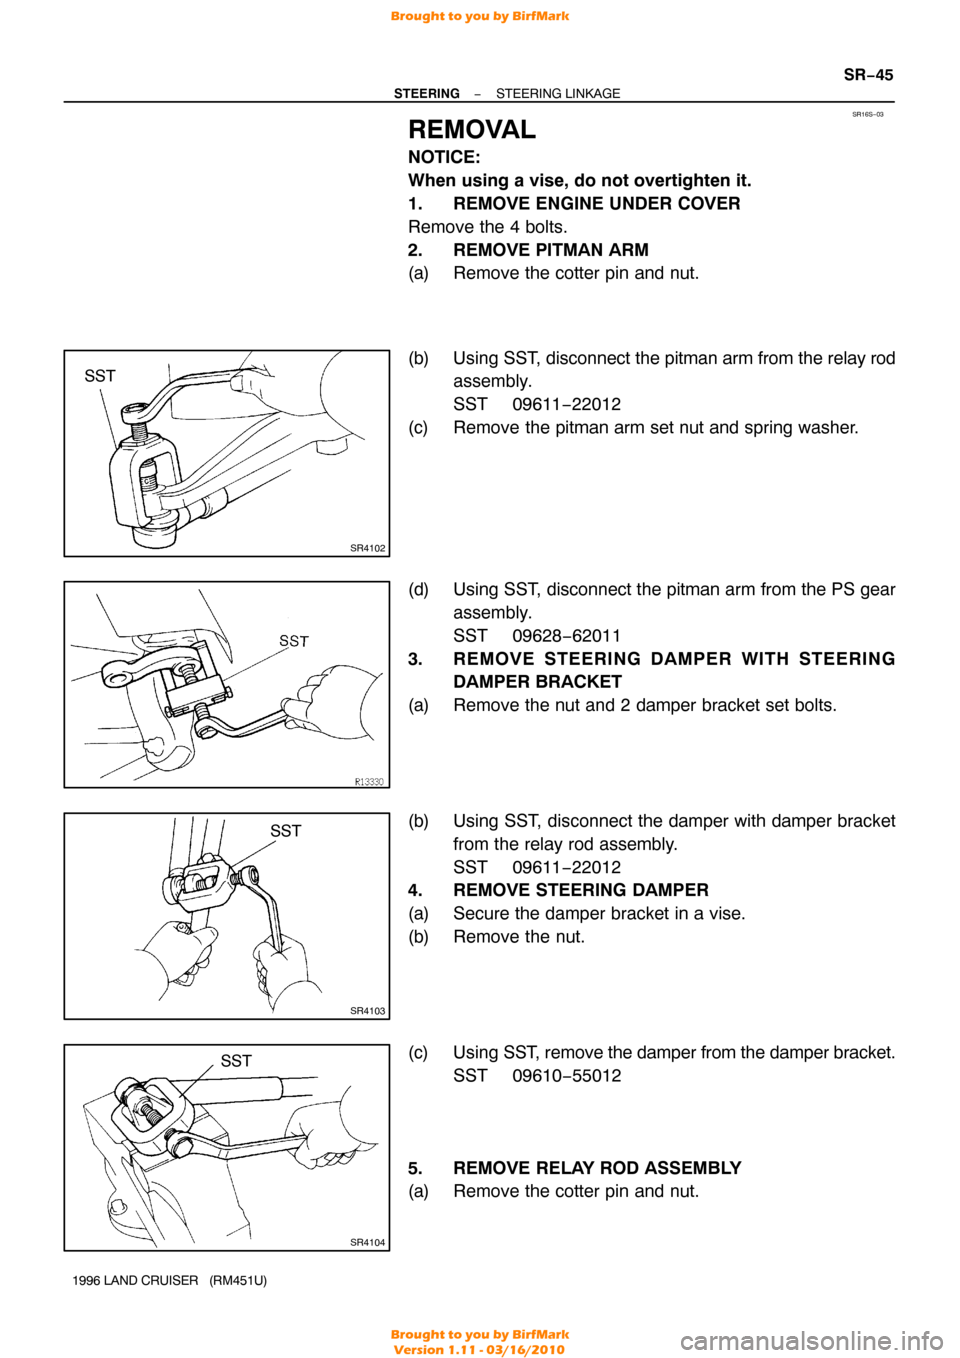
2. REMOVE PITMAN ARM
(a) Remove the cotter pin and nut.
(b) Using SST, disconnect the pitman arm from the relay rod
assembly.
SST 09611 −22012
(c) Remove the pitman arm set nut and spring washer.
(d) Using SST, disconnect the pitman arm from the PS gear assembly.
SST 09628−62011
3. REMOVE STEERING DAMPER WITH STEERING DAMPER BRACKET
(a) Remove the nut and 2 damper bracket set bolts.
(b) Using SST, disconnect the damper with damper bracket from the relay rod assembly.
SST 09611 −22012
4. REMOVE STEERING DAMPER
(a) Secure the damper bracket in a vise.
(b) Remove the nut.
(c) Using SST, r emove the damper from the damper bracket.
SST 09610−55012
5. REMOVE RELAY ROD ASSEMBLY
(a) Remove the cotter pin and nut.
Brought to you by BirfMark
Brought to you by BirfMark
Version 1.11 - 03/16/2010
Page 1299 of 1399
SR4106
SST
SR−46
−
STEERING STEERING LINKAGE
1996 LAND CRUISER (RM451U)
(b) Using SST, disconnect the relay rod assembly from the
knuckle arm.
SST 09611 −22012
6. REMOVE TIE ROD ASSEMBLY
(a) Remove the 2 cotter pins and nuts.
(b) Using SST, disconnect the tie rod assembly from the RH and LH knuckle arms.
SST 09611 −22012
7. REMOVE TIE ROD ENDS AND RELAY ROD ENDS
Loosen the tie rod end or relay rod end clamp and remove the
tie rod end or relay rod end.
Brought to you by BirfMark
Brought to you by BirfMark
Version 1.11 - 03/16/2010
Page 1300 of 1399
SR16T−01
−
STEERING STEERING LINKAGE
SR−47
1996 LAND CRUISER (RM451U)
INSTALLATION
HINT:
When connecting the ball stud to the arm or rod, remove the
grease on the joint surfaces.
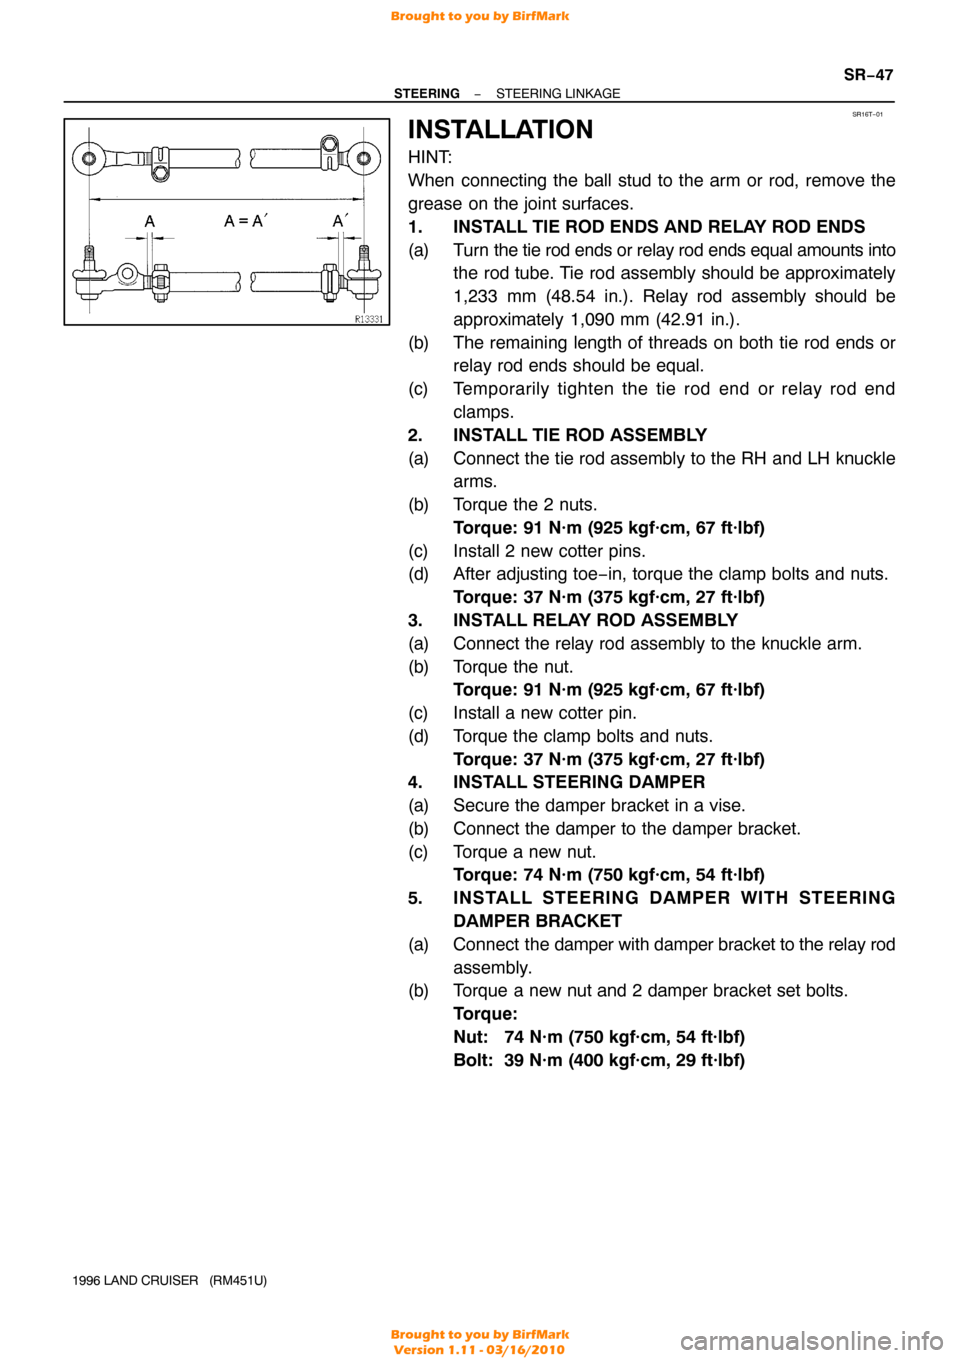
1. INSTALL TIE ROD ENDS AND RELAY ROD ENDS
(a) Turn the tie rod ends or relay rod ends equal amounts into
the rod tube. Tie rod assembly should be approximately
1,233 mm (48.54 in.). Relay rod assembly should be
approximately 1,090 mm (42.91 in.).
(b) The remaining length of threads on both tie rod ends or relay rod ends should be equal.
(c) Temporarily tighten the tie rod end or relay rod end clamps.
2. INSTALL TIE ROD ASSEMBLY
(a) Connect the tie rod assembly to the RH and LH knuckle arms.
(b) Torque the 2 nuts. Torque: 91 N·m (925 kgf·cm, 67 ft·lbf)
(c) Install 2 new cotter pins.
(d) After adjusting toe−in, torque the clamp bolts and nuts. Torque: 37 N·m (375 kgf·cm, 27 ft·lbf)
3. INSTALL RELAY ROD ASSEMBLY
(a) Connect the relay rod assembly to the knuckle arm.
(b) Torque the nut. Torque: 91 N·m (925 kgf·cm, 67 ft·lbf)
(c) Install a new cotter pin.
(d) Torque the clamp bolts and nuts. Torque: 37 N·m (375 kgf·cm, 27 ft·lbf)
4. INSTALL STEERING DAMPER
(a) Secure the damper bracket in a vise.
(b) Connect the damper to the damper bracket.
(c) Torque a new nut. Torque: 74 N·m (750 kgf·cm, 54 ft·lbf)
5. INSTALL STEERING DAMPER WITH STEERING DAMPER BRACKET
(a) Connect the damper with damper bracket to the relay rod
assembly.
(b) Torque a new nut and 2 damper bracket set bolts.
Torque:
Nut: 74 N·m (750 kgf·cm, 54 ft·lbf)
Bolt: 39 N·m (400 kgf·cm, 29 ft·lbf)
Brought to you by BirfMark
Brought to you by BirfMark
Version 1.11 - 03/16/2010
Page 1301 of 1399
SR2922
Alignment Marks
SR−48
−
STEERING STEERING LINKAGE
1996 LAND CRUISER (RM451U)
6. INSTALL PITMAN ARM
(a) Align the alignment marks on the pitman arm and the
cross shaft, and install the spring washer and set nut.
Torque: 177 N·m (1,800 kgf·cm, 130 ft·lbf)
(b) Connect the pitman arm to the relay rod assembly.
(c) Torque the nut. Torque: 91 N·m (925 kgf·cm, 67 ft·lbf)
(d) Install a new cotter pin.
7. INSTALL ENGINE UNDER COVER
Tighten the 4 bolts.
8. CHECK FRONT WHEEL ALIGNMENT (See page SA−4 )
Brought to you by BirfMark
Brought to you by BirfMark
Version 1.11 - 03/16/2010
Page 1331 of 1399
SS1EC−02
SS−30
−
SERVICE SPECIFICATIONS SUSPENSION AND AXLE
153
Author�: Date�:
1996 LAND CRUISER (RM451U)
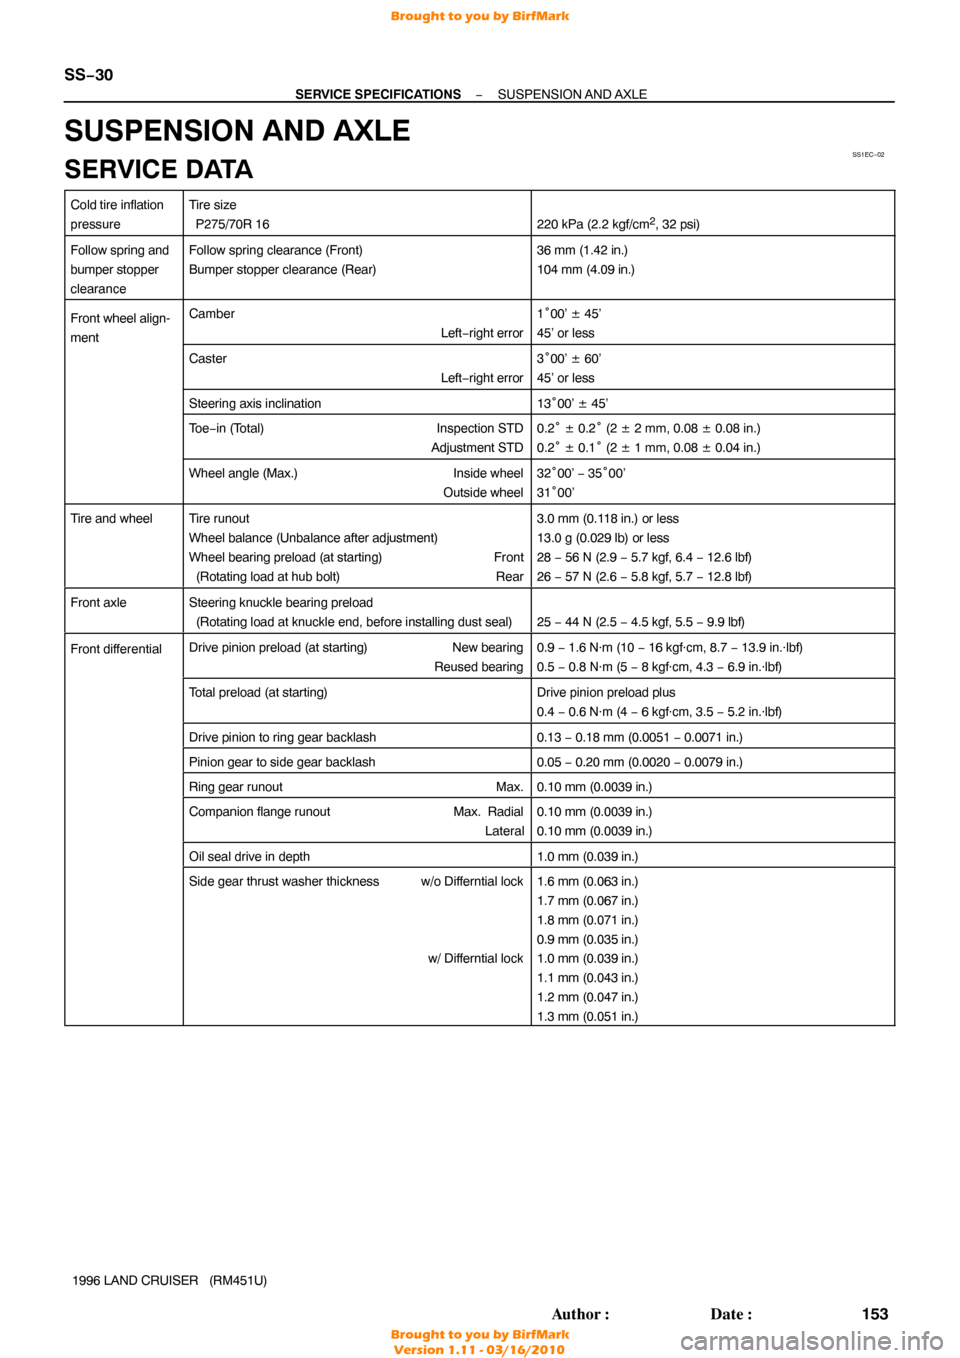
SUSPENSION AND AXLE
SERVICE DATA
Cold tire inflation
pressureTire size
P275/70R 16
220 kPa (2.2 kgf/cm2, 32 psi)
Follow spring and
bumper stopper
clearanceFollow spring clearance (Front)
Bumper stopper clearance (Rear)36 mm (1.42 in.)
104 mm (4.09 in.)
Front wheel align-
mentCamber Left−right error1°00’ ± 45’
45’ or less
Caster Left−right error3°00’ ± 60’
45’ or less
Steering axis inclination13 °00’ ± 45’
To e −in (Total) Inspection STD
Adjustment STD0.2 ° ± 0.2° (2 ± 2 mm, 0.08 ± 0.08 in.)
0.2 ° ± 0.1° (2 ± 1 mm, 0.08 ± 0.04 in.)
Wheel angle (Max.) Inside wheel
Outside wheel32 °00’ − 35°00’
31 °00’
Tire and wheelTire runout
Wheel balance (Unbalance after adjustment)
Wheel bearing preload (at starting) Front
(Rotating load at hub bolt) Rear3.0 mm (0.118 in.) or less
13.0 g (0.029 lb) or less
28 − 56 N (2.9 − 5.7 kgf, 6.4 − 12.6 lbf)
26 − 57 N (2.6 − 5.8 kgf, 5.7 − 12.8 lbf)
Front axleSteering knuckle bearing preload
(Rotating load at knuckle end, before installing dust seal)
25 − 44 N (2.5 − 4.5 kgf, 5.5 − 9.9 lbf)
Front dif ferentialDrive pinion preload (at starting) New bearing
Reused bearing0.9 − 1.6 N·m (10 − 16 kgf·cm, 8.7 − 13.9 in.·lbf)
0.5 − 0.8 N·m (5 − 8 kgf·cm, 4.3 − 6.9 in.·lbf)
Total preload (at starting)Drive pinion preload plus
0.4 − 0.6 N·m (4 − 6 kgf·cm, 3.5 − 5.2 in.·lbf)
Drive pinion to ring gear backlash0.13 − 0.18 mm (0.0051 − 0.0071 in.)
Pinion gear to side gear backlash0.05 − 0.20 mm (0.0020 − 0.0079 in.)
Ring gear runout Max.0.10 mm (0.0039 in.)
Companion flange runoutMax. Radial
Lateral0.10 mm (0.0039 in.)
0.10 mm (0.0039 in.)
Oil seal drive in depth1.0 mm (0.039 in.)
Side gear thrust washer thickness w/o Differntial lock
w/ Differntial lock1.6 mm (0.063 in.)
1.7 mm (0.067 in.)
1.8 mm (0.071 in.)
0.9 mm (0.035 in.)
1.0 mm (0.039 in.)
1.1 mm (0.043 in.)
1.2 mm (0.047 in.)
1.3 mm (0.051 in.)
Brought to you by BirfMark
Brought to you by BirfMark
Version 1.11 - 03/16/2010