Page 41 of 203

34
Coupe and liftback onlyÐYour vehicle
has anchors for securing the top strap of
a child restraint system. The anchor nuts
are welded beneath the sheet metal to
permit installation of an anchor bracket for
a child restraint system.
To install an anchor bracket, use an 8 mm
X 30 mm X 1.25 mm coarse thread metric
bolt and 15 mm (0.6 in.) spacer. Note that
the bolts accompanying many child re-
straint systems are not metric. You can
damage the anchor nuts on our vehicle if
you force bolts with different thread into
the anchor nuts.
For instructions about how to install the
anchor bracket, see (B) TOP STRAP
ANCHORS AND LOCATIONSº.
If your child restraint system does not pro-
vide any of the necessary parts, you can
purchase the following items from your
Toyota dealer.
* CRS installation kit (Part No. 04731-22012)
Ðcontains 1 bolt, 3 types of spacers and
1 locking clip.
* Bolt (Part No. 91511-60830)
(A) INSTALLATION ON REAR SEAT
When installing a rear-facing child re-
straint system, follow the same procedure
as when installing a forward-facing child
restraint system.
CAUTION!
Do not use a rear-facing child re-
straint system in the rear seat if it in-
terferes with the lock mechanism of
the front seats. This can cause se-
vere injury to the child and front pas-
senger in case of sudden braking or
a collision.
1. Fasten the lap and shoulder belt over
the child restraint system following the in-
structions provided by its manufacturer.
Keep the lap portion of the belt tight.
CAUTION!
� After inserting the tab, make sure
the tab and buckle are locked.
� Do not insert coins, clips, etc. in
the buckle as this may prevent you
from properly latching the tab and
buckle.
� If the seat belt does not function
normally, immediately contact
your Toyota dealer.
ProCarManuals.com
Page 42 of 203
35
2. Fully extend the shoulder belt to put it
in the lock mode.3. Place the shoulder belt between the ve-
hicle seatback and the child restraint sys-
tem and allow it to retract. To hold the
child restraint system securely, let the
shoulder belt retract as far as it will go
while firmly pushing down the child re-
straint system.4. Coupe and liftback only- If your child re-
straint system requires the use of a top
strap, latch the hook onto the anchor
bracket and tighten the top strap.
Liftback- Remove the luggage cover
when using the top strap.
ProCarManuals.com
Page 43 of 203
36
CAUTION!
Make sure the seat belt is securely
locked. Also make sure the child re-
straint system is secure by pushing
and pulling the child restraint sys-
tem in different directions.
5. To remove the child restraint system,
press the buckle-release button and al-
low the belt to retract. Unhook the top
strap.
ProCarManuals.com
Page 46 of 203
39
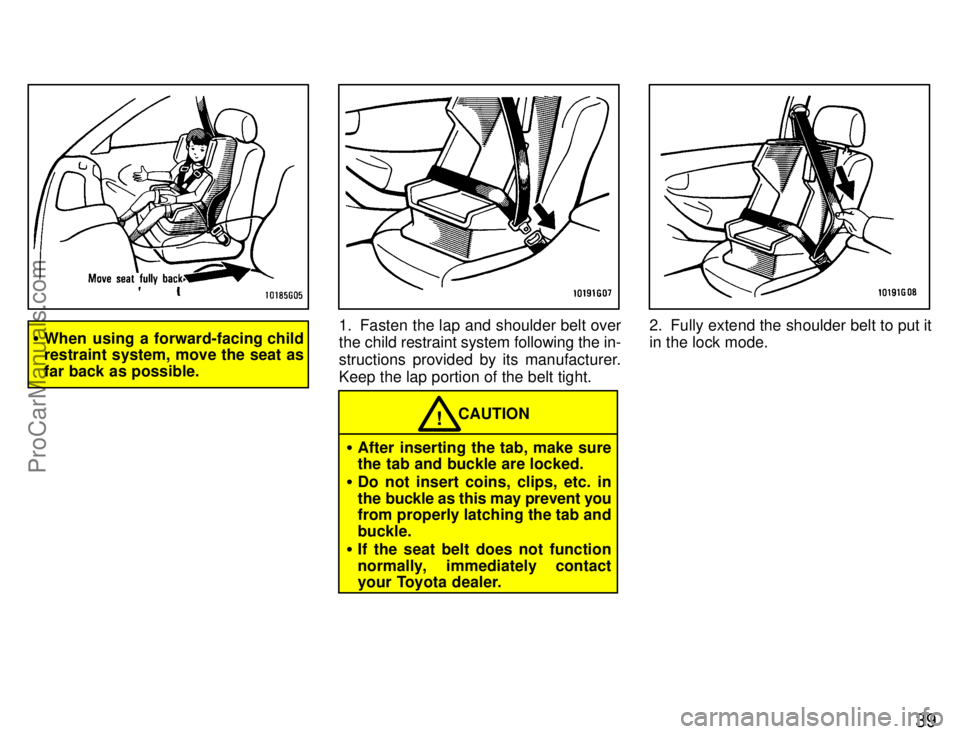
�When using a forward-facing child
restraint system, move the seat as
far back as possible.1. Fasten the lap and shoulder belt over
the child restraint system following the in-
structions provided by its manufacturer.
Keep the lap portion of the belt tight.
CAUTION!
�After inserting the tab, make sure
the tab and buckle are locked.
� Do not insert coins, clips, etc. in
the buckle as this may prevent you
from properly latching the tab and
buckle.
� If the seat belt does not function
normally, immediately contact
your Toyota dealer.
2. Fully extend the shoulder belt to put it
in the lock mode.
ProCarManuals.com
Page 47 of 203
40
3. Place the shoulder belt between the
vehicle seatback and the child restraint
system and allow it to retract. To hold the
child restraint system securely, let the
shoulder belt retract as far as it will go
while firmly pushing down the child re-
straint system.
CAUTION!
Make sure the seat belt is securely
locked and that the child restraint
system is secure by pushing and
pulling it in different directions.
4. To remove the child restraint system,
press the buckle-release button and al-
low the belt to retract.
ProCarManuals.com
Page 61 of 203
 Brake System Warning Light
This light has the following functions:
Parking brake reminder
If this light is on, make sure the parking
brake is fully released. The light should go
off.
Low brake")
54
(a) Brake System Warning Light
This light has the following functions:
Parking brake reminder
If this light is on, make sure the parking
brake is fully released. The light should go
off.
Low brake fluid level warning
If this light comes on and stays on while
you are driving, slowdown and pull off the
road. Then stop the vehicle carefully.
There maybe a problem somewhere in
the brake system. Check the fluid level of
the see-through reservoir.
To make sure the parking brake has not
caused the warning light to come on,
check to see that the parking brake is fully
released.
If the brake fluid level is low...
At a safe place, test your brakes by start-
ing and stopping.
�If you judge that the brakes still work
adequately, drive cautiously to your
nearest dealer or shop for repairs.
� If the brakes are not working, have the
vehicle towed in for repairs. (For tow-
ing information, see Part 4.)
It is dangerous to continue driving
normally when the brake fluid level
is low. CAUTION
!
If the brake fluid level is correct...
Have the warning system checked by
your Toyota dealer.
(b) Seat Belt Reminder Light and
Buzzer
Once the ignition key is turned to ONº or
STARTº, the reminder light and buzzer
come on if the driver's seat belt is not fas-
tened. Unless the driver fastens the belt,
the light stays on and the buzzer stops af-
ter about 4 to 8 seconds.
(c) Discharge Warning Light
This light warns that the battery is being
discharged.
If it comes on while you are driving, there
is a problem somewhere in the charging
system.
The engine ignition will continue to oper-
ate, however, until the battery is dis-
charged. Turn off the air conditioning,
blower, radio, e tc., and drive directly to the
nearest Toyota dealer or repair shop.
NOTICE
Do not continue driving if the engine drive belt is broken or loose.
(d) Low Oil Pressure Warning Light
This light warns that the engine oil pres-
sure is too low.
If it flickers or stays on while you are driv-
ing, pull off the road to a safe place and
stop the engine immediately. Call a Toyota
dealer or qualified repair shop for assis-
tance.
The light may occasionally flicker when
the engine is idling or it may come on brief-
ly after a hard stop. There is no cause for
concern if it then goes out when the en-
gine is accelerated slightly.
The light may come on when the oil level
is extremely low. It is not designed to indi-
cate low oil level, and the oil level must be
checked using the level dipstick.
NOTICE
Do not drive the vehicle with the warning light onÐeven for one
block. It may ruin the engine.
(e) Malfunction indicator lamp
This lamp comes on in the following
cases.
a. The fuel tank is completely empty.
(See Fuel gaugeº in Chapter 1-5 for in-
structions.)
ProCarManuals.com
Page 117 of 203

11 0
When stowing luggage or cargo in the ve-
hicle, observe the following:
�Put luggage or cargo in the trunk or
luggage compartment when at all pos-
sible. Be sure all items are secured in
place.
� Be careful to keep the vehicle
balanced. Locating the weight as far
forward as possible helps maintain
this.
� For better fuel economy, do not carry
unneeded weight.
CAUTION!
�To prevent luggage or packages
from sliding forward during brak-
ing, do not stack anything in the
luggage compartment higher than
the seatbacks. Keep luggage or
packages low, as close to the floor
as possible.
� Never allow anyone to ride in the lug-
gage compartment. It is not de-
signed for passengers. They s hould
ride in their seats with their seat
belts properly fastened. Otherwise,
they are much more likely suffer seri-
ous bodily injury, in the event of sud-
den braking or a collision.
� Do not place anything on the filler
panel behind the rear seatback or
luggage cover. Such items may be
thrown about and possibly injure
people in the vehicle during sud-
den braking or an accident.
� Do not drive with objects left on top
of the instrument panel. They may
interfere with the driver's field of
view. Or they may move during
sharp vehicle acceleration or turn-
ing, and impair the driver's control
of the vehicle. In an accident they
may injure the vehicle occupants.
Do not load the vehicle beyond the
vehicle capacity weight specified in
Part 8.
NOTICE
The vehicle identification number
(VIN) is the legal identifier for your ve-
hicle. This number is on the left top of
the instrument panel, and can be seen
through the windshield from outside.
This is the primary identification number
for your T oyota. It is used in registering the
ownership of your vehicle.
Your Toyota's identification-
-V ehicle identification number
Luggage stowage precautions
ProCarManuals.com
Page 120 of 203
 Before cranking
Before starting the engine
11 3
STARTING AND
DRIVING
�Before starting the engine
� How to start the engine
� Tips for driving in various
conditions")
Part 3
How to start the engineÐ
(a) Before cranking
Before starting the engine
11 3
STARTING AND
DRIVING
�Before starting the engine
� How to start the engine
� Tips for driving in various
conditions
� Winter driving tips
� Trailer towing
� How to save fuel and make your
vehicle last longer, too
1. Check the area around the vehicle be-
fore entering it.
2. Adjust seat position, seatback angle,
head restraint height and steering wheel
angle.
3. Adjust inside and outside rear view
mirrors.
4. Lock both side doors.
5. Fasten seat belts. 1. Apply the parking brake firmly.
2. Turn off unnecessary lights and acces-
sories.
3.
Manual transmission: Press the
clutch pedal to the floor and shift the trans-
mission into neutral. Hold the clutch pedal
to the floor until the engine is started. A
starter safety device will prevent the start-
er from operating if the clutch pedal is not
fully depressed.
Automatic transmission: Put the selec-
tor lever in Pº. If you need to restart the
engine while the vehicle is moving, put the
selector lever in Nº. A starter safety de-
vice will prevent the starter from operating
if the selector lever is in any drive position.
4. Automatic transmission only: De-
press the brake pedal and hold it to the
floor until driving off.
ProCarManuals.com