Page 2 of 203

Your new vehicle is covered by the following Toyota
limited warranties:
For further information, please refer to the separate
Owner 's Guideº, Owner's Manual Supplementº or
Warranty Bookletº.�
New vehicle warranty
� Emission control systems warranty
� Others
It is the owner's responsibility to make sure that the
specified maintenance is performed. Part 6 gives de-
tails of these maintenance requirements. Also in-
cluded in Part 6 is general maintenance. For sched-
uled maintenance information, please refer to the
separate Owner's Manual Supplement/Mainte-
nance Scheduleº.
A wide variety of non genuine spare parts and acces-
sories for Toyota vehicles are currently available in the
market. You should know that Toyota does not war-
rant these products and is not responsible either for
their performance, repair or replacement, or for any
damage they may cause to, or adverse effect they
may have on, your Toyota vehicle.
This vehicle should not be modified with non genuine
Toyota products. Modification with non genuine Toyo-
ta products could affect its performance, safety or du-
rability, and may even violate governmental regula-
tions. In addition, damage or performance problems
resulting from the modification may not be covered
under warranty.
The spark ignition system in your Toyota meets all re-
quirements of the Canadian Interference-Causing
Equipment Standard.
Spark ignition system of your Toyota
Accessories, spare parts and modification of your ToyotaNew vehicle warranty
Your responsibility for maintenance
ProCarManuals.com
Page 8 of 203
3
1. Headlight and turn signal switch
2. Wiper and washer switches
3. Emergency flasher switch
4. Clock
5. Center vents
6. Car audio
7. Air conditioning controls
8. Rear window defoggers switch
9. Coupe and liftbackÐPower rear view mirror control
switch (without power windows)
ConvertibleÐ
Convertible top control switch and
quarter window control switches
10. Cigarette lighter
11. Ignition switch
12. Cruise control switch
13. Tilt steering lock release lever
14. Instrument panel light control knob
ProCarManuals.com
Page 13 of 203
8
LOCKING AND UNLOCKING WITH
KEY
Insert the key into the keyhole and turn
it.
To lock: Turn the key forward.
To unlock: Turn the key backward.
Both side doors lock and unlock simulta-
neously with either side door. In the driv-
er 's door lock, turning the key once will un-
lock the driver's door and twice in
succession will unlock both side doors si-
multaneously.LOCKING AND UNLOCKING WITH IN-
SIDE LOCK KNOB
Move the lock knob.
To lock: Push the knob forward.
To unlock: Pull the knob backward.
Closing the side door with the lock knob in
the lock position will also lock the side
door. Be careful not to lock your keys in
the vehicle.
Vehicles with power door lock systemÐ
The side door cannot be locked if you
leave the key in the ignition switch.Driver's side
Passenger 's side
Side doors
ProCarManuals.com
Page 14 of 203

9
LOCKING AND UNLOCKING WITH
POWER DOOR LOCK SWITCH
Push the switch.
To lock: Push the switch on the front side.
To unlock: Push the switch on the rear
side
Both doors lock or unlock simultaneously.
Before driving, be sure that the side
doors are closed and locked, espe-
cially when small children are in the
vehicle. Along with the proper use of
seat belts, locking the side doors
helps prevent the driver and passen-
gers from being thrown out from the
vehicle during an accident. It also
helps prevent the side doors from
being opened unintentionally. CAUTION
!
To avoid serious personal injury, you
must do the following.
�
Always make sure the head, hands
and other parts of the body of all oc-
cupants are kept completely inside
the vehicle before you close the
power windows. If someone's n eck,
head or hands gets caught in a clos-
ing window, it could result in a seri-
ous injury. When anyone closes the
power windows, be sure that they
operate the windows safely.
� When small children are in the ve-
hicle, never let them use the power
window switches without supervi-
sion. Use the window lock button
to prevent them from making unex-
pected use of the switches.
� Never leave small children alone in
the vehicle, especially with the igni-
tion key still inserted. They could
use the power window switches and
get trapped in a window. Unattended
children can become involved in se-
rious accidents. CAUTION
!
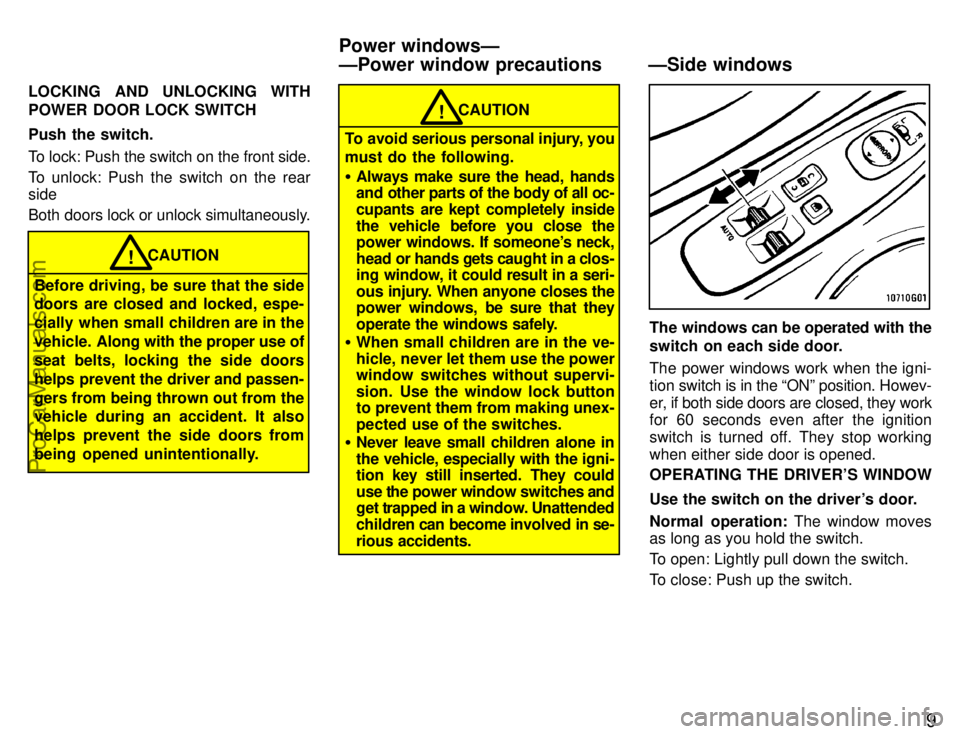
The windows can be operated with the
switch on each side door.
The power windows work when the igni-
tion
switch is in the ONº position. Howev-
er, if both side doors are closed, they work
for 60 seconds even after the ignition
switch is turned off. They stop working
when either side door is opened.
OPERATING THE DRIVER'S WINDOW
Use the switch on the driver's door.
Normal operation: The window moves
as long as you hold the switch.
To open: Lightly pull down the switch.
To close: Push up the switch.
Power windowsÐ
ÐPower window precautions ÐSide windows
ProCarManuals.com
Page 19 of 203

14
2. To remove the fuel tank cap, turn
the cap slowly counterclockwise, then
pause slightly before removing it. Af-
ter removing the cap, hang it on the
cap hanger.
It is not unusual to hear a slight swoosh
when the cap is opened. When installing,
turn the cap clockwise till you hear a click.
�Make sure the cap is tightened se-
curely to prevent fuel spillage in
case of an accident.
� Use only a genuine Toyota fuel
tank cap for replacement. It has a
built-in check valve to reduce fuel
tank vacuum.
CAUTION!
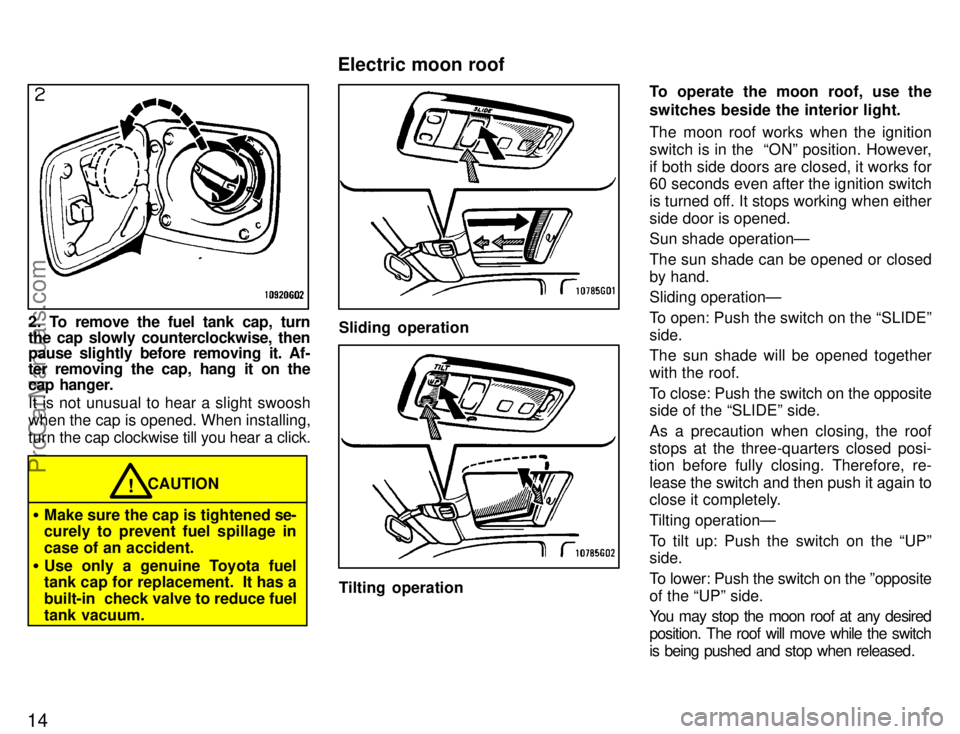
Sliding operation
Tilting operation To operate the moon roof, use the
switches beside the interior light.
The moon roof works when the ignition
switch is in the ONº position. However,
if both side doors are closed, it works for
60 seconds even after the ignition switch
is turned off. It stops working when either
side door is opened.
Sun shade operationÐ
The sun shade can be opened or closed
by hand.
Sliding operationÐ
To open: Push the switch on the SLIDEº
side.
The sun shade will be opened together
with the roof.
To close: Push the switch on the opposite
side of the SLIDEº side.
As a precaution when closing, the roof
stops at the three-quarters closed posi-
tion before fully closing. Therefore, re-
lease the switch and then push it again to
close it completely.
Tilting operationÐ
To tilt up: Push the switch on the UPº
side.
To lower: Push the switch on the ºopposite
of the UPº side.
You may stop the moon roof at any desired
position. The roof will move while the switch
is being pushed and stop when released .
Electric moon roof
ProCarManuals.com
Page 21 of 203
16
LOWERING THE CONVERTIBLE TOP
The ignition switch must be in the ONº
position to operate the convertible top.
1. Lower all the side windows, quarter
windows, and sun visors. Then pull
the latch handles fully backward.
Before operating, make sure the manual
control switch is not in the MANUALº
position. (See If the convertible top does
not raise or lowerº in Part 4.)2. Push and hold the convertible top
control switch on the OPENº side un-
til the convertible top is completely
lowered. Raise the sun visors.INSTALLING THE TOP BOOT
The top boot is used to cover and conceal
the completely lowered convertible top. It
is in the trunk, and is stored in a plastic
bag.
3. Place the top boot over the lowered
convertible top. Then tuck its outer
edge under the body moldings.
ÐLowering the convertible top
ProCarManuals.com
Page 23 of 203
18
2. Release the top boot snaps from
the quarter trim.3. Pull out the outer edge of the top
boot from under the body moldings.
Put the removed top boot in the plastic
bag and store it in the trunk.RAISING THE CONVERTIBLE TOP
The ignition switch must be in the ONº
position to operate the convertible top.
4. Lower the sun visors. Check that all
the side windows and quarter win-
dows are l owered. Then push and hold
the convertible top control switch on
the CLOSEº side until the top
touches the windshield frame.
ProCarManuals.com
Page 34 of 203

28
The SRS (Supplemental Restraint Sys-
tem) airbags are designed to provide
further protection to the driver and
front passenger when added to the pri-
mary protection provided by the seat
belts.
In response to a severe frontal impact, the
SRS airbags work together with the seat
belts to help prevent or reduce injury by in-
flating, in order to decrease the likelihood
of the driver's or front passenger's head
or chest directly hitting the steering wheel
or dashboard. The passenger airbag is
activated together with the driver airbag,
even with no passenger in the front seat.This indicator comes on when the
ignition key is turned to the ACCº or
ONº position. It goes off after about 6
seconds. This means the SRS airbags
are operating properly.
The SRS airbag warning light system
monitors the front airbag sensors, center
airbag sensor assembly, inflators, warn-
ing light, interconnecting wiring and power
sources.The SRS airbag system is designed to
activate in response to a severe frontal
impact within the shaded area be-
tween the arrows in the illustration.
The SRS airbags will deploy if the severity
of the impact is above the designed
threshold level, comparable to an approxi-
mate 20 km/h (14 mph) collision when im-
pacting straight into a fixed barrier that
does not move or deform.
If the severity of the impact is below the
above threshold level, the SRS airbags
may not deploy.
SRS airbags
ProCarManuals.com