Page 140 of 203

133
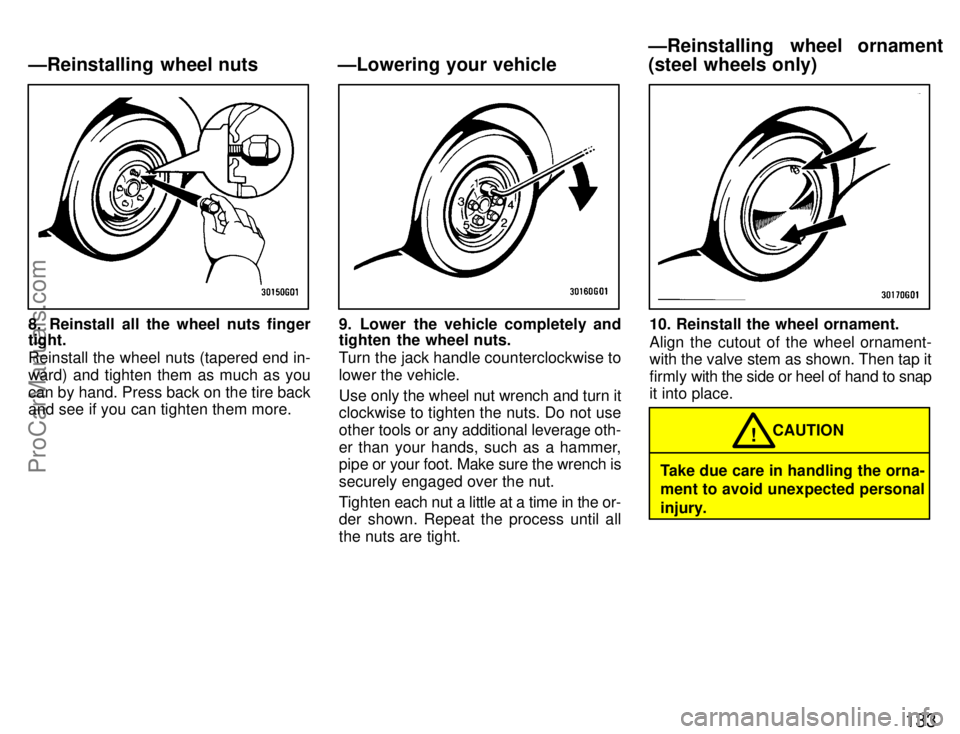
8. Reinstall all the wheel nuts finger
tight.
Reinstall the wheel nuts (tapered end in-
ward) and tighten them as much as you
can by hand. Press back on the tire back
and see if you can tighten them more.9. Lower the vehicle completely and
tighten the wheel nuts.
Turn the jack handle counterclockwise to
lower the vehicle.
Use only the wheel nut wrench and turn it
clockwise to tighten the nuts. Do not use
other tools or any additional leverage oth-
er than your hands, such as a hammer,
pipe or your foot. Make sure the wrench is
securely engaged over the nut.
Tighten each nut a little at a time in the or-
der shown. Repeat the process until all
the nuts are tight.10. Reinstall the wheel ornament.
Align the cutout of the wheel ornament-
with the valve stem as shown. Then tap it
firmly with the side or heel of hand to snap
it into place.
Take due care in handling the orna-
ment to avoid unexpected personal
injury. CAUTION
!
ÐReinstalling wheel nuts ÐLowering your vehicle
ÐReinstalling wheel ornament
(steel wheels only)
ProCarManuals.com
Page 171 of 203

164
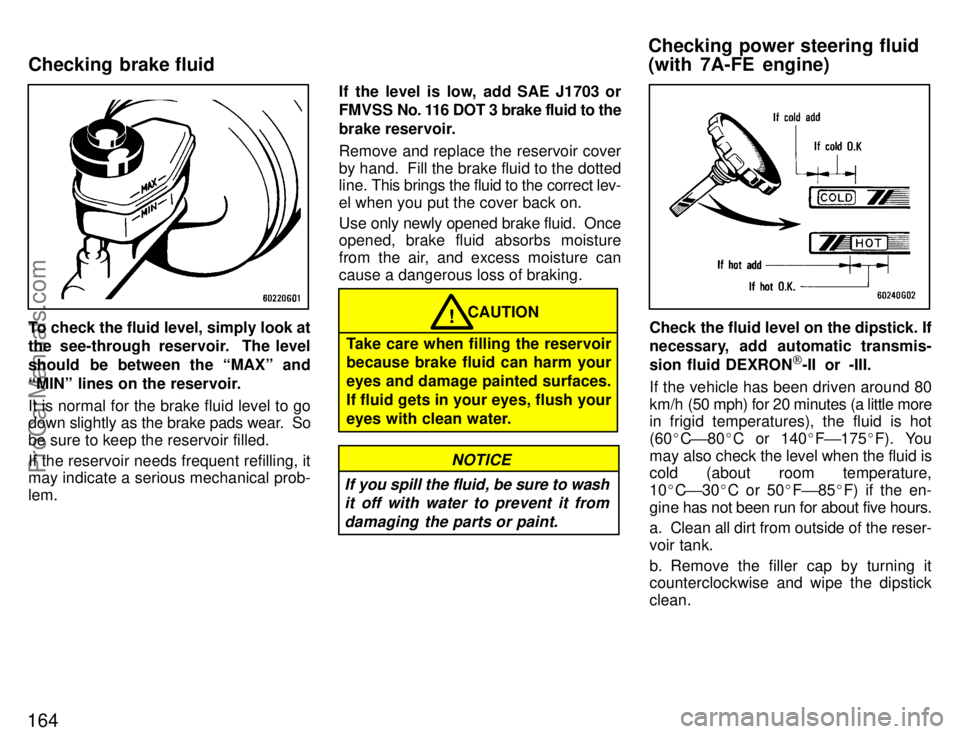
To check the fluid level, simply look at
the see-through reservoir. The level
should be between the MAXº and
MINº lines on the reservoir.
It is normal for the brake fluid level to go
down slightly as the brake pads wear. So
be sure to keep the reservoir filled.
If the reservoir needs frequent refilling, it
may indicate a serious mechanical prob-
lem. If the level is low, add SAE J1703 or
FMVSS No. 116 DOT 3 brake fluid to the
brake reservoir.
Remove and replace the reservoir cover
by hand. Fill the brake fluid to the dotted
line.
This brings the fluid to the correct lev-
el when you put the cover back on.
Use only newly opened brake fluid. Once
opened, brake fluid absorbs moisture
from the air, and excess moisture can
cause a dangerous loss of braking.CAUTION
Take care when filling the reservoir
because brake fluid can harm your
eyes and damage painted surfaces.
If fluid gets in your eyes, flush your
eyes with clean water.!
If you spill the fluid, be sure to wash it off with water to prevent it from
damaging the parts or paint.
NOTICE
Check the fluid level on the dipstick. If
necessary, add automatic transmis-
sion fluid DEXRON
[-II or -III.
If the vehicle has been driven around 80
km/h (50 mph) for 20 minutes (a little more
in frigid temperatures), the fluid is hot
(60 �C ' 80 �C or 140 �F ' 175 �F). You
may also check the level when the fluid is
cold (about room temperature,
10 �C ' 30 �C or 50 �F ' 85 �F) if the en-
gine has not been run for about five hours.
a. Clean all dirt from outside of the reser-
voir tank.
b. Remove the filler cap by turning it
counterclockwise and wipe the dipstick
clean.
Checking brake fluid Checking power steering fluid
(with 7A-FE engine)
ProCarManuals.com
Page 172 of 203

165
c. Reinstall the filler cap.
d. Remove the filler cap again and look at
the fluid level. If the fluid is cold, the level
should be in the COLDº range on the dip-
stick. Similarly, if it is hot, the fluid level
should be in the HOTº range. If the level
is at the low side of either range, add auto-
matic transmission fluid DEXRON
[ -II or
-III to bring the level within the range.
e. After replacing the filler cap, visually
check the steering box case, vane pump
and hose connections for leaks or dam-
age.
CAUTION
The reservoir tank may be hot so be
careful not to burn yourself.!
Avoid overfilling, or the power steering could be damaged.
NOTICE
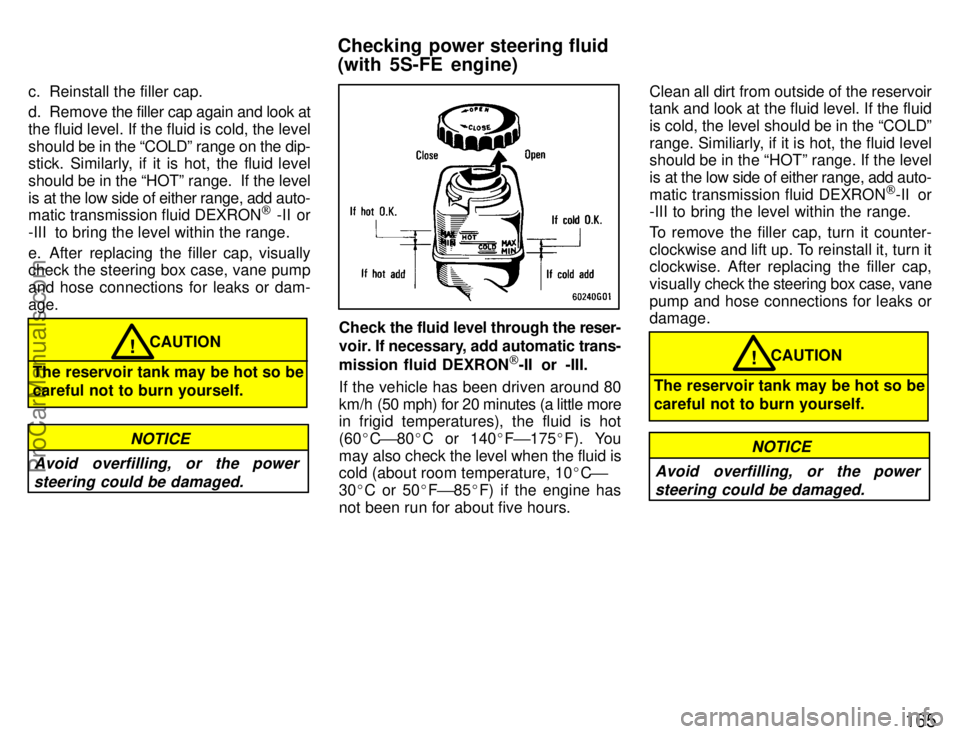
Check the fluid level through the reser-
voir. If necessary, add automatic trans-
mission fluid DEXRON
[-II or -III.
If the vehicle has been driven around 80
km/h (50 mph) for 20 minutes (a little more
in frigid temperatures), the fluid is hot
(60 �C ' 80 �C or 140 �F ' 175 �F). You
may also check the level when the fluid is
cold (about room temperature, 10 �C '
30 �C or 50 �F ' 85 �F) if the engine has
not been run for about five hours. Clean all dirt from outside of the reservoir
tank and look at the fluid level. If the fluid
is cold, the level should be in the COLDº
range. Similiarly, if it is hot, the fluid level
should be in the HOTº range. If the level
is at the low side of either range, add auto-
matic transmission fluid DEXRON
[-II or
-III to bring the level within the range.
To remove the filler cap, turn it counter-
clockwise and lift up. To reinstall it, turn it
clockwise. After replacing the filler cap,
visually check the steering box case, vane
pump and hose connections for leaks or
damage.
CAUTION
The reservoir tank may be hot so be
careful not to burn yourself.!
Avoid overfilling, or the power steering could be damaged.
NOTICE
Checking power steering fluid
(with 5S-FE engine)
ProCarManuals.com
Page 186 of 203
179
3. Install a new bulb and the connec-
tor into the mounting hole.
Aiming is not necessary after replacing
the bulb. When aiming adjustment is nec-
essary, contact your Toyota dealer.1. Loosen the retainer screw and take
out the beam unit.2. Turn the cover counterclockwise
and remove it.
ÐFront fog lights
ProCarManuals.com
Page 187 of 203
180
3. Disconnect the cords.4. Release the bulb retaining spring
and remove the bulb. Install a new
bulb and the bulb retaining spring.
To install the bulb, align the cutouts of the
bulb with the protrusions of the mounting
hole.5. Connect the cords, install the cover
and turn it clockwise so that two
triangle marks are aligned. Plug the
connector together. Install the beam
unit and tighten the screw.
ProCarManuals.com
Page 200 of 203
193
Fuses (type A)
1 AM2 30 A: Starting system
2 HAZARD 10A: Emergency flashers
3 HORN 7.5 A: Horns
4 Radio NO.1 20 A: Car audio system
5 ECU-B 15 A: Anti-lock brake system,
cruise control system
6 DOME 10 A: Interior lights, personal
lights, luggage compartment light, trunk
light, door courtesy lights, clock
7 HEAD (LH) 15 A: Left-hand headlight
8 HEAD (RH) 15 A: Right-hand head-
light9 SPARE: Spare fuse
10 SPARE: Spare fuse
11 SPARE: Spare fuse
12 ALT-S 7.5 A: Charging system
13 SRS WRN 7.5 A: SRS airbag warning
light
14 EFI 15 A: Multiport fuel injection sys-
tem/sequential multiport fuel injection
system
15 HEAD (LH) LO 15 A: Left-hand head-
light (low beam)
16 HEAD (RH) LO 15 A: Right-hand
headlight (low beam)
17 HEAD-HI (RH) 15 A: Right-hand
headlight (high beam)
ProCarManuals.com
Page 201 of 203

194
18 HEAD-HI (LH) 15 A: Left-hand
headlight (high beam)
19 DRL 7.5 A: Daytime running light sys-
tem
20 ECU-IG 15 A: Electronically con-
trolled automatic transmission system,
anti-lock brake system
21 SEAT-HTR 20 A: No circuit
22 PANEL 7.5 A: Instrument panel lights
23 STOP 15 A: Stop lights, high mounted
stoplight, multiport fuel injection system/
sequential multiport fuel injection system,
cruise control system cancel device, elec-
tronically controlled automatic transmis-
sion system, anti-lock brake system 24 FOG 20 A: Front fog lights
25 CIG & RAD 15 A: Cigarette lighter,
dig-
ital clock display, car audio system
26 IGN 7.5 A: Charging system, dis-
charge warning light, multiport fuel injec-
tion system/sequential multiport fuel in-
jection system, SRS airbag system
27 WIPER 20 A: Windshield wipers and
washer, rear window wiper and washer
28 MIR-HTR 10 A: Multiport fuel injection
system/sequential multiport fuel injection
system
29 TURN 10 A: Turn signal lights, emer-
gency flashers
30 TAIL 15 A: Tail lights, parking lights,
front side marker lights, rear side marker
lights, license plate lights
31 HTR 10 A: Air conditioning system,
rear window defogger
32 GAUGE 10 A: Gauges and meters,
power door lock system
33 ST 7.5 A: Starting system, multiport
fuel injection system/sequential multiport
fuel injection system
34 A/C 10 A: Air conditioning system
35 OBD II 7.5A: On-board diagnosis sys-
tem Fuses (type B)
36 RDI 30 A: Electric cooling fan
37 CDS 30 A: Electric cooling fan
38 AM1 40 A:
Electronic ignition system/
distributor ignition system
39 DOOR 30 A: Power door lock system,
convertible top control system
40 DEF 30 A: Rear window defogger
41 POWER 30 A: Power windows, elec-
tric moon roof
Fuses (type C)
42 HTR 40 A: Air conditioning system
43 ALT 100 A: ALT-Sº, TAILº, DOORº,
DEFº and POWERº fuses
44 MAIN 60 A: Starting system, head-
lights, AM2º, HAZARDº, HORNº,
DOMEº and RADIOº fuses
45 ABS 50 A: Anti-lock brake system
ProCarManuals.com