Page 62 of 226

56
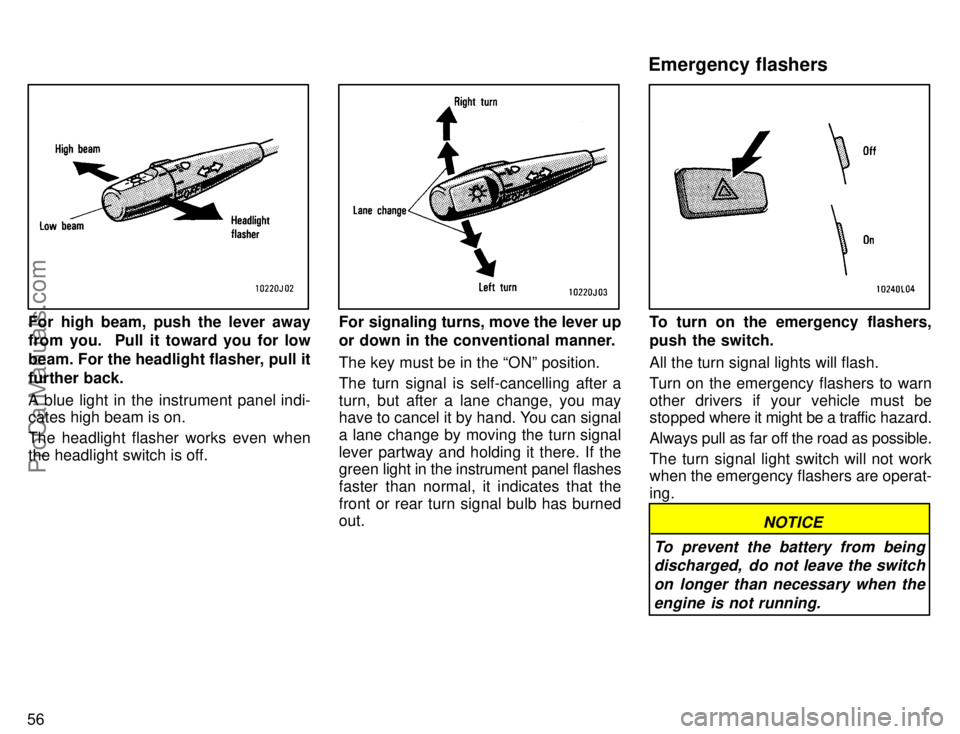
For high beam, push the lever away
from you. Pull it toward you for low
beam. For the headlight flasher, pull it
further back.
A blue light in the instrument panel indi-
cates high beam is on.
The headlight flasher works even when
the headlight switch is off.For signaling turns, move the lever up
or down in the conventional manner.
The key must be in the ONº position.
The turn signal is self-cancelling after a
turn, but after a lane change, you may
have to cancel it by hand. You can signal
a lane change by moving the turn signal
lever partway and holding it there. If the
green light in the instrument panel flashes
faster than normal, it indicates that the
front or rear turn signal bulb has burned
out.To turn on the emergency flashers,
push the switch.
All the turn signal lights will flash.
Turn on the emergency flashers to warn
other drivers if your vehicle must be
stopped where it might be a traffic hazard.
Always pull as far off the road as possible.
The turn signal light switch will not work
when the emergency flashers are operat-
ing.
NOTICE
To prevent the battery from being
discharged, do not leave the switch
on longer than necessary when the
engine is not running.
Emergency flashers
ProCarManuals.com
Page 73 of 226

67
NOTICE
Do not drive the vehicle with the
warning light onÐeven for one
block. It may ruin the engine.
(g) ABSº Warning Light
This light warns that there is a problem
somewhere in your anti-lock brake sys-
tem.
If the light comes on while you are driving,
have your vehicle checked by your Toyota
dealer as soon as possible.
The light will come on when the ignition
key is turned to the ONº position. After
about 3 seconds, the light will go off.
When the ABSº warning light is on (and
the brake system warning light is off), the
brake system operates conventionally but
without anti-lock function.
(h) Open Door Warning Light
This light remains on until all the doors
and back door are completely closed.
(i) Rear Light Failure Warning Light
If this light comes on when the headlight
switch is turned on (at the first or second
clickstop), it indicates that one or more of
the tail lights are burned out.
If it comes on when the brake pedal is de-
pressed, one or more stop lights are
burned out.Have defective bulbs replaced as soon as
possible.
(j) SRS Airbag Warning Light
This light will come on when the igni-
tion key is turned to the ACCº or ONº
position. After about 6 seconds, the
light will go off. This means the airbag
system is operating properly.
The warning light system monitors the
front airbag sensors, center airbag sensor
assembly, inflators, warning light, inter-
connecting wiring and power sources.
If either of the following conditions occurs,
this indicates a malfunction somewhere in
the parts monitored by the warning light
system. Contact your Toyota dealer as
soon as possible to service the vehicle.
�The light does not come on when the
ignition key is turned to the ACCº or
ONº position or remains on.
�The light comes on while driving.
(k) Key Reminder Buzzer
This buzzer reminds you to remove the
key when you open the driver's door with
the ignition key in the ACCº or LOCKº
position.CHECKING SERVICE REMINDER INDI-
CATORS (except the low fuel level
warning light)
1. Apply the parking brake.
2 . Open one of the side doors or back door.
The open door warning light should come
on.
3. Close the door.
The open door warning light should go off.
4. Turn the ignition key to ACCº.
The SRS airbag warning light should
come on. It goes off after about 6 sec-
onds.
5. Turn the ignition key to ONº, but do not
start the engine.
All the service reminder indicators except
the open door warning light and SRS air-
bag warning light should come on. The
ABSº warning light goes off after about 3
seconds.
If any service reminder indicator or warn-
ing buzzer does not function as described
above, either the bulb is burned out or the
circuit is in need of repair. Have it checked
by your Toyota dealer as soon as pos-
sible.
ProCarManuals.com
Page 206 of 226

200
Never use a fuse with a higher am-
perage rating, or any other object,
in place of a fuse. This may cause
extensive damage and possibly a
fire.CAUTION
!
If any washer does not work, the wash-
er tank may be empty. Add washer
fluid.
You may use plain water as washer fluid.
However, in cold areas where tempera-
tures range below freezing point, use
washer fluid containing antifreeze. This
product is available at your Toyota dealer
and most auto parts stores. Follow the
manufacturer 's directions for how much
to mix with water.
NOTICE
Do not use engine antifreeze or any
other substitute because it may
damage your vehicle's paint.
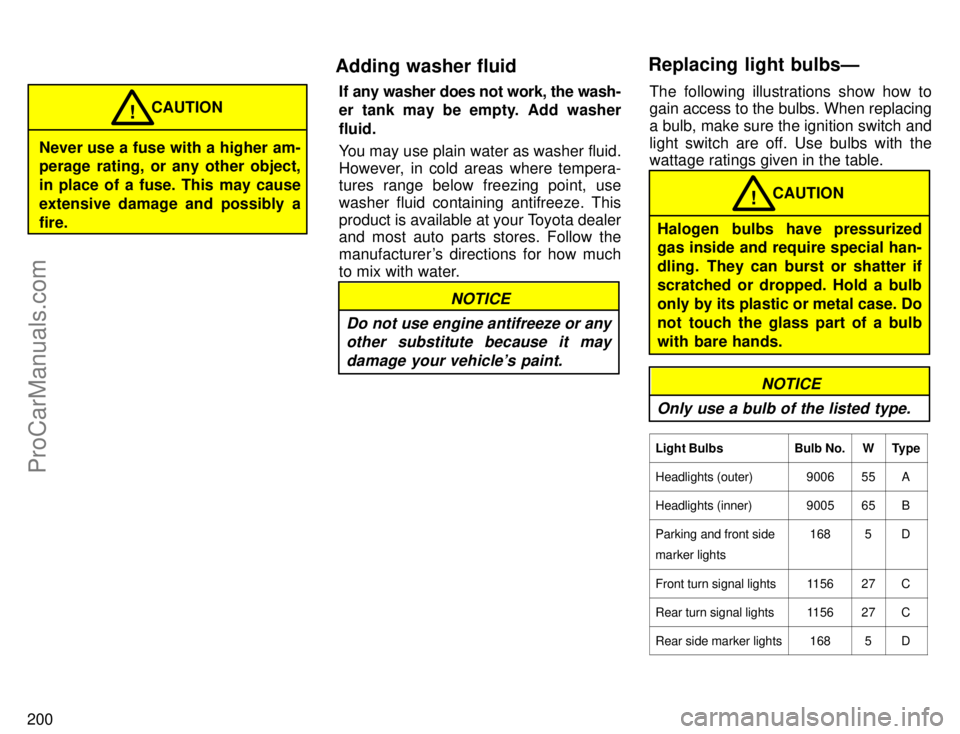
The following illustrations show how to
gain access to the bulbs. When replacing
a bulb, make sure the ignition switch and
light switch are off. Use bulbs with the
wattage ratings given in the table.
Halogen bulbs have pressurized
gas inside and require special han-
dling. They can burst or shatter if
scratched or dropped. Hold a bulb
only by its plastic or metal case. Do
not touch the glass part of a bulb
with bare hands.CAUTION
!
NOTICE
Only use a bulb of the listed type.
Light BulbsBulb No.WType
Headlights (outer)900655A
Headlights (inner)900565B
Parking and front side
marker lights1685D
Front turn signal lights115627C
Rear turn signal lights115627C
Rear side marker lights1685D
Replacing light bulbsÐ
Adding washer fluid
ProCarManuals.com
Page 207 of 226
201
Light BulbsBulb No.WType
Stop and tail lights115727/
8C
Back-up lights115627C
License plate lights1685D
High mounted stop
light92118D
Interior lightÐ10E
Personal lightÐ10C
Vanity lightsÐ3E
Glovebox lightÐ1.2D
Door courtesy lights3.8D
Trunk lightÐ3.8E
Luggage compartment
lightÐ5E
A: HB4 halogen bulbs
B: HB3 halogen bulbs
C: Single end bulbs
D: Wedge base bulbs
E: Double end bulbs
1. Open the hood. Unplug the connec-
tor while depressing the lock release.
If the connector is tight, wiggle it.2. Turn the bulb and remove it. Install
the new bulb and install the connector.
To install a bulb, align the tabs of the bulb
socket with the cutouts of the mounting
hole.
Aiming is not necessary after replacing
the bulb. When aiming adjustment is nec-
essary, contact your Toyota dealer.
ÐHeadlights
ProCarManuals.com