Page 151 of 217

148When restarting out after parking on a slope:
1. With the transmission in Pº position
(automatic) or
the clutch pedal depressed
(manual), start the engine. (With an auto-
matic transmission, be sure to keep thebrake pedal depressed.)
2. Shift into gear.
3. Release the parking brake (also foot
brake on automatic transmission ve-
hicles) and slowly pull or back away from
the wheel blocks. Stop and apply yourbrakes.
4. Have someone retrieve the blocks.
CAUTION!
� Do not exceed 72 km/h (45 mph) or
the posted towing speed limit,
whichever is lower. Because in-
stability (swaying) of a towing ve-
hicle-trailer combination usually
increases as the speed increases,
exceeding 72 km/h (45 mph) maycause loss of control.
� Slow down and downshift before
descending steep or long downhill
grades. Do not make suddendownshifts.
� Avoid holding the brake pedal
down too long or too frequently.
This could cause the brakes to
overheat and result in reduced
braking efficiency. Getting
more kilometers/mileage from a li-
ter/gallon of fuel is easyÐjust take it easy.
It will help make your vehicle last longer,
too. Here are some specific tips on how to
save money on both fuel and repairs: � Keep your tires inflated at the cor- rect pressure. Underinflation causes
tire wear and wastes fuel. See Chapter
7-2 for instructions.
� Do not carry unneeded weight in
your vehicle. Excess weight puts a
heavier load on the engine, causinggreater fuel consumption.
� Avoid lengthy warm-up idling.
Once the engine is running smoothly,
begin drivingÐbut gently. Remember,
however, that on cold winter days this
may take a little longer.
� Accelerate slowly and smoothly.
Avoid jackrabbit starts. Get into high
gear as quickly as possible.
� Avoid long engine idling. If you have
a long wait and you are not in traffic, it
is better to turn off the engine and start
again later.
� Avoid engine lug or overrevving.
Use a gear position suitable for the
road on which you are travelling.
How to save fuel and make
your vehicle last longer, too
Page 164 of 217

161
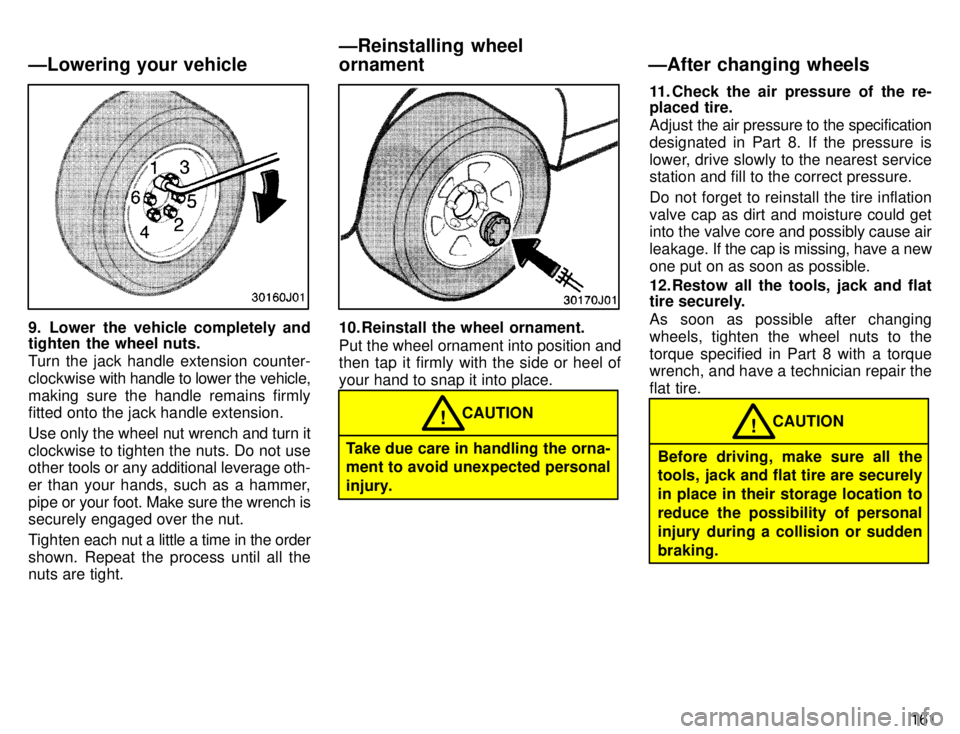
9. Lower the vehicle completely and
tighten the wheel nuts.
Turn the jack handle extension counter-
clockwise with handle to lower the vehicle,
making sure the handle remains firmly
fitted onto the jack handle extension.
Use only the wheel nut wrench and turn it
clockwise to tighten the nuts. Do not use other tools or any additional leverage oth-
er than your hands, such as a hammer,
pipe or your foot. Make sure the wrench is
securely engaged over the nut.
Tighten each nut a little a time in the order
shown. Repeat the process until all the
nuts are tight.10. Reinstall the wheel ornament.
Put the wheel ornament into position and
then tap it firmly with the side or heel of your hand to snap it into place.
Take due care in handling the orna- ment to avoid unexpected personal
injury. CAUTION
! 11. Check the air pressure of the re-
placed tire.
Adjust
the air pressure to the specification
designated in Part 8. If the pressure is
lower, drive slowly to the nearest service station and fill to the correct pressure.
Do not forget to reinstall the tire inflation valve cap as dirt and moisture could get into the valve core and possibly cause air
leakage. If the cap is missing, have a new
one put on as soon as possible.
12. Restow all the tools, jack and flat
tire securely.
As soon as possible after changing
wheels, tighten the wheel nuts to thetorque specified in Part 8 with a torque wrench, and have a technician repair the flat tire.
Before driving, make sure all the
tools, jack and flat tire are securely in place in their storage location to
reduce the possibility of personal
injury during a collision or suddenbraking. CAUTION
!
ÐLowering your vehicle
ÐReinstalling wheel
ornament ÐAfter changing wheels
Page 194 of 217

191
Keep your tire pressures at the proper level.
The recommended cold tire pressures,
tire size and the cargo weight rating are
given in Part 8.
You should check the tire pressures every
two weeks, or at least once a month. And
do not forget the spare!
Incorrect tire pressure can reduce tire
life and make your vehicle less safe todrive.
Low tire pressure results in excessive
wear, poor handling, reduced fuel econo-
my, and the possibility of blowouts fromoverheated tires. Also, low tire pressure
can cause poor sealing of the tire bead. If
the tire pressure is excessively low, there
is the possibility of wheel deformation and/or tire separation.
High tire pressure produces a harsh ride,
handling problems, excessive wear at the center of the tire tread, and a greater
pos-
sibility of tire damage from road hazards.
If a tire frequently needs refilling, have it
checked by your Toyota dealer. The following instructions for check-
ing tire pressure should be observed: �
The pressure should be checked
only when the tires are cold. If your
vehicle has been parked for at least 3hours and has not been driven for
more than 1.5 km or 1 mile since, you
will get an accurate cold tire pressure reading.
� Always use a tire pressure gauge.
The appearance of a tire can be mis-
leading. Besides, tire pressures that
are even just a few pounds off can de-
grade handling and ride.
� Do not bleed or reduce tire pres-sure after driving. It is normal for the
tire pressure to be higher after driving.
� Never exceed the vehicle capacityweight. The passenger and luggage
weight should be located so that the
vehicle is balanced.
� Be sure to reinstall the tire inflation
valve caps. Without the valve caps,
dirt or moisture could get into the valve
core and cause air leakage. If the capshave been lost, have new ones put onas soon as possible.
CHECKING YOUR TIRES Check the tire tread for the tread wear
indicators. If the indicators show, re-
place the tires.
The tires on your Toyota have built-in tread wear indicators to help you know
when the tires need replacement. When
the tread depth wears to 1.6 mm (0.06 in.)
or less, the indicators will appear. If you
can see the indicators in two or more adja-
cent grooves, the tire should be replaced.
The lower the tread, the higher the risk of skidding. The effectiveness of snow tires is lost
if the tread wears down below 4 mm (0.16 in.).
Checking tire pressure
Checking and replacing tires